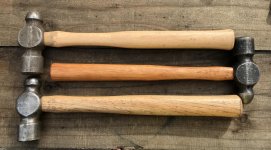
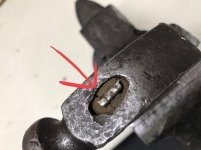
I recently found 5 of grandpas old hammers dating back to the 1930s. The heads are in good shape, just a little dirty but minimal mushrooming. The handles themselves are in decent shape too, likely will strip the poly that’s on them, sand lightly up to 250 grit, and then use some wipe on poly. My main question is that there is some cracking/ gaps where the handles meet the head.... can I salvage these by putting in some new wedges to fill the gaps and use BLO to rejuvenate the woods? The handles have sentimental value so I’d like to keep them if possible. Thanks!

You are using an out of date browser. It may not display this or other websites correctly.
You should upgrade or use an alternative browser.
You should upgrade or use an alternative browser.
Can I salvage these hammer handles?
- Thread starter JimFZR
- Start date

Lots of ways to do this
Put it in a vice, with the biggest punch possible drive the handle out. Clean it, when dry, mix some clear epoxy, coat the inside of the hammer, and out side of the handle, drive the handle back in, some of the top ofhandle will be above the hammer, with a punch, chisel,drive the wedge down even with top of hammer. Clean off excess epoxy. Let epoxy dry for a day. Cut off excess handle with a coping saw. Finish with olive oil.
Put it in a vice, with the biggest punch possible drive the handle out. Clean it, when dry, mix some clear epoxy, coat the inside of the hammer, and out side of the handle, drive the handle back in, some of the top ofhandle will be above the hammer, with a punch, chisel,drive the wedge down even with top of hammer. Clean off excess epoxy. Let epoxy dry for a day. Cut off excess handle with a coping saw. Finish with olive oil.
jimreed2160
Well-known member
I say definitely keep his original handles. Here is what I would do.
On old things, less is more. You can always escalate if later if your first attempts don't work. And remember--one of these is an antique family cobblers hammer that is unlikely to see future abuse.
Hold the hammer upright and hit the bottom on an anvil or concrete floor to fully seat the head. Break a few round toothpicks in half and drive them into the holes and cracks as far as you can. Cut everything flush and treat the whole exposed wood top surface with 50-50 boiled linseed oil and turpentine.
Good luck with your restore.
Looks like you can pull out that wedge with vise grips, then you can push out the handle. Run the handle (vertically) through a table saw where the wedge now is. Make up a blunt wedge from Oak or Maple that fits your new cut, then reinstall the handle and glue in the wedge (carpenter's glue). Install the metal wedge perpendicular to the wooden wedge to expand the handle end fully.
Hammer shown is my very first handle repair, done in 1956 and still going strong today. But, did have to shorten the handle.
Hammer shown is my very first handle repair, done in 1956 and still going strong today. But, did have to shorten the handle.
Attachments

Unmarked Bill
Well-known member
Maybe you’re like me and it drives you crazy to throw away unused epoxy after you use what you need. I’m always keeping a mental list of cauls and whatnot I can smear with excess epoxy, this might be a great use for it if you go the route Snapmom suggests.
Hold the hammer upright and hit the bottom on an anvil or concrete floor to fully seat the head. Break a few round toothpicks in half and drive them into the holes and cracks as far as you can. Cut everything flush and treat the whole exposed wood top surface with 50-50 boiled linseed oil and turpentine.
Good luck with your restore.
This. Once the head is driven down even, you may only need the seat the existing wedge. BLO will expand the wood to fill gaps.
No epoxy. No Poly.
This. Once the head is driven down even, you may only need the seat the existing wedge. BLO will expand the wood to fill gaps.
No epoxy. No Poly.
I’m going to try this. I do have a bunch of scrap cedar I could use in addition to toothpicks if they don’t fit. The only thing I want to poly is the handles. I would put several coats of BLO on the handles and drip some down the top and let dry before poly-ing the handles... likely would not poly the top though so I can add BLO every year or so.
I don't know the correct method. If the handle is not bad, I make sure it is plenty secure/tight in the head, usually with tapping and wedges. Then, BLO on the end of the wood. It has seemed to work out well.
Good luck with your sentimental journey.
Good luck with your sentimental journey.
This. Once the head is driven down even, you may only need the seat the existing wedge. BLO will expand the wood to fill gaps.
No epoxy. No Poly.
This is what I tried on an old Heller hammer with a loose original handle. For insurance, I then filled any remaining gaps with some epoxy after the BLO was dry. Since it wasn't much epoxy, the handle can still be removed in the future without too much cursing, if necessary.
I’ve been giving it some more thought and am going to do the toothpick/ BLO method. Seems like the least invasive and the toothpicks are just the right size. For the handles, I think I am just going to scuff them a little woth some fine steel wool and wipe on a thin coat of poly. Going to skip sanding them/ stripping them to preserve the patina. Might just wire brush the heads a little
Billythekid1
Well-known member
- Joined
- Jun 30, 2015
- Messages
- 240
I want to add this to the thread I hope that hope the op doesn't mind if you put radiator coolant in a cup and put the hammer in headfirst it may swell the wood enough to fill in your gaps this will fix a loose head the coolant will last longer than water water will also work if you don't have coolant but will evaporator back out in time
d42jeep
Well-known member
Looks like you can pull out that wedge with vise grips, then you can push out the handle. Run the handle (vertically) through a table saw where the wedge now is. Make up a blunt wedge from Oak or Maple that fits your new cut, then reinstall the handle and glue in the wedge (carpenter's glue). Install the metal wedge perpendicular to the wooden wedge to expand the handle end fully.
Hammer shown is my very first handle repair, done in 1956 and still going strong today. But, did have to shorten the handle.
I’ve repaired and installed dozens of used and new wooden hammer handles basically using the method described above. Great advice.
-Don