To avoid these ads, REGISTER NOW!

Happy Campers "Shop" Till I Drop Project

HappyCamperIV

Active member
Joined
Aug 2, 2017
Messages
30
Location
Michigan, USA
Hello all,
I thought it might be fun to start a build thread of my new (almost new) garage project. I enjoy reading other threads and I like the fact that lots of people offer lots of suggestions for fun things to do with the shop. I always joke with my buddies that it’s really nice of you guys to come over, drink my beer, eat my snacks and come up with so many excellent ideas for how I can spend my money. I don’t know how it gets any better! That is, of course, one of the main reasons I decided to start this little adventure. Having a place to just kick back sometimes is a pretty good thing to do.

About 20 years ago I was driving by a new group of buildings that had just gone up, It was a long building with 7 units side by side, each having a large overhead door, a bathroom and a service entrance. I stopped by and talked with one of the owners, he explained all the details of this being a condo with deeded ownership and dues to pay for snow removal, building maintenance and landscaping. I though “wow, I would love to own one of those one day.” Well about two years ago, some construction began next door to this original building and as it turned out, it was the second phase of the original project. This time I was in a position to seriously consider doing this. I was reluctant, but much to my surprise, my dearest seemed to think this was a very good idea and she proceeded to try talking me into doing this.

Her enthusiasm stems from the fact that all of my tools, materials and equipment were currently residing in the third stall of our homes attached garage. I think it was pretty apparent to her that I had outgrown this space and the fact that she was more than a little tired of the dust and smells coming from the shop. So, with her coaxing and me tiring of my tiny overcrowded work space, and the fact that this building, being a real commercial building is located in a very nice location for commercial real estate, I could no longer resist!

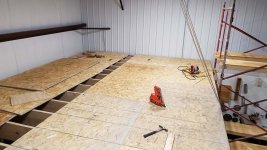
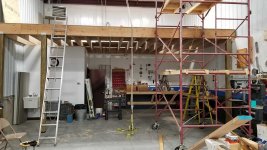
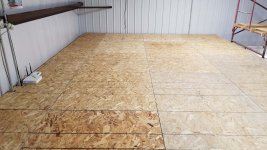
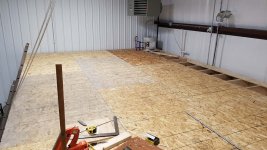
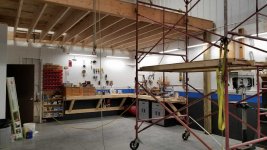
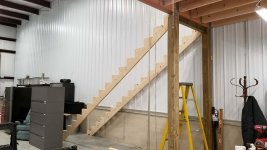
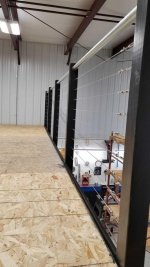
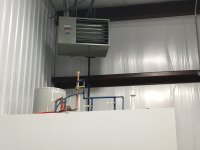
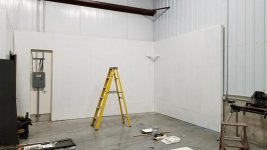
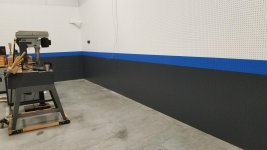
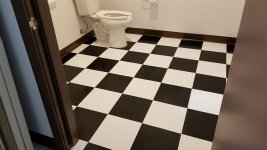
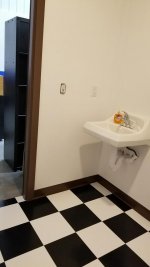
It is only ½ mile from my house; walking distance when the weather is nice. My little portion of this new 12 unit building is 1500 sq feet. 25’ X 60’ with a 20’ high ceiling. It has a 14’ X 14’ garage door and a tinted glass and aluminum service door with an awning, natural gas heat, a wash basin, electrical outlets, Hi-bay LED lighting and a bathroom.
We took possession in November of 2017.
Man was I excited.
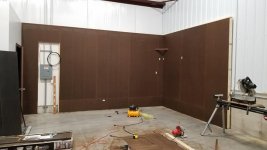
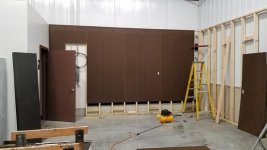
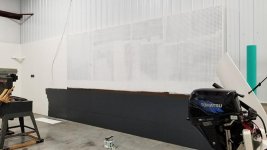
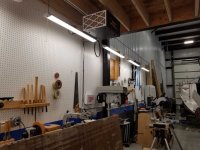
As you can see, the first order of business was to pressure wash the construction dust off the insides.
 

Attachments

  • IMG_2067.JPG
    IMG_2067.JPG
    137.4 KB · Views: 281
  • IMG_2077.JPG
    IMG_2077.JPG
    97.3 KB · Views: 253
  • IMG_2051.JPG
    IMG_2051.JPG
    112.9 KB · Views: 251
Last edited:
To avoid these ads, REGISTER NOW!
OP
H

HappyCamperIV

Active member
Joined
Aug 2, 2017
Messages
30
Location
Michigan, USA
Next thing to do was to start moving stuff into the new building.
 

Attachments

  • IMG_2074.jpg
    IMG_2074.jpg
    56.6 KB · Views: 212
  • IMG_2068.jpg
    IMG_2068.jpg
    62.6 KB · Views: 246
  • IMG_2073.jpg
    IMG_2073.jpg
    40.7 KB · Views: 203

ovscrider

Well-known member
Joined
Oct 1, 2008
Messages
2,349
Location
NH
nice had a coworker develop something similar years back, i should have bought one i hate having my trailers in the yard so over the years I've sold off a lot of toys i'd have kept with a good storage spot
 

Augus7us

Well-known member
Joined
Jan 14, 2017
Messages
1,190
Location
Central Ohio
Hey this is pretty cool. My first shop was a 15x50' storage unit with 100amp service. yours reminds me of it, however yours is much nicer.

Looking forward to seeing how you make use of the space!

-Clint
 
OP
H

HappyCamperIV

Active member
Joined
Aug 2, 2017
Messages
30
Location
Michigan, USA
Peg Board Wall:
My previous shop had all four walls covered floor to ceiling with pegboard. I figured I had better work out a way to get some pegboard around the area that will end up being the workbench and wood shop area of the shop. I started with 2X4 framing 16” OC. I used a treated 2X4’s for the base and the cleats that will come in contact with the concrete. I anchored the framing to the concrete with molly anchors and to the steel with screws.
Once the framing was up, I put up the 1/4” thick pegboard. After this I rolled on a coat of white paint. Then another. Then another. I installed the pegboard with the smooth side out and it still took a gallon of paint to cover this small wall! Pegboard acts more like a sponge than a wall.
 

Attachments

  • Second Coat.jpg
    Second Coat.jpg
    36 KB · Views: 128
  • First Coat.jpg
    First Coat.jpg
    39.7 KB · Views: 131
  • Wall 3.jpg
    Wall 3.jpg
    36.9 KB · Views: 130
  • Wall 2.jpg
    Wall 2.jpg
    39 KB · Views: 141
  • Wall 1.jpg
    Wall 1.jpg
    67.3 KB · Views: 153
  • Moveing Stuff In3.jpg
    Moveing Stuff In3.jpg
    39.3 KB · Views: 128
Last edited:
OP
H

HappyCamperIV

Active member
Joined
Aug 2, 2017
Messages
30
Location
Michigan, USA
More Peg Board Wall:
After the pegboard was up, I started moving machines in and planning benches and I quickly realized I needed more pegboard wall. Up goes another 12 feet of pegboard.

About half way through the install of the second section of pegboard I decided I should add a splash of color to the scheme. I picked a dark gray for the bottom and some spiffy looking blue for a stripe. I marked the tape lines on the wall using my laser level and some frog tape. This tape is amazing and gives a very nice paint line, almost zero bleed under the tape. Once the painting was done, I reinstalled the electrical and added an additional circuit to increase the number of outlets for machines, benchtop equipment and chargers.
 

Attachments

  • Wall 4.jpg
    Wall 4.jpg
    54.9 KB · Views: 122
  • Wall 6.jpg
    Wall 6.jpg
    146.8 KB · Views: 136
  • Blue Strip 4.jpg
    Blue Strip 4.jpg
    40.7 KB · Views: 120
  • 12 feet more 2.jpg
    12 feet more 2.jpg
    37.9 KB · Views: 114
  • 12 feet more 1.jpg
    12 feet more 1.jpg
    41.8 KB · Views: 116
  • Moving Stuff In 2.jpg
    Moving Stuff In 2.jpg
    53.5 KB · Views: 119
Last edited:
OP
H

HappyCamperIV

Active member
Joined
Aug 2, 2017
Messages
30
Location
Michigan, USA
Wall Mounted Work Benches:
Next up was the wall mounted benches. Having built many workbenches, I knew I didn’t want the bench supports to go down to the floor. I would be forever hitting, kicking and moving the posts, in addition, storing things under there becomes difficult.
I didn’t want to repeat those issues. I attached a 2” X 6” cleat to the wall studs with large lag screws anchors. This cleat would hold up the 45 Deg. angle supports. I chose 4” X 4”’s for the angle supports, they may be a bit of overkill, but I sure liked the look. I framed the bench with 2” x 4”’s and screwed them to the angle supports.
 

Attachments

  • Bench 4.jpg
    Bench 4.jpg
    109.3 KB · Views: 148
  • Bench 3.jpg
    Bench 3.jpg
    112.1 KB · Views: 129
  • Bench 2.jpg
    Bench 2.jpg
    118.4 KB · Views: 124
  • Bench 1.jpg
    Bench 1.jpg
    115.3 KB · Views: 139
Last edited:
OP
H

HappyCamperIV

Active member
Joined
Aug 2, 2017
Messages
30
Location
Michigan, USA
Wall Mounted Work Benches (Continued)
I leveled these before attaching them for a nice flat surface. A piece of 3/4” ACX plywood was attached as the top. The edge “banding” was made with 1” X 4” pine boards ripped to the correct width. The bench was then finished with a couple coats danish oil. I suppose this bench is a bit overdone, but I have always felt a bench you can’t walk on or sit on without compromising it’s structure is pretty much a waste of effort and materials.
It's finally starting to look a bit like a workshop!
 

Attachments

  • Bench 5.jpg
    Bench 5.jpg
    121.3 KB · Views: 165
  • Bench 6.jpg
    Bench 6.jpg
    111.9 KB · Views: 160
  • Bench 7.jpg
    Bench 7.jpg
    126.6 KB · Views: 168
  • 20171228_090019.jpg
    20171228_090019.jpg
    119.5 KB · Views: 172
Last edited:
OP
H

HappyCamperIV

Active member
Joined
Aug 2, 2017
Messages
30
Location
Michigan, USA
Bathroom Floor:
Once the pegboard and benches were complete, I decided the bathroom floor needed a bit of spiffing up. The local building inspector made the builder add a waterproof sealer to the bathroom floor. My original intent was to epoxy this floor, but it was cost prohibitive and the waterproof sealer was almost impossible to get off without drastic measures (sand blast, or grinding!)

I found these nifty peel and stick 12” floor tiles at the local big box store for about a $1 each. I drew a couple of pencil lines on the cement to center the pattern and began sticking down the tiles. I tucked the tiles (about 2.5mm thick) under the rubber baseboard trim. This turned out to be the toughest part! It was tricky to get the tile under the baseboard without having it stick to the floor in the wrong place. I ended up lifting the rubber with a couple of putty knives and slipping the tiles under; the trick was not to stop sliding until the tile was in the correct position. If the motion stopped, the tile would stick. Lots of fun.

After it was all stuck down, I walked around on them for about 45 minutes in my stocking feet to make sure they were all stuck down good! I was pretty happy with the result. I just need to calk around the toilet now and job done.
 

Attachments

  • Bathroom Floor 1.jpg
    Bathroom Floor 1.jpg
    82.6 KB · Views: 81
  • Bathroom Floor 4.jpg
    Bathroom Floor 4.jpg
    84.2 KB · Views: 72
  • Bathroom Floor 3.jpg
    Bathroom Floor 3.jpg
    95.4 KB · Views: 79
  • Bathroom Floor 2.jpg
    Bathroom Floor 2.jpg
    37.4 KB · Views: 78
Last edited:
OP
H

HappyCamperIV

Active member
Joined
Aug 2, 2017
Messages
30
Location
Michigan, USA
The Mezzanine:
After lots of planning, sketching and thinking, we decided to add a mezzanine to the rear of the shop. The idea was to build a “hang out” type area up there. I was thinking a man cave and the boss was thinking living room. Those details will be all worked out as time goes by.
I went to my local lumber company and discussed the plans with them. I wanted to be sure it would be strong enough to be able to have “living room” type loads up there. Their in-house engineer was excellent to work with and I was very happy with what he designed. The one thing I was unhappy with was the stair design. (more to come on that later!)

The basic idea was to support a large laminated beam on top of three 6”X6” posts. Once the beam was installed, 2” X 12”’s spaced 16” on center would support the flooring. I wanted to have a large unsupported length of beam directly below the mezzanine. I wanted about a 20’ clear span if possible. We were able to make that work just fine, with load to spare!

The lumber delivery guys backed into the garage and slid the materials off the back of their truck and onto the floor. This pile was, of course, in exactly in the wrong spot and I had to re-stack all the materials.
I started out by doubling up the top plate on the peg board wall. I also put an additional 2X4 on top of the steel stud wall that framed the bathroom. The bathroom ceiling is framed with steel 2X4’s and is incapable of supporting anymore weight than the drywall ceiling! The walls are different and are quite strong.

I wanted the joists to rest on top of the perimeter walls and not sit on the bathroom ceiling at all. This top row of 2X4’s made that possible. The bottom of the joists would be 1-1/2” above the bathroom ceiling structure. Once that was done, I began laying things out on the floor and setting the posts. I drilled a 5/8” diameter hole in the concrete floor (6” thick high strength concrete with lots of re-rod. The builder was storing his cement trucks in a couple of the units prior to their sale. I was not at all concerned about the floors strength!) Next I drilled a 5/8” hole into the bottom of the 6” X 6” to slip over a foot long, 5/8 re-rod locating “pin”. The idea was to keep the posts from moving if they were ever hit. I attached the 6X6’s to the side wall with a couple of anchor screws to hold them in position during the build. I am expecting the mezzanine to be basically free standing, not needing the building to support the loads. I set the three 6X6 posts and I was ready for the beams.
 

Attachments

  • Mez.jpg
    Mez.jpg
    129 KB · Views: 161
  • Mez 1.jpg
    Mez 1.jpg
    129.8 KB · Views: 139
  • Mez 2.jpg
    Mez 2.jpg
    119.6 KB · Views: 149
  • Mez3.jpg
    Mez3.jpg
    63.9 KB · Views: 145
Last edited:

C_F

ALLIANCE MEMBER
Joined
Jan 21, 2005
Messages
9,675
Location
Utah...SNOW BLOWS!
I just came across your thread today, your garage condo looks really nice, and being 25x60, that's a nice size too! Nice job on the work bench, that looks nice-n-stout. :thumbup: 
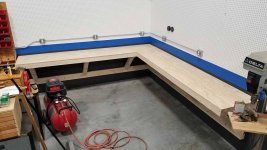
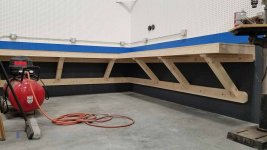
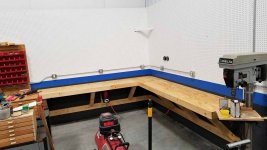
I may have to borrow your design one of these days. :D

Looking forward to seeing how your mezzanine turns out, it sounds like it will be plenty stout.
 
OP
H

HappyCamperIV

Active member
Joined
Aug 2, 2017
Messages
30
Location
Michigan, USA
Up goes the mezzanine structure:
I enlisted some help for setting the beams (Good friend and my son in law! Thanks you guys.) I attached a logging chain to a couple of the roof beams and used my block and tackle to lift the beams onto the posts. The beams are a Glu-Lam construction. 1-3/4” X 12” X 24’. There are three of these beams screwed together using a “super duper” drive screw designed just for this purpose. (Sorry, I cant remember the name of the screws). They are designed so that you can drive them in without pilot holes.

I decided that in the name of consistency I would drill pilot holes in the first two beams using a small 3/16” drill bit. This hole was tiny compared to the size of the screws and insured the screws were driven straight and in the correct location. I only drilled the first two beams, the third was left un-drilled. I clamped the beams together, centered them on top of the posts and anchored them into position using steel brackets and specially designed screws.
The joist hangers were then attached and the joists were lifted into place. A pretty good weekend’s work.
 

Attachments

  • Mez 5.jpg
    Mez 5.jpg
    133.3 KB · Views: 175
  • Mez 7.jpg
    Mez 7.jpg
    132.4 KB · Views: 159
  • Mez 6.jpg
    Mez 6.jpg
    128.8 KB · Views: 145
Last edited:
OP
H

HappyCamperIV

Active member
Joined
Aug 2, 2017
Messages
30
Location
Michigan, USA
Decking time!
The decking on top of the 2X12’s is 3/4” OSB sub-flooring with tongue and grove joints. The decking is attached to the 2X12’s using construction adhesive and nails. I started along the front edge on top of the beams and worked my way back.
The only tricky part was lifting the baby 10 gallon water heater up enough to slip the sub floor under it. I left the piece of sub-floor under the hot water heater un-glued and I attached that piece with screws. I will have to remove that section later to move the water heater. I left the sub-floor about 1” short of the walls. I didn’t want any decking movement to rub the walls and cause squeaks or rattles. I will have to work out the interface between the flooring and the walls later. It sure is a lot nicer walking around on the sub-floor compared to walking the joists!
 

Attachments

  • SubFloor7.jpg
    SubFloor7.jpg
    122.8 KB · Views: 116
  • SubFloor4.jpg
    SubFloor4.jpg
    127.2 KB · Views: 126
  • SubFloor6.jpg
    SubFloor6.jpg
    117.2 KB · Views: 109
  • SubFloor5.jpg
    SubFloor5.jpg
    124.8 KB · Views: 102
  • SubFloor1.jpg
    SubFloor1.jpg
    126.8 KB · Views: 89
  • SubFloor2.jpg
    SubFloor2.jpg
    124.3 KB · Views: 100
  • SubFloor3.jpg
    SubFloor3.jpg
    115.7 KB · Views: 114
Last edited:

C_F

ALLIANCE MEMBER
Joined
Jan 21, 2005
Messages
9,675
Location
Utah...SNOW BLOWS!
Judging from the photos and your description, your mezzanine floor should be very firm & squeak free for life. Looks good!
 
OP
H

HappyCamperIV

Active member
Joined
Aug 2, 2017
Messages
30
Location
Michigan, USA
Lights,
After the decking was installed, it got really dark under the mezzanine! I waited for a sale on linkable LED shop lights. It didn’t take long and a version of what I was looking for popped up. They were 4 foot, 3700 lumen, off brand lights for about $14 usd each. I bought 12 of them to hang over the benches. My local big box store also had a sale on shelving brackets. They were 12” steel brackets painted white for $4.95 each with a $4.95 rebate! What, free brackets? I’m in; I bought a dozen.

I attached the brackets to a piece of 2X4 and then to the studs behind the peg board. I used some 3/4” emt conduit to form a “hanging rail” that rested on top of the brackets. I held the EMT on top of the brackets with a zip tie. The “S” hooks for the light chains fit perfectly over the 3/4” conduit so I ended up with a long rail to hang the lights from that allowed me to reposition them however I liked.

I added another circuit to the panel and a light switch and, like magic, Lots of light. I hung a couple over the center of the wood shop area where the table saw will generally be and another over the work bench on the wall nearest the bathroom. Nice and bright under there now.
 

Attachments

  • Lights 3.jpg
    Lights 3.jpg
    119.4 KB · Views: 118
  • Lights 2.jpg
    Lights 2.jpg
    93.2 KB · Views: 97
  • Lights 4.jpg
    Lights 4.jpg
    136.4 KB · Views: 104
  • Lights 1.jpg
    Lights 1.jpg
    113.7 KB · Views: 125
  • Lights 6.jpg
    Lights 6.jpg
    121 KB · Views: 112
  • Lights 7.jpg
    Lights 7.jpg
    91.8 KB · Views: 114
To avoid these ads, REGISTER NOW!

TX4runner

Well-known member
Joined
Mar 9, 2014
Messages
307
Location
Houston, TX
Looks good. Looks like pic #2 is a sneak peek at the finished mezzanine? Nice that you found a spot so close to your home and could free up home garage space for all your projects.
 
OP
H

HappyCamperIV

Active member
Joined
Aug 2, 2017
Messages
30
Location
Michigan, USA
Good eye TX4runner!
That pic was taken last night. It's not done up there by any means, but it's coming along nicely now!
Some of the guys I work with and I have a monthly meeting there, we call it the "Board of directors meeting" What that really means is a good excuse to get together and drink a few beers and shoot the breeze. A great thing to do on our crappy midwest winter evenings.
Once spring "sprung" this past spring & summer, I pretty much stopped working out there (too many fun things going on). Now that the boat is put away and the winterization at home is all complete, It's back to the garage projects!
YAY
There have been lots of projects in between, that have been done. I will keep em coming.
 
OP
H

HappyCamperIV

Active member
Joined
Aug 2, 2017
Messages
30
Location
Michigan, USA
Stairs,
I knew I wanted something a bit special for the stairs. The total rise was about 10’6”, quite a big climb. I liked the industrial open riser look, but the design done by the lumber company engineer was not like that at all. I decided to redesign the stairs from scratch. I chose a fairly shallow rise over run angle to make the climb pretty easy. I wanted them to be quite wide so it didn’t look like I was cutting corners and if you needed to pass someone going the other direction, it didn’t feel cramped. I went with a 42” wide tread. After about 20 lunch hours of tinkering around with my CAD software, this is what I came up with.
 

Attachments

  • Stair Image1.jpg
    Stair Image1.jpg
    121.3 KB · Views: 43
  • Stair Image 3.jpg
    Stair Image 3.jpg
    102.8 KB · Views: 40
Last edited:
OP
H

HappyCamperIV

Active member
Joined
Aug 2, 2017
Messages
30
Location
Michigan, USA
Stairs Cont:
I didn’t want to have supports mid way along the stair stringers. I was a bit nervous about the “springyness” of the stairway with only the outside two stringers and no center support. I came up with the idea to sister the notched stringers to an uncut 2X12. This gave me a doubled up pair of stringers, one notched and the other un-notched. Some basic calcs convinced me this would be plenty strong.
 

Attachments

  • Stairs6.jpg
    Stairs6.jpg
    67.3 KB · Views: 105
  • Stairs7.jpg
    Stairs7.jpg
    118.7 KB · Views: 101
  • Stairs8.jpg
    Stairs8.jpg
    132.1 KB · Views: 95
  • Stairs4.jpg
    Stairs4.jpg
    124.1 KB · Views: 105
  • Stairs5.jpg
    Stairs5.jpg
    101 KB · Views: 111
Last edited:
OP
H

HappyCamperIV

Active member
Joined
Aug 2, 2017
Messages
30
Location
Michigan, USA
On to the treads:
I chose 2X12’s each cut to 42”. I rounded the edges with a 3/8” round over bit and settled in for a couple of long sessions of sanding. I chose a cherry color stain and then I applied three coats of hardwood floor urethane. I sanded lightly in between coats and I used a foam brush for the last coat. The finish was very smooth. The is a semi-gloss finish so it is not nearly as shiny as the pics show, I was pretty wet then.
Once the layout was marked onto the 2X12’s, I started cutting, rounding over and sanding some more. I temporarily set the stringers in place for a test fit. Convinced my calcs were good enough, I took them back down; glued and screwed the stringers together and set them back in place for the final attachment.
 

Attachments

  • Stairs10.jpg
    Stairs10.jpg
    122.2 KB · Views: 70
  • Stairs11.jpg
    Stairs11.jpg
    120.9 KB · Views: 67
  • Stairs12.jpg
    Stairs12.jpg
    119.8 KB · Views: 61
Last edited:
OP
H

HappyCamperIV

Active member
Joined
Aug 2, 2017
Messages
30
Location
Michigan, USA
Finishing up the stairs:
I applied three coats of semi-gloss black latex. I really liked the look, but this was a mistake! The latex doesn’t cure very hard, it always has a slightly “tacky” feel to it. It’s easy to touch up and it really wares quite well, but I just don’t like the tacky feel. I suppose an oil base of some sort would have been better, but you know what they say: “hind sight is 50/50”, or something like that anyway.

I ground off the bottom 1/1/2” portion of each tread that would be glued to the stringers and set them in place using construction adhesive and screws from the underside. These were “Toe-screwed” if that is a real term.

The base of the stair system was then anchored to the concrete floor with three 1/2” concrete molly’s. As it turned out, the stair strength is excellent, but there was a bit of side to side movement that make them feel less substantial than they should, so I made a couple of filler blocks that fit in between the wall side stringer and the steel studs along that wall. A couple of screws into the steel studs and they felt solid as a rock! No squeaks or perceptible bounce at all. Just what I was looking for.
 

Attachments

  • Stairs2.jpg
    Stairs2.jpg
    107.2 KB · Views: 96
  • Stairs1.jpg
    Stairs1.jpg
    111.9 KB · Views: 134
OP
H

HappyCamperIV

Active member
Joined
Aug 2, 2017
Messages
30
Location
Michigan, USA
I think so C F, The black was painted last February and it still has that slight tackiness to it. Feels kind of like a soft touch paint or something. I spoke with my local paint guy (Repcolite) and they tell me that it will steadily get less tacky for about the first 6 months, but after this amount of time, it still isn't good.
I used a primer on the stair stringers, but not on the rest and it all seems to feel the same.
I waited 24 hours between coats, but still sticky. Maybe it needed more than that? Who knows.
It sounds like the only solution is to paint over it with oil base paint.
It's not that annoying, but I would have preferred not to have that slightly tacky feel.
Here is what I found on line about it:

"Has this ever happened to you?
It's damp, it's rainy... and your exterior doors stick so badly that they are nearly impossible to open! You'll never see this happen with oil or "alkyd" paints. This tackiness problem is solely owned by latex paints! The problem is known as blocking, and can be caused by many factors such as applying an overly thick layer of paint, not allowing adequate drying between coats, reactions between the primer and the finish coat or the temperature at which the paint was applied... too hot or cold.

Want to get rid of the tackiness? Get rid of the latex!
First, don't use latex paint. Latex paints are a marvelous invention for many reasons but, in some applications and under some conditions, gloss and semi-gloss latex paints can develop a "tackiness" that seems to last forever. I painted a garage door with an exterior latex paint over 5 years ago and, in the warm weather, I still hear the sound of the tacky paint breaking contact as the door goes up!

The best way to avoid blocking is to avoid latex paints for 1) surfaces that contact each other and 2) surfaces you put things on, such as bookshelves. Use an oil-based alkyd paint instead, whether for inside or outside applications. Alkyd paints, which are the very top quality oil paints, dry hard and smooth and do not produce the tackiness you have been experiencing."
 

C_F

ALLIANCE MEMBER
Joined
Jan 21, 2005
Messages
9,675
Location
Utah...SNOW BLOWS!
Wow, it sure does sound like the tackiness will remain forever. I wonder if it is possible then, to merely paint an oil based paint over the latex without a reaction of some sort? I guess it's worth a shot for sure, on a small test spot.
 
OP
H

HappyCamperIV

Active member
Joined
Aug 2, 2017
Messages
30
Location
Michigan, USA
My local Repcolite paint guys tell me that you can paint oil base over latex if its fully cured. It's been 6 months ish, so I'm pretty sure it's cured. If it's glossy they recommend a light scuff with a Scotchbrite pad prior to painting the oil base. Tempting to try I guess.
 
OP
H

HappyCamperIV

Active member
Joined
Aug 2, 2017
Messages
30
Location
Michigan, USA
Hand rail:
Oh dear! This turned out to be quite a big job. I wanted to stick with the industrial look theme so I went with 4X4 vertical newel posts and 1-1/2” emt conduit hand rails. I drilled the posts to accept the 1-1/2” conduit rails, but the holes needed to be pretty precise or a large gap would be seen.

I also wanted to use stainless steel wire rope and turnbuckles to form the “baluster” portion of the rail system. This would put the conduit rails in quite a lot of compressive load and might tend to dig into the 4X4 newel posts. In order to keep the conduit from cutting in, I placed a large fender washer into the bottom of each hole for the conduit to seat against.

The posts were cut, drilled and leveled; then anchored with 3/8” X 6” lag screws after the conduit railing was inserted. Notice the angles, cuts and holes that needed to be done for the newel post midway along the stairs! I spent a pinch more than two hours on just that one post! Man I’m glad that part is over.
 

Attachments

  • Railing3.jpg
    Railing3.jpg
    109.1 KB · Views: 106
  • Railing4.jpg
    Railing4.jpg
    124 KB · Views: 101
  • Railing5.jpg
    Railing5.jpg
    145.2 KB · Views: 99
  • Railing6.jpg
    Railing6.jpg
    125.3 KB · Views: 96
  • Railing8.jpg
    Railing8.jpg
    115 KB · Views: 95
  • Railing7.jpg
    Railing7.jpg
    120.8 KB · Views: 96

wasfast

Well-known member
Joined
Apr 10, 2014
Messages
874
Location
San Diego CA
The tackiness though sounds like its NOT fully cured. Perhaps apply a very small section with the oil after scuffing the latex up and see how it goes.
 
OP
H

HappyCamperIV

Active member
Joined
Aug 2, 2017
Messages
30
Location
Michigan, USA
I'm with you wasfast, I will certainly try small, hidden areas before I try anything major. At this point I am planning on just living with it. Should it ever need re-doing, I will just do the whole thing if the test spots work out. I'm sure, like you were getting at, the longer I wait, the better the chances of not causing some sort of a reaction. It's not that bad, I just don't like it. Knowing what I know now, I would have chosen a different paint system and probably tried some small spots to be sure it was OK before jumping right in.
 
OP
H

HappyCamperIV

Active member
Joined
Aug 2, 2017
Messages
30
Location
Michigan, USA
Balusters:
After the posts and rails, I started on the stainless steel wire rope balusters. This was a kit I bought on Amazon. It came with the turnbuckles, thimbles and crimp-rings. Just add the wire rope and you have all the parts. It was quite reasonable as compared to a conventional baluster system. I had considered a glass panel style, but the cost was very high and although it will be a living area up there, the rest of the place is still a working shop and I would have been looking forward to endless cleaning of the glass panels. As it is, there will always be a slight “patina” up there from working on projects; I didn’t need to add more.

You start out by threading the wire rope through the holes in the 4X4’s. Next attach the stainless pad eyes. Loop the rope through the pad eyes and crimp the crimp-ring over the wire rope. You do the same thing on the other end, however, you just add a trunbuckle in between the thimble and the pad eye. Tighten the turnbuckles and you have a spiffy looking railing system. I didnt like the look of the lose ends of the wire rope poking out past the ends of the crimp-rings so I went back and cut them off using a fiber wheel on my Dremmel. This made for a clean “poke free” connection. Now, no little grand kid fingers will be poked on this railing. Job done!
 

Attachments

  • Railing13.jpg
    Railing13.jpg
    94.4 KB · Views: 86
  • Railing12.jpg
    Railing12.jpg
    126.4 KB · Views: 85
  • Railing10.jpg
    Railing10.jpg
    60.3 KB · Views: 91
  • Railing11.jpg
    Railing11.jpg
    89.5 KB · Views: 100
  • Railing9.jpg
    Railing9.jpg
    75.3 KB · Views: 84

Kburk09

Well-known member
Joined
Jul 10, 2013
Messages
69
Location
Kansas
Railing looks great. Planning a mezzanine in my shop and will definately steel this idea!
 

DadsBlueFord

New member
Joined
Mar 13, 2012
Messages
2
Great work! I'm in the process of buying a similar 24x48 unit in my town, and have been racking my brain trying to figure out a loft plan. Yours is very similar to what I have in mind, except I don't have a bathroom, so where your bathroom is will be basically the landing for my stairs, which will go up the side of the loft. I'll be stealing some of your ideas!
 
To avoid these ads, REGISTER NOW!
Top Bottom