To avoid these ads, REGISTER NOW!

After a dozen years... the 30x40 shop is being built

medic583

Well-known member
Joined
May 25, 2007
Messages
72
Location
Northwestern Ontario
Hello all... it's been quite awhile since I joined up here looking for information and somewhere along the way... the building of my garage/shop got put off again and again and...

Yet this year I decided I couldn't wait any longer so I'm back and the build is just beginning.

Bit of background... bought a piece of property in our rural community... a couple of acres right inside town/city limits with a couple of houses on it, town sewer/water/gas/hydro... you name it... and on the river to top it all off.

But... what I didn't know when I bought the property a dozen years ago was the fact that both houses should have been bulldozed... they were in that bad of shape.... even the property was a mess...

Yet... over the past few years I've managed to clean up the yard somewhat, rebuild and sell the rental, sell off another chunk of property and almost have my little shack completely rebuilt as well. From not knowing which end of a hammer to use to this point... well... it's been a long learning process getting to this point.

Now... after all these years.... it's garage/shop time... and I just can't wait any longer. :) Best of all though... for the first time in over a dozen years... i'm hiring someone to help out... a BIG first for me. Why... simply because of time and the fact I'm not really interested in getting up on a roof this fall :)

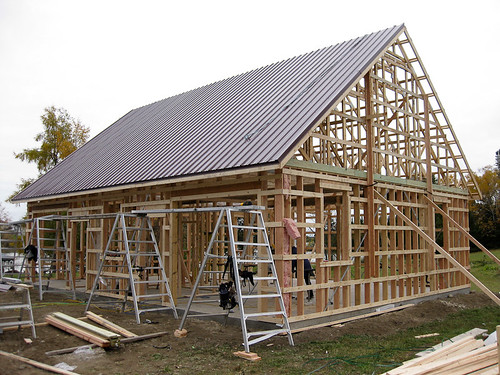
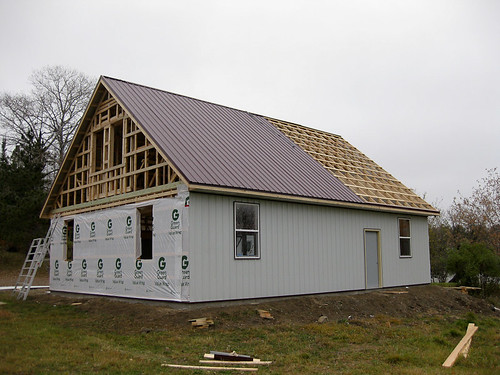
Anyhow... the building itself is going to be stick framed, metal clad 30'D x 40'D with RIA trusses on 10'H walls (2 x 6) heated with an in-floor heating setup and 4inch pad.

The main 30x40 area will be divided into two basic rooms (3 if you include the little office area)... a 16W x 30D auto area lined with metal so I can weld, grind, etc... and the 24W x 30D wood area will be used for the table saws and all things wood.

Easier to show a layout I guess

20-08-2009 12-41-32 AM.jpg

So...that`s the layout for now... in the spring there will be a carport style room added to the backside for the building so I can hide the trailers and such out of the sun, yet not fully closed in just yet.

But... for now... it`s just the basics...

Looking back a few years, here are a few shots to show the changes already done...

1. The dozer hired a few years ago to fill in the swamp after I had cleaned out all the junk.
swamp dozer.jpg

2. The building of the pad begins... sort of... hours before this shot was taken and while I could not get into my yard due to the dozer tearing it up... the contractors came to my door and said `woops` they screwed up the estimate and the cost would be double if I wanted them to continue past that point. I had no choice... they told me flat out that because their estimate was not in writing it would be father and sons word against mine and if I didn`t want them to continue that I could find someone else to put my driveway back in.
swamp pad begin.jpg

3. Well, instead of having an area 40D x 50W (so we could use scaffolding when putting the shop up) level with the driveway they just made it big enough for the 30D x 40W garage I was planning for... and even skimped out on the apron area to top it all off. YES... Lesson learned :)
swamp dozer mom.jpg

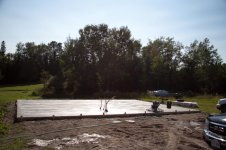
4. The swamp is levelled from dirt in the back of the yard moved forward and the pad compacted was compacted with a highway packer... Unfortunately due to other projects which were a tad more important (weeping tile, metal roof and siding on house, windows, etc...) up until this week it was used for storage only.
swamp levelled.jpg

Sooo... that`s the old photos... and from many, many years ago.

This summer I decided it was time to build... have talked to a couple of places about packages... have two rough estimates... and decided to call a local builder to see if he was interested in helping me out build this thing.

Sure enough... he showed up last week, recommended the cement crew that everyone seems to recommend... and the next thing I know they`re at my door wanting to start the pad on Monday morning. The framing package hasn`t even been ordered... only a week for delivery I`m told... but wow... they had a couple of days available and want to get it going.

So... here`s the form work being done this week...
august 24 - 2.jpg

august 24 - 3.jpg

Yet... there is another hold up. Our community has changed their bylaws... requiring `chairs` to be built for the footings to tie into the pad itself... so they have to be custom built in Winnipeg and should be here in two days. Yes... these are not the `chairs` we all know which support the rebar or mesh... but rebar bent to look like a `P` to ensure the weight of the walls do not push the footings down and away from the pad... a new engineering requirement.

70 `chairs` are on order... the 6mil poly is down, the 2in HD styro is roughly in place and as soon as the chairs are here we finish up the rebar and mesh and I get to lay out the PEX and they can begin the pour....

Stay tuned... will figure out what I just did to my keyboard on the laptop to make all the characters turn french instead of slashes and question marks, colons, etc... and will be posting a lot more photos as the build progresses:).

I do know I`m going with the Room-in-Attic trusses... throwning my leftover Hickory flooring down up there, having the access to it outside instead of taking up valuable interior floor space... and... hmm... need to think about the heating setup and what and where to get it from.

Other than that... electrical is going to be 100amp, might be able to run the Natural Gas line back to it as it comes right down the driveway currently... soo much more to think about... soo much mored to do...

Anyhow... hi all... :)
 
To avoid these ads, REGISTER NOW!
OP
M

medic583

Well-known member
Joined
May 25, 2007
Messages
72
Location
Northwestern Ontario
So the "chairs" came in this afternoon and the concrete guys came back to lay them all out.

Here's a shot of the new "chairs" that our town has adopted as code recently... they make sense in tying the footings to the slab... but being the first in town to be required to go with them delayed things a day or two.

IMG_0897.jpg

Anyhow.. the boys set to work laying out the rebar, mesh and chairs this afternoon as the rain came down...

The 6 mil poly is in place, the 2" High Density Styrofoam as well...

IMG_0899.jpg

Yet now the chairs have to be tied into the mesh and rebar running the footings..

IMG_0910.jpg

And a last close up of the "chairs" required ...

IMG_0912.jpg

I managed to miss the last shot of the day with everything tied together because of the rain and running to see the g/f and kids in the parade tonight... the mesh to the rebar to the chairs are all done though... ready for me to tie in the PEX.

It hasn't stopped raining here all summer here... the boys doing the concrete will be back Tuesday now... giving me time to work my 12+ hour shifts this weekend and get that 1/2" PEX tubing strapped in place by the time they come to do the pour on Tuesday.

In the meantime... besides work... I've still got to wrangle the parents into helping finish the most important project... the deck railing so the little one doesn't take a 8' tumble onto the lawn... :(

IMG_0959.jpg

Yep... feel a bit guilty about wrangling the 67 year old mother into being free labour... but heh... the extra hands always help out :)

So... back to work for the weekend... have to layout the PEX next, the pour on Tuesday... and ... garage package coming... soon I hope...
 
Last edited:

bluesman2a

Well-known member
Joined
Aug 16, 2005
Messages
1,312
Location
Atlanta, Ga.
In the meantime... besides work... I've still got to wrangle the parents into helping finish the most important project... the deck railing so the little one doesn't take a 8' tumble onto the lawn... :(

IMG_0959.jpg

I really like the look of that railing, if you don't mind me asking how did you do it? Was it conduit or something cut for the spindles?
 
OP
M

medic583

Well-known member
Joined
May 25, 2007
Messages
72
Location
Northwestern Ontario
Heh bluesman2a... I actually got the aluminum spindles from Menards. I'd thought about EMT conduit as I can get it quite cheap in International Falls (too expensive up here) but loved the look of the "rust" colour on these spindles as they come close to the burgandy metal of my house and garage on the way.

Think they cost $1.69/ea... but there were certain standard colours for $.99/ea.

The best thing though... 3 1/2" space on bottom, 3 1/2" - 2x4 on edge, 30" spindle held in place by these neat little cedar strips, another 3 1/2" - 2x4 on edge then capped by a 1 1/2" of a 2 x 4 flat (coming up next) for the railing gives me my 42" required railing height...

Nowhere for the little one to step up on, nowhere for her to slide through... and soo easy to frame.

1. Posts up first, levelled and plumbed, 2x4 cross pieces in place spaced 30 1/8" apart... "cedar spindle spacers" assembled with the rust coloured aluminum spacers... slid into place and air nailed in for the time being (will add screws this week... just cause :) ).

_MG_8463.jpg

_MG_8461.jpg

2. Here's what's was done the other day before we got to the stairs... every second post is going to be cut level so a 2x4 cap will span two sections. A copper light cap will go on every second post... the ones that still remain after the sawzall fires up.

_MG_8455.jpg

The only problem with them so far... forgot when installing them on the stairs that they do not have angle cuts on top and bottom for the railing angle and they just fit into the precut holes (fixed with angle grinder though :)).
 

fredn

New member
Joined
Aug 28, 2009
Messages
1
Beautiful property - just got back from a trip to Alberta... jasper and banff.

You are living the dream.
 
OP
M

medic583

Well-known member
Joined
May 25, 2007
Messages
72
Location
Northwestern Ontario
fredn... haha... yep... dreaming of anything above 20C without rain this summer :)

Can't complain at all though... loved living in Alberta but work and family brought me home to the Northwest region of Ontario, only lasted 2 years in the concrete jungle called Toronto... came back again, and lived in various other other small towns/cities... but came back when I found my dream property....

70' from the water, couple of acres in our community, all city amenities such as high speed dsl, sewar/water, natural gas... yea... can't complain at all :)

But... after a few years of rebuilding the houses from the ground up... now... now it's time for the playing... the "shop" and I can't freakin' wait.

The PEX goes in tomorrow... 5 - 250' rolls set up for two different zones. 2 rolls will do the 16'W x 30'D metal lined side where I will do the welding/grinding/auto/etc... and 3 rolls for the 24'W x 30'D wood shop. I'll hook up the upstairs later on when I decide on whether or not to go with a radiator style setup or ???

Can't wait... pick up some zip ties tomorrow (Menards forgot to ship the mesh/pex connectors) and have to have 'er all laid out by tomorrow night :)
 
OP
M

medic583

Well-known member
Joined
May 25, 2007
Messages
72
Location
Northwestern Ontario
August 31, 2009

Well... had to rummage through town today to try and find some conduit for the PEX where it comes through the cement. Sure enough... small town... only one batch available in about two sizes too big.

But... picked up 10 sections of conduit and spent the next 6 hours or so laying the PEX and zip tying it to the mesh.

Lucky though... the family felt pity on me and everyone showed up to help out near the end.

IMG_0074.jpg

Note: Bought the PEX from Menards... and NIBCO supplied a layout for the tubing. I wanted it in two zones so they placed the tubing right at the doorways... one in each room. Talked to my local heating contractor... drew out some rough plans to redo it and ensure the tubes come out in the mechanical room... thus the not so neat layout, yet no more than the required foot apart. Local contractor also suggested putting extra loops by doorway as most of the heat loss occurs there.

September 01, 2009

The cement crew showed up first thing this morning as I was thinking of crawling out of bed... thinking being the key word (7:30am) as I'm on holidays. They wanted to make sure it was a go ahead for the pour and were checking to see if I managed to get the tubing done.

One last quick phone call to the building inspector... sure enough all the close up photos I'd taken of the pad prep, layout of "chairs" etc... made his day and it was a go for us to pour.

_MG_8862.jpg

The next thing I know... we've got three trucks bringing cement... 15 cubic meters (?) and $4000 Canadian down the tubes... just for the cement alone. Ohh... forgot to mention added some of the fiber mix for strength... the guys weren't really keen on it as it leaves threads up in the floor... but problems with the new computer at the plant have left some po'd people around here lately with the quality of the cement so thought... why not add some extra strength just in case.

_MG_8873.jpg

Soo... total cost so far...

5 rolls of 1/2" (250') PEX = $320 US
35 2" - 4'x8' R10 Foamular250 = $605 US
2 Reinforcing mesh 5'x150' 6"x6" 10g = $150 US
25 1/2" x 20' Rebar #4 = $100 US
2 6mil 8-4'x100 Poly = $80US

sub-total = $1255 US

Border crossing weekend fee = $50US (sent with deck railing material)
Delivery charge = $250US (sent with deck railing material)
Taxes and Duty = $$$ ??? have to look that up and break it down.

Cement = $4000 CAN
Labour = $3800 CAN

Grand total for pad roughly $ 10,000 :(

So... that's out of the way... it's being watered down and kept damp to ensure no flaking occurs...

September 03, 2009

Just got off the phone with Menards...

Plans were updated to reflect the tubing placement and new access points to the shop areas. Minor changes really, but the "mechanical room" will only have access from inside, the two shop areas will have their own doors in and out... but the big change was my mess up when I first asked for whatever window size.

I changed the windows to 36"W x 60"H, single hung... great egress routes, great airflow... and heh... can even throw a cheap window rattler in there if it gets too hot in the summer time.

02-09-2009 10-20-46 AM.jpg

The garage package itself will be here on September 28th ish... wahoo... about $17,000 US down the tubes for that before taxes and such.

Now I just have to wait for my heating guy to get back to me on suggestions for the gas heater for the infloor and radiators upstairs... and find someone to run the electrical out to the shop.

I'm thinking 100amp will do... have 200amp to the house and have to feed off that due to the layout of the property... but will see what the electrician says. Personally I'd like to layout the interior wiring myself again... but noway going near the main line.

Well... guess it's waiting time now ...
 

Attachments

  • _MG_8894.jpg
    _MG_8894.jpg
    60.8 KB · Views: 129
Last edited:

rinker1

Well-known member
Joined
Aug 30, 2008
Messages
289
Location
Ohio
I know what its like to wait years for a shop, congratulations. Its one year today that we started ours.
 
OP
M

medic583

Well-known member
Joined
May 25, 2007
Messages
72
Location
Northwestern Ontario
Heh rinker1... ha... please don't tell me you wish it was bigger?? :)

I feel like I'm expecting a newborn or something... I've been working out of my basement for years with the the renovations and woodworking... the vehicles... well... wherever I can... and already I'm wondering where I'm going to park the trucks and the girlfriends car :)

Ha... first time I've looked forward to winter in a LONG time :)
 

rinker1

Well-known member
Joined
Aug 30, 2008
Messages
289
Location
Ohio
Bigger is always nice but I went so long with nothing I'm thrilled with what I have.
 
OP
M

medic583

Well-known member
Joined
May 25, 2007
Messages
72
Location
Northwestern Ontario
Well... it took a while longer than I thought to get the shipments here from Menards... but it looked like most of it arrived.... The first delivery was to arrive on September 28th and I was heading to Winnipeg to pick up our new Dobe on the 29.

After waiting around all day for the 68' transport to arrive... the phone rings and I find out they will not be here till the next day... when I'm on a 12 hour road trip...

We get home later in the evening on the 29th... the only items delivered were the metal roofing/siding and trim... ????? Sure enough... the phone calls start and on October 8th what I think is the final load arrives.... well... some of it (the windows upstairs along with the patio door which were in stock when I paid for them were sold... have to wait for new ones... along with the missing sub-floor, more metal, etc...). The next load on October 22nd is supposed to be the final load with the drywall... but will see...

I hired a local contractor to help out (he managed to get another guy I went to school with to come help as well)... as I've been working round the clock day in and day out... and need to get this shelled in within the next two weeks.

So...

October 14th, we managed to frame the two side walls (30 foot walls, 2x6 and 10' high).

IMG_1277.jpg

IMG_1280.jpg

October 15th... major head cold but only could spare the morning dealing with it... spent the afternoon finishing off the framing of the windows and such of the 30' walls... contractors not here but should be again next day....

October 16th...

We began at 8am again... working on the back 40' wall...

IMG_1297.jpg

Since the guys have worked a lot together over the years... I made myself into a grunt... :) and did header boxes, cutting studs to length and the like. Of course being in Canada... metric... interior wall height here in town is limited to 3 meters... so each and every stud had to be cut. The step-father and mother along with the girlfriend popped in to help out as well.

IMG_1299.jpg

Talk about HEAVY beams... since the 9'x8' doors are on the eave ends of the shop... had to double up on the laminated headers.

IMG_1305.jpg

Windows all framed in with insulation boxed in the headers.... Yep... we went overkill on the headers for simple 36'x60' single hungs... but figured since it was the eave sides... why not.

IMG_1307.jpg

Sure enough... just like my last Dobe... "Deedee" is enjoying her new home with us (got her 2 weeks ago) and is already covered in sawdust daily. Have to keep an eye on our coffee mugs... little thing has been stealing the insulated mugs and lapping up the java...

IMG_1306.jpg
 
Last edited:
To avoid these ads, REGISTER NOW!
OP
M

medic583

Well-known member
Joined
May 25, 2007
Messages
72
Location
Northwestern Ontario
October 16th continued....

Since I'm not using OSB for the walls, metal strapping has to be laid in...

IMG_1313.jpg

To end off the day, the 1"x4" strapping was nailed down at 2' centers along with everywhere the metal j and f channel is going...

IMG_1316.jpg
 
OP
M

medic583

Well-known member
Joined
May 25, 2007
Messages
72
Location
Northwestern Ontario
October 17th.... woke to a frozen morning (-6 Celcius)...

After scraping off the frost we set to work again... The two side walls were ready to go and this morning before "the gang" showed up to help lift walls we set about finishing off the front wall.

Yes... it's cold at 8am now... :)

IMG_1321.jpg

We managed to get the front walls done as well as the main interior wall, and sure enough at 10am the gang showed up to help lift. The gang consisted of a few retired folk my parents know, a buddy or two of mine, the brother in law and his friends, and a few others....

IMG_1326.jpg

Well... it wasn't as bad as we thought.... :)

Up went wall two, the lakeside wall...

IMG_1332.jpg

Can you tell I'm happy now?

IMG_1333.jpg

And sure enough the neice runs up onto the rock at the back of the yard to show the progress....

IMG_1334.jpg

The interesting part came when we went to lift the front wall... I was wondering how it would all come together... sure enough... the main part went up first, then we tied in part of the interior wall to form a "T". Hmmm... makes sense now...

IMG_1343.jpg

After this we lifted the doubled up garage door header beams and tied them to the center of the wall along with the 2' edges.

IMG_1345.jpg
 
OP
M

medic583

Well-known member
Joined
May 25, 2007
Messages
72
Location
Northwestern Ontario
Ahhh... but before I forget... of course this project hasn't been without it's problems :)

When searching for prices I found quotes in town for roughly 28g's for the package... 14g's at Menards. Hmm... Canadian dollar is almost on par... well... ya know what I went with :) Anyhow... they use a computer system to design their packages and with my 10' walls, metal siding and add a room trusses I had to get it done up a bit customized.

Sure enough... when I was ready to go I give them a call to have them take off the OSB they included in the quote along with the cement, sauna and such. "Oopps... a mistake on the previous package 3 weeks before... now it's 20g's".

Yea... some mistake alright... they had extra on the package but now come in almost 6g's more??? Well, maybe I could skip on the deck outside for now and maybe the metal liner inside the one bay? Anyhow... quote comes back after the so called estimator looks at it again... back down to 15g's.... wahoo....

Lets just say... WHAT A NIGHTMARE!

Yes... there is something to be said for people that can estimate and those whom rely on a computer program.

The trusses.... no eave tails the estimator tells me... have to be site built. No biggie... a pain... but.... Sure enough... the trusses show up... with a 24" overhang.... ??? So... quick phone calls and okay.... the metal is just about long enough... second screw up but in a good way... it's almost long enough for the tails... just have to cut off about 6".

Next up we discover... the "estimator" who relies on a computer... sends us 11 metal sheets for each side of the roof.... Yes... these panels/sheets are only 38" wide (minus the 2" of overlap) so that gives me enough metal for a 33' wide roof... not the 42' I need!!!

Another phone call... few more sheets ordered... but now the rest will not be here for a week or two. Ya got to be freakin' kidding me... honestly... this guy is killin' me :)

Gaskets/weather stripping around garage doors... also missing. Oppps... not included with doors... have to buy seperately. Maybe two hours south of us they don't have snow??? While we're at it... what about the trim... sure enough... only enough for a 33' roof... ridge cap to short, drip edge, you name it. Strangely enough... they calculated the walls at 30'x40'... hmmm. Oh yea... and lets not forget the 4" metal trim for the garage doors... guess he forgot the walls are 6" walls??? Yea... that's reordered again as well.

So...the rest of the roof will be here when the drywall shows up.... the 100 or so 8' 2x4's that showed up are going back as well, the felt for the roof and the OSB which had been taken off the order a long time ago... that was all hand bombed back onto the truck... all 52 sheets of it as well....

Ohhh... so one last thing... if they only calculated for a 33' roof... let me guess... not enough screws? Yeppers... now I'm really impressed with their estimating... more ordered.

The worst part... it's my own fault. The salesman I bought the package from never sent the final materials package... I'm still waiting on it, I'm still waiting on the design plans and... well... I should've had it in my hands in the first place instead of forging ahead and relying on itemized bills showing up to work from. The biggest thing though... had to pay $400 US to have the trusses stamped for Canadian standards... and still haven't received that paperwork (as my building inspector is eagerly awaiting despite getting ahold of the truss specs and him handing me a permit). Yep... kind of important missing piece of paper :)

Anyhow... sure their will be more issues...

Four walls up, strapped with metal and 1x4's, drilled and bolted down the walls and ready to go...

IMG_1356.jpg

Along with this we also managed to get some temporary beams up across the entire 40' width of the garage (at 10' from each side) to support the trusses when we lift them into place). Found out I ended up buying some beat up 20' 2"x10"'s that had been used to form my slab and MANY others... might as well put them to use...

It's finally looking like a shop....

IMG_1358.jpg

Next up... cutting tails tomorrow and getting ready for Monday when we lift the rafters up and into place....
 
Last edited:

flyguy330

Member
Joined
Aug 18, 2009
Messages
7
I live just north of Winnipeg and bought about half of my materials at Menards. The funny thing was that you really had to know your material prices!!! Lumber was the same price in Canada as at Menards, and shingles were actually more! The place I really saved money was on the pex tubing, Formular 250 insulation, windows and doors. On these items alone I saved $8000. If you are close to the border its certainly worth the the couple hour drive for the materials. I'll be heading down south for the drywall in a couple weeks. That alone will save another $1300. 4 x 10 sheets are $17 in Canada and only about $6 bucks down there. Looks awesome so far!!!:beer:
 
OP
M

medic583

Well-known member
Joined
May 25, 2007
Messages
72
Location
Northwestern Ontario
Yea flyguy330.... esp. with the monies almost on par right now... some items are definately cheaper to get locally :). My only problem so far was the estimating and not reviewing it line by line... definately lesson learned :)
 
OP
M

medic583

Well-known member
Joined
May 25, 2007
Messages
72
Location
Northwestern Ontario
October 19, 2009

8am on a Monday morning and the local AA Hockey Team (IceDogs) show up to help us old guys out. Seriously... these guys are from all over Canada here to play AA hockey and the offered to come help us lift the trusses into place on the 3 meter high walls.

4026187761_d8f88d3e65.jpg


Yep... I'm impressed.... they didn't have practice till 11am so they showed up for an early workout :)

After all 20 trusses were lifted up onto the walls the guys took off and we stood the gable end and a few others.

4026944320_386667a1bd.jpg


It's gonna be a great view from upstairs now that I've changed the deck/door to the southern side (had it on the other side on the original plans). Yes... the 25x35 house is looking kinda small right now... but when the addition goes across the front of the house in a couple of years it should even things out.

4026191929_c772083b75.jpg


I was kind of shocked when the trusses showed up a week or two ago. After seeing everyones trusses on here and the widths, angled interior ceilings... well... mine only have a 10' width. Not bad I guess, but a couple extra feet would have been nice, albeit more drywall work. Talk about a heavy bottom cord on those 10/12 pitch trusses:)

4026945152_800b380c03.jpg


Well... it's lunch time for the guys and I'm in here with the dogs for a bit... thought I'd post up the progress...

4026950074_2e13ca67f4.jpg


4026948834_e225cd84c3.jpg


So... for the rest of the day we're gonna try and get the trusses strapped into place... tomorrow I'm guessing the peaks of the trusses have to go on, metal started?
 
Last edited:
OP
M

medic583

Well-known member
Joined
May 25, 2007
Messages
72
Location
Northwestern Ontario
October 19, 2009

Whew... another long day down the tubes... It started off this morning with a bunch of 20 year old hockey players helping us out... and by 6pm all the trusses are standing.

The guys were quite impressed with the "bowling alley" upstairs... and I'm sure their still shaking their heads at the fact it is going to be 3/4" hickory flooring up there :)

4027331605_4a767f6572.jpg


Tomorrow I'm heading out of town for the 1 yr old's doctors appt so I will not be helping out... but plans are for the peaks of the trusses to go on, the facia to go on and getting ready for the metal on the roof/walls. Should be a LONG day of small stuff.

Anyhow... here is a couple of shots at the end of the day...

4027332383_acfa060b4f.jpg


4027332931_447d37c7cf.jpg


October 21, 2009

Long day today... the guys were up installing the roofing panels and putting the ridge cap on. Now we got to see what a 10/12 pitch is really like... wow... shingles might have been easier for running up and down the roof... but the metal... so much quicker. Dave stayed up near the top of the roof line, Gabby at the eaves and me passing the 22' sheets up... the whole roof minus the missing 20' on the back side was done.

Here's a shot mid way through the day... metal on, ridge and end caps on... onto the tyvek, J channels and such tomorrow on the lower part of the building.

4033040659_35d4277d9f.jpg


4033793194_1070940d52.jpg


Oh.... had to make a few more phone calls last night... had to order one more 36x60 window, cut back on the plywood for upstairs (they had 20 sheets and we only need 15 sheets) and check to make sure the rest of the J channel and things are coming (along with the 85 sheets of 4'x12' drywall). I lucked out though and have been dealing with the "shipper" at the store... she's been great to deal with compared to the "estimator". Looking forward to getting the sheeting upstairs, it's a wee bit wobbly walking on those beams :)
 
Last edited:
OP
M

medic583

Well-known member
Joined
May 25, 2007
Messages
72
Location
Northwestern Ontario
October 26, 2009

Well, had to go back to work for a bit so missed some of the metal installments... but progress is being made.

Soffit is being installed around the last two sides of the shop...

4047314418_4ef74e88da.jpg


Window openings are framed in upstairs... waiting for the missing windows and J channel to be delivered...

4047315050_f1ee8d91a8.jpg


The double door upstairs has been installed on the lakeside of the shop, the missing metal for the roof is being sent out on Friday... hoping before the snow falls...

4047315326_12a42ac439.jpg


Almost at a standstill now waiting for the missing materials (J channel around windows/doors about 25 lengths of it, two upper double hung windows, garage door weather stripping, 6" garage door flashing as they sent 4" flashing, and of course the 6 sheets of roofing) to close it in.

The deck for the upstairs door (12'x12') will be put on hold until the spring as will the fascia... that was a given when the ordering started... but other than that... just picking up some more missing drip edge from a local store to keep things running till the rest of the order shows up...

Getting there... light snowfall this morning that melted right away... but it's gonna be close if the roof doesn't show Friday. Steep pitch (10/12) will make it extremely difficult getting the last few sheets up along with the gable end cap on if we have frost or it's snowing so crossing the fingers...

Now I'm going to have to start thinking about natural gas heaters for the radiant flooring, no water lines coming into the shop so it will have to be a closed loop system and as well have to get a trench dug for the electrical to come in. I don't think I can run a 200amp service out as that's all I have to the house and I'm pretty sure due to the layout of the yard (rock/hills) that I will have to branch off the house to the shop... limiting me to a max of a 100amp service in the shop? Still have to get the electrical guy in for the main and start asking questions....
 
Last edited:
OP
M

medic583

Well-known member
Joined
May 25, 2007
Messages
72
Location
Northwestern Ontario
November 14, 2009

Well... the rest of the exterior metal showed up, even the missing windows and the guys went on despite the below freezing temps and the 4-6" of snow we had for a week.

A view from the back of the shop into the 24'Wx30'D woodworking area.
4105041112_b3f8e0ac88.jpg


Same position but showing the little 8'Wx10'D office.
4104275873_d227b21803.jpg


Same position at the back of the shop showing the metal/auto working side of the shop (16'Wx30'D)
4104275581_d6c2342a7c.jpg


The upstairs (40'Wx10'Dx8'H) double doors are in place
4105041918_87c1b7a9bc.jpg


As are the two double hung window units at the other end
4105042456_4f41ef1946.jpg


And the view from the double doors where a 10'Wx12'D deck will be going on in the spring....
4105042678_3456628e02.jpg
 
OP
M

medic583

Well-known member
Joined
May 25, 2007
Messages
72
Location
Northwestern Ontario
November 16th, 2009

Well... the last day... the outside of the shop is now finished.... :bowdown:

25' to the peak on the North/South sides... the fascia is just going up
4115961083_e30c7b39fb.jpg


The last 20' of roof metal is on... first day we've had since the last metal showed up where we could get up on the 10/12 pitch roof.
4115962567_f838f9a6f8.jpg


My girlfriends daughter soo happy that I'll be around more now that the outside is done till spring :)
4115963083_df936a2007.jpg


Since it's below zero most days... the painting of the trim around the doors and even the doors themselves will have to wait till spring.
4116733326_30e56c517a.jpg


Well.... time to finish off the bathroom tile in the house, install a few more solid core doors, finish the ceiling tile in the basement, add a bathroom in the basement... and somehow find the time to wire the shop, get the drywall/insulation up and install the hardwood upstairs in the shop before spring.

Yep... gonna have to wait till the spring to run the hydro and gas to the shop as well as dig the sauna tubes for the deck... but... it's up and closed in and I'm a happy camper for now :)
 
To avoid these ads, REGISTER NOW!
Top Bottom