To avoid these ads, REGISTER NOW!

WWII/KW-era Navy NAF 1156-1 Fastener Kit

Private Lugnutz

Well-known member
Joined
Mar 30, 2012
Messages
30,456
Location
The Authentic Jersey Shore
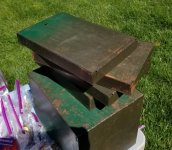
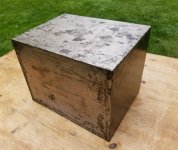
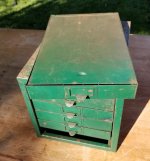
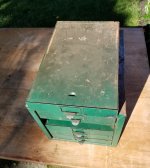
As I was saying on the 2019 Garage Sale thread, I found a small parts cabinet at the flea market this morning that turned out to be something much much better than just any old small parts cabinet.

attachment.php


It was in a huge liquidators' lot of tools and junk. I had already made a circuit around the entire flea market, so when I saw several guys already pawing through some of the toolboxes, I was not optimistic. I was standing there surveilling the whole lot, biding my time on one of the boxes when I spotted this cabinet. I almost missed it, because it was tucked in between some other stuff with something on top of it.

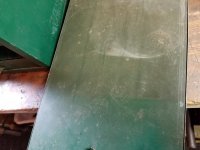
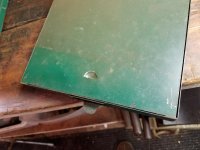
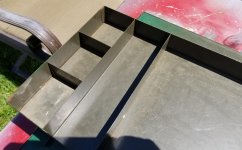
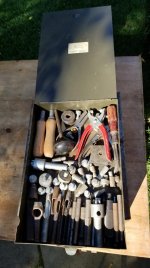
Initially, I was just interested in it for the cabinet. Ironically, when I pulled a drawer out I was annoyed that it had a lid on it, hinged in the back, since I had to pull it all the way out to see what was inside.

attachment.php


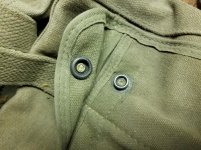
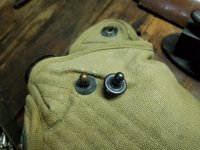
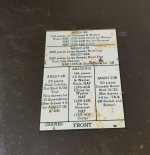
When I flipped the lid open and saw the Lift-the-Dot fasteners and such...

attachment.php


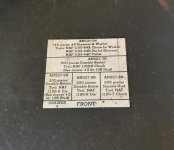
...and a packing label on the lid with AN 227- and NAF 1155- part numbers, I knew immediately what it was.

attachment.php


So I checked all the other drawers and tried to maintain my composure for the negotiation. When the seller asked if I wanted "the stuff inside" or just the cabinet, I knew he didn't know what it was, and I was going to get a good deal.

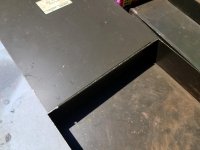
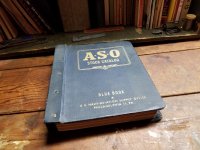
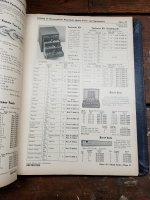
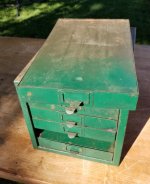
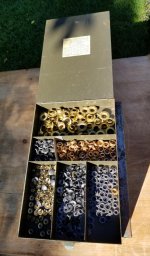
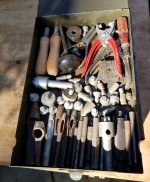
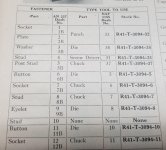
This is a complete US Navy NAF-1156-1 Fastener Kit, with a lot of NOS pieces inside of it still in their correct drawers, and all the drawers have the original packing labels. The part numbers on the labels are wartime, and the contents match the contents in the 1944 Navy Aviation Supply (ASO) Office Class 41 Stock Catalog...

attachment.php


attachment.php


attachment.php


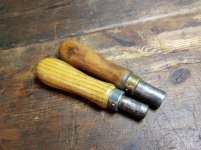
...with a few caveats. The cabinet has AN 230-B2 / NAF 1155-42 and AN 230-B10 / NAF 1155-40 fasteners, and the 1944 ASO Class 41 does not. Note also that the drawers inside the cabinet depicted in the wartime catalog don't have the nifty hinged lids. And finally, some of the hand presses and some other pieces thrown in there also seem a little newer. So it might have been postwar, or perhaps used for awhile and then forgotten.

Either way, it's amazing and rare. I have seen maybe two or three others, neither as well-preserved, neither with all the packing decals, and neither with this many NOS pieces remaining.
 

Attachments

  • NAF 1156-1 1.jpg
    NAF 1156-1 1.jpg
    149.4 KB · Views: 751
  • NAF 1156-1 2.jpg
    NAF 1156-1 2.jpg
    150.7 KB · Views: 704
  • NAF Drawer 2_3.jpg
    NAF Drawer 2_3.jpg
    151.7 KB · Views: 709
  • NAF Drawer 2_4.jpg
    NAF Drawer 2_4.jpg
    106.8 KB · Views: 701
  • NAF ASO Book 1.jpg
    NAF ASO Book 1.jpg
    147.4 KB · Views: 688
  • NAF ASO Book 3.jpg
    NAF ASO Book 3.jpg
    125.9 KB · Views: 690
  • NAF ASO Book 4.jpg
    NAF ASO Book 4.jpg
    147.3 KB · Views: 688
Last edited:
To avoid these ads, REGISTER NOW!
OP
P

Private Lugnutz

Well-known member
Joined
Mar 30, 2012
Messages
30,456
Location
The Authentic Jersey Shore
Here are all the contents, drawer by drawer.

Drawer 1
 

Attachments

  • NAF Drawer 1_1.jpg
    NAF Drawer 1_1.jpg
    91.8 KB · Views: 48
  • NAF Drawer 1_2.jpg
    NAF Drawer 1_2.jpg
    106 KB · Views: 67
  • NAF Drawer 1_3.jpg
    NAF Drawer 1_3.jpg
    149.4 KB · Views: 90
  • NAF Drawer 1_4.jpg
    NAF Drawer 1_4.jpg
    99 KB · Views: 65
OP
P

Private Lugnutz

Well-known member
Joined
Mar 30, 2012
Messages
30,456
Location
The Authentic Jersey Shore
...and Drawer 5.

This is where a PO was throwing some extra things, such as the upholstery punches. The screwdriver (a Forsberg) and the dies are original, but need to be sorted into some of the other drawers.
 

Attachments

  • NAF Drawer 5_1.jpg
    NAF Drawer 5_1.jpg
    95.3 KB · Views: 60
  • NAF Drawer 5_2.jpg
    NAF Drawer 5_2.jpg
    81.9 KB · Views: 97
  • NAF Drawer 5_3.jpg
    NAF Drawer 5_3.jpg
    118.1 KB · Views: 137
  • NAF Drawer 5_4.jpg
    NAF Drawer 5_4.jpg
    95.8 KB · Views: 78
OP
P

Private Lugnutz

Well-known member
Joined
Mar 30, 2012
Messages
30,456
Location
The Authentic Jersey Shore
Finally, here are close-up excerpts from the 1944 Navy ASO Class 41 Blue Book, documenting the contents matching the drawer packing labels.
 

Attachments

  • NAF ASO Book 9.jpg
    NAF ASO Book 9.jpg
    145.3 KB · Views: 36
  • NAF ASO Book 8.jpg
    NAF ASO Book 8.jpg
    107 KB · Views: 36
  • NAF ASO Book 7.jpg
    NAF ASO Book 7.jpg
    130.9 KB · Views: 35
  • NAF ASO Book 6.jpg
    NAF ASO Book 6.jpg
    149.1 KB · Views: 33
  • NAF ASO Book 5.jpg
    NAF ASO Book 5.jpg
    129.5 KB · Views: 35
  • NAF ASO Book 4.jpg
    NAF ASO Book 4.jpg
    147.3 KB · Views: 36
OP
P

Private Lugnutz

Well-known member
Joined
Mar 30, 2012
Messages
30,456
Location
The Authentic Jersey Shore
Neat find. Is the green paint original? I would have expected some shade of battleship grey.
It's been re-painted, Stuart. You can see the brush strokes on that Kelly green on the back. But only on the outsides. The original paint can be seen on the inside of the drawers and lids. The shade is somewhere between an OD green and a steel grey.
 

ttpete

Well-known member
Joined
Mar 8, 2011
Messages
6,737
Location
Dearborn, MI
At one time I had the bench press and all of the dies and punches for those fasteners. A friend went into the boat cover business and I sold it to him.
 

Outlawmws

Well-known member
Joined
Aug 9, 2011
Messages
39,089
Location
The Badlands
Lugs are those primarily the tent type snaps and grommets, of are some the WWII "canteen Snaps"? I'd like to get a few of those canteen snaps somewhere... would you know a source?
 

Oregon rock crusher

Well-known member
Joined
Jun 28, 2016
Messages
1,899
Location
West of Salem
A very nice find Lugz. Great compartment loading of the hardware in that vintage kit. Nice when the compartments are packed tight with the right stuff. Even has the installation tools. Those lift dot sockets and studs are very similar to the snaps securing the rag tops on British sports cars. You've been finding lots of the really good stuff lately. Ed.
 

gpw_42

Well-known member
Joined
Apr 24, 2017
Messages
717
Location
NC Sandhills, USA
+1 to Don's question. If you're going to remove the kelly green, I'd like to know how you go about it, as I still need to remove the blue spray on my armorer's cabinet.

That set is really nice, great addition to the Lugzonian! The contents just "make it."
 

Outlawmws

Well-known member
Joined
Aug 9, 2011
Messages
39,089
Location
The Badlands
your best bet for rattle can and house paint is Simple green you just have to work it slowly as it will also attack the original paint, jsut not so fast... (exception for Coleman paint, that stuff came off with ANYTHING!)
 
OP
P

Private Lugnutz

Well-known member
Joined
Mar 30, 2012
Messages
30,456
Location
The Authentic Jersey Shore
Thanks, guys!

Lugs are those primarily the tent type snaps and grommets, of are some the WWII "canteen Snaps"? I'd like to get a few of those canteen snaps somewhere... would you know a source?
There are several different sizes of United-Carr type snaps and grommets/washers that were standardized across the technical branches, hence the Federal Stock Numbers and the "AN" (Army-Navy) numbers correlated to the NAF- numbers, and they were used on shelter halves, tarps, sleeping bags, overall buttons, etc, and all kinds of tool bags. My WWII canteens all have Lift-the-Dot (LTD) type fasteners. If you send me a photo and dimensions of the snaps you're referring to, I'd bet I have them in this box.

Those lift dot sockets and studs are very similar to the snaps securing the rag tops on British sports cars.
Yup, and there are three different sizes of LTD's in here!
 

Attachments

  • 20190622_205606.jpg
    20190622_205606.jpg
    155.6 KB · Views: 52
  • 20190622_205531.jpg
    20190622_205531.jpg
    155.2 KB · Views: 54
  • 20190622_210506.jpg
    20190622_210506.jpg
    156.6 KB · Views: 52
  • 20190622_210415.jpg
    20190622_210415.jpg
    142.4 KB · Views: 56
  • 20190622_205312.jpg
    20190622_205312.jpg
    149.8 KB · Views: 57
  • 20190622_205239.jpg
    20190622_205239.jpg
    154.8 KB · Views: 60
To avoid these ads, REGISTER NOW!
OP
P

Private Lugnutz

Well-known member
Joined
Mar 30, 2012
Messages
30,456
Location
The Authentic Jersey Shore
Are you thinking of removing the exterior brushed on paint and exposing the OD?
Yes, Don. I'm going to try. And if worse comes to worse, I may just do my magic on it. Here are some more pics. You can see how ridiculous they boogered this thing up. They just pulled the drawers out a little and sprayed the Kelly green on the face and as far back as the drawer was pulled out. See Pic 1 & 2. Pic 3 is to show the contrast of the Kelly green and the original color on the on one of the drawers.

+1 to Don's question. If you're going to remove the kelly green, I'd like to know how you go about it, as I still need to remove the blue spray on my armorer's cabinet.
I am going to start with Simple Green. Outlaw is correct. I learned the hard way that it will remove not only overspray but original paint if left on long enough. If that doesn't work, I will try Evaporust. I also learned the hard way that it will also remove certain paints if the piece is left in it long enough. I am hoping either one softens it up enough to wipe off.
 

Attachments

  • 20190622_204154.jpg
    20190622_204154.jpg
    54.4 KB · Views: 42
  • 20190622_204137.jpg
    20190622_204137.jpg
    133.8 KB · Views: 39
  • 20190622_203944.jpg
    20190622_203944.jpg
    111.6 KB · Views: 39
OP
P

Private Lugnutz

Well-known member
Joined
Mar 30, 2012
Messages
30,456
Location
The Authentic Jersey Shore
I found these United-Carr fastener punches a few years ago. Now I have a more suitable place (top drawer) to keep them! :)
 

Attachments

  • 20190622_210814.jpg
    20190622_210814.jpg
    153 KB · Views: 41
  • 20190622_210827.jpg
    20190622_210827.jpg
    135.7 KB · Views: 49

gpw_42

Well-known member
Joined
Apr 24, 2017
Messages
717
Location
NC Sandhills, USA
Yes, Don. I'm going to try...I am going to start with Simple Green. Outlaw is correct. I learned the hard way that it will remove not only overspray but original paint if left on long enough. If that doesn't work, I will try Evaporust. I also learned the hard way that it will also remove certain paints if the piece is left in it long enough. I am hoping either one softens it up enough to wipe off.


Thanks, Lugz and Outlaw both for the insight on Simple Green. Picked up most of a gallon at an estate sale on Friday, so will use that to go after the blue on my kit. Thankfully, it's all external, nothing on the drawers to have to clean up.

I recently submerged a vise in about 1.5 gallons of SG - in a few days, the vise was clean as a whistle, and subsequently primed & repainted well. https://www.garagejournal.com/forum/showpost.php?p=7921618&postcount=7165
 

Aerospace Eng

Well-known member
Joined
Jun 2, 2019
Messages
93
Location
Zelienople, PA
Somewhat off topic, but there are laser paint strippers now that are color tunable so you can remove the topcoat and leave the primer, or striping/lettering without messing up the base coat.


They are $500K machines, but if you can find someone that has one it might be a way to go depending on the price difference between original and repainted.
 

MenkeJ

New member
Joined
Jul 18, 2019
Messages
1
Location
Florida
I just bought the same thing from an older women in Central Florida. The drawers are in upside down. Drawer 5 the tallest one should be on the bottom. Flip the cabinet 180 degrees and reinsert drawers top to bottom 1 thru 5. Now with that said each drawer compartment has the Die, Chuck or Punch number if required listed and they should be in that slot with the buttons. Drawer #5 should have the press that holds each of those Dies and Chucks which is missing. Each die and chuck has a number on it which corresponds with the listed item on the labels.
 
Last edited:
OP
P

Private Lugnutz

Well-known member
Joined
Mar 30, 2012
Messages
30,456
Location
The Authentic Jersey Shore
I just bought the same thing from an older women in Central Florida.
Sweet! Please post photos.

If yours has one, I am especially interested in seeing the nomenclature decal that went on top. Mine is missing. All that remains is the outline of the decal where they sprayed that kelly green right over the top of it.

Some colleagues and I believe this NAF 1156-1 is late war (and no earlier than March 1944), at the earliest, and might be post-war. For a few reasons....

- Other found examples of USN 1156-1 are a darker, semi-gloss green (the original paint on this one, under that Kelly green, is more like a flat steel green)

- Other found examples of USN 1156-1 do NOT have hinged drawer lids, and therefore, no contents labels, matching the figure of the cabinet in the March 1944 copy of the US Navy ASO Catalog I have, as shown upthread.

- As already mentioned upthread, my example of an NAF 1156-1 contains three (3) fasteners that are NOT included in the contents listed in the March 1944 copy of the US Navy ASO Catalog I have, as shown in post #8.

The drawers are in upside down.
Yeah, I noticed that the cabinet was upside down when I went to strip it and saw the outline of the decal that I knew was supposed to be on top, on the bottom instead. That deeper drawer and the numbering system should've been a cue, anyway. Thanks.

...each drawer compartment has the Die, Chuck or Punch number if required listed and they should be in that slot with the buttons.
Yup. As I alluded to in Post #7...
The screwdriver (a Forsberg) and the dies are original, but need to be sorted into some of the other drawers.
 
OP
P

Private Lugnutz

Well-known member
Joined
Mar 30, 2012
Messages
30,456
Location
The Authentic Jersey Shore
I started 'Pandemic Project' #7 yesterday.

It was a beautiful day, perfect for working outside. After my daily Post Office drop-off walk, the sun was fully up, 55*F, and I was all set up on a portable table out back by 10AM. Latex gloves. Stripper. Acetone. Several pads of 0000 steel wool. And lots of rags. It was a little embarrassing to have to put everything away for today when it struck me that I had gotten just a little ahead of myself and I needed to empty all the drawers first!
:withstupi

If you recall, whoever spray bombed the chest itself with rattle can Kelly Green THANKFULLY only bothered to spray the facing and only a few inches of each drawer. If you look back, or at some of the new pictures I just took and posted below, you can see how the drawers were pulled out and stacked haphazardly on top of each other when he painted, creating lines between the original gorgeous Olive Drab and the Kelly Green. :lol:

I thought I could get away with stripping the Kelly Green on the lid and the face of each drawer without emptying the contents, but I didn't want that goop dripping in the drawers, and I couldn't turn them over, either. So, first things first and the chest itself could wait.

It turned out to be a break-breaking all-day job. There are thirty-three (33) separate compartments! And, I took a healthy scoop out of each compartment, soon to be shipped to a friend and fellow WWII collector and colleague of mine who also has the same NAF 1156-1 Fastener Kit, but empty, like most of them are typically found. So, sixty-six (66) Hefty quart bags, all labeled with the contents with a fine point Sharpie!

After an hour I was audibly cursing. After two, I grabbed a chair, and the little red devil on my left shoulder was recommending just dumping it all and sorting later.
:evil:

Have you ever tried to remove hundreds of Lift-the-Dot, Anzo, Segma, and Durable buttons, studs, sockets, and clinch plates in five different sizes, including too-big-for-stubby-fingers tiny, from 2" x 2" compartments?! I went from fingers to a spoon to a magnet to "Hey sonny boy, c'mere and help me with this...," to "Just friggin' shoot me!"
:lol_hitti

But, it was worth it. I am ready to get this thing back to its original finish glory today.

:thumbup:
 

Attachments

  • 20200513_151149.jpg
    20200513_151149.jpg
    150.2 KB · Views: 30
  • 20200513_135617.jpg
    20200513_135617.jpg
    147.5 KB · Views: 25
  • 20200513_132325.jpg
    20200513_132325.jpg
    106.8 KB · Views: 25
  • 20200513_132159.jpg
    20200513_132159.jpg
    147.7 KB · Views: 35
Last edited:

Username already in use

Well-known member
Joined
Sep 4, 2015
Messages
2,177
Location
Ohio
Nice! Looks like a fun project. You might not even need the paint stripper. I'd give it a go with the acetone and the steel wool first to see how it goes.

I'm anxiously awaiting the 'after' pics!
 
OP
P

Private Lugnutz

Well-known member
Joined
Mar 30, 2012
Messages
30,456
Location
The Authentic Jersey Shore
Pics 1 & 2 are a couple more BEFORE shots.

You can see what I'm dealing with. The faces of the drawers were absolutely slathered in the Kelly green, and then just the front of the lids lightly sprayed with it. Everything else is original OD. Thankfully, they didn't touch the inside at all, also all original OD. I would bet dollars to donuts they painted these with the drawers loaded!

Pics 3, 4, & 5 show two (2) drawers after paint removal with brush cleaner and 0000 steel wool, with some scraper action around the label holder.

As soon as I started rubbing the first drawer it became very obvious why they did what they did. There was bad box rot and box rot stains in splotches on both drawers. The problem is they painted right over the rust. I wish they had removed it first, and used OD. When I am done all five (5) drawers I will reconsider next steps, but I am torn between doing nothing and OD refinish. It will all depend on the chest, which I haven't touched yet. Unfortunately, I think that was probably rusty, too, and they slathered it for that reason. It looks like a PO found it, it was pretty much roached on the outside, and what I am removing was his sloppy lazy solution.
 

Attachments

  • 20200514_111040.jpg
    20200514_111040.jpg
    152.8 KB · Views: 41
  • 20200514_111901.jpg
    20200514_111901.jpg
    156.8 KB · Views: 44
  • 20200514_170130.jpg
    20200514_170130.jpg
    135.7 KB · Views: 41
  • 20200514_170126.jpg
    20200514_170126.jpg
    133.6 KB · Views: 41
  • 20200514_170241.jpg
    20200514_170241.jpg
    146.4 KB · Views: 39
Last edited:
OP
P

Private Lugnutz

Well-known member
Joined
Mar 30, 2012
Messages
30,456
Location
The Authentic Jersey Shore
Warm day here (already 65* F) and I started in on the cabinet shell early before a pre-summer thunderboomer moved in.

There is a layer of OD under the Kelly green on both sides, but it's going to be next to impossible to save. Rubbing with even the mildest of solutions affected both layers. And even if I were to go small and precise on the remaining Kelly green areas and heavy streaks, I don't think enough would be left for me to consider it 'preservable'. See Pics 1, 2, & 3.

There was no OD left on the top, except, oddly, a perfectly rectangular area were I am guessing the kit label used to be. See Pics 4 & 5.

There was no OD whatsoever left under the Kelly green on the bottom. See Pic 6.

The only place where there is an original layer of OD and no Kelly green paintbomb over it was the back. See Pic 7.
 

Attachments

  • Cab 7 back.jpg
    Cab 7 back.jpg
    135.5 KB · Views: 18
  • Cab 6 bottom.jpg
    Cab 6 bottom.jpg
    153.3 KB · Views: 18
  • Cab 5 top label area.jpg
    Cab 5 top label area.jpg
    78.5 KB · Views: 19
  • Cab 4 top.jpg
    Cab 4 top.jpg
    151 KB · Views: 20
  • Cab 3.jpg
    Cab 3.jpg
    151.6 KB · Views: 20
  • Cab 2.jpg
    Cab 2.jpg
    145.7 KB · Views: 18
  • Cab 1.jpg
    Cab 1.jpg
    147 KB · Views: 19
Last edited:
OP
P

Private Lugnutz

Well-known member
Joined
Mar 30, 2012
Messages
30,456
Location
The Authentic Jersey Shore
The way this cabinet is designed, with the lids hinged on the back of the drawers, you can't just pull a drawer half way out and remove fasteners. The hinged lid won't let you. The intent is to pull a drawer all the way, put it on a bench or on top of the cabinet so you can flip the lid all the way open, check the contents label, and remove the stud, socket and clinch plate for the type of fastener you need from the correct compartments. (Journeyman and expert upholsterers obviously wouldn't need to consult the labels, but still need to pull the drawer all the way out.) I hate to re-finish vs. preserve, but when it's past the point of preservation, I don't mind. In this case, the drawers are totally preservable except for the faces and a little of the front on each lid. The cabinet shell is not except for the back. But I think a combination of my 'barn find' look re-finish on the cabinet and the drawer faces only blended into the original finish of the drawers will look completely original, preserved, but well-used. I can imagine it done with some drawers pulled out part way, and one drawer all the way out and it being convincing. And that's the way I am leaning.
 

Username already in use

Well-known member
Joined
Sep 4, 2015
Messages
2,177
Location
Ohio
Sorry to see that the sparybomb isn't coming off without some sacrifice to the drab green underneath. I'm living in a similar hell right now on my cabinet.
 
OP
P

Private Lugnutz

Well-known member
Joined
Mar 30, 2012
Messages
30,456
Location
The Authentic Jersey Shore
I've finished removing every last lick, smidge, or spot of that offensive Kelly green. Again, you can see the motivation. I reckon this box sat around for years and years. Most of the drawers and all the fasteners, which are absolutely immaculate, were protected from the elements. The exterior was roached and the creeping crud went a few inches inside on the lid and underneath on each drawer. I just wish whoever found it hadn't painted right over the danged rust with whatever danged color they had on hand.
 

Attachments

  • Stripped 1.1.jpg
    Stripped 1.1.jpg
    143.5 KB · Views: 30
  • Stripped 1.2.jpg
    Stripped 1.2.jpg
    142.5 KB · Views: 24
  • Stripped 1.3.jpg
    Stripped 1.3.jpg
    104.1 KB · Views: 23
  • Stripped 1.4.jpg
    Stripped 1.4.jpg
    136.9 KB · Views: 21
  • Stripped 1.5.jpg
    Stripped 1.5.jpg
    150.4 KB · Views: 29
To avoid these ads, REGISTER NOW!
Top Bottom