To avoid these ads, REGISTER NOW!

As promised.......Wilton vise restoration thread.

evintho

Well-known member
Joined
Apr 6, 2006
Messages
1,358
Location
Santa Rosa, CA.
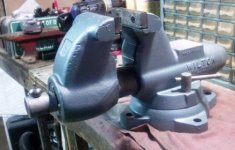
Here it is. This was a pretty straightforward restoration. Thank God, 'cause it's also my first! When I picked up this 4.5" Wilton, model #9145 off of craigslist it was in pretty good shape. It opened and closed smoothly with no binding and virtually zero play. Over the years it had been beat on and the tops of the jaws were very chewed up. It was pretty crusty looking but definitely a sound starting point.

P8240002.jpg


P8240003.jpg


P8240009.jpg


P8240006.jpg


I won't go into the disassembly process. It's basic common sense. Soak everything in penetrating oil, remove the appropriate nuts and bolts, drive out pins, etc. Take photos so you remember how it goes back together!

After disassembly, I washed everything in the parts washer to remove any gunk and grime. Then, on to the bead blaster to remove all rust, paint, scale, etc. Here it is after blasting.

P8260001.jpg


You can find the date of manufacture underneath the moveable jaw, stamped on the drift key.

P8260005.jpg


Mine was made 11/30/56. This puppy is 53 years old!

P8260003.jpg


The only real problem I had with disassembly was jaw removal. Note the condition of the jaw screws in the 3rd photo. The screwheads were smashed, chewed up and virtually unrecognizable. What to do?

First, I drenched them liberally in PB Blaster and let them soak overnight. The next day I tapped all around them with a ball peen hammer and hit 'em again with PB Blaster. Someone here on GJ recommended these, some time ago for removing screws with mutilated heads.

P8300001.jpg


I was in Sears one day and saw these on sale for something like $8.99. I figured what the heck, maybe I could use them someday. Well, someday came! They made quick work of those jaw screws! Simply chuck a bit in a reversable drill, flick it to counterclockwise and SLOWLY apply power. They came right out!

P8300003.jpg


A small bit of fabrication. The 2 pins on the right are what holds the rear collar and inner screw tube (sorry, I don't know the names of all the parts!) in place. I don't know if they're factory or not, but that's what came out. The one on the far right is missing the head. I found a 6 penny nail to be just the right shaft diameter and has the proper head. I just hacked off the bottom of a couple of nails and there were my collar pins!

P8300004.jpg


I straighted the handles on the swivel holddown nuts and painted all these pieces with Alumablast spray paint. Grabbed some stainless steel screws for the spindle retainer ring also.

P9010007.jpg


Now I'm ready for paint. I decided to go with Rustoleum Carnival Red. I decided against spray paint and went with an oil base brush on enamel. I've got plenty of paint left for the next project!

P9010006.jpg


I washed everything liberally with grease and wax remover, brushed on a coat of primer and followed that with 2 coats of color. I waited 24 hours between each coat.

P9010005.jpg


P9010001.jpg


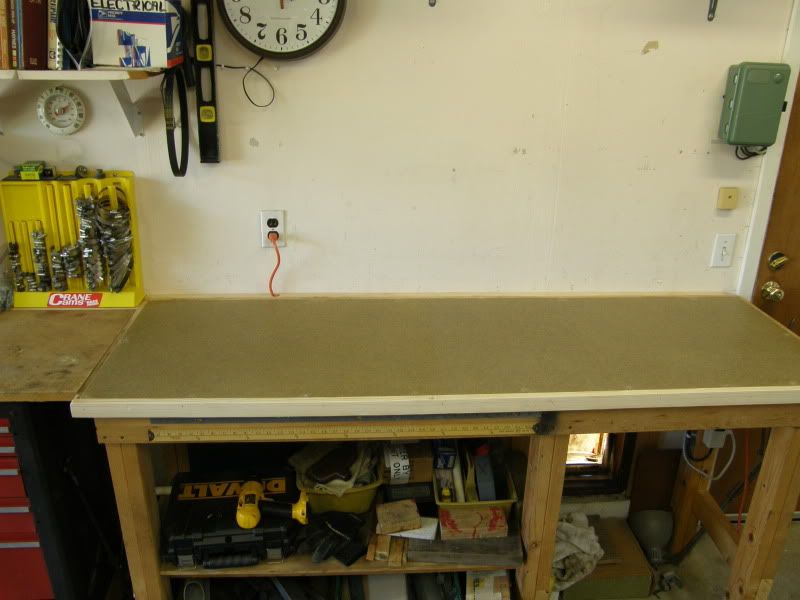
Before I reassembled the vise I decided to replace my workbench top. I had built this bench 15 years ago and installed an insert of hardboard as a working surface. I did this knowing I could replace it after a few years when it became too crusty. I think it's time! Note cheap chinese piece of **** vise. Looks pretty.........utterly useless!!

P9040001.jpg


Half hour later.....................

P9050002.jpg


On to reassembly! Very easy! First installed the collar over the screwtube. It only goes on 1 of 2 ways. Make sure the pin holes both line up.

P9050003.jpg


P9050004.jpg


Next, insert the collar and screwtube assemble into the rear of the vise. Again, it only fits 1 of 2 ways. Makes sure ALL the pin holes line up.

P9050006.jpg


Insert the 2 pins. They can't extend past flush with the screwtube or else they'll run into the jackscrew assembly.

P9050008.jpg


P9050009.jpg


Now you're ready for the moveable jaw. I filled this cup with 90 weight gear oil and dunked the shaft into it. Slide the moveable jaw into the main vise body.

P9050010.jpg


Now liberally grease the jackscrew with multi-purpose grease and screw it into the screwtube. Install the spindle assembly retaining ring.

P9050011.jpg


Flip the vise over and insert the 2 swivel base carriage bolts. Screw on the retaining nuts on the other side.

P9050014.jpg


The jaws were pretty torn up but the faces were in good condition (see
pic 3). After pricing out replacement jaws and seeing that they cost twice as much as the vise, I decided to simply flip the jaws over and file the ends somewhat flush. The jaw bottoms were pristine! Now the pristine part is on top! Thanks Rory Bellows for that tip!

P9050001.jpg


I found some good Dorman allenhead screws at NAPA auto parts but the heads were just a hair too thick. I remedied this by grinding off about 1/8" off each head, allowing them to sink below the face of the jaws. I added a dab of Loctite before installing them.

P9050013.jpg


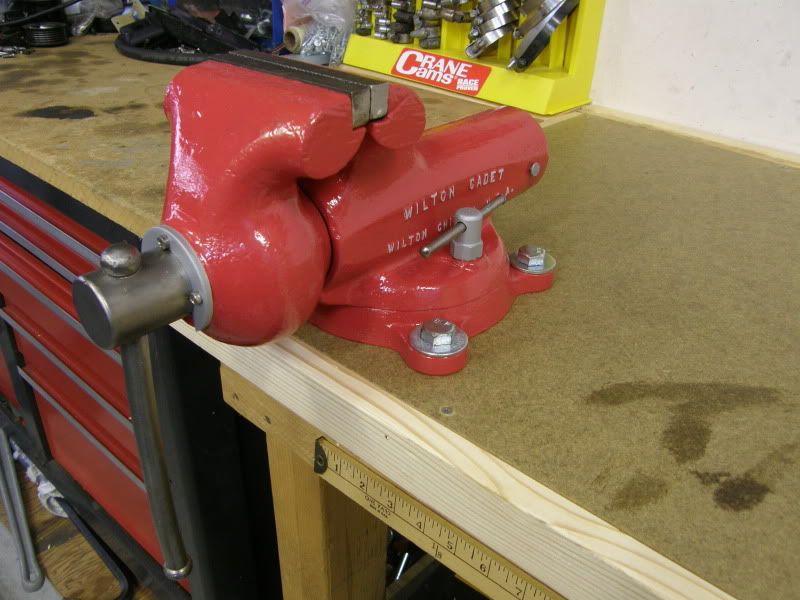
Now all that was left was to drill mounting holes in my new benchtop work surface and mount the beast! Here it is in all it's splendored glory! Note, I chose to highlight the raised letters. Why not?! Ya only go around once in life!

P9050021.jpg


P9050018.jpg


P9050016.jpg


P9050020.jpg


P9050001.jpg


P9050022.jpg


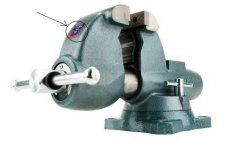
All in all, it was fairly easy and a lot of fun! It should tide me over and take care of all my needs until I'm able to acquire this bad boy! Now that'll be a restoration!!

PB080036.jpg
 
To avoid these ads, REGISTER NOW!

r6_cannibal

Well-known member
Joined
Jan 19, 2009
Messages
694
Location
Southern California
mmmm red :drool:
Great work on the restoration!
I think I have that same cheap-o asian vise you replaced with the wilton. I picked it up used for 15 dollars, but I don't think I would have paid more than that.
Is your future restoration project a friend's vise or something? And how come it's outside?
 

Lookin4'67Galaxieconv

Well-known member
Joined
Jul 2, 2008
Messages
16,627
Location
Atlanta, GA
Very impressive! I've cleaned and painted a few vises but haven't dealt with one that needed that much cleaning and rehabbing. You did a great job! It seems just a couple weeks ago or so that you were asking advice on what vise to buy...wait a minute, it was! :pimpflash

So what's the deal with the old vise in the last picture? Are you trying to negotiate a deal to buy that off somebody?
 
OP
E

evintho

Well-known member
Joined
Apr 6, 2006
Messages
1,358
Location
Santa Rosa, CA.
Is your future restoration project a friend's vise or something? And how come it's outside?

Here's the original thead....................

http://www.garagejournal.com/forum/showthread.php?t=24797

I sent a letter to the owner of the property but no response. I'm waiting for some movement on the property. The city is building a new housing development on the south side of that property. The neighbor on the north side has been trying to buy it as a buffer to the housing development. I'm hoping the city will condemn it, the owner put it up for sale, something! I just need to be patient. Good things come to he who waits!
 

Damon L.

Well-known member
Joined
Mar 23, 2008
Messages
169
Location
SE Minnesota
Very nice. I like the highlighted letters.

In the spirit of the thread (and from being called out in the lurkers thread) here is mine.

Dad gave this one to me a few weeks back. He forgot he had it lying around the shop, and knew I was looking for a 3.5" vise.

Dissassembled:
Vise001.jpg


I just degreased and wire brushed everything, cleaned with thinner, shot with IH red, lubed and reassembled. Total time: 2 hours

Vise002.jpg


Vise003.jpg
 

Joe Mamma

Well-known member
Joined
May 31, 2009
Messages
339
I was in Sears one day and saw these on sale for something like $8.99. I figured what the heck, maybe I could use them someday. Well, someday came! They made quick work of those jaw screws! Simply chuck a bit in a reversable drill, flick it to counterclockwise and SLOWLY apply power. They came right out!

. . .

The jaws were pretty torn up but the faces were in good condition (see
pic 3). After pricing out replacement jaws and seeing that they cost twice as much as the vise, I decided to simply flip the jaws over and file the ends somewhat flush. The jaw bottoms were pristine! Now the pristine part is on top! Thanks Rory Bellows for that tip!

These two tips could save someone a lot of headache!

Great project. Thanks for posting everything.

Joe Mamma
 

Diesel_Crawler

Well-known member
Joined
Apr 17, 2009
Messages
1,267
Location
Canada, NB
Very nice. I like the highlighted letters.

In the spirit of the thread (and from being called out in the lurkers thread) here is mine.

Dad gave this one to me a few weeks back. He forgot he had it lying around the shop, and knew I was looking for a 3.5" vise.

Looks good, You should take the swivel holddowns as well as the main arm off and smack them with a wire brush or paint them so they don't have that surface rust. Plus they would shine up nice.
 

rhastings80

Well-known member
Joined
Apr 1, 2009
Messages
636
Wow great job, your vice looks very nice. I have been watching Craig's list in MN but nothing has popped up yet. I have a couple of questions if you don't mind?

How do you get those pins out in the rear of the vise? Can you just pound them in and then they fall in the middle? Or did you have to use that screw extractor and pull them out?

What size screws did you used on the jaws and on the horseshoe collar? I have another Wilson vise and it was missing 2 of the 3 collar screws and I had to order them off the internet from Wilton as I could not find any local place with the right thread pattern.

Also what did you use for the white letters? It looks super cool.

Thanks
 

Uncle Buck

Banned
Joined
Mar 7, 2005
Messages
9,120
Location
Kansas
Very nice job on the vise. Excellent choice of color if you ask me.

BTW: Damon L. Your old vise looks very nice wearing a new suit as well! Yes, stop lurking dude, see how nice it was posting a few pics of your cool project for everyone to ogle!
 
OP
E

evintho

Well-known member
Joined
Apr 6, 2006
Messages
1,358
Location
Santa Rosa, CA.
Wow great job, your vice looks very nice. I have been watching Craig's list in MN but nothing has popped up yet. I have a couple of questions if you don't mind?

How do you get those pins out in the rear of the vise? Can you just pound them in and then they fall in the middle? Or did you have to use that screw extractor and pull them out?

What size screws did you used on the jaws and on the horseshoe collar? I have another Wilson vise and it was missing 2 of the 3 collar screws and I had to order them off the internet from Wilton as I could not find any local place with the right thread pattern.

Also what did you use for the white letters? It looks super cool.

Thanks

One pin still had the head on it so I just placed a screwdriver between the head and vise body and pried it out. Then, after removing the spindle assembly, I put a really skinny punch in that hole and knocked the second pin out of the other side.

The jaw screws are 1/4" x 32 thread pitch. The collar screws are #10 x 32 thread pitch. On the collar screws, they're panheads and they interfered with the spindle so I had to grind some of the head off so they would clear.

The raised letters are silver. I had some old silver 1-shot enamel laying around from a previous pinstripping job. You can see it in the pic of paint cans. I went to the local model store and bought a pack of micro-fiber paint brushes - $1.79 and they worked great for the small detail.
 
To avoid these ads, REGISTER NOW!

studebaker

Member
Joined
Jul 8, 2009
Messages
6
Very nicely done!
I just did two wilton vises. The first a 450 model and the next a 6400 model. I powder coated the pieces for the 6400 and also high lighted the letters like you did. The pins you have don't match the ones in either of these. Your vise pins look like nails that have been cut off and used as pins. The ones in both of these look like regular round stock that is cut and driven in for locking the collar in place.
Yes, to remove these, I just drove them into the vise housing, then took them out of the end. To replace, just drive them in with a hammer and punch.
 

whaler2001

Well-known member
Joined
Oct 12, 2009
Messages
260
Location
Blythewood, South Carolina
Today I slid the vise apart to find the date on my dad's old vise. The only numbers I saw in the location you've pointed out was "174"

Anyone have any ideas? Here is the beast....


133ff419.jpg
 

Adam McLaughlin

Well-known member
Joined
Oct 13, 2008
Messages
1,843
Location
Santa Rosa, CA
Yeah, good job. When you want help pulling that over grown ******* out of the South West Santa Rosa Area, holler at me and I will help you drag it up. Might let you drive the 5.8 Ranger too if you ask nice enough. :eek:)

Adam
 
Joined
Jun 28, 2011
Messages
1
Hi folks Im new here and not even sure if Im posting this the proper way but here goes. I was recently given an old vise which belonged to my grandad. To me this is a great honor to be trusted with such a piece of my own personal history. Anyway its a Columbian Vise and Mfg Co. model 604 1/2. Id like to try to figure out how old it is and most of all how to replace the jaws. The jaws do not have screws in the face but appear to be machined to fit in a tear drop shape into the vise itself with three retaining screws or pins ( I cant determine which ) Im seeking knowledge here folks, help a country boy out please
 

autopts

Well-known member
Joined
Jul 4, 2009
Messages
2,268
Hi folks Im new here and not even sure if Im posting this the proper way but here goes. I was recently given an old vise which belonged to my grandad. To me this is a great honor to be trusted with such a piece of my own personal history. Anyway its a Columbian Vise and Mfg Co. model 604 1/2. Id like to try to figure out how old it is and most of all how to replace the jaws. The jaws do not have screws in the face but appear to be machined to fit in a tear drop shape into the vise itself with three retaining screws or pins ( I cant determine which ) Im seeking knowledge here folks, help a country boy out please

Welcome aboard, there is a great thread here about Columbian vises from their early days to the Ken Tool aquiring them and up until Wilton buying the rights. Those jaws are probably held in with pins and they are "T" type jaws. You can go on viseparts.com and they may have them. There is a mahinist on Ebay that is reasonable also. Good luck and post some photos!
 

Catalyze

Well-known member
Joined
Feb 7, 2011
Messages
1,369
Location
New Mexico
Hi folks Im new here and not even sure if Im posting this the proper way but here goes. I was recently given an old vise which belonged to my grandad. To me this is a great honor to be trusted with such a piece of my own personal history. Anyway its a Columbian Vise and Mfg Co. model 604 1/2. Id like to try to figure out how old it is and most of all how to replace the jaws. The jaws do not have screws in the face but appear to be machined to fit in a tear drop shape into the vise itself with three retaining screws or pins ( I cant determine which ) Im seeking knowledge here folks, help a country boy out please

Greetings!
Look up towards the top of the page and you will see a Search button. Fiddle around and search for Columbian and several posts on working on them should appear to give you an idea what lurks behind those Ohio vises. Make sure to post a photo or two in the Vises of Garage Journal thread. Lots of photos there to give you help or just make you buy more vises.
Craig
 

JRWyckoff

New member
Joined
Nov 22, 2011
Messages
4
Location
North East Alabama
Wilton vise restoration

Finally got the restoration finished on my Wilton C2 vise. Not perfect but alot nicer than I found it! Does anyone know where I can get a emblem for the front of the vise? It is the badge emblem thingy on the front top. Thanks for any input. :thumbup:

Jim
Attalla, AL
 

Attachments

  • 10250_main.jpg
    10250_main.jpg
    17 KB · Views: 133
  • 751.jpg
    751.jpg
    19.3 KB · Views: 147
  • 754.jpg
    754.jpg
    23.3 KB · Views: 134

autopts

Well-known member
Joined
Jul 4, 2009
Messages
2,268
Wilton, as far as I know, will not release that emblem as a part number. Copy this photo, crop it, and print it on some label paper, cut it, and stick it on.

WiltonLabel.jpg
 

kuper02

New member
Joined
Dec 26, 2011
Messages
1
Location
Israel
My contribution for the Thread..

Hi all,
I found this old vice in my Grandpa where-house.
I learned allot form this Thread and I would like to shear with you guys my restoration.. : ]

I still have one thing to do though, I miss the handle part of the Vice.
I'm not sure how to make new one.. If anyone faced this problem before and/or have a good solution of me I will be happy to learn.

Thank's in advance and greeting's from Israel : ]

#1:what I started with.
DSC_3016%20(800x531).jpg


#2:after a week of soaking with WD-40.
DSC_3023%20(800x531).jpg


#3
DSC_3027%20(800x531).jpg


#4:after grinding all the rust and dirt.
DSC_3135%20(800x531).jpg


#5:painting.
DSC_3141%20(800x531).jpg


#6:this one i call "one moving part, one serial bowl, one cat, one eye".
DSC_3147%20(800x531).jpg


#7:final product!!
DSC_3156%20(800x531).jpg
 

filler36

New member
Joined
Jul 12, 2012
Messages
1
Thanks to your resto info, I was inspired to clean up and refurbish my dad' s old vise (also a #9145, also built in 11/56), in preparation for mounting to the workbench I just built. Although my neighbor has a beadblasting cabinet, I chose to just chuck a wire brush in my drill and clean everything off after degreasing it all. All of the hardware is original and cleaned up nicely, and the jaws were in very good shape (surprising, since that vise has taken quite a pounding over the years). Since it was originally orange, I primed it and shot it with Plasti-cote Chevrolet orange engine enamel. This vise will surely outlast the building it' s sitting in. Glad I found this site, and people who appreciate old, good stuff like I do. BTW, there are two of these vises in the family, identical and presumably purchased at the same time. My brother has the other one, which used to be my Grandpa' s. I' ll post a picture of mine as soon as I figure out how to upload; apparently, the jpeg file size is too large. Any suggestions? I am 47 and sometimes electronically- challenged.
 
Last edited:

Blacksmiths Wright

New member
Joined
Aug 2, 2013
Messages
1
Great job evintho, you really went all out. I have a Wilton or two that I should follow your lead. In fact I have one that has some sort of ring on the front of the screw. It really doesn't work in any fashion, I guess it might need to be disassembled and cleaned. Anyone have one like it I would accept your thoughts.:dunno:
 

Mohawk Dave

Well-known member
Joined
Oct 7, 2012
Messages
5,068
Location
SoCal
WOW, old thread bump.

Great job OP. One question, however. Loc-Tite on Jaw screws??? I use anti-sieze. Them suckers can be a PITA to get out, as you know, so I just barely snug mine.

Over the years the phillips or hex or what have you get jacked up, and make it even harder to remove.
 

fishwatcher

Well-known member
Joined
Jan 26, 2023
Messages
754
Great step by step post on your Wilton Cadet restore. This post is over 13 years old and still being read by those looking for restore tips. I've bookmarked this thread for my Cadet restore. Thanks!
 
To avoid these ads, REGISTER NOW!
Top Bottom