
nissan_crawler
Well-known member
Here are the part #'s:
Note the bottom one is for a stainless top, mine was switched to mdf, due to removing it anyway to install the top chest.

and the top:

The bottom box is made by Montezuma solely for strictlytoolboxes.com. That's global72 on here, his name is Shannon, great guy to deal with.
The difference is the second drawer on the far left of the cabinet under the locking drawer is a 4" drawer vs. 2 - 2" drawers on the 17 drawer model.
I chose to upgrade to the spring loaded casters, and personally feel it would be stupid not too. Where my old box teetered with 1/4" under the wheels, this sits level. Run over cracks, or the 3/4" lip into my garage is much easier, as the wheels lift up and let you go over it easier, rather than slamming into them.
On to the pictures. I realize this is more than just a review, but...most people will also have to get it put together in a similar fashion, so I'm providing that info, also. Some may not be able to do it all, due to not having the equipment, or will need to borrow it, I figure posting the process will help people plan for the box's arrival and make things easier.
I drove to Montezuma and picked them up myself. The people there are very nice, and easy to work with.
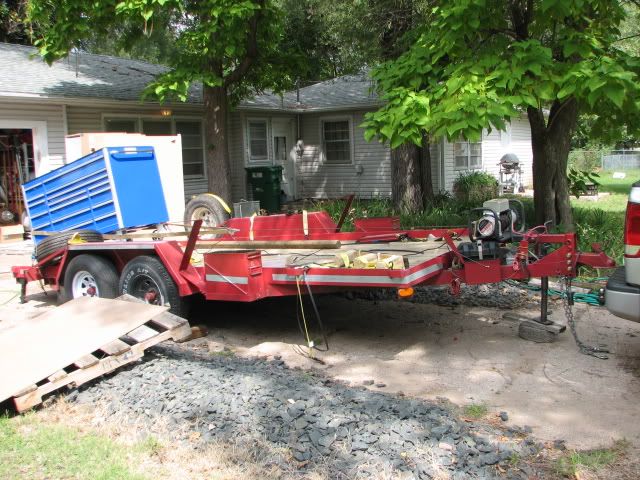
Here's the boxes back at home:

These are packed VERY well, and VERY tight. To take the box of the top chest, I just cut the straps on it, wrapped a chain around it with a boomer to give it a little tension, and hooked it up to the cherry picker with a chain and lifted it off. You could also tear the box down, I just thought this was quick and easy, with no possibility of damaging the toolbox itself.


Unfortunately...here's where my camera batteries were dying and quit taking pictures without me knowing it...so no shots of removing the top box off the trailer...I'll explain how and why later on in another picture.
I had no way of lifting the shipping box off the roller cabinet, so I just broke it down by hand. I removed the wood strips blocking the wheels, and just pushed it off the pallet onto the trailer. This rolls so easy, it was no problem.

I used a lifting sling and the winch to ease it down the ramps. Two guys would be a bare minimum to get this off a trailer with ramps, IMHO.
Now, onto setting the chest on the cabinet. You'll notice the lifting setup...I tried lifting it with just attaching chains from the eye hooks to the cherry picker and slowly lifted. As I had wondered, it was too much side load and it began to bend the top around the threaded inserts, so I quit. If somebody had something that lifted really high and had 5-6' long chains, this might not be an issue. My cherry picker was about maxed out on height as it was, so I needed to keep things as short as possible.
I think Montezuma needs to warn the owner about this. I didn't get much damage due to expecting it, but there is some minor damage, and the next guy might not expect it. I would think the sheer physics of this would make it nearly impossible to make it so they couldn't bend, but again...there should be a warning stating that in the first place.
So, I made this quick lifting setup. Nothing fancy, just one long 2x4 across the box, and two short 2x4's across the ends. I ran 2 3" screws on each side to keep the short boards from sliding around. These don't take weight the way I did it, so this is more than sufficient.
I ran 4 chains between the lift hooks and the short 2x4's, and then wrapped a chain around each end of the long 2x4 to the cherry picker. Doing it this way makes the long board lift on the short ones, which are attached to the chains, no relying on screws for weight.
I also had to clean up the threads on the lifting eyes with a thread file before installing them. They probably could have gone in anyway, but they had some resistance, the threads weren't perfectly machined.
Long story short, it worked great:

Now, onto bolting the top down. It uses 6 large bolts to hold it onto the bottom box. One in each front corner, two about 6" either way from each back corner. You have to pull the bottom drawers of the chest out, and you will have a much easier time if you find a 6'5" 10 year old to reach the bolts in the back. I didn't, so I managed.
Now, here's the next thing I think Montezuma should address. The bolts are provided without washers, which doesn't grip much of the slot. I personally found this unacceptable, and think 6 washers should be provided also. This isn't a big deal, but still.
As provided:

With washer added, much better:

So, that's all done. The next thing was casters. I didn't even think to mention how I wanted them setup, and do to the garage setup, and project vehicle in it, I could only get the box in the garage with them setup one way. They came with the casters at each end and the fixed ones in the center.
I used the lift strap to pick up one side of the box. It had too much stretch and I couldn't lift the box before maxing out the cherry picker, so as you can see, I attached a chain to the strap and the cherry picker frame and used a boomer to get some slack out of the strap before ever lifting the box:

Here's a shot of the wheels:

All together and back on the ground:


Now, onto the features...
Here's a shot of the stiffeners on the bottom of the roller chest:

Here's the stiffeners on the bottom of the long drawers:

Drawer slides:

Locking mechanism:

Warning stickers if anybody cares:

I took the MDF top for the roller cabinet, used a spade bit to countersink some bolts, and bolted it down to the top box using the lifting eye mounts. Might as well, the edges are beveled, corners are rounded nicely, good coating on it, I couldn't bring myself to throw it out.

Here's the box in it's home, you can see how small it makes the 56" International look. Oh, I got the old chevy emblem mounted on it, too.

Drawer shots, this will show which ones come with dual slides, and which ones can have them added. I believe Shannon said the slides run $36/set. He recommends not adding them unless you have the weight, due to the detents being stiff if you don't have much weight in the drawers. You can also see how the sides and back of the drawer are bent 90*, this really stiffens up the drawer.


Here's the pile of packaging left, along with a couple extra pieces of plywood I threw in:

Here's the two boxes that it replaced:


Both of these boxes were plumb full, plus I put other tools in the Montezuma box that weren't in these. I still have 9 drawers completely empty, and many of the others are only 50% full or so, plenty of room to grow.
All in all, this blows Craftsman/International/Waterloo/C-Pro, HF, etc., out of the water, IMHO. If money wasn't an object, I would immediately replace my C-Pro at work with one of these. A guy at work got an $8,000 Snap-On box, and I can't say I was anymore impressed with that than this. I would love to see the difference between this and the Elite series.
Post up any questions you have, or if you want pictures of anything else. I'm not going to take pictures of the tool layout though, everything is just chucked in right now.
Note the bottom one is for a stainless top, mine was switched to mdf, due to removing it anyway to install the top chest.
and the top:
The bottom box is made by Montezuma solely for strictlytoolboxes.com. That's global72 on here, his name is Shannon, great guy to deal with.
The difference is the second drawer on the far left of the cabinet under the locking drawer is a 4" drawer vs. 2 - 2" drawers on the 17 drawer model.
I chose to upgrade to the spring loaded casters, and personally feel it would be stupid not too. Where my old box teetered with 1/4" under the wheels, this sits level. Run over cracks, or the 3/4" lip into my garage is much easier, as the wheels lift up and let you go over it easier, rather than slamming into them.
On to the pictures. I realize this is more than just a review, but...most people will also have to get it put together in a similar fashion, so I'm providing that info, also. Some may not be able to do it all, due to not having the equipment, or will need to borrow it, I figure posting the process will help people plan for the box's arrival and make things easier.
I drove to Montezuma and picked them up myself. The people there are very nice, and easy to work with.
Here's the boxes back at home:
These are packed VERY well, and VERY tight. To take the box of the top chest, I just cut the straps on it, wrapped a chain around it with a boomer to give it a little tension, and hooked it up to the cherry picker with a chain and lifted it off. You could also tear the box down, I just thought this was quick and easy, with no possibility of damaging the toolbox itself.
Unfortunately...here's where my camera batteries were dying and quit taking pictures without me knowing it...so no shots of removing the top box off the trailer...I'll explain how and why later on in another picture.
I had no way of lifting the shipping box off the roller cabinet, so I just broke it down by hand. I removed the wood strips blocking the wheels, and just pushed it off the pallet onto the trailer. This rolls so easy, it was no problem.
I used a lifting sling and the winch to ease it down the ramps. Two guys would be a bare minimum to get this off a trailer with ramps, IMHO.
Now, onto setting the chest on the cabinet. You'll notice the lifting setup...I tried lifting it with just attaching chains from the eye hooks to the cherry picker and slowly lifted. As I had wondered, it was too much side load and it began to bend the top around the threaded inserts, so I quit. If somebody had something that lifted really high and had 5-6' long chains, this might not be an issue. My cherry picker was about maxed out on height as it was, so I needed to keep things as short as possible.
I think Montezuma needs to warn the owner about this. I didn't get much damage due to expecting it, but there is some minor damage, and the next guy might not expect it. I would think the sheer physics of this would make it nearly impossible to make it so they couldn't bend, but again...there should be a warning stating that in the first place.
So, I made this quick lifting setup. Nothing fancy, just one long 2x4 across the box, and two short 2x4's across the ends. I ran 2 3" screws on each side to keep the short boards from sliding around. These don't take weight the way I did it, so this is more than sufficient.
I ran 4 chains between the lift hooks and the short 2x4's, and then wrapped a chain around each end of the long 2x4 to the cherry picker. Doing it this way makes the long board lift on the short ones, which are attached to the chains, no relying on screws for weight.
I also had to clean up the threads on the lifting eyes with a thread file before installing them. They probably could have gone in anyway, but they had some resistance, the threads weren't perfectly machined.
Long story short, it worked great:
Now, onto bolting the top down. It uses 6 large bolts to hold it onto the bottom box. One in each front corner, two about 6" either way from each back corner. You have to pull the bottom drawers of the chest out, and you will have a much easier time if you find a 6'5" 10 year old to reach the bolts in the back. I didn't, so I managed.
Now, here's the next thing I think Montezuma should address. The bolts are provided without washers, which doesn't grip much of the slot. I personally found this unacceptable, and think 6 washers should be provided also. This isn't a big deal, but still.
As provided:
With washer added, much better:
So, that's all done. The next thing was casters. I didn't even think to mention how I wanted them setup, and do to the garage setup, and project vehicle in it, I could only get the box in the garage with them setup one way. They came with the casters at each end and the fixed ones in the center.
I used the lift strap to pick up one side of the box. It had too much stretch and I couldn't lift the box before maxing out the cherry picker, so as you can see, I attached a chain to the strap and the cherry picker frame and used a boomer to get some slack out of the strap before ever lifting the box:
Here's a shot of the wheels:
All together and back on the ground:
Now, onto the features...
Here's a shot of the stiffeners on the bottom of the roller chest:
Here's the stiffeners on the bottom of the long drawers:
Drawer slides:
Locking mechanism:
Warning stickers if anybody cares:
I took the MDF top for the roller cabinet, used a spade bit to countersink some bolts, and bolted it down to the top box using the lifting eye mounts. Might as well, the edges are beveled, corners are rounded nicely, good coating on it, I couldn't bring myself to throw it out.
Here's the box in it's home, you can see how small it makes the 56" International look. Oh, I got the old chevy emblem mounted on it, too.
Drawer shots, this will show which ones come with dual slides, and which ones can have them added. I believe Shannon said the slides run $36/set. He recommends not adding them unless you have the weight, due to the detents being stiff if you don't have much weight in the drawers. You can also see how the sides and back of the drawer are bent 90*, this really stiffens up the drawer.
Here's the pile of packaging left, along with a couple extra pieces of plywood I threw in:
Here's the two boxes that it replaced:
Both of these boxes were plumb full, plus I put other tools in the Montezuma box that weren't in these. I still have 9 drawers completely empty, and many of the others are only 50% full or so, plenty of room to grow.
All in all, this blows Craftsman/International/Waterloo/C-Pro, HF, etc., out of the water, IMHO. If money wasn't an object, I would immediately replace my C-Pro at work with one of these. A guy at work got an $8,000 Snap-On box, and I can't say I was anymore impressed with that than this. I would love to see the difference between this and the Elite series.
Post up any questions you have, or if you want pictures of anything else. I'm not going to take pictures of the tool layout though, everything is just chucked in right now.
Last edited:


