

CarQuestions
New member
Greetings,
In an effort to give back to the community I figured that I would do a quick report on the results of the "Double Bubble Foil Insulation"
Bottom line at the top...mildly satisfied with the result.
Building and Insulation:
I have a 60 foot by 50 foot steel building in Arizona and it has beige walls, a white roof, 14 foot side walls with a 1 to 12 slope roof pitch. I installed the Insulation Stop double bubble product with foil on one side and white plastic material on the other side. I installed this product with the foil side toward the outside of the building and the white surface toward the inside of building interior.
The building is ventilated by a Mastercool AS2C7112 7000 CFM Evaporative Cooler.
Installation Technique:
For the side walls and also the roof I used double stick tape to apply the insulation to the interior surface of the building. First I cleaned the metal surface really good with isopropyl alcohol and made sure the surface was completely clean.
The first attempt at the double stick tape was a fail because I used a double stick tape from Gradient Guard called "Double-Sided Tape (1.5 in X 180 ft) × 15" and the side wall insulation fell of on the second day.
I ended up calling Echo Tape directly and they supplied their product called DC-U032A 1.89 in x 54.6 yd / 48mm x 50m and it is a double stick tape with yellow peel off backing. This tape adheres very nicely to the side walls and the roof and so far none of it has come loose. Of course it's in the summer time so it's extremely hot and who knows what the effect will be once it gets cold here.
The sidewalls I purchased enough insulation for two layers.
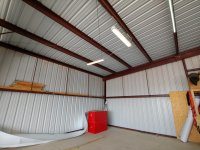
The ceiling is a single layer however I cut the material wide enough so that it drapes down about 3 inches in the middle of the purlin bays and this provides the recommended air gap between the roof panel and the insulation foil.
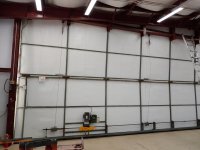
The side walls look really good (yes I should have used furring strips to create an air gap between the side walls and the wall panels).
The ceiling installation was really difficult to make it look clean and "pretty" because the material is not as flexible as you would think and the material if you make any kind of crease in it as you lift it up to the ceiling that crease will show as a HUGE wrinkle and this was amplified because I wanted to have the material drape down to create the air gap so I am not too happy with the look of the ceiling.
See attached before and after pictures.
Cost:
The double foil insulation cost $2300.00 delivered plus $400.00 for the double stick tape plus $400.00 for the scissors lift for a total of $3200.00.
I had received quotes for the fiberglass batt insulation with a white poly surface on one side and the quotes for the material alone was $6500.00 to $7500.00.
Time:
I ordered insulation that was close to the width that I needed for the sidewalls and the roof purlin bays however I still need to cut off a slight amount to get them to fit in the appropriate spaces. It take a great deal of time to roll out the bubble wrap and foil material, measure, draw the line, cut down the line, then place one strip of double stick tape down the entire length of the material both on the top edge and the bottom edge of the insulation material (left and right edge for the roof material). To save time on the rental of the scissors lift I cut and taped the material before I got the scissors lift. Working by myself it took about 4 days to cut the rolls and stick the tape. The Schweiss bifold door was the biggest PITA to cut out the material and most time consuming to install.
I rented the scissors lift for 5 day rental at Home Depot because I was also installing my LED lights in the ceiling (BTW The LED are great...I got a pile of old florescent lights if you want them).
In other words it was a TWO WEEK HOT AS HELL PROJECT!!!
Post Installation Results:
Prior to installing the insulation the building had no insulation system at all and the bare metal would radiate about a gazillion BTUs of heat into the building to the point where it was hotter inside the building with the door open then outside. Here in Southern Arizona we have a lot of sun so the daytime temperatures get to 110 F. Even with my Mastercool Evaporative cooler running the interior temp of the building was 115 F all day long.
The double bubble foil has significantly dropped the interior temperature of the building. Previously the sidewalls would be very hot to the touch and now they feel very slightly warm but not cool.
With the evaporative cooler running the interior of the building compared to the exterior outside air temperature produces the following stats:
TIME
OUTSIDE AIR TEMPERATURE
INSIDE AIR TEMPERATURE
EVAPORATIVE COOLER DISCHARGE TEMPERATURE (DEW POINT)
0930
99
77
74
1030
101
81
73
1230
105
83
74
1330
105
83
74
1430
107
84
73
Bottom Line At The Bottom:
So the bottom line is it has reduced the amount of heat entering the building and it was a more economical option than getting the building insulated with fiberglass batt however all-in-all I should have simply spent more money on the fiberglass and had somebody install it.
In an effort to give back to the community I figured that I would do a quick report on the results of the "Double Bubble Foil Insulation"
Bottom line at the top...mildly satisfied with the result.
Building and Insulation:
I have a 60 foot by 50 foot steel building in Arizona and it has beige walls, a white roof, 14 foot side walls with a 1 to 12 slope roof pitch. I installed the Insulation Stop double bubble product with foil on one side and white plastic material on the other side. I installed this product with the foil side toward the outside of the building and the white surface toward the inside of building interior.
The building is ventilated by a Mastercool AS2C7112 7000 CFM Evaporative Cooler.
Installation Technique:
For the side walls and also the roof I used double stick tape to apply the insulation to the interior surface of the building. First I cleaned the metal surface really good with isopropyl alcohol and made sure the surface was completely clean.
The first attempt at the double stick tape was a fail because I used a double stick tape from Gradient Guard called "Double-Sided Tape (1.5 in X 180 ft) × 15" and the side wall insulation fell of on the second day.
I ended up calling Echo Tape directly and they supplied their product called DC-U032A 1.89 in x 54.6 yd / 48mm x 50m and it is a double stick tape with yellow peel off backing. This tape adheres very nicely to the side walls and the roof and so far none of it has come loose. Of course it's in the summer time so it's extremely hot and who knows what the effect will be once it gets cold here.
The sidewalls I purchased enough insulation for two layers.
The ceiling is a single layer however I cut the material wide enough so that it drapes down about 3 inches in the middle of the purlin bays and this provides the recommended air gap between the roof panel and the insulation foil.
The side walls look really good (yes I should have used furring strips to create an air gap between the side walls and the wall panels).
The ceiling installation was really difficult to make it look clean and "pretty" because the material is not as flexible as you would think and the material if you make any kind of crease in it as you lift it up to the ceiling that crease will show as a HUGE wrinkle and this was amplified because I wanted to have the material drape down to create the air gap so I am not too happy with the look of the ceiling.
See attached before and after pictures.
Cost:
The double foil insulation cost $2300.00 delivered plus $400.00 for the double stick tape plus $400.00 for the scissors lift for a total of $3200.00.
I had received quotes for the fiberglass batt insulation with a white poly surface on one side and the quotes for the material alone was $6500.00 to $7500.00.
Time:
I ordered insulation that was close to the width that I needed for the sidewalls and the roof purlin bays however I still need to cut off a slight amount to get them to fit in the appropriate spaces. It take a great deal of time to roll out the bubble wrap and foil material, measure, draw the line, cut down the line, then place one strip of double stick tape down the entire length of the material both on the top edge and the bottom edge of the insulation material (left and right edge for the roof material). To save time on the rental of the scissors lift I cut and taped the material before I got the scissors lift. Working by myself it took about 4 days to cut the rolls and stick the tape. The Schweiss bifold door was the biggest PITA to cut out the material and most time consuming to install.
I rented the scissors lift for 5 day rental at Home Depot because I was also installing my LED lights in the ceiling (BTW The LED are great...I got a pile of old florescent lights if you want them).
In other words it was a TWO WEEK HOT AS HELL PROJECT!!!
Post Installation Results:
Prior to installing the insulation the building had no insulation system at all and the bare metal would radiate about a gazillion BTUs of heat into the building to the point where it was hotter inside the building with the door open then outside. Here in Southern Arizona we have a lot of sun so the daytime temperatures get to 110 F. Even with my Mastercool Evaporative cooler running the interior temp of the building was 115 F all day long.
The double bubble foil has significantly dropped the interior temperature of the building. Previously the sidewalls would be very hot to the touch and now they feel very slightly warm but not cool.
With the evaporative cooler running the interior of the building compared to the exterior outside air temperature produces the following stats:
TIME
OUTSIDE AIR TEMPERATURE
INSIDE AIR TEMPERATURE
EVAPORATIVE COOLER DISCHARGE TEMPERATURE (DEW POINT)
0930
99
77
74
1030
101
81
73
1230
105
83
74
1330
105
83
74
1430
107
84
73
Bottom Line At The Bottom:
So the bottom line is it has reduced the amount of heat entering the building and it was a more economical option than getting the building insulated with fiberglass batt however all-in-all I should have simply spent more money on the fiberglass and had somebody install it.
Attachments



Last edited: