To avoid these ads, REGISTER NOW!

VCT install pics - start to finish

dipper

Well-known member
Joined
Jun 27, 2007
Messages
759
Location
Rochester, NY
Well I finally got around to installing my VCT tile this weekend after looking at it in the garage for about a year. My choice to do VCT was made easy about a year ago when my brother said he couldn't use it (was moving to a new house); so we moved it to my garage instead. :)

Products:
Mannington Brushwork Granito #702 (14 cases, plenty to do my 440sf)
http://207.245.65.105/commercial/Colorway.aspx?id=2011
Armstrong S-750 VCT Adhesive (2 Gallons, was plenty of adhesive for 440sf)
Trowel (i used what was suggested on the S-750 packaging)
Mineral Spirits (for cleanup)

Tools:
100lb flooring roller (rental from local place, $32 for 1.5 days)
Chalk Line
Utility Knife
Straight edge
Cutting board (scrap plywood or 2x6 worked good)


Instructions:
Thanks to fellow member ssleepingbeauty for his posts/comments on how to properly install VCT. Here's a link to a comment he made in another thread the I used, refer to post #10.
http://www.garagejournal.com/forum/showthread.php?t=33284

I had to move all my stuff on the floor into one corner, couldn't leave stuff outside so had to do it in two parts. Lay out the line so i had approximately 6" cuts on all 4 sides. Apply adhesive - full spread with recommended trowel and let dry for 1-2 hours.

all stuff in one corner :shocking: (notice the 2'x4' stack of suspended ceiling tiles, that is the next big project ;) )
DSC04181.jpg


glue applied - notice dark black line to lay first row against.
DSC04178.jpg


DSC04180.jpg


Start by "laying the line" as termed by ssleepingbeauty
DSC04182.jpg


DSC04183.jpg


Then start laying the field tile - i found the corners fit together better if they were layed down diagonally and working across the floor, instead of going row by row.
DSC04184.jpg


DSC04186.jpg


DSC04188.jpg


DSC04191.jpg


DSC04192.jpg


DSC04210.jpg


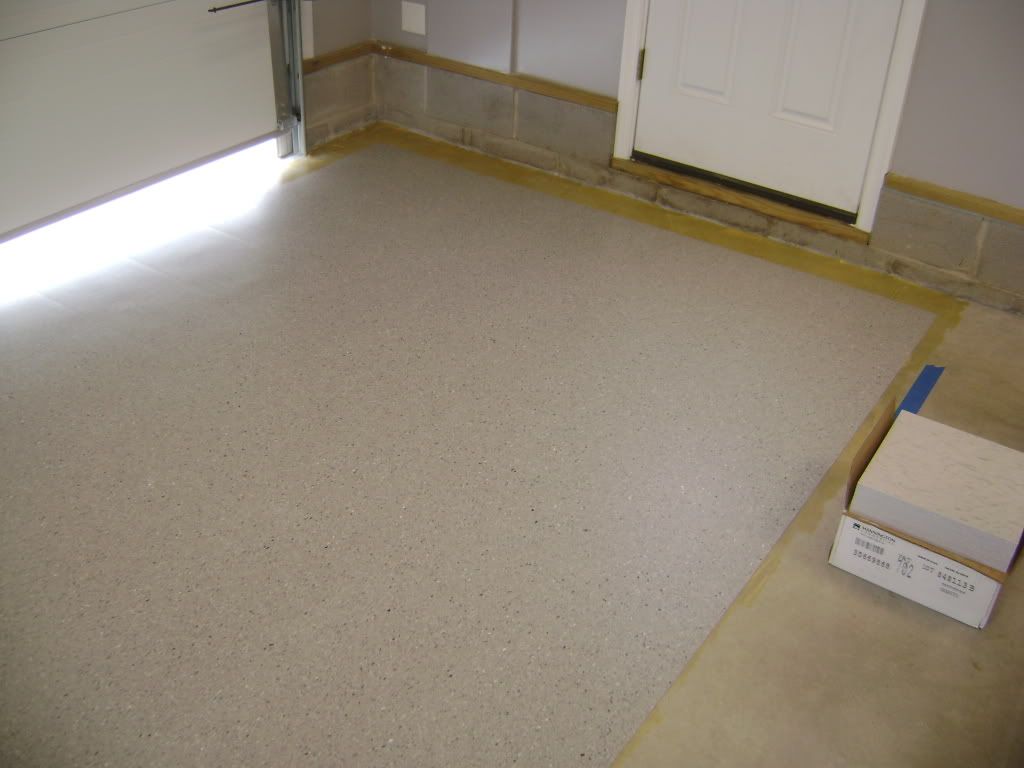
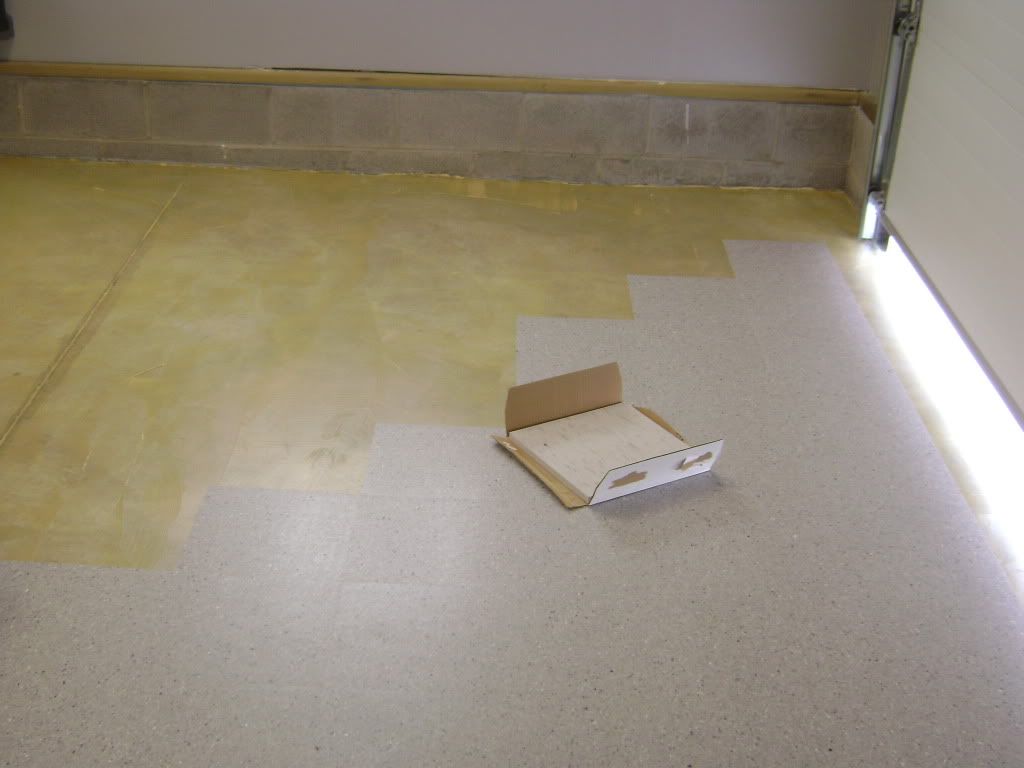
Cutting and fitting the ~6" edge tiles was easy using the overlay and mark method used in most tile installations. Cutting the tile was easily done with a good utility knife to score the tile and then break the piece in half.
DSC04197.jpg


DSC04198.jpg


DSC04227.jpg


The flooring roller was nice to make sure all the tile was down good and stuck to the glue. It was a $32 dollar rental for 1.5 days from a local Taylor Rental.
DSC04200.jpg


The floor turned out great and is going to be sooooo much easier to clean than the bare concrete I had before.
DSC04218.jpg


I am also using construction adhesive to apply the flooring to the stem wall and covering up the pressure treated 2x6 sill plate. I am going to use a piece of aluminum angle channel to cover up the top corner of the stem wall.
DSC04234.jpg


DSC04235.jpg


I am going to continue working on the stem wall this week.
The edge of the flooring that runs underneath the garage door seal will have a 3/4" carpet type aluminum trim that will get screwed into the concrete.

I will post more pics here as I progress on finishing up the floor, but it has turned out sweet so far.
 
Last edited:
To avoid these ads, REGISTER NOW!

jayoldschool

Well-known member
Joined
Apr 23, 2006
Messages
2,119
Location
Canada
Thank you! I will be tackling my install soon, and this is great inspiration. After seeing yours, I am reconsidering my pattern and may go one color with a border.

I, too, have stuff that can't stay outside. I suppose the cars can stay out for a couple of days (gasp - some haven't spent a night out for over ten years!). Did you just move the stuff to one corner, then move it onto the new tile to tile where the stuff was?
 

G-force

Well-known member
Joined
Jul 2, 2006
Messages
739
Location
Oregon
Nice job!

It looks like you chose not to alternate direction of the grain. It kinda looks like epoxy.
 
OP
D

dipper

Well-known member
Joined
Jun 27, 2007
Messages
759
Location
Rochester, NY
I, too, have stuff that can't stay outside. I suppose the cars can stay out for a couple of days (gasp - some haven't spent a night out for over ten years!). Did you just move the stuff to one corner, then move it onto the new tile to tile where the stuff was?

Yup, I pretty much did 3/4 of the floor, then rolled it real good, and then moved all my stuff into the opposite corner and in front of the garage door and then finished up the last 1/4 of the floor. Definitely make sure you rent a roller, it makes sure all the tile is down good.


It looks like you chose not to alternate direction of the grain. It kinda looks like epoxy.

Correct, i decided it would be too confusing to try to alternate the grain of the tile. In fact, out of the 440sf, there were 2 tiles that just didn't look right. I figured maybe i put one in backwards so decided to pull the tile back out. The tile was in the right direction but was probably manufactured differently or something. I put a new tile in it's place and all was good.


Thanks for all the compliments.
 
OP
D

dipper

Well-known member
Joined
Jun 27, 2007
Messages
759
Location
Rochester, NY
Thank you! I will be tackling my install soon, and this is great inspiration. After seeing yours, I am reconsidering my pattern and may go one color with a border.

I was originally thinking about doing a checkerboard pattern, but that would have required me buying about 6 cases of red tile. I decided it would be best to not spend the extra money and just do it a solid color. All in all, i've spent about $100 on this floor so that works out to about $0.044 per square foot. Not too bad ;)

If you like the one color, having a border to accent it on the outside sounds like a good idea.
 
OP
D

dipper

Well-known member
Joined
Jun 27, 2007
Messages
759
Location
Rochester, NY

Thank you for all your help. I still have some work to do on it, but it's getting close. I have almost all the stem wall finished. I just have to clean and polish the floor and then move some stuff out of the way. I have the transition strip and anchors now too, I just have to drill about 32 3/16" x 1" holes in my concrete floor :(

My plan is to have it all finished up my mid october or so cause I gotta either replace the broken fuel pump in my truck or push it back into the garage before the snow starts flying here.

here's a couple of more pics - I also have some Dupont w/Kevlar Light gray caulk that will fill in the gap between the floor and the wall.

DSC04244.jpg


DSC04246.jpg
 

tstang90

Well-known member
Joined
Sep 27, 2009
Messages
108
very nice floor. How is it holding up so far?

What happens with spills? It doesnt go under the tiles right?
 

metal1313

Well-known member
Joined
Apr 28, 2009
Messages
3,416
Location
clinton NJ
once the tile is sealed its very hard for anything to get under it. i love vct, but certain heavy objects with small contact areas can sink/cut into it. more than likely i'll prob lay it down in my garage, but i want to go with a textured tile
 

jayoldschool

Well-known member
Joined
Apr 23, 2006
Messages
2,119
Location
Canada
I forgot to ask: did you consider the S-515 moisture resistant adhesive? I am going to try it on my job...
 
To avoid these ads, REGISTER NOW!
OP
D

dipper

Well-known member
Joined
Jun 27, 2007
Messages
759
Location
Rochester, NY
We own a flooring business and I must say, you did a great job laying that tile. How's it holding up so far?

Welcome to the board!! It's holding up great. It's been raining alot here lately so I didn't get chance to get the edge trim installed until last night. Now I have to get it all cleaned up and get some polish on the floor to protect it. I will hopefully spend some time out there this weekend working on polishing to floor.

So far I am impressed with how good it looks, and how easy it is to keep clean. It should be even easier once polished too.
 

jayoldschool

Well-known member
Joined
Apr 23, 2006
Messages
2,119
Location
Canada
I brought my tile home yesterday! I will get at it next weekend. I ordered the S-515 adhesive, and that doesn't come in until Thursday.
 

BerBer5985

Well-known member
Joined
Oct 9, 2009
Messages
175
Location
Crofton, MD
Another good adhesive if you're looking for something decent and may be a little cheaper would be the Taylor 2033 VCT adhesive. We've used this for years and has always proven to be consistently great. Just a thought. I'm actually covering my work bench in VCt as we speak. I saw someone on here did that with a blue and black tile and it looked really nice. A much better look than the knife engraving of certain 4 letter words (hey, I found this thing outside of a dumpster and it was great for what I needed).
 

glennm

Well-known member
Joined
Jul 29, 2009
Messages
207
Yup, was me that did my workbench with blue/black. Very quick and easy. One coat of sealer and it looks much, much better than the MDF that was stained and beat up. If you cut the tiles, I found using the table saw and cutting them face down worked a little better. Found a nice small metal trim strip for the front at HD for about 7$ -- total cost around $30 !!!
 
OP
D

dipper

Well-known member
Joined
Jun 27, 2007
Messages
759
Location
Rochester, NY
How did you fill those expansion joints in the floor so the tile dosen't break at the joint?

It was a DAP self leveling concrete filler from home depot. They had some cheaper $3 tubes and some more expensive $7 tubes. I went with the $7 tubes, it dries yet still retains some flexibility. I just used a putty knife to smooth it out a little.
 
OP
D

dipper

Well-known member
Joined
Jun 27, 2007
Messages
759
Location
Rochester, NY
Here's a four month update on the floor. I've got some pics of it all polished up.

I am so glad I decided to go with the VCT. I had to do a water pump and power steering pump on my daily driver last week and had to move the truck out into the snow bank so I could work on it in the warmth. My car was in there for a few days and did drip a bunch of oil, antifreeze, grease, grime and gunk all over the floor. It cleaned up so easily and looks just like new :beer:.

Here's a few polished pictures.
DSC04299.jpg


DSC04300.jpg


DSC04301.jpg
 

scottbabu

Member
Joined
Sep 11, 2008
Messages
12
Is the floor slick when it gets wet?
I was thinking of doing VCT but adding a clear sealer on top with an anti-slip additive like Sharks Grip. Can you put a wter based sealer on top of VCT?
 
OP
D

dipper

Well-known member
Joined
Jun 27, 2007
Messages
759
Location
Rochester, NY
Is the floor slick when it gets wet?
I was thinking of doing VCT but adding a clear sealer on top with an anti-slip additive like Sharks Grip. Can you put a wter based sealer on top of VCT?

Yes it does get pretty slick. In my case I don't use it to park any daily drivers in so it isnt like it gets wet all the time. I did a couple of autostarts in early december last year and the melting snow off a car had to be mopped up or squeeged out the door. But it's not too bad, and in my case i'm not pulling cars in/out all winter. I pretty much park my truck in there in and it stays.

Not sure about any clear sealer you could put on it. I would probably do a clear epoxy and you could probably add something to that to make it non-slippery. A few on here have done the clear epoxy, and then you don't have to polish the floor either. I would be curious to see how the anti-slip would affect when you sweep the floor?
 

Nealcrenshaw

Well-known member
Joined
Mar 20, 2008
Messages
3,401
Location
Cleveland,OH
According to SSbeauty posts am i correct where he says to cover the entire floor with glue then start laying the tiles downs or is it as you go? I couldn't really tell by the pics?
 

Kevin54

MEMBER EMERITUS
Joined
Jan 12, 2005
Messages
29,341
Location
Urbana, Ohio
Wow !! I haven't seen this thread until now. Very nice job Dipper.:thumbup: The more I see it, the more I am leaning towards VCT. I was leaning towards the standard black & white if I went with tile, but what you put down gives it a super clean look as it is not too busy. I Like It :bowdown:
 

ssleepingbeauty

Well-known member
Joined
Jan 17, 2006
Messages
106
Location
Washington
According to SSbeauty posts am i correct where he says to cover the entire floor with glue then start laying the tiles downs or is it as you go? I couldn't really tell by the pics?

Spread the entire area that you think you can do that day. Let the glue completely dry before starting to lay any tile. A fan speeds up the dry time 10 fold.

P.S. Also snap your chalk line before gluing. Spray the chalk line with some clear. Don't tell your wife, but hairspray also works:bounce: Then you can glue right over the line without it getting wiped away or smeared from the glue:thumbup:
 
OP
D

dipper

Well-known member
Joined
Jun 27, 2007
Messages
759
Location
Rochester, NY
Thanks for all the comments guys. I will post some more pictures in the future.

If anyone is interested, I have 2 full unopened cases of this tile leftover that I don't need, total square footage would be 90 (45 sqft per case).
Free to the first person who wants it and wants to pay for shipping. Not exactly sure on weight, but each case is probably 50-60 pounds. PM me for more details.
 

Auzivision

Well-known member
Joined
Oct 6, 2009
Messages
252
Location
Hoosier State
This is an awesome thread worthy of a sticky. I don’t understand why searching on “VCT” results in zero matches, yet there are tons of threads on the topic. This is one of my favorites so far.

Also, I’m really sold on the single color over the checkerboard pattern… nothing against the checkerboards, just my opinion. I’m thinking solid color with a boarder or something. Anyone have pictures or other ideas?
 
To avoid these ads, REGISTER NOW!
Top Bottom