To avoid these ads, REGISTER NOW!

My modest dream come true

BertoBuckeye

Well-known member
Joined
Dec 21, 2013
Messages
66
OK y'all. Long time reader on this page, I've learned a few things but I know I have a LOT more to learn. I'm generally handy around the house, taking on projects but putting together a building is a new endeavor. Though I did not do the ground work, nor the building, but I will be doing the finishing/electric.

So, been saving for over 11 years, we bought this house 5 yrs ago with the idea of putting a shop on the property. Though I'm finding out now that maybe the terrain wasn't ideal, but thats life. And anything can be fixed if you throw enough money at it, right?

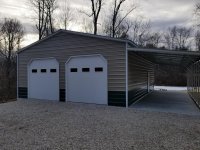
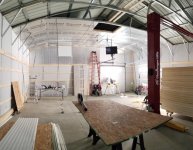
I'm going for a 30x40 metal building (square tube / carport), 12ft tall. On one of the 40 ft sides it will have a 12ft wide lean-to for trailer parking and over flow of vehicles that don't 'need' to be inside (like the truck).

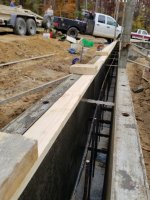
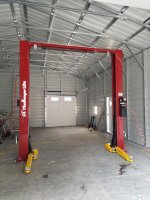
A 2 post lift and a 4 post lift are in the plans. the 4 post will be mainly for parking purposes and will be later on down the road. However, the 2 post will be installed as soon as the shop is up. Already put a deposit down on a Challenger CL-10. The locations for the posts have already been determined and those spots have a 8" thick concrete with rebar. Better safe than sorry.

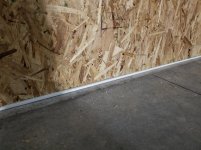
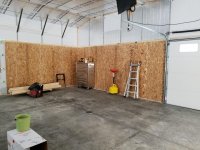
The shop will be insulated and 'finished' inside, I've heard this can be a challenge but it is what it is. I chose a metal building because we live in the woods and everything here wants to eat our house. And I did not want to deal with the typical pole barn that is common around here because of the fear of rotten posts in the future. I know there are so many options to protect against it but there is really no proof on which one is best. And the older I get the less I'll want to deal with a rotten post.

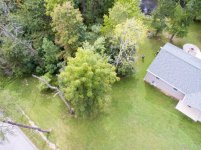
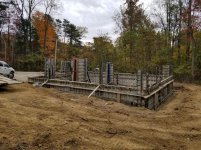
So attached is a picture of the build site, its south of the house, and there are a considerable amount of trees to clear. Additionally we are on a bit of a slope.

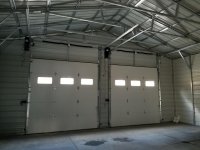
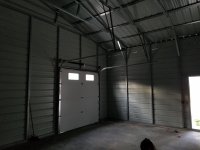
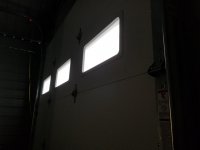
So the building.... it will have 2 10x10 doors in the front and one 8x8 door in the back. I did not get the roll up doors offered by the building and decided to go with a panel door with a high rise rail. They are easier to insulate and probably better quality than what is included with the building.

I am a bit paranoid about security so the smaller door towards the back will allow me to leave the front doors closed from prying eyes, but the back door open with view of the pond, while I'm out there working. And easier access to the mower.
 

Attachments

  • Building Rendering.jpg
    Building Rendering.jpg
    14.8 KB · Views: 319
  • DJI_0036-low res.jpg
    DJI_0036-low res.jpg
    155.5 KB · Views: 405
Last edited:
To avoid these ads, REGISTER NOW!
OP
B

BertoBuckeye

Well-known member
Joined
Dec 21, 2013
Messages
66
Considering that the spot for the property is on a slope....After talking to a few contractors there were really 3 options:

1) the least expensive way. Put a stone pad, level it and pour a slab on it and hope that it doesn't end up down hill over time.
2) putting a real foundation down and then building up a block wall to keep everything together.
3) slightly more expensive option, formed concrete walls.


Honestly, I was blown away at the cost to have this work done. I know the clearing is expensive, I know concrete is expensive, but the whole package. wow. We ended up going with the concrete walls. I really liked the contractor's professionalism and attention to detail and the price really wasn't that much more than block walls.

It ended up being the right choice too because he was able to make a feature at the top of the wall. In one of the images you will see the detail. The rail for the building will sit on top, then the sheeting for outer covering will overlap the wall (~3/4"). Then the rest of the wall slopes outward to let the water drain away. Also this makes sure the concrete anchors used aren't to close to the edge of the wall.

Him and the excavator really did a kick **** job. We get a lot of water coming down the hill when it rains hard. The excavator put in a nice feature between the shop and the house to carry the water away.

Also for the driveway, we had the county put in the culvert. Went with a 40ft wide culvert to make it easier to back in the trailer. The contractors pretty much all recommended to have the culvert put in by the dept of highway for the county. They get the culvert at wholesale price and don't charge tax. its cheaper than they can do it.

The concrete for the interior slab is 4000 psi with fiber. We dug 2 8" deep pockets with rebar for where the 2 post lift will be. The external slab is slightly different. Its 4000psi but has no fiber but does have metal mesh in it.

I put 2 drains in. One in the 'parking' side of the shop, and then one in the back section of the shop. There is no drain under the lift. The drains I found were pretty darn neat. They have a little catch basin in them. Which will come in handy if I drop a bolt in there.
 

Attachments

  • 20191024_135723.jpg
    20191024_135723.jpg
    150 KB · Views: 447
  • 20191024_135831.jpg
    20191024_135831.jpg
    105.9 KB · Views: 440
  • 20191025_152257.jpg
    20191025_152257.jpg
    146.2 KB · Views: 452
  • 20191025_153847.jpg
    20191025_153847.jpg
    149.9 KB · Views: 456
  • 20191104_162138.jpg
    20191104_162138.jpg
    150.9 KB · Views: 498
OP
B

BertoBuckeye

Well-known member
Joined
Dec 21, 2013
Messages
66
Now i'm at the point where i'm waiting for the concrete to cure. Hopefully in a few weeks the building folks come in and put the building up before xmas 
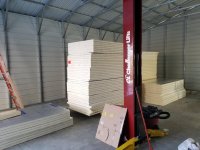
so I can work on it over our holiday break. I'm starting to look at some items ideas for how to address some concerns while the building is being put up, how can I prepare. Questions i'm starting to think about. The building will have bubble wrap insulation under the ceiling as a starting point. As i Insulate the barn i will also add foam board insulation.

1) I want to seal and possibly isolate the metal frame from the concrete. While I believe it will stay dry, and have great drainage. I also upgraded the gauge of the tubing from 14gauge to 12gauge. I still want to try and minimize the risk of rust and also seal that joint between the rail and the somewhat uneven concrete wall its sitting on. I've been looking into a 'sill plate gasket' to set the rail on.
2) Likewise I also want to seal where the sheet metal overlaps the 3/4" vertical lip on the concrete wall. The building sheets will be horizontally ribbed so I don't have to worry about using the foam that is formed to the metals ridges. What is the best material to use here? In theory the sill plate gasket is wide enough that I could fold it around the corner and downwards to seal that up too. I'm just not sure its thick enough for that.

3) What if anything should I be looking to have them seal the roof joints with? or the sheet metal with?
 

Landroving

Member
Joined
Jun 20, 2017
Messages
18
Location
British Columbia
I'm loving this build. I live in an arid area now, but previous dealt with a lot of humidity and rainfall issues with past garages... so suffice to say I'm really digging all the efforts being made to buttress this garage against the onslaught of dihydrogen monoxide.
 
OP
B

BertoBuckeye

Well-known member
Joined
Dec 21, 2013
Messages
66
OK here we go. The Structure is up!

A crew of 4 came in and was able to complete the building in one day. I realize this is all they do but the efficiency was pretty damn incredible.

There were 3 things I needed to accomplish, working around the crew while they worked.
- I added a sill plate gasket/foam to the underside of the rail that sits on the concrete. The idea is to have this keep any potential critters/insects out, but also if there is any moisture that comes up through the concrete, the metal won't come in contact. I know its galvanized steel but the foam is so cheap, no brainer.
- I added aclosed foam 3/4" strip to the lip feature in the concrete. Again adding some more sealing once the metal sheeting is put on the outside.
- I added 1/8" foam tape to every frame section that faced outwards. The idea being that since the sheeting is steel, any heat would conduct in through the frame. So the foam tape is to work as a thermal break.

I was working REAL hard to not slow these guys down. I knew if I did they'd charge me extra for labor so it was a very long day.

All in all i'm happy with the construction. The building is rated for the snow and wind in the area. Plus I shortened the spacing on the framing and upgraded to 12 gauge so hopefully its a little more robust than most car ports.

Gutters are going to be a bit of a challenge, I've hired someone to do seamless ones so we'll have to see how he makes that work. Doors with Jackshaft openers will be in tomorrow. Very excited to get doors on, right now its just a big picnic shelter.

I'm in process of planning out how I will insulate the inside and frame it out. Still a but unsure of how to do it. Also looking for ways to secure the 'mobile home' door that came with the building.
 

Attachments

  • 20200114_100245.jpg
    20200114_100245.jpg
    146.8 KB · Views: 523
  • 20200114_100214.jpg
    20200114_100214.jpg
    143.8 KB · Views: 589
  • 20200113_131840.jpg
    20200113_131840.jpg
    131.5 KB · Views: 545
  • 20200113_150811.jpg
    20200113_150811.jpg
    153.9 KB · Views: 603
Last edited:

LXCam

ALLIANCE MEMBER
Joined
Apr 23, 2013
Messages
19,075
Location
AZ
I’ve got a carport style shop and have seen several on here. But yours certainly is one of the top two, nice job bud!
 

Pluribus

Well-known member
Joined
Dec 16, 2012
Messages
2,143
Location
Skagit County, WA
My guess is you won't regret doing the concrete the way you did, even if it was more expensive. Nice attention to detail, too. Isn't it amazing that a building can go up in one day?
 
OP
B

BertoBuckeye

Well-known member
Joined
Dec 21, 2013
Messages
66
Ok doors in.

Went with high lift track with liftmaster 8500w for the main doors. Love these openers. So quiet, wifi, battery backup, and a dead bolt feature. Honestly a bit of a mistake on my part, I told the contractor to put it as high as it'll go. Didn't think it would be THAT high. The left motor is well into the 4" foam board i plan to put up. I will have to get crafty in that area.

The rear door has no motor. I did a regular track on it since I plan to build a little mezzanine above it for storage.

A little lesson learned. The back door has a 'weather lip' feature in the concrete. It's designed to trap any water that might get past the seal. Well that meant an 8x8 door was slightly too short. He had a track seal on all the doors but on this one he had to add an outdoor seal to get that to work. Somewhat frustrating on a few fronts. I should have asked the guys building the place to put that cross beam an inch lower. But also the contractor came out and looked at the situation to give a quote. Would have expected him to catch that in his measurements. Live and learn.

A new issue, mostly comes with the process of sealing the building. But the white building trim around the door doesn't really seal against the building. So the trim on the top essentially captures water and brings it down to the inside. Well, it's not going to get in the building since it dumps out in front of the garage door but my OCD doesn't like it. Not sure if I should really worry about rust in the area because of that too? The frame is all galvanized so maybe it's no big deal.

Also originally I had the windows at the very top for security reasons but with the doors being so big, and the angles at the top it looked funky so they did me a favor and move the windows down one panel. Working on getting some frosted film for privacy.
 

Attachments

  • 20200122_163548.jpg
    20200122_163548.jpg
    152.3 KB · Views: 378
  • 20200122_163444.jpg
    20200122_163444.jpg
    132.9 KB · Views: 389
  • 20200122_163454.jpg
    20200122_163454.jpg
    118.6 KB · Views: 372

mannydantyla

Well-known member
Joined
Jan 24, 2019
Messages
160
Location
LFK
Very nice!

I'm planning something similar. Can I ask how much you spent on the foundation? More or less than $10k?
 
OP
B

BertoBuckeye

Well-known member
Joined
Dec 21, 2013
Messages
66
Very nice!

I'm planning something similar. Can I ask how much you spent on the foundation? More or less than $10k?

It was a crazy amount, about 3x your value. It was way more than I expected/wanted. And I got plenty of quotes all in the ball park. There was a good chunk that was tree removal. The contractor that did the work overshot the stone budget by 50% too.
 
OP
B

BertoBuckeye

Well-known member
Joined
Dec 21, 2013
Messages
66
Update

- Lesson learned on concrete (potentially). So the outdoor concrete has more air in it (for freezing and thawing). However, the indoor slab has less air since it will not be exposed to weather, allowing for a smoother finish. Well I (and the contractor) hasn't thought about the fact that we poured in November, and needed 28 days worth of curing before we can even attempted to anchor the building to it. Thats all great. except for we're getting into winter and the slab would be exposed. The Ghost shield sealer i bought can't be applied until weather is warmer. So I got some big sheets of plastic to try and keep the slab dry. Of course it worked to a degree. Well after I took the plastic off on build day (January), and then got the floor all cleaned up I noticed a few chip ups. ~4 of them fairly big. (1" across, 3/8" deep), there are more smaller ones. Contractor believes its due to freezing. However many of them have this dark brown (almost like dirt/sand) stuff that I end up having to dig out before patching.

I'm not a concrete expert but this doesn't feel like freezing damage to me. I'm pretty disappointing (mad), I spent a ton of cash in concrete and having a nice finish and it gets jacked up. Live and learn. I did patch the 4 big holes with the rust-o-leum epoxy patch. Lets see how it goes.

- Because its a metal building there are no fascia boards to attach the gutters to. After the seamless gutter contractor came by and talked I put some boards behind the trim. The trim is on very solid and is well supported. He only wanted something to give the mounting screws to grip into but I went ahead and added some metal brackets for good measure. I can't get a second screw into the metal frame because the impact driver won't fit in there. I'll have to see if I can find an alternative.

- Added some frosted window film to all the windows.

- Challenger lift came in (CL10 V3). I didn't necessarily want it this soon into the build. but I got a really good deal on it and i moved on it. Currently running off a generator. But in reality I won't be using the shop until I get the floor sealed. Still super nice to have this in and dream.

I'm currently struggling with what insulation to go with. There is a local supplier that has a great deal on polyiso, but after reading it looks like polyiso drops in performance in cold weather (which is when I really want it to perform. But EPS (expanded polystyrene) does not, but it has less r-value. But it is substantially cheaper.
 

Attachments

  • 20200207_120420.jpg
    20200207_120420.jpg
    114.4 KB · Views: 341
  • 20200202_162904.jpg
    20200202_162904.jpg
    71 KB · Views: 323
  • 20200207_135034.jpg
    20200207_135034.jpg
    60.1 KB · Views: 314
  • 20200202_143734.jpg
    20200202_143734.jpg
    82.2 KB · Views: 367
OP
B

BertoBuckeye

Well-known member
Joined
Dec 21, 2013
Messages
66
I got polyiso delivered today. If anyone is close to southern indiana, plywoodking has great deals.

Doing 3" on ceiling and 2" on walls. They have foil on both sides.

I generally wasnt so thrilled about polyiso because its r value decreases in the cold, but the deal was so good and the r-value is so high, even if it drops it's still pretty good.
 

Attachments

  • 20200214_165727.jpg
    20200214_165727.jpg
    147.8 KB · Views: 271
OP
B

BertoBuckeye

Well-known member
Joined
Dec 21, 2013
Messages
66
Been a while since myblast update I've been working steadily on the shop as time allows.

Not sure how much of the details I will jump in through but I'll try to hit the important stuff.

Because I'm adding insulation between the frame sections, there would be nothing on the corners/edges for me to attach any finishing components, so I ended up having to 'frame out', for lack of a better term, each and every corner. Which by the way doing a bunch of self taping bits into metal ***** big time.

All the wall insulation is done. The frame is 2.25" thick so I can have .25" air gap for the radiant barrier. Which is small and potentially not effective but I'll make the most of it. I bought a couple if big bags of the round felt furniture pads, that happen to be .25" thick. I stuck them to the metal before putting in the insulation board to keep that gap as uniform as can be.

I tried using a sharp foam knife and it worked ok but it was just not my cup of tea. I bought a junkie fine tooth table saw blade for the table saw for this project. If the foam melted and destroyed the blade I wouldn't be upset. I'm not going to lie it makes a mess but it's the way to go.

I got the wall boards up this weekend and halfway done with the ceiling insulation.
 

Attachments

  • 20200330_195125.jpg
    20200330_195125.jpg
    62.3 KB · Views: 274
  • SmartSelect_20200411-233753_Gallery.jpg
    SmartSelect_20200411-233753_Gallery.jpg
    108.6 KB · Views: 305
OP
B

BertoBuckeye

Well-known member
Joined
Dec 21, 2013
Messages
66
overdue for an update.

I got the ceiling insulation all done.

Also while it was warmer i did the floor sealer. I ended up going with Ghost Shield 8510 (and the recommended densifier. I got it from https://www.garageflooringllc.com/ which I believe is a sponsor on here. Best price i could find. Really impressed with how easy the sealer went on. The picture attached is of some water in the exterior area. That puddle of water sat on top of the concrete for days. Super impressed with it so far.

Once the insulation was up I ran wood across the frame sections. Put about 2 ft of space between them. The lower 3 rows were 1x4's then the row at 8ft was 1x6, and then everything above that and the ceiling was 1x2's.

Being its a carport style building i wasn't too comfortable with the idea of a lot of weight on the walls and on the ceiling so I tried to keep everything light.

I put OSB in one corner which will be my 'work' area. This gives me freedom for hanging some light stuff and/or tools. But I wanted to make sure the OSB was resting on the concrete before I bolted it up, hoping the weight wouldn't be supported by the structure. I added a small strip of white PVC to the bottom of each OSB sheet where it contacts the concrete. The idea is to keep the OSB isolated from any moisture that might come through the concrete or while cleaning the floor out.
 

Attachments

  • 20200505_091345.jpg
    20200505_091345.jpg
    146.7 KB · Views: 261
  • 20200417_142437.jpg
    20200417_142437.jpg
    151.1 KB · Views: 250
  • 20200508_122553.jpg
    20200508_122553.jpg
    148.7 KB · Views: 267
OP
B

BertoBuckeye

Well-known member
Joined
Dec 21, 2013
Messages
66
Big step over the last few weeks. I got my wall coverings done.

Again I wanted something light, durable, and that was going to be ok with the occasional water splash. Since I hope to be able to wash a car on the non-lift side.

I went with a corrugated PVC sheet form Menards. It wasn't cheap but I liked it for a lot of reasons.
- I don't have to paint it.
- Its very durable but yet has some give. If I end up parking close to the wall and swing a car door open its basically impossible to ding the door.
- waterproof
- Light
- Bright! (+1 for lighting efficiency)
- Easy to install and cut. I just got some beefy carboard scissors and it did a great job.

One tricky spot was the sides of the roof. Due to the truss/frame design there was a piece of the square tubing that stuck out. Already having to cut around the corner braces wasn't ideal and having more cuts was something I wanted to avoid. I did a test with one of the pieces and it flexed and made a curve without kinking at the transition. I definitely had to think through about the support structure behind the sheets at the bends but it worked out.

While a friend and I did the ceiling insulation installation with 2 ladders it was incredibly inefficient and slightly sketchy. For installing the corrugated plastic in the ceiling I borrowed a scaffold on wheels and thought i'd do that while using a rope to pull myself across the shop. Terrible idea. it just wasn't worth it.

Ended up renting a 2 person scissor lift from the local rental company for the weekend and it was WELL worth the expense.

We went ahead and put chalk lines down for the the rows of lights that will be installed eventually. I added a couple of fluorescent lights I had laying around just to add some light until the lights are installed and the electric is run.

It feels INCREDIBLY good to be at this place in the project. Ready to use this shop!


I feel the insulation has been doing really well. We've had several nights in the lower 20 DegF and the shop temperature never went below 37DegF. There is no heat source yet other than my torpedo heater when i'm in there working.
 

Attachments

  • 20210110_185037.jpg
    20210110_185037.jpg
    147.2 KB · Views: 340
To avoid these ads, REGISTER NOW!

Sladeharrison

Member
Joined
Jun 8, 2020
Messages
17
Location
Baker, FL
I guess it's all relative. It's just a 30x40 carport with insulation. Seen some incredible builds on here.

Sent from my SM-G950U using The Garage Journal mobile app

This is an awesome write up on your build. I'm currently debating between an enclosed pole barn or metal building like you have (30x50x14).

Why didn't you install wiring before insulating and installing the corrugated panels? Seems like it might be more costly now...
 

LutzTD

Well-known member
Joined
Dec 31, 2011
Messages
3,673
Location
Lutz, Florida
looks like a great start to realizing your dream. 11 years of saving and planning shows you are not afraid to work for what you want, good luck and godspeed. I will be watching and following too :)
 
OP
B

BertoBuckeye

Well-known member
Joined
Dec 21, 2013
Messages
66
This is an awesome write up on your build. I'm currently debating between an enclosed pole barn or metal building like you have (30x50x14).

Why didn't you install wiring before insulating and installing the corrugated panels? Seems like it might be more costly now...

I'm not sure its really an option especially if its insulated. I would not have felt comfortable with drilling holes through the metal frame for wiring to pass through. Not sure how that would have affected my insulation? I figure keeping the sheets with minimal cuts/gaps will help with efficiency. Furthermore if I ever want to add a circuit or do a repair I wanted it all easily accessible.
 

jollygreengiant

Well-known member
Joined
Nov 10, 2013
Messages
2,354
Location
Ontario, Canada
Nice build! Seeing an all metal building is a rare thing. Around here it's mostly wood, and the metal ones are made from big steel columns.


It was a crazy amount, about 3x your value. It was way more than I expected/wanted. And I got plenty of quotes all in the ball park. There was a good chunk that was tree removal. The contractor that did the work overshot the stone budget by 50% too.

Are you saying that your foundation and knee walls cost $30,000??? And that was in line with other quotes you got? :wtf:
 

Kevkx125

Well-known member
Joined
Dec 26, 2013
Messages
3,394
Location
DOUGLASSVILLE, PA
BB nice build, well thought out. I have the same size building and I hope to put a carport down the one 40ft side for the same reasons you listed. Can't wait to see how you finish it out.
 
OP
B

BertoBuckeye

Well-known member
Joined
Dec 21, 2013
Messages
66
I went back and forth with several light ideas. Originally I was going to go with 15-18 dual LED tube fixtures un 3 rows. But in the end went with these high bay UFO lights.

150watt hyperlite units off amazon. 6 of them total. Very pleased with the light output though I will maybe add another one in the middle of the shop. These are just rigged up temporarily till I run electric out.20210207_133026.jpeg20210207_132545.jpg20210207_132540.jpg

Sent from my SM-G950U using The Garage Journal mobile app
 
OP
B

BertoBuckeye

Well-known member
Joined
Dec 21, 2013
Messages
66
Long time no update. I've always had a terrible work bench. I went back and forth with the idea of building a big custom work bench or something relatively small but mobile. I went with the mobile idea since I've opted to keep pretty much everything on wheels so I can move things around for whatever task is being done. I also keep a 6ft folding table on hand for any big projects that might need more space, rather than having a huge bench that takes space up 100% of the time.

I got a great deal on this gladiator bench, but used 2x4's, steel pegboard, and a shelf up top. In a later iteration I bolted the TV to it as well. Its on retractable casters which work really well. Its nice to be able to move it for cleaning. Or if I end up working on a big project in one of the bays I can move the whole bench/TV with it. I've got it all tied back into 1 plug which helps with mobility. I was also able to find a clear plastic sheet from amazon to put on the bench to try and keep it somewhat nice.

Also threw on this 2" square receiver as a universal tool holder. In the pic I have the grinder but I also have another base with my vice. I could have mounted the vise on the bench but I seldom need it and I don't like the idea of it taking up that space all the time. The 2" receiver has an anti-rattle bolt which helps keep things fixed when I'm doing something that requires that.
 

Attachments

  • 20211220_153755.jpg
    20211220_153755.jpg
    305.3 KB · Views: 127
  • 20211015_193210.jpg
    20211015_193210.jpg
    449.8 KB · Views: 140
OP
B

BertoBuckeye

Well-known member
Joined
Dec 21, 2013
Messages
66
Reasonably priced 24" deep pallet racks are very hard to come by since its not a standard size. Most stores only carry 8ft tall and 8ft wide ones. But to maximize the space I needed a 12ftx12ft.

Finnaly found one after 2 yrs of scouring FB marketplace. These were destined to be scrapped. But i got one for the shop.

Eventually if I need more storage, the plan is to build a platform above the garage door. Likely using another pallet rack on the other side as another support but so far I have increased my storage capacity by A LOT.

The beams are overkill but its what they had. In order not to waste space i added some crossbeams to the bottom of the beams so I can store full length lumber in that dead space.
 

Attachments

  • 20211218_130642.jpg
    20211218_130642.jpg
    299.8 KB · Views: 145
OP
B

BertoBuckeye

Well-known member
Joined
Dec 21, 2013
Messages
66
Quick add on today. Can't have enough pegboard.

Used the same stuff that i used for the work bench (but a smaller size, 16x16). Then I ran some boots threw it to the existing threaded holes for the top section handles. I did have to drill one new hole since the spacing didn't work out.
 

Attachments

  • 20220326_135722.jpg
    20220326_135722.jpg
    268.5 KB · Views: 153
OP
B

BertoBuckeye

Well-known member
Joined
Dec 21, 2013
Messages
66
Monumental day today. It's done. Its a real shop now. The electrician finished and I am no longer running an extension cord to my house. Needing to turn off the lights to run the air compressor or the mitre saw. Its great.

After over 2 years since the building was erected. But I don't regret it. Finishing it and using it for a bit gave me a much better feel for where I wanted the outlets and what I wanted them for.

You may notice that I hired an electrician, but when I first planned the shop I was going to take it on. I'm glad I did. I simply didn't have time to do it.

Some highlights from the wiring.
- everything is in conduit. Maybe a bit more conduit than needed but left some room to add if needed.
- Added an extra 220V outlet between the garage doors. If I ever need to weld something out in the driveway the plug is right there. Also if I upgrade to a bigger air compressor I will use that plug.
- Had him wire in the disconnect for the mini split. One less thing for later.
- Added a socket to the attic in case I want to add a fan up there.
- Added a couple of sockets under the lean to in case I need to plug in anything out there for some work or a pressure washer.
- the 4 lights over the cars are on a separate switch than the ones in the front. Save some power when I'm just working on stuff non-car stuff.
- added a 6 gauge circuit to the wall by the lift for an electric heater in case we get very cold and the mini split can't handle it. Or if I want to just take the edge off the cold. This would be for a 10,000 watt heater.

Originally the conduit that crosses over from the breaker panel to the other side of the shop was going to go straight up and over. However, the high track for the garage door was too close and the conduit wouldn't fit. So we had to improvise.
 

Attachments

  • 20220408_141446.jpg
    20220408_141446.jpg
    208.2 KB · Views: 122
  • 20220408_141508.jpg
    20220408_141508.jpg
    287.4 KB · Views: 132
Last edited:
To avoid these ads, REGISTER NOW!
Top Bottom