To avoid these ads, REGISTER NOW!

1 1/2" Sq Tube Lumber Rack - Wall Mount Options

couch67

Well-known member
Joined
Mar 18, 2016
Messages
1,401
Location
Ontario Canada
Hello,
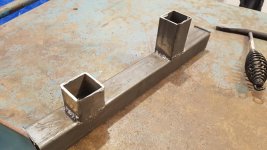
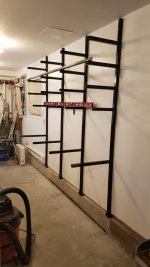
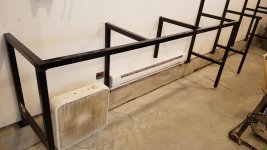
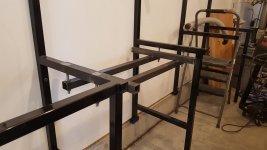
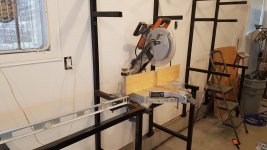
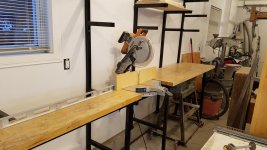
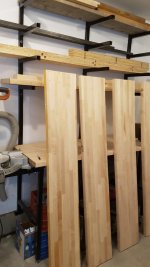
In the process of design / building a metal wall mounted wood rack. All 1 1/2" square tube, 0.100" wall thickness. Shelf supports will be 12 to 16" long, and welded directly to the uprights, floor to ceiling. The uprights will be mounted directly to the wall studs, including the top wall plate. 4 uprights in total, 32" apart.

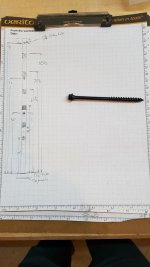
My main question is what fasteners to use for attaching to the studs? Structural fasteners like GRK seem like the way to go, they are more than strong enough, but haven't been able to confirm whether its suitable for fastening metal to wood. My default would be good old lag bolts.

Second question - should I fasten through both the front / back of the upright, so the fastener head is tight to the front of the upright, or drill an oversize hole through the front to allow the bolt head through, so the fastener is tight to the backside of the upright?

Thanks for any comments, hope the questions make sense.

Couch
 
To avoid these ads, REGISTER NOW!

The Tool Tyrant

ALLIANCE MEMBER
Joined
Dec 19, 2011
Messages
2,182
Location
Bonita, Ca. (San Diego)
Questions for you: 1) Is the only vertical member the one mounted to the stud or will you also have one at the front, and all lumber loading will be from the end?

2) Are you mounting directly to the stud or over a wall finish (drywall/ paneling etc)?
 

TurnipTruck

Well-known member
Joined
Aug 28, 2005
Messages
1,554
Location
Southcentral Alaska
If the steel tube touches the floor and supports itself, I think any fastener better than a Sheetrock screw will be fine. Simple lag screws through both walls of the square tube will be more than adequate, except the exposed heads could mar your stored wood.
 
OP
C

couch67

Well-known member
Joined
Mar 18, 2016
Messages
1,401
Location
Ontario Canada
thanks for the quick replies.

Tyrant, yes only the wall mounted end of the shelf will be supported. It will be mounted to the studs through 5/8" drywall, and it will go floor to ceiling.
 

readhead

Well-known member
Joined
Dec 8, 2012
Messages
6,175
Location
Durango, Co.
Why are the arms so far apart? If you load them up you will always want the bottom back piece. More arms will give you more variety and less load on each arm.

Just reread your first post. Did you mean 32" post to post or 32" between arms?
 
OP
C

couch67

Well-known member
Joined
Mar 18, 2016
Messages
1,401
Location
Ontario Canada
Thanks Readhead,

The uprights will be spaced 32" apart horizontally, but the shelf arms will be spaced about 12" to 16" from each other vertically, for the reasons you mention.

Lots of welding on the horizon!
 

PugetDude

ALLIANCE MEMBER
Joined
Mar 13, 2013
Messages
22,341
Location
Superstition Mountains, AZ
I'd weld a 16-18" " long piece of tube perpendicular to the vertical legs at the bottom to help take the lateral load on the vertical uprights and distribute it outside the center of gravity to minimize the bending stress on the studs. It wouldn't take up much room and will make the whole assembly a lot stronger, especially if you gusset the connection at the corners. Also, you might consider leaning the uprights back a few degrees (use plate spacers where you bolt them to the wall to get your offset) as a an additional precaution against the rack pulling away from the wall when loaded.
 

matt_i

Well-known member
Joined
Mar 14, 2008
Messages
10,725
Location
SE Michigan
I would drill clearance thru both thicknesses rather than a big clearance hole in the "front" of the wall and then drive the fastener down into the recess. The GRK-RSS are excellent into solid wood, very impressive screw.
 

Jeff Ivers

Well-known member
Joined
Apr 9, 2010
Messages
2,555
Location
Oklahoma
Why not weld a piece of angle iron to the side of each upright where you want to anchor to the wall and run a lag bolt through that into the stud? I would think one anchor near the top and one near the bottom of each upright would be more than enough.
 

Boundertom

Member
Joined
Jan 5, 2011
Messages
23
I built and installed a storage rack EXACTLY as you described in one of my storage trailers. The trailer has steel framing, so I used large self drilling screws through both walls of the uprights. My rack is loaded with conduit, aluminum and steel stock and all sorts of miscellaneous materials. It is rock solid. In your case, I would probably use 3/8" by 4" lag screws. Drill pilot holes in the studs. The screws near the top will be doing most of the supporting, so use extra ones near the top. Enjoy your welding project!
 
OP
C

couch67

Well-known member
Joined
Mar 18, 2016
Messages
1,401
Location
Ontario Canada
Thanks for all the replies, some great feedback. Decided to go with 5/16" x 5" lags. With the tubing and drywall thickness, will get just under 3" of bite into the studs (2x6).

Started cutting yesterday and doing some practice welds. Picked up a MigPak 180 on sale in the spring, first time putting it to use! Will take a bit of getting used to. My dad was a F/T welder for 40 years, I'm sure he's rolling in his grave right about now!
 

Attachments

  • 20191207_145611.jpg
    20191207_145611.jpg
    94 KB · Views: 150
  • 20191207_173342.jpg
    20191207_173342.jpg
    150.5 KB · Views: 161

bob15

Well-known member
Joined
Dec 8, 2011
Messages
6,863
Location
Northeasten, CT
I would have used unistrut instead of square tubing & welding it together. With unistrut, your racks are adjustable by just either loosing or unbolting the gusset and sliding it. You can also have them sit on the floor, so much of the dead weight will be transferred to the floor and not the walls.

I would also skip the lag bolts and use Timberlok or Flatloks. They are stronger, don't require pre-drilling and smaller in OD which means less chance of splitting/cracking the 2x's.
 

SGKent

Banned
Joined
Feb 12, 2010
Messages
1,959
Location
Citrus Heights CA
Tyrant, yes only the wall mounted end of the shelf will be supported.

I am not an engineer but there will be a lot of leverage on the studs that the lag screws will go into if only that side is supported. Be careful with the total weight of the wood you store.
 

tarmy

Well-known member
Joined
May 28, 2014
Messages
4,663
Location
Nor Cal
I hope you have figured out if power or other utilities are not running thru the studs you plan to penetrate that deep...
 

Bodycount_NJ

Active member
Joined
Nov 28, 2019
Messages
28
Location
NJ Meadowlands
I built and installed a storage rack EXACTLY as you described in one of my storage trailers. The trailer has steel framing, so I used large self drilling screws through both walls of the uprights. My rack is loaded with conduit, aluminum and steel stock and all sorts of miscellaneous materials. It is rock solid. In your case, I would probably use 3/8" by 4" lag screws. Drill pilot holes in the studs. The screws near the top will be doing most of the supporting, so use extra ones near the top. Enjoy your welding project!


I agree with extra support at the top.
 

bullnerd

Well-known member
Joined
Sep 17, 2012
Messages
5,690
Location
Jersey
First of all, Did you check with your local building codes official inspector committee and get a permit?

Muhahahah!

Through both, ledger locks or Spax. With all the modern hardware available, I don't even consider lag bolts a thing.

Go to Amazon and look at those orange wood racks that are very popular, they're made out of super thin steel tube and held up with crappy hardware, Look at the load ratings.
 
OP
C

couch67

Well-known member
Joined
Mar 18, 2016
Messages
1,401
Location
Ontario Canada
Thanks for replies. Yep, confirmed nothing in the wall to hit, I had built the addition and attached garage about 20 years ago and all wiring is in the ceiling. And I didnt check with the building inspector or HOA, I'm sure nobody's going to kick up a fuss.

So I did end up going with 4" Timberlok screws, the original question for this thread.

I've been on the fence with how to maximize the space on the side wall, and finally decided to incorporate a miter saw table into the lumber rack. The miter table will be high enough to allow the table saw / router to roll under it. Some pictures of the assembly, and beginning of the installation. There will be more supports installed to the left of the four lumber rack supports, to extend the miter saw table.

Gave the Migpak a first time workout. I love it! Sure beats my 120V buzzbox. I did learn that square tubing will warp as you weld on just one side of it (picture). Applied heat with a MAPP torch directly to the backside of each welded support. No after shot, but it did make a difference, took the warp from >2" to <1" from end-end. Oxy acetylene would have been better but I dont do enough steel work to have torches (yet). I dont think the warp was much an issue here anyway, I could close the gap by squeezing the two tubes together by hand.

The outside supports for the miter saw table will get table legs with adjustable feet, to add some stability to the table.
 

Attachments

  • 20191210_202529.jpg
    20191210_202529.jpg
    77.2 KB · Views: 151
  • 20191216_213730.jpg
    20191216_213730.jpg
    59.7 KB · Views: 183
  • 20191216_213859.jpg
    20191216_213859.jpg
    91.5 KB · Views: 137
To avoid these ads, REGISTER NOW!

bullnerd

Well-known member
Joined
Sep 17, 2012
Messages
5,690
Location
Jersey
Yup, very nice.

I always wanted to build a rack with the saw built in.

Looking forward to seeing the rest.

Oh, and the inspector thing was a joke.
 

cdestuck

Well-known member
Joined
Nov 13, 2013
Messages
1,462
Location
Altoona, Pa
If you set on metal then disregard this. But what I did was fasten 4x4s to your studs. Sitting rt beside them. I then used 3/4” black iron pipe for my horizontals. I marked my 4x4s at the height I wanted my horizontals and drilled 3/4” holes with a spade bit. This makes your horizontals movable at any time your needs change.
 
OP
C

couch67

Well-known member
Joined
Mar 18, 2016
Messages
1,401
Location
Ontario Canada
Spent Sunday cutting and welding legs on the outer ends of the bench, just two per each side of the miter saw. This will give me plenty of room to slide the table saw and jointer underneath each side. Sorry no pics, will post some when I can snap them.

I also fabbed up the supports for the left side of the miter saw table. This time I read and watched a bit more online how to manage metal movement and warping with tube. With some simple tips I pretty much eliminated the warping I had with the first set of supports! Some of these are obvious but indulge this beginner:

- tack all 4 corners of the tube before laying welds (duh). I was only doing 2 opposite corners.
- weld the flat seams first, so if you are envisioning a shelf support and upright, weld the 'sides'.
- do one side, then flip and do the other side right away. This allows both sides to counteract each other as they cool.
- weld the top fillet seam next
- in the case of a shelf support, the bottom seam of the support has no strength so do not weld it.

Looking forward to getting back to the project, after the next few days are over and done with!
Merry Christmas
 
OP
C

couch67

Well-known member
Joined
Mar 18, 2016
Messages
1,401
Location
Ontario Canada
Got the left side of the bench installed today. Set the verticals to the wall and welded the horizontal length to tie them together. Its a long 8' span, pretty sure its going to hold up but then again I wont be rebuilding engines on that table.

Next steps will be to prep the table tops, and the adjustable sub-table for the miter saw.
 

Attachments

  • 20191229_173724.jpg
    20191229_173724.jpg
    134.1 KB · Views: 77
  • 20191229_173702.jpg
    20191229_173702.jpg
    61.2 KB · Views: 84

maxpat82

Well-known member
Joined
Dec 9, 2012
Messages
275
planning to do the exact same.
will use 3/4 x 1-1/4 ( 1/16 wall) tubing (was thrown away at work and I have about 100 48" tube). and anchor then with 1/4 lag bolt.

I will angle the support 5deg up
 
OP
C

couch67

Well-known member
Joined
Mar 18, 2016
Messages
1,401
Location
Ontario Canada
Here's how I built my steel rack. Same kind of deal I guess.
Glenn

Never thought I'd say this to a guy but nice rack! Good idea to space it off the wall, get a better bite into two wall studs. Plus that allowed you to go directly to the floor and not just to the wall curb.
 
OP
C

couch67

Well-known member
Joined
Mar 18, 2016
Messages
1,401
Location
Ontario Canada
Got the miter saw sub-table set up yesterday. Welded 1/2" lengths of threaded rod to the underside of the table, this will support the sub-table and allow for vertical adjustment. The table is made up of 4 pieces of 1 1/2" square tube. I used 'heavy' tack welds on the 4 corners. Should be easy to get apart if I ever change saws and need a different layout.

Next up is to start prepping the table tops. Only if the fog lifts in my head... might be a tomorrow job.
 

Attachments

  • 20191231_151640.jpg
    20191231_151640.jpg
    108.6 KB · Views: 52
  • 20191231_145841.jpg
    20191231_145841.jpg
    144.1 KB · Views: 57
OP
C

couch67

Well-known member
Joined
Mar 18, 2016
Messages
1,401
Location
Ontario Canada
Started to prep the table tops today. These were castaway 36x72 maple tops I got free after an upgrade from work. The right side of the saw will be easy, just 24 x 72 and its pretty much flat (sanding still to be done), but the left side of the saw will need to be about 100" long. Started to cut the last top into 12" widths and finish them, to be glued together for that piece.

Did a dry fit with the saw and a few table pieces in place. The saw does need a lot of working room, leaving just enough table space for its maximum cut (~10"). Test fitted the jointer in its planned storage space. So far so good.
 

Attachments

  • 20200102_160831.jpg
    20200102_160831.jpg
    65.5 KB · Views: 61
  • 20200102_162413.jpg
    20200102_162413.jpg
    149.2 KB · Views: 64
OP
C

couch67

Well-known member
Joined
Mar 18, 2016
Messages
1,401
Location
Ontario Canada
I should have named the Thread something different, like 'my lumber rack / miter saw table'. Would make more sense for future readers.

This weekend I flattened out the right side of the table which is a 24 x 72" slab. It had about a 1/8" crown or so in the middle so I put together a quick flattening table to allow a router to make quick work of it. The first shot shows some of the work the initial pass did. By the end it was dead flat.

For the left table, I cut the slab into 12" widths to get them through the planer, and this width will allow them to be glued up to a 24 x 100" piece. The board were straight end to end but had a crown so the planer flattened the tops out nicely. Edge treatment on the table saw (flat down), and they are close now to be cut and glued to size.
 

Attachments

  • 20200104_161920.jpg
    20200104_161920.jpg
    146.3 KB · Views: 57
  • 20200104_161936.jpg
    20200104_161936.jpg
    147.4 KB · Views: 51
  • 20200105_173032.jpg
    20200105_173032.jpg
    62.5 KB · Views: 54
Last edited:
OP
C

couch67

Well-known member
Joined
Mar 18, 2016
Messages
1,401
Location
Ontario Canada
Fast forward a bit, the left side of the miter table top has been glued up and sanded. Front edge eased by 45 degrees.

Couple of pics with the mobile tools stored under the table. Very happy with how it turned out. Next steps to inlay a tape into the table, and build a fence on the left side with integrated stop.
 

Attachments

  • 20200111_165122.jpg
    20200111_165122.jpg
    149.4 KB · Views: 54
  • 20200111_165133.jpg
    20200111_165133.jpg
    148.7 KB · Views: 49
  • 20200111_165141.jpg
    20200111_165141.jpg
    150.6 KB · Views: 48

bullnerd

Well-known member
Joined
Sep 17, 2012
Messages
5,690
Location
Jersey
Very nice! Excellent job!

Now the trick will be to not let it turn into a catchall, so its open when you need it.

We better not see pics of you cutting wood on the floor! lol!
 

Jeff Ivers

Well-known member
Joined
Apr 9, 2010
Messages
2,555
Location
Oklahoma
Fast forward a bit, the left side of the miter table top has been glued up and sanded. Front edge eased by 45 degrees.

Couple of pics with the mobile tools stored under the table. Very happy with how it turned out. Next steps to inlay a tape into the table, and build a fence on the left side with integrated stop.

That is a very nice and well thought out setup you have built. Are you planning to cap the open end of the pipes with those plastic end caps?
 
OP
C

couch67

Well-known member
Joined
Mar 18, 2016
Messages
1,401
Location
Ontario Canada
Very nice! Excellent job!

Now the trick will be to not let it turn into a catchall, so its open when you need it.

We better not see pics of you cutting wood on the floor! lol!

Yes I hope that doesn't happen! I'm thinking of moving my small parts cabinets to the right table side to make some use of the table behind the fence cut line.

That is a very nice and well thought out setup you have built. Are you planning to cap the open end of the pipes with those plastic end caps?

Funny you ask, I had searched for those on Amazon a few weeks ago and have an email from them this afternoon on exactly that! I have them on the short list, but $18 for 20 pcs, I'll see how things go without them for a bit.
 

tboy

Well-known member
Joined
May 23, 2013
Messages
149
Location
Central Ohio
Great looking bench, love it. I'm subscribing for updates, wondering if I can do something similar in my space.
 
To avoid these ads, REGISTER NOW!
Top Bottom