To avoid these ads, REGISTER NOW!

Above 1200 Sq/FT A New Shop in Tennesse

Wokspaces above 1200 squarefeet.

1MtnGoat

Well-known member
Joined
Aug 18, 2013
Messages
92
Location
Cleveland, TN
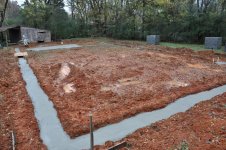
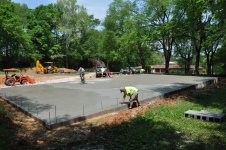
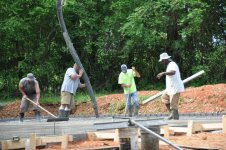
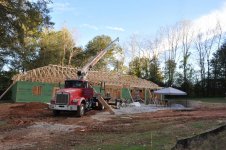
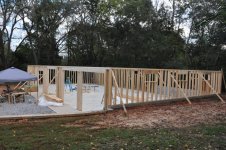
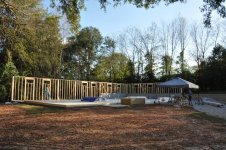
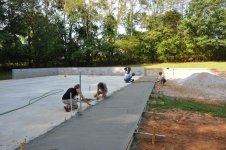
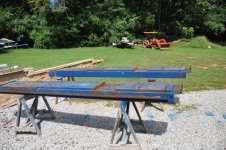
Hello, I'm a retired shop (high school/college) teacher. After schools stopped teaching shop I went into maintenance. Thirty plus years ago my wife and I talked it over and decided we would build a shop to "tinker" in when I retired. We decided to start saving and purchasing tools so when the shop was finished I could build and do most anything I wanted. All machinery was either purchased new on a super sale or used and completely refurbished. Just over two years ago I started the build. By coincidence it was 2 years to the day from permit pull to receiving the CO. I drew the plans, applied for permit then purchased a used backhoe to do the ground work. When we were finished the backhoe sold for cost. One of my sons said he would help me. The two of us did all the work ourselves except concrete slab pouring/finishing, setting trusses and sheathing the roof. Several times other members of the family would help for a day or two.

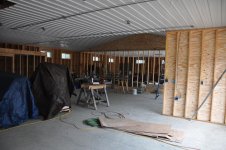
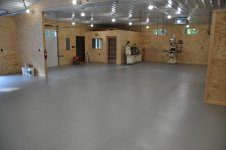
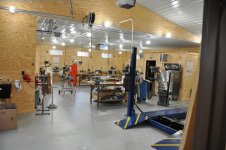
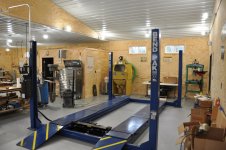
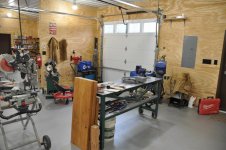
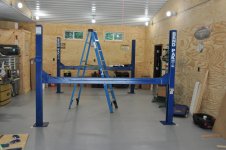
The shop is 40' x 76'. 2x6 framed and insulated walls and ceiling. Vinyl siding on exterior, interior walls are finished with B/C sanded plywood. Ceiling is white prefinished metal siding. Wall height is 10' with scissor trusses over the lift bay. This gave a max. of 14' ceiling height in this area. Min. is just over 12' above lift. All floors are finished with Hellfire coating.

Instead of dragging the build posts out over a couple of years I'll post a bunch of pictures all at once here.
 
To avoid these ads, REGISTER NOW!
OP
1

1MtnGoat

Well-known member
Joined
Aug 18, 2013
Messages
92
Location
Cleveland, TN
I think I have the pictures figured out!
 

Attachments

  • Footings.jpg
    Footings.jpg
    158.6 KB · Views: 290
  • Expansion joints cut.jpg
    Expansion joints cut.jpg
    157.2 KB · Views: 288
  • Finishing slab.jpg
    Finishing slab.jpg
    161.4 KB · Views: 264
  • Pouring.jpg
    Pouring.jpg
    165.6 KB · Views: 269
  • Ready to pour.jpg
    Ready to pour.jpg
    159.2 KB · Views: 272
  • Steel in place.jpg
    Steel in place.jpg
    158.2 KB · Views: 279
  • Header Block Laid.jpg
    Header Block Laid.jpg
    163.5 KB · Views: 285
OP
1

1MtnGoat

Well-known member
Joined
Aug 18, 2013
Messages
92
Location
Cleveland, TN
More pictures.
 

Attachments

  • Trusses all set.jpg
    Trusses all set.jpg
    160.5 KB · Views: 361
  • Truss time.jpg
    Truss time.jpg
    165.6 KB · Views: 342
  • End of second day framing.jpg
    End of second day framing.jpg
    162.5 KB · Views: 362
  • First day of framing.jpg
    First day of framing.jpg
    162 KB · Views: 331
  • Whole family pouring apron.jpg
    Whole family pouring apron.jpg
    161 KB · Views: 343
  • Working hard getting ready to fill knee wall.jpg
    Working hard getting ready to fill knee wall.jpg
    158.5 KB · Views: 418
  • Son laying knee wall.jpg
    Son laying knee wall.jpg
    158.5 KB · Views: 323
OP
1

1MtnGoat

Well-known member
Joined
Aug 18, 2013
Messages
92
Location
Cleveland, TN
More
 

Attachments

  • Soon to be office.jpg
    Soon to be office.jpg
    152.1 KB · Views: 447
  • Inside during construction.jpg
    Inside during construction.jpg
    155.6 KB · Views: 462
  • OHDs installed.jpg
    OHDs installed.jpg
    162.7 KB · Views: 451
  • Ceiling and rough electrical done.jpg
    Ceiling and rough electrical done.jpg
    153.7 KB · Views: 434
  • Shingles on.jpg
    Shingles on.jpg
    161.3 KB · Views: 420
  • Sheathing roof.jpg
    Sheathing roof.jpg
    166.7 KB · Views: 403

Jagmandave

Well-known member
Joined
Nov 6, 2011
Messages
6,299
Location
Overland Park, Ks.
OK, question.....I like the looks and reflective properties of the white metal ceiling, but is it louder/noisier in that area due to reflected sound off the ceiling? For example, when running an impact or other air powered tools?
 
OP
1

1MtnGoat

Well-known member
Joined
Aug 18, 2013
Messages
92
Location
Cleveland, TN
Floor coated using Legacy Industrial products. Hellfire and crack filler. The crack filler works fast and neat. Fill the cracks with play sand, apply solution to sand and grind flush in 30 minutes. (After mixing in the applicator bottle you have about 10 minutes to apply or it will set in the bottle. Work fast!) My floor was finished (troweled) fairly smooth about like 220 grit sand paper. I applied 4 coats in the main shop (2,000 sq.ft.) and 3 coats on the garage side (1,000 sq. ft.). With the crack filler the total price worked out to $0.65 per sq. ft.
 

Attachments

  • More Hellfire.jpg
    More Hellfire.jpg
    107.6 KB · Views: 397
  • Floor painted with Hellfire.jpg
    Floor painted with Hellfire.jpg
    97.2 KB · Views: 394
  • Expansion joints ground.jpg
    Expansion joints ground.jpg
    83.3 KB · Views: 350
  • Filling expansion joints.jpg
    Filling expansion joints.jpg
    91.4 KB · Views: 356
OP
1

1MtnGoat

Well-known member
Joined
Aug 18, 2013
Messages
92
Location
Cleveland, TN
Still more.
 

Attachments

  • Looking out of office.jpg
    Looking out of office.jpg
    149.1 KB · Views: 510
  • Looking into office.jpg
    Looking into office.jpg
    127.8 KB · Views: 518
  • View entering door.jpg
    View entering door.jpg
    154.1 KB · Views: 540
  • Orgainizing tools.jpg
    Orgainizing tools.jpg
    156 KB · Views: 589
  • Exterior finished.jpg
    Exterior finished.jpg
    160.2 KB · Views: 453
  • Siding being applied.jpg
    Siding being applied.jpg
    158.8 KB · Views: 486
OP
1

1MtnGoat

Well-known member
Joined
Aug 18, 2013
Messages
92
Location
Cleveland, TN
Here are a few pictures walking around the shop.
 

Attachments

  • Shop 7.jpg
    Shop 7.jpg
    152.5 KB · Views: 404
  • Shop  6.jpg
    Shop 6.jpg
    150.7 KB · Views: 410
  • Shop 5.jpg
    Shop 5.jpg
    154.1 KB · Views: 423
  • Shop 4.jpg
    Shop 4.jpg
    153.7 KB · Views: 431
  • Shop 3.jpg
    Shop 3.jpg
    152 KB · Views: 416
  • Shop 2.jpg
    Shop 2.jpg
    153.7 KB · Views: 432
  • Shop 1.jpg
    Shop 1.jpg
    150.1 KB · Views: 430

harley jim

Well-known member
Joined
Dec 6, 2013
Messages
11,385
Location
Cleveland Tn..........out in the sticks
Welcome Mtn goat
That is a nice shop you have. It looks like you and your wife put a lot of thought into it. I cant wait to see what you do with it.
I'm also in cleveland and retired last year and have been getting the shop set up like it should have been.

Sent from my SM-A102U using Tapatalk
 
OP
1

1MtnGoat

Well-known member
Joined
Aug 18, 2013
Messages
92
Location
Cleveland, TN
Here is the garage/storage side along with some before and after of the lift. Lift was purchased from a tire shop the had gone out of business. It is a 12K alignment lift with 2 - 6K rolling jacks. We sand blasted, primed and sprayed 3 coats of matching semigloss Urethane automotive paint.
 

Attachments

  • StorageGarage side.jpg
    StorageGarage side.jpg
    153.6 KB · Views: 391
  • Rusty lift.jpg
    Rusty lift.jpg
    165.7 KB · Views: 377
  • Lift being installed.jpg
    Lift being installed.jpg
    147.2 KB · Views: 373
  • Lift finished.jpg
    Lift finished.jpg
    152.6 KB · Views: 375

frankush

Well-known member
Joined
Oct 23, 2011
Messages
1,156
Location
IL
That is one good looking shop. I think I could be a happy camper working out of that space. Very nice layout also.
 
OP
1

1MtnGoat

Well-known member
Joined
Aug 18, 2013
Messages
92
Location
Cleveland, TN
Well there it is done except for the dust collection and air lines. All said and done the building ran us less than $25 a square foot. I shopped a fair amount for materials. Lowes had the best prices on many of the supplies. The Lowes rep said if one purchased more that $1,500 at a time they can submit to corporate for special pricing. Even so you still had to watch. I had quotes from Lowes and a number of other places. Prices varied alot for the same items. I priced trusses at 4 places. They all used the same design software and specs. The prices varied by just over 3K. I did not skimp on quality. I don't plan on doing this again. We got lucky on the slab pour. One of the best guys in the area said he had a cancellation and if he could come the next day it would be $0.60 sq. ft. to pour and finish. I told him we'd be ready. Doing most all all ourselves saved a large bundle on labor costs and I could control the quality. Our building inspector said it the best constructed and nicest shop he'd seen. I'm extremely thankful to my friends and family who helped this dream come true!
 
OP
1

1MtnGoat

Well-known member
Joined
Aug 18, 2013
Messages
92
Location
Cleveland, TN
I don't notice any noise problems I wish to keep my hearing for a long time so have always used ear protection a lot of the time running a saw or other noisy equipment.
 

PA Slammer

Well-known member
Joined
Nov 14, 2011
Messages
267
Location
Loveland, CO
First off, awesome build. You’ll spend years enjoying it for sure!

Vacuum and air lines... you’re planning outside the walls, right? Does anyone ever put them inside the walls? Pros/cons?

What did you use to heat the place? Maybe I missed that.

I’ve got my garage framed in and I’m starting to plan electrical. So these questions are currently on my mind. I hope to have thought out theses things the beat I can. I’m sure I’ll forget something.
 

CombatNinja

Well-known member
Joined
Aug 24, 2013
Messages
1,456
That shop is awesome. You should be proud of it for sure. May you come to use it in good health and happiness for a long time to come.
 
To avoid these ads, REGISTER NOW!
OP
1

1MtnGoat

Well-known member
Joined
Aug 18, 2013
Messages
92
Location
Cleveland, TN
First off, awesome build. You’ll spend years enjoying it for sure!

Vacuum and air lines... you’re planning outside the walls, right? Does anyone ever put them inside the walls? Pros/cons?

What did you use to heat the place? Maybe I missed that.

I’ve got my garage framed in and I’m starting to plan electrical. So these questions are currently on my mind. I hope to have thought out theses things the beat I can. I’m sure I’ll forget something.

Both air lines and dust collection will be surface mounted on the walls. The office is the only place with heat and A/C. The temps are fairly mild here in TN. On a cold day the shop is 50-55* so I work a bit faster or wear a light coat. The office is insulated and inside the shell. I have a small 850 watt floor heater that maintains 68-70 with no effort.
 

Jakemedic

Well-known member
Joined
Jul 26, 2013
Messages
721
Location
Cornfields of SE Iowa
Love your plywood walls. What thickness of BC Plywood did you use? I was planning on OSB but really like the wood look. Did you varnish the plywood? Congrats on the shop! Mine should be breaking ground this month as long as old man winter is done!
 

PA Slammer

Well-known member
Joined
Nov 14, 2011
Messages
267
Location
Loveland, CO
Both air lines and dust collection will be surface mounted on the walls. The office is the only place with heat and A/C. The temps are fairly mild here in TN. On a cold day the shop is 50-55* so I work a bit faster or wear a light coat. The office is insulated and inside the shell. I have a small 850 watt floor heater that maintains 68-70 with no effort.


Thanks! Appreciate the info. Still debating what I’ll do. I like the plywood walls! I might do reclaimed cedar fencing.
 

PhilJohn

Well-known member
Joined
Jul 1, 2019
Messages
204
Location
Minnesota
I can tell you knew exactly where you were going before you even broke ground. Awesome shop and enjoy!
 

captain14

Well-known member
Joined
Dec 19, 2012
Messages
7,013
Location
Near College Park Maryland 20740
Very nice shop and we’ll planned out. Hope you get years of enjoyment out of it.

Do you have a half bath in the building?

Can you identify to the reading audience what each of the bay doors lead to?

Auto/truck, wood shop, yard maintenance?
 

Jayman17

Well-known member
Joined
Feb 6, 2017
Messages
3,793
Location
Seattle, Wa
Very nice shop I hope you enjoy it for a long time. It will always be a reminder of how you built it mostly on your own with friends and family and that's great.
:beer:

Jay
 

Murrdog

Active member
Joined
Jan 31, 2020
Messages
37
Location
Lincoln Nebraska
Love the look of the metal roofing panels on the ceiling. Question: how much and what kinda of insulation did you do on the ceiling. Is there any chance of the metal panels sagging over time? I plan to do this on my building with scissor type trusses at 4/12 inside pitch. Wondering if you had any install photos of the pitched roof and how you fastened them. Thanks love the build!
 

jonnmtjuliet

Well-known member
Joined
Jun 20, 2019
Messages
65
Location
TN
Well there it is done except for the dust collection and air lines. All said and done the building ran us less than $25 a square foot. I shopped a fair amount for materials. Lowes had the best prices on many of the supplies. The Lowes rep said if one purchased more that $1,500 at a time they can submit to corporate for special pricing. Even so you still had to watch. I had quotes from Lowes and a number of other places. Prices varied alot for the same items. I priced trusses at 4 places. They all used the same design software and specs. The prices varied by just over 3K. I did not skimp on quality. I don't plan on doing this again. We got lucky on the slab pour. One of the best guys in the area said he had a cancellation and if he could come the next day it would be $0.60 sq. ft. to pour and finish. I told him we'd be ready. Doing most all all ourselves saved a large bundle on labor costs and I could control the quality. Our building inspector said it the best constructed and nicest shop he'd seen. I'm extremely thankful to my friends and family who helped this dream come true!

Well done on the shop. Not much you can't take care with your layout. I did have a question on the concrete. I'm assuming you paid for the concrete and set the forms and the pro's just did finishing and placement. I'm trying to find someone near me to to do the same thing. Hard to find right now...
 
OP
1

1MtnGoat

Well-known member
Joined
Aug 18, 2013
Messages
92
Location
Cleveland, TN
Very nice shop and we’ll planned out. Hope you get years of enjoyment out of it.

Do you have a half bath in the building?

Can you identify to the reading audience what each of the bay doors lead to?

Auto/truck, wood shop, yard maintenance?

No 1/2 half bath. Would have been nice. I do have a hand wash sink. On the OHDs left to right. 8x8 to welding area provides extra ventilation and access for larger projects. The next 3 are 10wx9h. The first goes to the 4 post lift area. The last 24' of the South end are walled off from the rest of the shop. This is the "storage" area. Access is through two metal doors one at each end. One is a 3' and the other is 3'-6" to make it easier to roll tool chest or other larger items through. The last two on the right are to the storage area.
 
OP
1

1MtnGoat

Well-known member
Joined
Aug 18, 2013
Messages
92
Location
Cleveland, TN
Love the look of the metal roofing panels on the ceiling. Question: how much and what kinda of insulation did you do on the ceiling. Is there any chance of the metal panels sagging over time? I plan to do this on my building with scissor type trusses at 4/12 inside pitch. Wondering if you had any install photos of the pitched roof and how you fastened them. Thanks love the build!

The pitched area is above the lift. All ceiling panels are run perpendicular to the trusses. A drywall lift was used to lift each panel in place. 3 people made this job easier. One to run the lift and two on scaffold to put in screws. The person running the lift on the floor "eyeballed" the screw pisition for a straight line with truss. An extension can be used with the lift to reach higher areas if necessary. The selling company provided truss head screws to fasten panels to ceiling. They are color matched to the panels and have a torx drive. A sharp center punch was used to "mark the spot" and just barely puncture the metal. This is not necessary but made life a bit easier. Fastening was 9" OC across each panel at each truss (trusses 24" OC) Screws are placed next to each large ridge. (This is standard fastening proceedure) We put a little better than 12" of blown insulation above after the metal was up. (Insulation was purchased at a box store and they provided the blower free. This saved almost 1k$) All siding/roof panels are ridged to give strength. The weight of insulation will not cause a problem. If one needed 2' of blown in it should be just fine. Be sure and use the eave baffles so your attic can breathe through the soffit and out the ridge vent.
 
OP
1

1MtnGoat

Well-known member
Joined
Aug 18, 2013
Messages
92
Location
Cleveland, TN
Love your plywood walls. What thickness of BC Plywood did you use? I was planning on OSB but really like the wood look. Did you varnish the plywood? Congrats on the shop! Mine should be breaking ground this month as long as old man winter is done!

The plywood is 1/2". No finish. Did this in a previous garage, it had been in for 15 years when we sold the place. Still looked good. The plywood not only looks good but you can put in a screw where you wish and it has good holding power. I would still hang cabinets on studs. The panels were held up 3/8" - 1/2" above the floor. I planed down treated 1x4 to 9/16" and chamfered about half of the top edge at 45* for baseboards. All panels and baseboards are screwed in place to they can be removed to access wall if necessary and also screws have better holding power.
 
To avoid these ads, REGISTER NOW!
Top Bottom