To avoid these ads, REGISTER NOW!

Below 265 SQ/FT Seattle Townhouse Small Garage - 15'9" D x 9'11" W

All workspaces below 265 squarefeet.

mitchellc

Well-known member
Joined
Nov 17, 2019
Messages
88
Location
Seattle
First, some background:

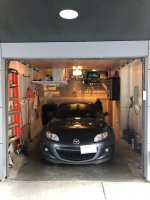
My wife and I purchased our first place a few months back, a townhouse built in 2008 about two miles away from Seattle's city center. The place we fell in love with has a minuscule 15'9" L x 9'11" garage, a bit short in depth even by Seattle townhouse standards. Despite its small size, I'm set on getting the most out of it!

This brings us to current:

My neighbors are having their roof replaced, which means that scaffolding will block my driveway in June. I've been looking for an excuse to tidy up and reconfigure the space a bit, so parking the car elsewhere will be a great opportunity to take down the existing shelving, paint the unfinished walls, add a few additional outlets, introduce an area to tackle small projects, and add in shelving and storage that's a bit more tailored to our needs. I'm hoping to be in a good spot to park the car in the garage again come end of June.

attachment.php


attachment.php


I've searched around on GJ for a while, and while I have found other small garage threads, I thought it may be helpful to share another approach to making the most from a little.
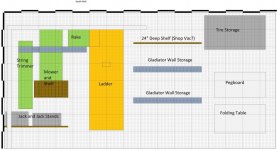
What's the goal?

Here's ultimately what I want to accomplish:
  1. Nothing is stored on the floor
  2. There is at least one work surface; either collapsible or fixed
  3. Walls and ceiling are finished by fiilling any holes, prepping for paint, and painting
  4. Additional outlets are added to minimize need for using extension cords
  5. Every storage shelf or bin is sturdy (with a known weight limit) and serves a specific purpose

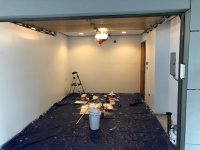
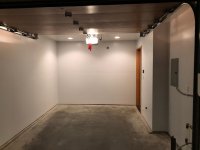
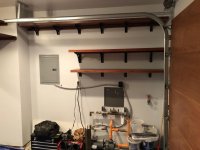
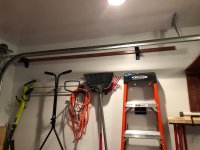
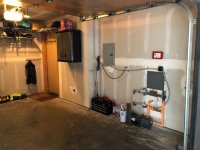
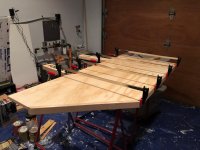
The attached images show what I'm starting with. All of the shelving and hooks are leftovers from the previous owners.
 

Attachments

  • Garage_Straight_Ahead.jpg
    Garage_Straight_Ahead.jpg
    144.8 KB · Views: 2,005
  • Garage_Left_Wall.jpg
    Garage_Left_Wall.jpg
    135.6 KB · Views: 217
  • Garage_Right_Wall.jpg
    Garage_Right_Wall.jpg
    129 KB · Views: 242
  • Garage_Straight_Ahead_2_License_Blank.jpg
    Garage_Straight_Ahead_2_License_Blank.jpg
    81 KB · Views: 2,254
Last edited:
To avoid these ads, REGISTER NOW!

el monte slim

Well-known member
Joined
Apr 4, 2018
Messages
243
Location
Midwest USA
Welcome to the forum. I can surely relate to the challenge of having a small workspace, as mine's a 13' x 12' bonus room leading to one vehicle carport.

It sounds like you've got a good plan to move forward. It's unfortunate that the one recessed area of your garage is taken up with electrical and mechanical access points, exposed plumbing, and the well pump. This area is where you'll need to be the most creative in maximizing use of the space, and I suggest the following as possibilities:

1) Since you're going to be patching drywall and adding electrical outlets, I'd also reroute the flexible electric conduit and the well pump pressure switch box to a less visually obtrusive location.

2) If you're considering the purchase of a stacked tool box on wheels, I'd place it in front of the fuse panel on the left side of the recessed area. When the need arises, you can easily pull it away from the wall for panel access.

3) I'd custom-build a rolling workbench with locking casters to be placed over and in front of the plumbing, well pump, and mechanical access door. Bonus points if your workbench design has built in storage underneath that fits around and conceals the plumbing and well pump. When you need access to those, the workbench can easily be pulled away from the wall.

4) If possible I'd relocate the red box, (First aid kit maybe?) and mount storage cabinets to the wall above the workbench.

Good luck with your project!
 

The J

Well-known member
Joined
Mar 4, 2010
Messages
152
What helps is putting together a list of tools and equipment and understanding how often you actually use them.

There are a lot of tools you use a lot less than you think and vice versa.


Build overhead storage shelf

I use Hefty clear bins with latch/lock lids from Lowes for almost all my stuff. Separate electrical, painting, plumbing, car maintenance, etc bins. They’re clear and stackable, and modular so 2 smaller bins fit in the space of 1 bin.

This let me put a single shelf up high sized around the large bin size. Bins are either full height of half height so they’re never stored more than 2 high. This avoids clutter and having to remove 5 bins to get to the bottom bin you need.


I hung my ladder from the ceiling.


Long materials went in between ceiling joists or under the overhead shelf.
 

Jagmandave

Well-known member
Joined
Nov 6, 2011
Messages
6,299
Location
Overland Park, Ks.
I see that big ol pump there on the floor, but why would he be on a well 2 miles from downtown Seattle?

What else could that pump be for?

OP? are you on a well?
 
OP
M

mitchellc

Well-known member
Joined
Nov 17, 2019
Messages
88
Location
Seattle
Thanks for the input everyone!
- The pump is for the fire sprinkler system. Not sure the code for fire sprinklers, but many attached townhomes have them here. We’re on a sewer system.
- The red box is additional fire sprinkler nozzles.

Good idea to use a standard bin size.
 

el monte slim

Well-known member
Joined
Apr 4, 2018
Messages
243
Location
Midwest USA
Thanks for the input everyone!
- The pump is for the fire sprinkler system. Not sure the code for fire sprinklers, but many attached townhomes have them here. We’re on a sewer system.
- The red box is additional fire sprinkler nozzles.

Good idea to use a standard bin size.

That's interesting. I assumed it was a well pump and pressure switch because it looks nearly identical to the one I had in my previous home. I also (incorrectly) assumed that a pressurized well tank was located on the other side of that recessed wall. Even though it's unsightly, it's probably best to leave everything intact and work around it the best you can.
 

Jayman17

Well-known member
Joined
Feb 6, 2017
Messages
3,793
Location
Seattle, Wa
MitchellC, hello, looking forward to watching your update of your garage space. I like to follow local builds when I see them. Good luck! I might be doing my own update myself later this year. :beer:

Jay
 
OP
M

mitchellc

Well-known member
Joined
Nov 17, 2019
Messages
88
Location
Seattle
MitchellC, hello, looking forward to watching your update of your garage space. I like to follow local builds when I see them. Good luck! I might be doing my own update myself later this year. :beer:

Jay

Thank you for the welcome and well-wishes! Look forwarding to seeing your update.

Milestone: Painting

Today marks the jump from planning to action, which began with filling the Miata's trunk with painting supplies. Once back home, after sweeping the floors and walls, my wife and I took everything off of the shelves, piled everything onto the floor, and took down all shelving. Afterwards, I filled somewhere between 50 and 100 holes and made a few quick drywall repairs.

Tomorrow will bring more paint prep: Sanding, wall and ceiling washing, and masking. The ceiling will get two coats of high-gloss white, but I'm still pondering the final paint color for the walls. Painting the walls white feels like a bit of wasted effort; It's like cooking and seasoning only with salt. I've tentatively crossed out gray as well. My car is gray, most of the storage I'm looking at is gray, and about 180 days a year, Seattle's skies are gray. For now I've honed in on blue, and picked up a few light blue samples today. One with a tinge of green, another with a tinge of gray, and the third somewhere in the middle.

You may notice the lack of outlets... The garage has a 15A circuit, with only one GFI outlet and one outlet on the ceiling for the garage door opener. I plan to have three additional outlets added; one in the back left, one in the back right, and one right off of the garage door aperture, ideally surface-mounted in EMT conduit.

attachment.php
 

Attachments

  • Garage_ShelvingRemoved_InitialWallPrep_053020.jpg
    Garage_ShelvingRemoved_InitialWallPrep_053020.jpg
    84 KB · Views: 1,764
Last edited:
OP
M

mitchellc

Well-known member
Joined
Nov 17, 2019
Messages
88
Location
Seattle
Are you interested in regional housing differences? Would you like to learn more about Seattle housing, specifically, single-family and townhouse residences built in the last few decades? If so, this post is for you. While I'm no expert on the subject, I'll at least share what I've learned. The first thing I learned as a transplant is to forget what housing should cost based upon price reference points anywhere else in the country.

For some background, I grew up in the south (specifically, about as far away from a beach as you can get in Florida). Before taking a job at a big multinational, I didn't get outside of the southeast much. When I first flew out to Seattle for a business trip, I was fascinated by the views, the weather (best summers around), and the housing, not to mention the city's topography, since there was more elevation gain in the city than the entire state of Florida. After traveling all throughout the country for work on business for a few years, I was offered a transfer to Seattle about three years ago, and snapped up the opportunity.

Before moving here, I was accustomed to cities with downtown areas that were ghost towns after 5 PM, that were generally laid out in concentric circles as downtown areas, big chunks of commercial/retail, and then the suburbs, where getting between each of the zones required a car. In contrast, Seattle's general layout is downtown core, with the next concentric circle dense retail/mid-rise stick built apartments on main thoroughfares, and single family homes on the arterial streets, followed by still-dense single family residences starting about two miles further out. Despite the hills, the city is pleasantly walkable. In fact, my wife and I were both able to walk to work at our last residence. While we take transit now, on nice days, it's a lovely hour and a half jaunt.

Back to housing at large, until recent decades, upzoning in Seattle has been met with resistance. Perhaps this was because of nimbyism, maybe due to zoning changes moving at the speed of law, or more probably, a bit of both. Additionally, the city is located on an isthmus between the Puget Sound and Lake Washington, which means that there's just not a lot of land east to west. With few exceptions, the only new land to develop is further north and south, which can result in eye-watering commutes to the city's core. Add in high demand, and the result is especially spendy real-estate on very small lots.

The first of my housing questions was "Why are there so many townhouses?" Because there are very few undeveloped lots left in the city, typically, for new construction to proceed, an older single-family home on a ~6,000 sq. ft. lot is razed. Within the neighborhoods where I was searching, total revenue opportunity from a single family plot converted to townhouses seemed to be about 1.5x to 2x the prevailing rate for a new-construction single family home in the same neighborhood. This doesn't account for the difference in material and labor cost to construct the higher-density housing, but given how common townhouses and rowhouses are being constructed, and that these residences are in reach of more people, the economics seem to be tipped in favor of high-density housing.

My next question was, "Why are garages so small and hard to access?" Typically, there's a narrow driveway on one side of a group of residences leading to a central courtyard 90 degrees off of the entry drive. The garage entries on ground level are set back from the rest of the house, which results in a structure with varying amount of cantilevering over the courtyard. Unsurprisingly, the reasoning for this layout breaks down to zoning. After accounting for lot shape and size, setbacks, and minimum driveway width, the much-maligned "Seattle 4-Pack" that I described above is the typical outcome. If you would like more details, you can read more about them in this blog post I found from 10 years ago. Hey, I found it interesting at least.

As a self-proclaimed car nerd and perpetual hobbyist, how did I end up with a 150 sq. ft. garage in the 4-pack layout I described above? Quite simple - otherwise it was exactly what we wanted. :)
 
Last edited:
OP
M

mitchellc

Well-known member
Joined
Nov 17, 2019
Messages
88
Location
Seattle
Not a very exciting update today. I sanded down yesterday's hole filling and swept up up the resulting dust. Thankfully it was a cool day out, not breaking the low 60s, so spending a fair amount of time in a heavy mask was about as pleasant it can be. I looked closely for divots and dings, and as a result, round two will have 50+ locations that need another layer of joint compound.

Yesterday, I should have inspected the walls closely first, and marked all of the locations that needed repair. Today I made sure to mark everything with blue tape so that I don't miss anything tomorrow. This is my first rodeo for prepping drywall for paint, so I expected a few lessons learned.

I also had a junk removal service come by and take all of the old shelving, a few car parts that I never plan to reinstall, and some hardieboard scraps that after some honest assessment, I am highly unlikely to need again... at least in those specific shapes. Knock on wood. It's tough not to hoard, but space is precious, so I have to be intentional on what gets to stay around.

attachment.php
 

Attachments

  • Garage_Sanding_053120.jpg
    Garage_Sanding_053120.jpg
    112.3 KB · Views: 1,781
Last edited:
OP
M

mitchellc

Well-known member
Joined
Nov 17, 2019
Messages
88
Location
Seattle
Today my wife and I finished out the second coat of primer. With the paint, I realized that I should have mudded over the tape joining all of the drywall sheets... The builder put on thin coat over the tape, but the paint shows that the drywall sheet edges have a depression where they're nailed down. Whoops! Live and learn. Hopefully a few more coats of paint make the depression a bit less noticeable.

During the week, I'm hoping for two dry evenings to put on the two coats of gloss white on the ceiling. I like to take everything out of the garage while painting... I'm about as neat of a painter as I am a cook, and the kitchen often looks like a bomb went off when I'm done.

attachment.php


Here are the paint samples I chose for the walls. The goal was something between light grayish blue and light greenish grayish blue.

attachment.php


attachment.php


attachment.php
 

Attachments

  • Garage_Primed_060720.jpg
    Garage_Primed_060720.jpg
    118.9 KB · Views: 1,749
  • Behr_Urban_Raincoat.JPG
    Behr_Urban_Raincoat.JPG
    17.2 KB · Views: 1,741
  • Behr_Offshore_Mist.JPG
    Behr_Offshore_Mist.JPG
    16.8 KB · Views: 1,735
  • Behr_Fresh_Tone.JPG
    Behr_Fresh_Tone.JPG
    15.1 KB · Views: 1,733
OP
M

mitchellc

Well-known member
Joined
Nov 17, 2019
Messages
88
Location
Seattle
Storage:

To the disappointment of some (many?), quite a bit of the storage will be a bit more bought than built. I'd love to have a garage full of woodworking and welding tools, but with my garage, a garage full would still not be much. I digress!

To get back to my first post, one of my core objectives is to store nothing on the floor. The second objective, since the garage is primarily used for car storage, is to be able to get into the driver and passenger doors without having to be a contortionist. If you look back at my first few posts, you can see the black and gray Craftsman storage cabinet on the same wall as the water pump. Because I always back into the garage, that cabinet is right above the driver door, so I have to turn into Gumby whenever I get in the car. So annoying. Most of my storage within this sacred walking path will be up high, at about 6' above the ground.

As the layout and storage bits are coming together in my head, I think I have settled on a few elements, but I'm still formulating the design of where everything will go.

**Note that I don't have any personal association with the manufacturers or retailers; not sure if it's uncouth to post direct links to specific purchase links on GJ.

  • Shelving brackets: Though a bit pricey, these https://www.fastcap.com/product/speedbrace brackets seem to have pretty good clearance, and the cutout means that I'm less likely to ring my bell when walking under a shelf at 6' height.
  • Tire storage: After lots of digging, I think that this tire shelf gives the best clearance underneath that I've found, and I like that the leading edge is cantered upwards.
  • Folding Worktop: I'd like to have a large sit-down workspace, but a permanent worktop would sacrifice walking space. Something like this folding wood worktop or this steel-over-MDF worktop would give me just a bit of space to work while the car is in the garage, and free up walking space to the passenger side of the car when not in use.
  • Gear Track storage: Along the long unbroken left wall, so far Gladiator Gear Track seems to be the best option for long spindly things stored close to the wall like brooms, rakes, ladders and such.
 
Last edited:
OP
M

mitchellc

Well-known member
Joined
Nov 17, 2019
Messages
88
Location
Seattle
I tried the three colors above, but on the wall, yikes, they were way too dark. Kudos to user 111R for reaching to provide recommendations and examples of paint he used; was really helpful to see the relation between paint color and how it looked in photos under garage lighting.

attachment.php


After comparing a handful of light greyish paint chips, I decided on Etched Glass, which is an ever so slightly blueish gray. I decided to use the Marquee satin finish.

attachment.php


Here's the first coat on the wall. If you look close enough, you can see that I put a bit too much faith in the builders' wall prep. There an obvious horizontal depression at the drywall edges that I should have smoothed out, as well as a few tape lines that are poorly concealed. Oh well, at least it's only the garage.

attachment.php


Another view with the door closed. The ceiling has two coats of high-gloss pure white.

attachment.php


One more coat on the walls, some final touch-up, and I can finally move on to the next stage, adding electrical outlets.
 

Attachments

  • Garage_Paint_Test_060820.jpg
    Garage_Paint_Test_060820.jpg
    71.2 KB · Views: 1,663
  • Garage_First_Coat_061320_1.jpg
    Garage_First_Coat_061320_1.jpg
    121.6 KB · Views: 1,670
  • Garage_First_Coat_061320_2.jpg
    Garage_First_Coat_061320_2.jpg
    131.8 KB · Views: 1,671
  • Behr_EtchedGlass.JPG
    Behr_EtchedGlass.JPG
    16.1 KB · Views: 1,663

Arclitgold

Well-known member
Joined
Dec 20, 2017
Messages
317
Subscribed! Looks like you’re off to a great start


Sent from my iPhone using Tapatalk
 
OP
M

mitchellc

Well-known member
Joined
Nov 17, 2019
Messages
88
Location
Seattle
Finally, I can mark the paint milestone complete. If only I could keep it this empty, so that it could be a Miata Mausoleum.

attachment.php


attachment.php


Alas, I have **** to put away. Since this project began, I added a shop vac, various paint supplies, reel lawn mower, and battery operated string trimmer, all of which need to be put away... somewhere. As I envisioned, home ownership means nonstop acquisition of new tools.

In an attempt to Tetris everything on the walls while still allowing easy access into the car, I've mapped out a floorplan and all of the walls in Excel. This will make it a bit easier to play with different layouts without committing to holes in the wall.

Here's the floorplan. The gray rectangle in the middle is the Miata.

attachment.php


This counts as the first measure, right?
 

Attachments

  • Garage_Floorplan_Baseline_062120.jpg
    Garage_Floorplan_Baseline_062120.jpg
    19.8 KB · Views: 1,520
  • Garage_Paint_Finished_062120_1.jpg
    Garage_Paint_Finished_062120_1.jpg
    76.2 KB · Views: 1,526
  • Garage_Paint_Finished_062120_2.jpg
    Garage_Paint_Finished_062120_2.jpg
    88.4 KB · Views: 1,517

Arclitgold

Well-known member
Joined
Dec 20, 2017
Messages
317
Nice work!! It’s starting to come together!


Sent from my iPhone using Tapatalk
 
To avoid these ads, REGISTER NOW!

Glin60

New member
Joined
Mar 3, 2016
Messages
1
Really like the excel floor plan idea... how did you generate that/ do you have a template laying around?

Moving from a 2+ car deep garage to a 1 car around your size, so I too will be in maximize all available space mode
 
OP
M

mitchellc

Well-known member
Joined
Nov 17, 2019
Messages
88
Location
Seattle
Really like the excel floor plan idea... how did you generate that/ do you have a template laying around?

Moving from a 2+ car deep garage to a 1 car around your size, so I too will be in maximize all available space mode

In a new sheet, I changed to "Page Layout" view (first image below). I selected all columns, and changed column width to 0.2", and selected all rows, and changed all row heights to 0.2". When you flip back to the normal view, the cells will be square. In all of my plans, I use 1 square = 1". I also filled all cells with a value of 1 so that as I drag a line across cells, I can keep track of length/height in inches. It's a lot of tedious work getting everything mapped out down to the inch, but it helps me triple check how all of the items fit together both relative to each other and relative to the studs.

attachment.php


Having a really narrow garage with storage and preserving getting in and out of the car on both sides means keeping storage as low profile as possible. Here are a few examples of how I'm obsessing over minimum depth from the wall:

The Racor PSM-1R ladder mount is the lowest-profile ladder mount I have found. It's quite simple and elegant too, actually.

I have a small reel lawn mower for the strip of grass in front of our townhouse pod. When laid flat, it is 14" deep. The The garage door opening is 12.5" from the interior wall, and I didn't want to risk scraping the car when entering the garage if I happen to be close to the edge or at an angle.

The mower is only~ 11.5" deep when at full droop. I drew up a rough plan for a wall mounted shelf so that I could ensure that the mower is always at its lowest-profile position. Here's the test fit from earlier today; should have it wrapped up in the next few days.

attachment.php


I think I've wrapped up the south wall plan, which is the largest open space, but again, need to have minimum depth below ~6' to be able to easily walk around.

attachment.php


Over the next week or two, I will finish building, staining, and mounting the shelves that I have sufficient material to complete, mount the racking (such as the tire rack) that was bought rather than built, and finish drawing out the wall plans for the north and west wall.
 

Attachments

  • Change_Cell_Size.JPG
    Change_Cell_Size.JPG
    24.9 KB · Views: 1,137
  • MowerShelf_WIP_062720.jpg
    MowerShelf_WIP_062720.jpg
    74.8 KB · Views: 1,142
  • Garage_Layout_South_Wall_062720_Resized.jpg
    Garage_Layout_South_Wall_062720_Resized.jpg
    152.7 KB · Views: 1,147
Last edited:
OP
M

mitchellc

Well-known member
Joined
Nov 17, 2019
Messages
88
Location
Seattle
Over the last week, I have been able to get all of the pre-fabbed storage stuff on the walls. Due to weird stud spacing, the tire rack is a few inches narrower than I would like, giving me only 4" of wiggle room beyond the Miata tires I have on the wall now. This will be an annoyance if/when I get a vehicle with wider tires sometime down the line.

Per a recommendation in this thread, for all of the high-load shelves, I installed using Rugged Structural Screws in lieu of the provided hardware. I frequently read not to trust installation hardware provided with shelving; for the heavy stuff overhead, I wanted to be as certain as I can be that everything is safely secured.

The wood shelving will take a while to complete (probably a few weeks from now). Need to pick up more materials, and per shelf, there are a lot more steps involved. I'm only able to work on one or two glue-ups and stainings at a time.

Most importantly, I've been able to whittle down the big pile of stuff on the floor that I have to constantly move in order to work. Feel like progress!

The only difference between the two photos is the folding table in the back corner.

attachment.php


attachment.php
 

Attachments

  • Garage_Update_070320_1.jpg
    Garage_Update_070320_1.jpg
    147.1 KB · Views: 1,110
  • Garage_Update_070320_2.jpg
    Garage_Update_070320_2.jpg
    143 KB · Views: 1,110

Arclitgold

Well-known member
Joined
Dec 20, 2017
Messages
317
It’s shaping up fast! Looks great so far!


Sent from my iPhone using Tapatalk
 

Dan in Pasadena

Well-known member
Joined
Feb 18, 2009
Messages
13,103
Location
Pasadena, CA
Excellent work!

Now of course you NEED a Race Deck floor! It's an immediate and amazingly dramatic impact. See Bikerneil's garages to get a good sense of the change it makes.

PS: Buy True Lock HD tiles - same but cheaper.
 
OP
M

mitchellc

Well-known member
Joined
Nov 17, 2019
Messages
88
Location
Seattle
It’s shaping up fast! Looks great so far!


Sent from my iPhone using Tapatalk

Thank you! After looking at the giant pile of stuff on the floor for the last month, it feels good to have the walls painted and to start chipping away at the pile.

Excellent work!

Now of course you NEED a Race Deck floor! It's an immediate and amazingly dramatic impact. See Bikerneil's garages to get a good sense of the change it makes.

PS: Buy True Lock HD tiles - same but cheaper.

Appreciate the recommendation; I haven’t made a choice on flooring yet. Given that my plan is to keep the floor clear, there’s not a lot of urgency to put anything down.
 
OP
M

mitchellc

Well-known member
Joined
Nov 17, 2019
Messages
88
Location
Seattle
Put up the first of the wood shelves. Didn’t bother sanding or using pre-conditioner prior to stain, and the color is a bit blotchy. Overall though, I am happy with the look and apparent strength.

attachment.php


Here’s the process I am using for the remainder, which is simply following the application guidelines as close as possible.

1. 3/4” plywood cut to size with 1”x2” hemlock glued vertically to the front edge
2. sanded down to 400 grit
3. Pre-condition side 1, stain, wipe away excess, dry 24 hrs
4. Pre-condition side 2, stain, wipe away excess, dry 24 hrs
5. Polyurethane side 1, dry 12 hrs, sand to 400 grit, another layer of polyurethane, dry 12 hrs
6. Polyurethane side 2, dry 12 hrs, sand to 400 grit, another layer of polyurethane, dry 12 hrs
7. Install

Here’s the mower shelf before polyurethane was applied:

attachment.php
 

Attachments

  • 1C4F9B84-18E3-40BE-BFAE-6FB46DDBF054.jpg
    1C4F9B84-18E3-40BE-BFAE-6FB46DDBF054.jpg
    68 KB · Views: 975
  • 33534C7F-EA2D-4AAD-8D2D-476CB8652EA9.jpg
    33534C7F-EA2D-4AAD-8D2D-476CB8652EA9.jpg
    124.3 KB · Views: 975
OP
M

mitchellc

Well-known member
Joined
Nov 17, 2019
Messages
88
Location
Seattle
Made some progress this week:

  1. Finished and mounted the lawnmower shelf
  2. Finished and mounted the Kayak Shelf
  3. Received delivery of all lumber to finish the project

The lawnmower and kayak shelves were both the highest effort pieces. The lawnmower shelf is four-sided and has embedded wheel stops so that it droops to its lowest profile position. This was really important, because otherwise it would stick out from the garage opening... right now it’s just inboard of the garage door aperture opening. The kayak shelf was placed on the wall in a position that had unexpected stud spacing. As a result I made a backing piece out of finished plywood so that I could bolt the bracket to the plywood backing and bolt the backing to the wall. The result is extremely sturdy and I avoided using drywall anchors.

The plan now is to get everything cut and glued, so that I can finish the remaining shelves all at once. I’m hoping that it will help me be more efficient by working in an assembly line. The last shall we say “procurement” step is to verify how much hardware is needed to finish out the job.

Current state:

attachment.php
 

Attachments

  • B2FD2B0D-A3BC-4233-BF3A-0C0B98B04D60.jpg
    B2FD2B0D-A3BC-4233-BF3A-0C0B98B04D60.jpg
    153.3 KB · Views: 945
OP
M

mitchellc

Well-known member
Joined
Nov 17, 2019
Messages
88
Location
Seattle
It’s coming along! Keep it going!


Sent from my iPhone using Tapatalk

Thank you! I have been side-tracked with yet more house projects the last two weeks, but was able to cut some boards and glue up one of the shelves this evening. Slow progress is still progress!

After years of apartment living, the smell of cut lumber, drying solvents, and grass-covered yard equipment is somehow both novel and really familiar.
 
Last edited:
OP
M

mitchellc

Well-known member
Joined
Nov 17, 2019
Messages
88
Location
Seattle
Nice transformation with paint. I've got a one car garage as well, so definitely interested to see what you can do with the space.

Thank you! Really like your build thread; your garage looks to have a lot of progress so far, and plenty of room to further optimize.

Painting has made the space much more welcoming to spend time in. I haven’t parked in the garage for two months now... just hoping that all of my assumptions about clearances are accurate once the car is back inside!
 
OP
M

mitchellc

Well-known member
Joined
Nov 17, 2019
Messages
88
Location
Seattle
A few small victories today:

  1. Scheduled an electrician to install extra outlets
  2. Finished last shelving wood cuts and glue-ups

For the extra outlets, I will have three quad outlet boxes installed. These will be surface mounted rather than flush-mounted, since I really don't want to do any more drywall and paint prep associated with flush-mounted outlets. Only adding three outlets since the garage is on a 15A breaker (which I am hoping can be exchanged for 20A), and the house only has 100A service, which isn't uncommon for Seattle townhouses, especially ones that have some gas appliances and rely on passive cooling rather than A/C. I would like to expand to 200A service in the future, but that's another project for another day.

I have continued to use the same general plan for shelving; 3/4" ACX plywood, with a 1" x 2" hemlock board glued to the face. I have two shelves that will be adjacent to the doorway into the house. My gut instinct was that having the shelving extend in front of the doorway would look weird, so I cut a 45 degree angle wedge out of the sides adjacent to the door, and used wire brads to secure the facing boards at an angle rather than clamps.

Last glue-up with one of these weird shelves missing a corner:
attachment.php
 

Attachments

  • Shelf_080420.jpg
    Shelf_080420.jpg
    142.5 KB · Views: 721
OP
M

mitchellc

Well-known member
Joined
Nov 17, 2019
Messages
88
Location
Seattle
Inching ever-closer to the finish line! Continuing on with finishing all of the shelves; applied the last of the stain tonight, and the first layer of polyurethane on half of the shelves. There's just enough space to lay all of the shelves flat on the garage floor, but reaching everything requires a bit of hopscotch and standing in really strange positions.

Should have sufficient materials to finish out the project. Famous last words, right? Crossing my fingers that I'll be able to get the damn thing done by next week so that I can finally park in the garage again after three months on the street.

attachment.php


Shelving finishing in progress... Astute viewers may notice that no two shelves are the same size. This wasn't just to make life more complicated; it was primarily to optimize for clearances and to fit for stud spacing. Kind of a pain, really. The four shelves in the foreground still have wet stain, whereas the three in the back have the first layer of poly applied, which accounts for the difference in finish (at least, I hope it does).
 

Attachments

  • Shelves_WIP_081320.jpg
    Shelves_WIP_081320.jpg
    151.6 KB · Views: 657
OP
M

mitchellc

Well-known member
Joined
Nov 17, 2019
Messages
88
Location
Seattle
It's going to look great...keep it up!

Thank you! Finally finished putting on the last coat of polyurethane tonight. What else would I want to do at midnight on a Saturday?

Picked up a high-capacity battery for the drill today, because I anticipate heavily perforating the walls tomorrow.
 
OP
M

mitchellc

Well-known member
Joined
Nov 17, 2019
Messages
88
Location
Seattle
I was really banking on having a full day in the garage today, but Sunday errands got in the way, and suddenly it was 4 PM, and I hadn't started. Thankfully I was still able to make tangible progress!

Started with the first three shelves around the door. These are all mounted high-up, with the bottom of the shelving brackets at 6'-02", because I wanted to be able to walk underneath. Previously there was a 12"-deep cabinet against the wall adjacent to the man door, which made getting in and out of the car a really annoying exercise. I probably started the project because of that damn cabinet (and needing somewhere else to put everything that was in the cabinet).

I just tacked the shelves down to the brackets (one screw per bracked), since all three will be taken down ahead of the electrician arriving next Monday to add in additional outlets.

attachment.php


I then mounted the other three shelves on the same wall as the man door. The top shelf will be used for paint, stain, and related supplies, so I will be inverting the leading edge so that it acts as a lip. This shelf will also probably need to be modified to accommodate conduit, so it's just resting in place.
The middle and bottom shelves will be used for hardware and power tools.

attachment.php


Here they are in relation to each other:

attachment.php


Finally, I have one more shelf that will fill the little bit of space above one of the garage door rails, which will be used for leftover lumber storage. I realized today that I never measured clearances to get it in place. Skeptical, I mounted just a few brackets try to wedge it in place, and of course it is just a few inches too long. I'll have to trim it down later this week.

attachment.php


A few thoughts on hardware from the project so far. I'm not affiliated with any of these companies, but let me know if I sound like too much of a shill.

  • I picked up a few packs of Fast Cap's Powerhead screws in square drive, since one of the sizes I needed was only available in philips and square drive. The square bits seem to round out really easily, and then they cam out and punch nice neat squares into the wall or into the work piece. Not super pleased.
  • GRK's Rugged Structural Screws (RSS) are awesome. I picked these up at the recommendation of another GJ user. They drive really easily, especially compared to lag screws, and I'm confident that they are way overkill for the amount that I am using for my shelves. I like overkill when stuff is stored overhead. The star-drive bit they include even holds up really well. Now onwards, I'm going star drive for screws wherever possible
  • I continue to be pleased with the Franklin Sensors FS710+ stud finder. I've used it to poke at least 100 holes in our walls so far, and it has been really trustworthy. The bubble level has been a massive help as well.
  • So far I really like the Fast Cap Speed Braces. They are eye-wateringly expensive compared to just about any other brackets I looked at, but they are the no-compromise option. I could wax poetic about why these are great, but in short, they are really heavy duty, they don't have the hypotenuse, they have copious large screw holes which are thoughtfully recessed and easy enough to access, and the dimension tolerances are really precise. I am hoping that these are an expense that only hurts once.
 

Attachments

  • Shelving_081620_3.jpg
    Shelving_081620_3.jpg
    148.8 KB · Views: 541
  • Shelving_081620_2.jpg
    Shelving_081620_2.jpg
    109.1 KB · Views: 536
  • Shelving_081620_1.jpg
    Shelving_081620_1.jpg
    130.9 KB · Views: 541
  • Shelving_081620_4.jpg
    Shelving_081620_4.jpg
    109.7 KB · Views: 538
To avoid these ads, REGISTER NOW!
Top Bottom