To avoid these ads, REGISTER NOW!

Craftsman 1956 "100" 103.248xx Restoration, Quill Jam

spletz

Member
Joined
Jul 1, 2020
Messages
11
Seems like the last two days of messages got lost in this mornings data dump, so I'll try to re-post the vital stats here. Thanks to Frank Lee and Provincial et al for the responses and help. Unfortunately I only subscribed last night and have the last two messages, which I'll copy and past into new posts after this one.

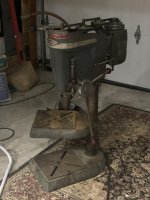
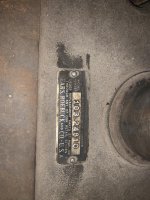
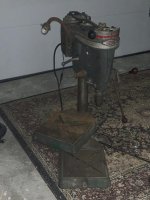
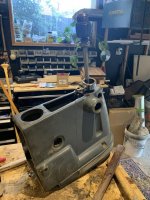
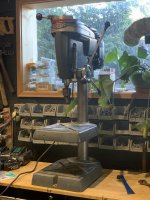
So, here goes. The other day my good buddy Joe managed to score this 1956 Craftsman 100 Bench-top Drill Press. Not only that, he's all set on a DP, so he gave to it me for his price, which was FREE!!!

It's in fabulous working order, with a fully functioning Vari-Slo unit. Hoping belts a run of de-greaser and a some new grease is all she needs.

WITH ONE BIG EXCEPTION!

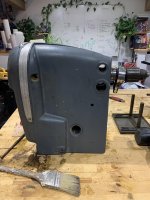
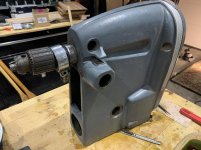
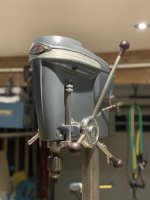
The quill is jammed in the head casting. Even while running, with all the bolts unlocked, I can't turn the feed or get any action on the quill.

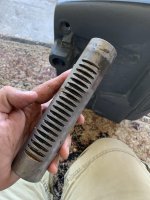
Frank recommended looking for a lodged object. There was a wasps nest, LOL, but it wasn't blocking it - at least not mechanically. It may be residues that did it in. I removed that. No dice. Next recommendation was to put some penetrator in. That is in process.

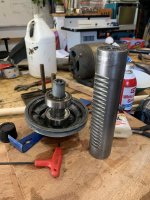
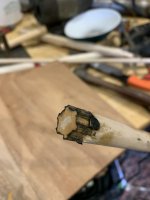
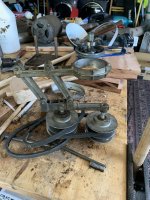
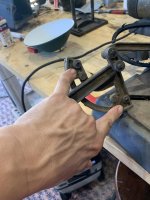
I've pulled all the head parts, disassembled per Frank's guide, and, and I get to step 12 of removing the quill and what seems like it should just slide out is stuck in. So I tap the spindle from the top, through the top of the pulley, and the spindle travels well until I feel some resistance,. but no movement on the quill.

At this point I'm wondering if it's OK to keep pressing through that resistance? Hoping that if we dislodge the upper support on the quill, it may release the tension that's seized it below. The dowel is well into the pulley head at this point and I don't want to damage what I can't see.

Thanks again to Frank and all who responded earlier or respond to this one. Tricky headscratcher. Hoping I don't mess it up!

-E
 

Attachments

  • IMG_2401.jpg
    IMG_2401.jpg
    107.4 KB · Views: 39
  • IMG_2419.jpg
    IMG_2419.jpg
    101.3 KB · Views: 24
  • IMG_2417.jpg
    IMG_2417.jpg
    118.2 KB · Views: 27
  • IMG_2415.jpg
    IMG_2415.jpg
    158.6 KB · Views: 30
  • IMG_2416.jpg
    IMG_2416.jpg
    148.2 KB · Views: 29
  • IMG_2406.jpg
    IMG_2406.jpg
    143.7 KB · Views: 26
  • IMG_2403.jpg
    IMG_2403.jpg
    88.9 KB · Views: 28
To avoid these ads, REGISTER NOW!
OP
S

spletz

Member
Joined
Jul 1, 2020
Messages
11
Some more images of Day 2 progress after some de-greasing and breakdown.

The model number on this is 103.24810. As I gather it, the 248 was the code for this model, the final two digits in the 10's signifying Bench, and a 20's being the floor model, 15 and 25 the tilt table, respectively.
 

Attachments

  • IMG_2427.jpg
    IMG_2427.jpg
    67.5 KB · Views: 30
  • IMG_2426.jpg
    IMG_2426.jpg
    75.1 KB · Views: 28
  • IMG_2425.jpg
    IMG_2425.jpg
    119.5 KB · Views: 29
  • IMG_2424 (1).jpg
    IMG_2424 (1).jpg
    96.9 KB · Views: 32
  • IMG_2423.jpg
    IMG_2423.jpg
    98.5 KB · Views: 32
  • IMG_2420.jpg
    IMG_2420.jpg
    87.7 KB · Views: 30
OP
S

spletz

Member
Joined
Jul 1, 2020
Messages
11
Frank - you also recommended removing the chuck for the quill removal. If I can tap this through is that necessary? You can see is a 6A33, which I guess I'd need wedge taps for.
 

Provincial

Well-known member
Joined
Sep 21, 2011
Messages
6,855
Location
Near Salem, OR
My response got lost in the data loss, so I'll repeat the suggestions.

It looks like there is rust at the joints where the quill enters the upper and lower parts of the housing. If you can scrape away what is hiding the seam between the two mating parts, it will help allow penetrating oil to work into the joint. I recommend a 50/50 mix of ATF and Acetone, Kroil, or Liquid Wrench. The first option must be mixed by the user and the Acetone evaporates fast enough it needs to be mixed just before application.

The latest photos you posted look like you have pulled the spindle out of the quill. If so, let the penetrating oil work for several days or a week before trying to move the quill again. Keep any area where the quill contacts the head casting soaked with the p-oil.

When the p-oil has had time to work, try moving the quill by placing a piece of smooth, flat steel on the end of the quill and hitting it with a soft-faced hammer. A plastic dead-blow hammer works well for this. The purpose of the steel is to apply the force evenly over the end surface of the quill to avoid damaging it.

Since the original paint is in such good shape, it would be a shame to have to resort to heat to get the quill moving. Take your time using less intrusive methods.

Good luck!
 

FrankLee

Well-known member
Joined
Sep 13, 2010
Messages
3,551
Location
seMI, 48317
It's like déjà vu all over again! :lol_hitti

No kidding!

Welcome back Speltz! You did an excellent job reconstructing this thread.

After your last post the other day, I was starting to think the spindle was seized in the spindle pulley. Your latest picture proves otherwise.

Questions:
  1. Did you remove the set screw on the spindle collar before sliding/driving the spindle down?
  2. What is the distance of the spindle showing between the bottom of the quill to the thrust collar?
  3. Can you tell if the top of the spindle is free from the spindle pulley?
  4. Can/did you remove the spindle collar, rubber washer and steel washer between the quill and the spindle pulley?
  5. Did you remove the spindle retaining screws?

I'm trying to determine if there is a burr on the spindle near the shallow divot, or is the spindle mushroomed at the top of the spindle splines.

It appears that the amount of spindle showing indicates that a burr on the spindle is stuck on the lower bearing. I just want to verify. If that's the case, you should be able to continue driving out the spindle from the top with a 1/2" wooden dowel or similar. The spindle may slide through the inner race of the lower bearing, or the lower bearing will slide out of the quill with the spindle.


50068377627_a6f94d0a12_o.jpg

I'm not sure there is much rust, but I agree with Provincial that a penetrant is needed. In addition to applying penetrant to the quill slides, spray/squirt some into the holes for the spindle retaining screws.

I don't think it's necessary to remove the chuck at this time, but you will likely want to later.


Some more images of Day 2 progress after some de-greasing and breakdown.

The model number on this is 103.24810. As I gather it, the 248 was the code for this model, the final two digits in the 10's signifying Bench, and a 20's being the floor model, 15 and 25 the tilt table, respectively.

Regarding model numbers... Like you said, 103.24810 is the model number. 103 is the Sears code for the manufacturer, King-Seeley. 2481 is the catalog number. The digit "1" means its a bench model; a "2" would be a floor standing model. The last digit is a "0" or "1". I don't think that has ever been deciphered.
 
Last edited:
OP
S

spletz

Member
Joined
Jul 1, 2020
Messages
11
Thanks all. That is super helpful. I’ll get the penetrant on there ASAP and loosen up any collars I can find before trying to tap it through the pulley. Thanks!

Provincial, what is ARM, BTW?
 
OP
S

spletz

Member
Joined
Jul 1, 2020
Messages
11
Thanks Provincial! Will do with the oil, and will definitely take my time. Would hate to ruin 63 years of use with one faulty hammer blow. I already made the mistake of putting a pipe wrench on the quill base and marring it. (Very bottom so hoping it can be buffed out and it’s not a fatal error!). Such a boneheaded move.
 
OP
S

spletz

Member
Joined
Jul 1, 2020
Messages
11
While we’re here, Frank I see your list of equipment has almost half 100s but you restore dozens of DPs it sounds like. What made you settle on the 100s? Thinking I got a true diamond in the rough here if I can get the quill working for the cost of free plus degreaser and some penetrating oil!
 

FJ 432

Well-known member
Joined
Aug 2, 2010
Messages
3,725
Location
Littleton Colorado
First off, great find on a wonderful bench model.

Selfishly, I would like to request a close up photo of how the vari-slow is attached to the top of the head. I have the vari-slow option but it has no way of attaching itself to the cast iron head. Thanks in advance.
 

FrankLee

Well-known member
Joined
Sep 13, 2010
Messages
3,551
Location
seMI, 48317
While we’re here, Frank I see your list of equipment has almost half 100s but you restore dozens of DPs it sounds like. What made you settle on the 100s? Thinking I got a true diamond in the rough here if I can get the quill working for the cost of free plus degreaser and some penetrating oil!
Growing up, my dad had a '50s 12-1/4 Dunlap drill press as long as I could remember. Years later, I got it and owned it for 25+ years until I bought dp#1 in 2012. I gave the Dunlap to my brother. I wanted to replace parts on the 100, so I looked for another, then another, and so on.

My keeper machine is a 100, but I've had all three King-Seeley sizes from the mid '40s to mid '60s. I just prefer the 100 over the others.
 
To avoid these ads, REGISTER NOW!

Provincial

Well-known member
Joined
Sep 21, 2011
Messages
6,855
Location
Near Salem, OR
spletz, I'm not sure what you mean about ARM. Perhaps you were meaning ATF, which is Automatic Transmission Fluid. There are may types of ATF, but for this purpose, just get the basic stuff.
 
OP
S

spletz

Member
Joined
Jul 1, 2020
Messages
11
Hi All. Phase 1 is complete.
With FrankLee’s help I was able to drive spindle through the pulley and quill and out. Had a bit of trouble because I mistakenly used a 5/8” dowel. Word to the wise, 1/2” does the trick. Once the soibdle was out (remember to loosen the spindle collar before you drive the spindle) then I was able to remove the steel washer, rubber washer, and collar. I thought at this point I might be able to move the quill with some persuasion but still no dice. So with FrankLee’s help I was able to pop the pulley and bearing assembly out from below without undoing the snap rings. I needed to insert the 1/2” dowel back up through the quill and then a larger block in between that dowel and the pulley so I could distribute the force. A couple solid taps and it was out. A couple taps askew popped the bearing out from either end of the quill.

Now it was just the head casting and the quill and still a few taps did nothing. Not wanting to strip the paint off my badges with heat or degreaser, I removed them with a metal punch from behind.

With mechanical force not working, it was time to turn to chemical and thermal methods. A blowtorch seemed a likely next age but I thought to try one other method.

I had about a quart of really concentrated degreaser I’d been using to clean the exterior. Basically an industrial strength Simple Green called CL 42A. The insteuctions in the degreaser say about 12 to 1 strength for machine cleaning, so naturally I was using it full strength. ;-) In any case I had preserved all of the degreasernid been soaking the parts in in one small tub. I took that quart or so of degreaser, removed the parts, and put it in a Home Depot tote with many gallons of hot hot water and submerged the head casting in this hot water for two hours.

When I came back and gave it a tap, the quill moved and it was easy least from there on out. Cleaned the parts, replaced the bearings and popped everything back in. I had to tap the holes for the badges with 6-32 dies and 3/8 stainless screws. Note: If you forget to get the tap handle and the store closes for the holiday before you can get back, you can use a spoke wrench! Still waiting on my Vari-Slo belts so I set it up at the 1750 RPM fixed position in the meantime but she‘s back up and running and the feed works flawlessly..

FL432 I will post a bunch of pictures on the VariSlo when the belts come in. For now a few others of the process.
 

Attachments

  • 73022CD8-0FA4-4019-969A-9F15581C82D1.jpg
    73022CD8-0FA4-4019-969A-9F15581C82D1.jpg
    90.8 KB · Views: 34
  • D09B21F0-D307-4B19-8C28-B17E399FEADC.jpg
    D09B21F0-D307-4B19-8C28-B17E399FEADC.jpg
    61.1 KB · Views: 34
  • DD3BE806-D4BB-4DD5-A039-7BEB9FDB5069.jpg
    DD3BE806-D4BB-4DD5-A039-7BEB9FDB5069.jpg
    129.3 KB · Views: 26
  • F9421D1F-20B3-4B0C-B8E7-213527E3F74E.jpg
    F9421D1F-20B3-4B0C-B8E7-213527E3F74E.jpg
    117 KB · Views: 24
  • 6584ADCE-16A6-49C8-91DF-3B37CBDAAB66.jpg
    6584ADCE-16A6-49C8-91DF-3B37CBDAAB66.jpg
    86.5 KB · Views: 30
  • A01319B7-4F81-404E-81E4-3004478499AD.jpg
    A01319B7-4F81-404E-81E4-3004478499AD.jpg
    51.3 KB · Views: 27
  • 83C838C6-6A3F-43A8-A502-5AAED45E6772.jpg
    83C838C6-6A3F-43A8-A502-5AAED45E6772.jpg
    75.1 KB · Views: 28

FrankLee

Well-known member
Joined
Sep 13, 2010
Messages
3,551
Location
seMI, 48317
Excellent work! Some creative thinking with impressive results.

Dismantling the Vari-Slo can be tricky, but shouldn't be as difficult as that quill.

I love the original paint. It looks great!
 
OP
S

spletz

Member
Joined
Jul 1, 2020
Messages
11
Hi all. It up and running with the Vari-Slo and I am SOOOO pleased with it. Thanks so much to all of you for your help, particularly King Seeley aficionado FrankLee.

Attached are some pics of the Vari-Slo after it was out. The guides were very helpful, and once it's off the column (which I did to clean) it was quite simple to change the bands. It does seem like you'd need a sink puller or something like that to remove the strut separating the two center pulleys otherwise as you need to remove at the same pace or it binds. Since I had it off, a quick tap from the bottom and it was off, which freed up all my belts. I used the AX15, 18 and 19 cogged belts. I thought I'd have to tune it to get it working right, but just getting the pulleys aligned per the patent drawings FrankLee posted it worked smooth the first time through.

FL432 - there are some flat-head screws on the inside of the Vari-Slow unit. These serve two purposes. You adjust them to get the level of the guide to sit cleanly, and then they catch the lip as you tighten the set screws from above. I didn't have to adjust these yet, but once you seat it correctly, and then tighten the set screws it fits like a glove without any fastener threading.

So I am so excited to build a cabinet for this and my compressor tomorrow.

The DP does seem to have a bit of wiggle in the bit. Any tips for tuning that out or am I in for a new spindle?

Also - I think I have a line on a 12" King Seeley Band Saw to match this DP and I am so excited. Any recommendations on it? Worht the restore to get the matching set? I have to say, I want to be a pragmatist and get a 14" but the aethetics of the pair!!! Plus since the DP was free and the Band Saw is under $100, that's pretty practical right?

Thanks Again!
 

Attachments

  • IMG_2522.jpg
    IMG_2522.jpg
    152.7 KB · Views: 19
  • IMG_2521.jpg
    IMG_2521.jpg
    124.1 KB · Views: 21
  • IMG_2455.jpg
    IMG_2455.jpg
    136.1 KB · Views: 21
  • IMG_2436.jpg
    IMG_2436.jpg
    86.8 KB · Views: 18
  • IMG_2435.jpg
    IMG_2435.jpg
    88.8 KB · Views: 17
  • IMG_2434.jpg
    IMG_2434.jpg
    131.9 KB · Views: 17
Last edited:

FrankLee

Well-known member
Joined
Sep 13, 2010
Messages
3,551
Location
seMI, 48317
Very nice!

I have had some success of reducing runout using a BFH, but I don't really recommend it.

A matching band saw would be a nice addition, but condition is everything. I've never refurbished a band saw, so maybe someone who has will chime in.

It would likely need new tires and the blade guides are often fubar. I believe replacements are available...$$.

New bearings for the drive wheel are no longer available and a close replacement may need machining. Search for water pump bearing.
 
Last edited:

Provincial

Well-known member
Joined
Sep 21, 2011
Messages
6,855
Location
Near Salem, OR
Spindle wobble, if due to a bent spindle, is best addressed in an arbor press, using a dial indicator to check the progress of carefully tweaking it back into alignment. It only takes a few minutes if the operator is experienced.
 
OP
S

spletz

Member
Joined
Jul 1, 2020
Messages
11
So finally I have the press where I want it. SItting on a cabinet I built, with a fence I built, and the runout taken down from over 85/1000s down to 3. I tell ya, I had this thing fall on my leg during the restoration at one point, and I still have a dent in my leg, but the scariest part was taking the hammer to the spindle to correct the runout!

Thanks again to FrankLee and all who helped me restore this new pride and joy of my shop.
 

Attachments

  • IMG_2672.jpg
    IMG_2672.jpg
    106.9 KB · Views: 16
  • IMG_2673.jpg
    IMG_2673.jpg
    112.3 KB · Views: 15
  • IMG_2554.jpg
    IMG_2554.jpg
    133.3 KB · Views: 15
  • IMG_2552.jpg
    IMG_2552.jpg
    114.6 KB · Views: 12
  • 61631454661__582A4A1F-03B6-40B8-AD73-8686DC1D3AAE.jpg
    61631454661__582A4A1F-03B6-40B8-AD73-8686DC1D3AAE.jpg
    125.6 KB · Views: 13
  • 61734755454__82E24B20-17E4-451B-B1A0-30D2882DD922.jpg
    61734755454__82E24B20-17E4-451B-B1A0-30D2882DD922.jpg
    95.8 KB · Views: 16
Last edited:
To avoid these ads, REGISTER NOW!
Top Bottom