To avoid these ads, REGISTER NOW!

Newbie questions about drawer construction

eljay

Well-known member
Joined
Mar 14, 2014
Messages
208
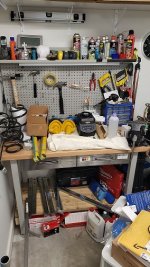
I have this workbench: https://www.amazon.com/dp/B005NAVFEW/?tag=atomicindus08-20

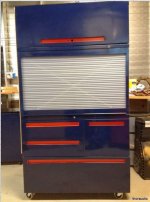
I am planning to add drawers to it. Currently, I'm leaning towards 5" high drawers, which would give me 4 extra drawers underneath the two under the top. Each would fit two small bits organizers stacked on top of each other.
My plan is to screw metal flat bars to the side legs and screw drawer slides to those.
Since I've never built drawers from scratch (there's a first time for everything!), my newbie questions are about materials and how to construct the drawers. I've watched some videos, but most are short width.
The drawers won't have heavy tools in them, but organizers with screws, nuts can get pretty heavy too.
Each drawer will be 3'x2'.
Do I go with 1/2" plywood for the drawer boxes and 3/4" for the fronts?
And is the best way to construct the box sides with glue and screws and then attach the bottom piece by gluing it and screwing it into the sides from the bottom with standard wood screws?

I don't have a table saw, so I hope I can find a nice enough HD associate to cut all the pieces for me.

Thanks!
 
To avoid these ads, REGISTER NOW!

astroracer

Well-known member
Joined
Jun 22, 2005
Messages
3,001
Location
Mid_Michigan
Google "building a drawer". Much easier then trying to explain it here. You can build them out of anything but 1/2" plywood for the sides and 1/4" for the bottom should suffice.
If you have no way to rabbit or dovetail them then screws and glue will work for light duty construction.
Mark
 
OP
E

eljay

Well-known member
Joined
Mar 14, 2014
Messages
208
Google "building a drawer". Much easier then trying to explain it here. You can build them out of anything but 1/2" plywood for the sides and 1/4" for the bottom should suffice.
If you have no way to rabbit or dovetail them then screws and glue will work for light duty construction.
Mark
Thanks. What I'm finding hard to determine is how to attach the bottoms. Some people screw the bottoms from underneath, some from the sides, some use dado. Putting the bottoms on the inside requires the most precision cut, so I hope the store can accomplish that.
Since I don't have any woodworking tools (just a circular saw with incorrect blade at this point!), I'm trying to find the best way to put it together for strength.
A Kreg jig will make it a lot simpler, and you'll find all kinds of uses for it.
Thanks. I'll go buy one as I do see that it would be a lot easier to put together drawer boxes with it.
 

aka Larry

Well-known member
Joined
May 2, 2012
Messages
8,038
Location
Eastern, NC
Unless your BBS is better than mine (Lowe's) forget about anything that even resembles a "precision cut". If you get something within 1/4" you're lucky IMO.

I agree that a dado (simple with a router and a fence) to make a slot for a floating bottom is the right way to do it.
 

astroracer

Well-known member
Joined
Jun 22, 2005
Messages
3,001
Location
Mid_Michigan
Get a fine tooth blade for your Skilsaw and have it. A lot can be built with a Skilsaw, accurate layout and some clamp-on cutting guides.
I built this cabinet with a Skilsaw and a router...
2v2UFqPUox9EDKg.jpg

2v2UFqk6vx9EDKg.jpg

Perfect match for the existing wall unit.
2v2UFqT8Mx9EDKg.jpg

Mark
 

lilredex

Well-known member
Joined
Apr 29, 2006
Messages
5,956
Location
Toronto
Mine is just a box that was dropped in when completed. Drawers are very basic with 1/8" bottoms glued/nailed on. The sides were grooved for drawer slides (runners) with a router. I do have a TS, but agree with above...you can do much with a hand held circular saw and a few guides.


It was built with rough scraps that were found. I had no planer, so if the sides were of different thicknesses, the front and back widths were adjusted to suit.

It has held up well for thirty years, and I'd do the same today.
 

Attachments

  • Fastener Storage 1E.jpg
    Fastener Storage 1E.jpg
    56.8 KB · Views: 74
  • Fastener Storage 1C.jpg
    Fastener Storage 1C.jpg
    82.4 KB · Views: 85
  • Fastener Storage 1B.jpg
    Fastener Storage 1B.jpg
    63.2 KB · Views: 66
  • Fastener Storage Drawer (Nails).jpg
    Fastener Storage Drawer (Nails).jpg
    152.4 KB · Views: 31
Last edited:
OP
E

eljay

Well-known member
Joined
Mar 14, 2014
Messages
208
Love the inspiration here!

Thank you.

I'll go look for some necessary tools and see what I can do.

I plan to get the metal flats and slides installed first and then measure the drawer sizes and go from there.

And yeah, precision cuts from HD may be tough to get. But I need that 4x8' plywood cut somehow to be able to transport it home.
 

manwithtools

ALLIANCE MEMBER
Joined
Aug 24, 2015
Messages
13,820
Location
Lebanon, TN
The rule is: every new project deserves a new tool. My wife has known this for years.

Glen

Absolutely, and since you never run out of projects there is an endless need to buy tools. I'm to the point now that I am upgrading old tools for the new projects and giving the old ones to my son.
 

nadogail

Well-known member
Joined
Jan 23, 2009
Messages
31,949
Location
Coronado, CA
A drawer is a box that slides in and out of a frame, usually there are some sort of slides involved.

As I consider the above, most carpentry work involves constructing some sort of a box; either to keep something in or something out.
 
OP
E

eljay

Well-known member
Joined
Mar 14, 2014
Messages
208
I picked up flat steel bars tonight and discovered that Princess Auto is now out of the 22in slides and they only had two 20in left. Oh well, I'll have to use two 22in and two 20in slides.

Now, I need to find some machine screws with low profile heads to attach the slides to the flat bars and then I'll start with the slides install.

I can't wait to see this through. It should clean up quite a bit of my loose mess and clear my bench.
 

rayra

Well-known member
Joined
Dec 1, 2014
Messages
4,724
Location
Escaped from Los Angeles
2' width, full of metal parts, I'd use the 3/4" for the bottom of the drawer box. And I would 'trap' the bottom within the sides. Think about gravity and sheer and pull strength of your fasteners and shape the design to work to the best advantages of those factors.

The way the sides meet each other matter as well, when you are moving such weight. Especially if you are using a plain **** or lap joint. Again position your pieces and fasteners so you or gravity are not given an easier time of pulling the drawer apart.

Glue AND screw.

Kreg's nice but the specialty screws are expensive.
 

bugnut

ALLIANCE MEMBER
Joined
Jul 14, 2012
Messages
3,886
Location
Central Ohio
eljay
i would suggest a visit to you tube Steve Ramsey wood working for mere mortals he builds without a lot of overkill and usually pretty functional. Take a look
 

MushCreek

Well-known member
Joined
Jan 14, 2015
Messages
9,768
Location
Upstate South Carolina
I agree with the others that a good saw blade and a cutting guide will get you there. I built all of my kitchen cabinets, and found it easier to cut the plywood that way rather than wrestle it on the table saw. The table saw would be better, but you need BIG in feed and outfeed tables to handle 4 x 8 sheets. I would also consider a router (used with the same cutting guide) to cut dadoes for the drawer bottoms. Good glue is a must building cabinets. I also used Kreg system for building my cabinets. The screws aren't that expensive if you buy them online.

Probably too late to help you, but I bought my ball bearing drawer slides online as well. Big Box store prices on that stuff are ridiculous. I got mine here:

https://www.cshardware.com/drawer-slides

They sell the special low-head screws to mount them, too.
 

aka Larry

Well-known member
Joined
May 2, 2012
Messages
8,038
Location
Eastern, NC
Probably too late to help you, but I bought my ball bearing drawer slides online as well. Big Box store prices on that stuff are ridiculous. I got mine here:

https://www.cshardware.com/drawer-slides

They sell the special low-head screws to mount them, too.

I've bought slides and hinges from CS Hardware as well. Their prices seem too cheap to believe, but I've been satisfied with all their products.
 
To avoid these ads, REGISTER NOW!
OP
E

eljay

Well-known member
Joined
Mar 14, 2014
Messages
208
Eljay

What do you think of that workbench? I am thinking about replacing my small one and have seen that one online a couple of times.
I really like it. I have mounted a vice to it and have built a bottom shelf to store things, but it's a mess and after getting a proper toolbox (42" Husky), I quickly realized how much I need drawers.

I'll see if I can post a pic later. It's a giant mess as I am in perpetual sorting mode and having too many things on the go and a toddler, so no time. I'm sure everyone here is in the same club. :)
 

spudley

Well-known member
Joined
Dec 27, 2016
Messages
702
Location
Northeast Wisconsin
When we (my boys and I) built a lake cottage, we cut down a few large oaks. A nearby farmer had a (Snidley Whiplash big wheel) sawmill that transformed those oaks into a 1000 bd ft of usable lumber. I started buying tools and like others said made the kitchen and bathroom cabinets and finish trim boards, mostly with a router and table saw.

You can find a functional table saw on Craigslist for $100. Buy one and get a good blade. Make your own straight cuts much faster and safer.

Kreg jigs are great for hiding fasteners but not necessary in your application. Today's glues, properly clamped have tremendous strength. Add some screws and you're good.

I would definitely rout or dado the drawer bottoms and use good slides, maybe even go with full extension models. Never hurts to increase material size especially when you start adding weight which is inevitable in a garage setting.

Warning...once the woodworking bug bites you, very few ever recover.
 
Last edited:
OP
E

eljay

Well-known member
Joined
Mar 14, 2014
Messages
208
The OP is in Canada which pretty well eliminates ordering them from the U.S. unless they are free.

PAL has them on sale right now at half price, $8.49 for a 22" pair.

https://www.princessauto.com/en/detail/22-in-full-extension-ball-bearing-drawer-slides/A-p8587776e
Yep. those are the ones I bought and that's what actually started the project idea. I saw these on sale and when I went home, I looked at the workbench and realized I need to get them. :)
The local store is out of the 22in, but I can order them online.
Now that I have 20, 22, and 24in at home, I am thinking that 20in is actually the best fit. The outside distance between the rear and front legs is exactly 22in. If I subtract 3/4" for the front, the max drawer box depth will be 21 1/4" and 20in slides would bolt to the metal flats easily between the legs. 20in should work for me, correct?
 

Attachments

  • bench.jpg
    bench.jpg
    84.6 KB · Views: 51
  • slides.jpg
    slides.jpg
    100.1 KB · Views: 46
Last edited:
OP
E

eljay

Well-known member
Joined
Mar 14, 2014
Messages
208
When we (my boys and I) built a lake cottage, we cut down a few large oaks. A nearby farmer had a (Snidley Whiplash big wheel) sawmill that transformed those oaks into a 1000 bd ft of usable lumber. I started buying tools and like others said made the kitchen and bathroom cabinets and finish trim boards, mostly with a router and table saw.

You can find a functional table saw on Craigslist for $100. Buy one and get a good blade. Make your own straight cuts much faster and safer.

Kreg jigs are great for hiding fasteners but not necessary in your application. Today's glues, properly clamped have tremendous strength. Add some screws and you're good.

I would definitely rout or dado the drawer bottoms and use good slides, maybe even go with full extension models. Never hurts to increase material size especially when you start adding weight which is inevitable in a garage setting.

Warning...once the woodworking bug bites you, very few ever recover.
I am quickly realizing that asking questions here is a big mistake... I should just ask my neighbour with a workshop to build me 4 drawers, give him a two-four and a bottle of wine and be done.
Instead, I will spend hours researching routers, table saws, build guides, and end up with whole bunch of new tools and need for more drawers and storage, won't I? :lol:

I am also planning on enclosing my storage racks (have another thread on that), so I guess any tools and experience will come in handy there to build sides and sliding doors frames. Yeah, I guess it started...
 

ford33

Well-known member
Joined
Feb 26, 2011
Messages
2,118
Location
Chicago, IL. USA
Don't over analyze the drawers. Pick a type to build and go for it. You're a rookie woodworker so any effort will be beneficial to you. If the drawers fall apart in 5 years, you can rebuild them with new found knowledge. It is a win win for you.

The stuff I built years ago is embarrassing to see now. I learned and now what I build is so much better. I wouldn't have the skills I have today without the experience I had earlier.

Good luck and post pictures when done.
 

HenryAZ

MEMBER EMERITUS
Joined
Sep 18, 2012
Messages
1,054
Location
South Congress AZ
I built many drawers when I worked in a millwork shop. The standard drawer was solid wood front, solid sides and back (cheaper wood, planed down to 1/2"), and a 1/4" plywood bottom set in a groove in the sides, passing over the bottom of the back where it was nailed. Use the bottom plywood to square up the drawer before nailing it to the back. The sides were simply rabbeted to the fronts, and secured with 4 or 6 penny cc nails, no glue anywhere in the drawer. For my own, or shop use, we just used wood slides. The shop drawers were for our workbenches, and were big, 2' x 3'. Customers' drawers typically had metal slides. The drawers I built for myself (a few items of furniture) are still in fine shape, nothing has come loose, and this is now 40 years since I made them. No need to get fancy for workbench drawers.
 

eastbaysubaru

Well-known member
Joined
Dec 6, 2009
Messages
340
Location
NorCal
FWIW, I would consider getting a track saw. It makes ripping down sheets of plywood very easy, especially when you're doing most of your work solo. I picked up this Makita and I told my wife I might leave her if it were possible to marry a tool, I love it that much. Super accurate cuts and the blade it comes with is very good. It's certainly an investment but I think between this and a router you can make a TON of stuff.

https://www.amazon.com/gp/product/B00CHN6L74/?tag=atomicindus08-20

-Brian
 

Sawdust_

Well-known member
Joined
Mar 2, 2020
Messages
77
Location
NY
I agree with the tracksaw comments and lucky you for getting the makita. I bought a Chinese made Wen tracksaw and that thing makes working on sheet goods so much easier.
 
OP
E

eljay

Well-known member
Joined
Mar 14, 2014
Messages
208
I just looked into tracksaws. I can totally see the benefits! Hm...

In other news, I got an idea from another member (thanks drboom!) that I'm now looking into: lateral filing cabinet instead!
As it happens, a standard legal 2-drawer metal filing cabinet (like this one) fits the opening quite nicely!
The cabinet size is 36x27-1/8x18". The only drawback is that I would get only two large drawers instead of 4 like I wanted.
But I can just buy a cheap used cabinet, install some coasters and slide it under the workbench and be done. Plus an ability to slide it out and even have some extra table work area when needed.
 

Sawdust_

Well-known member
Joined
Mar 2, 2020
Messages
77
Location
NY
The filing cabinet might work for you but it depends what you are storing in them. I use them at work but I find them flimsy and the slides start to jam up after a while.
Anything heavy in the drawers will be an issue.
 

Jackfre

Well-known member
Joined
Dec 26, 2010
Messages
4,410
Location
N CA
I received an promo from Rockler on Drawer Lock Align Hardware. You might look at them.
 
OP
E

eljay

Well-known member
Joined
Mar 14, 2014
Messages
208
The filing cabinet might work for you but it depends what you are storing in them. I use them at work but I find them flimsy and the slides start to jam up after a while.
Anything heavy in the drawers will be an issue.
Good point.
Ideally, I'd like at least two lower profile drawers. If I could find something like the bottom in the attached picture (found from another member on GJ), I might get that as it has smaller drawers.
I don't have many large tools to fill up a deep drawer like that.
Now, having said that, I just repurposed the bottom of the deep drawer on my toolbox and started filling it with HD small parts organizers just placed next each other as they fit perfectly. Then I will just label them to know, which one to pull out for what I need. I think I could do that for one of deep filing cabinet drawers, but not sure what I'd do with the top one being deep and not having full back and as you said, being a bit flimsy to pull out. It would also need to be secured somehow to prevent tipping if I were to put it on casters. So, I'm still back and forth on the direction to take.

Also, I found some leftover MDF trim boards in the garage. I have 1", 3/4" and 5/8" long pieces. Would those make good candidates for drawer boxes with plywood bottoms? Or do screws pull out of MDF easily over time?

I received an promo from Rockler on Drawer Lock Align Hardware. You might look at them.
Thanks! That looks good. I was able to find some nice and cheap organizers at Ikea in their kitchen and living room sections that I'm using in my toolbox.
 

Attachments

  • cabinet.JPG
    cabinet.JPG
    56.1 KB · Views: 35
Last edited:
OP
E

eljay

Well-known member
Joined
Mar 14, 2014
Messages
208
I picked up some 1/2" plywood today! So, the original plan is on! :)
I will do 1/2" all around and bottoms. I'll see if I can use the leftover MDF I have for the front face. I just probably need to screw the handles from inside the drawer box as MDF will bot be good for pulling in with just screws.
I'll attempt dado bottom with my circ saw and perhaps pick up that Kreg jig for the joins.

Let the learning begin.
 
OP
E

eljay

Well-known member
Joined
Mar 14, 2014
Messages
208
Getting close!!

Just need to decide how to attach the drawer fronts now, so I am looking for pull ideas. Originally, I wanted flat pulls like the metal tool chests have, but I think that attaching those would require the front would be just screwed to the drawer box and I'm afraid that won't last with pulling force being on the top of the drawer front alone. BTW, I'm using 3/4" ply for the fronts.

I hope to post pics soon! Thanks for all the pointers.
 

tthornto

Well-known member
Joined
Mar 11, 2011
Messages
743
I have never been a fan of the "floating" drawer bottoms slotted into a dado. Maybe I overload drawers, or maybe I just have cheap cabinets but they always end up warping and coming loose. I have a few like that that in our kitchen now that are warped and we are constantly losing kitchen utensils out the gap in the bottom, and finding them again months later when the big pot in the back of the cabinet gets pulled out. Pretty much every flatpacked dresser has drawers like this and the thin masonite bottoms make it so much worse.

I prefer the drawer slides that are L shaped and wrap around the bottom of the drawer to better support the bottom. Better yet are the drawer slides that double as the sides of the drawer box; like the the ones used here. https://ana-white.com/blog/2014/04/easiest-drawers
 

Jeff Ivers

Well-known member
Joined
Apr 9, 2010
Messages
2,556
Location
Oklahoma
Getting close!!

Just need to decide how to attach the drawer fronts now, so I am looking for pull ideas. Originally, I wanted flat pulls like the metal tool chests have, but I think that attaching those would require the front would be just screwed to the drawer box and I'm afraid that won't last with pulling force being on the top of the drawer front alone. BTW, I'm using 3/4" ply for the fronts.

I hope to post pics soon! Thanks for all the pointers.

In my opinion , you made a wise choice to go with 1/2 inch plywood for sides and bottom. I just finished building a pair of parts cabinets as documented at "DIY Shop" (link below). I made false fronts to attach to the drawer fronts. I made a 1/4 scrap plywood template for where I wanted to mount my drawer pulls. This was clamped to the front of each false front and I drilled through the false front. The false fronts were clamped to the front of the drawer and I used the holes in the false front to drill through the front of the drawer. I made drawer pulls from scrap plywood. I used pocket hole screws from the inside of the drawer to go through the front of the drawer, the false front and into the drawer pull.
 
OP
E

eljay

Well-known member
Joined
Mar 14, 2014
Messages
208
I have never been a fan of the "floating" drawer bottoms slotted into a dado. Maybe I overload drawers, or maybe I just have cheap cabinets but they always end up warping and coming loose. I have a few like that that in our kitchen now that are warped and we are constantly losing kitchen utensils out the gap in the bottom, and finding them again months later when the big pot in the back of the cabinet gets pulled out. Pretty much every flatpacked dresser has drawers like this and the thin masonite bottoms make it so much worse.

I prefer the drawer slides that are L shaped and wrap around the bottom of the drawer to better support the bottom. Better yet are the drawer slides that double as the sides of the drawer box; like the the ones used here. https://ana-white.com/blog/2014/04/easiest-drawers
Yes, that would've been a LOT easier. My whole "project" started with looking at the mess under the workbench and finding half price ball bearing drawer slides. And everything rolled from that. In hindsight, I'd do this differently, but I guess that's the nature of most new skills and experience.

After installing all the drawers, I realized that the worktop is not exactly level with the bottom bench brace. And of course, I've used the bottom brace as my baseline for leveling the slides. Sooo, the top drawer is noticeably not level with the worktop. Doh! But the drawers are pretty level. Hopefully, I can hide that well with the false fronts. :)
 
OP
E

eljay

Well-known member
Joined
Mar 14, 2014
Messages
208
In my opinion , you made a wise choice to go with 1/2 inch plywood for sides and bottom. I just finished building a pair of parts cabinets as documented at "DIY Shop" (link below). I made false fronts to attach to the drawer fronts. I made a 1/4 scrap plywood template for where I wanted to mount my drawer pulls. This was clamped to the front of each false front and I drilled through the false front. The false fronts were clamped to the front of the drawer and I used the holes in the false front to drill through the front of the drawer. I made drawer pulls from scrap plywood. I used pocket hole screws from the inside of the drawer to go through the front of the drawer, the false front and into the drawer pull.
Thank you! My only regret about drawer material choice is that I went with soft plywood. :( That's part of my learning experience. I didn't realize the differences until I came home with the sheets already cut down at the store.

I think I will just use cheap wire pulls (two per drawer) and find a matching length machine screws (1/2" front + 3/4" false front).

Another idea is to get a 1" aluminum U-channel and attach that right down the middle (or 2/3 up) of the front. I think if I were to attach it to the top of the false front, it would eventually rip the false front off the drawer front.
Not sure how it it'll look in the middle of the front, though.

P.S. Fantastic work in your garage over the years! ANd those hardware cabinets look great!
 
Last edited:
To avoid these ads, REGISTER NOW!
Top Bottom