justnutsandbolts
Well-known member
Sorry for the long post. Thanks for reading and let me know if you have any questions.
It is not 100% complete yet but I could not contain my excitement and wanted to share this with you guys as soon as possible.
Before:

Background
I have been looking into purchasing one of those in-ground dual scissor lifts for a long time after I saw the Install thread on here. The cost and the hassle of getting them from China put a hold to that. I had set an alert on Craigslist for "$500+ Scissor" and about a year later, I got lucky with an Atlas 9,000 above ground version at $1200, still new on pallets. Purchase of this lift and the hassle of only being able to use it at 1/2 lift height with 10' ceiling eventually led to the my Shop Makeover. I will give more details on the full makeover later.
Install Details
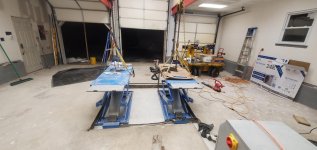
First of all, I do not recommend these lifts for trucks due to the required cross bars. Trucks have narrow frames. If you set the lifts at ~20 inches apart, you can get away without the support bars but then you only have 20" room. If you have the space, get 2 lost above ground and don't look back. If you have money, you can get flush 2 post in ground lifts in cassettes but that will run you over $15,000 including concrete work.
Anyway; I don’t think I have seen anyone who has done this way on this forum. The lifts I have are designed for above ground use. (https://www.gregsmithequipment.com/Atlas-SLP-9K-Full-Rise-Scissor-Lift). I could have eliminated the ramp portion of the lift but some trucks and cars have lift points that extend longer than the lifts which is why the In-Ground version has the pull out extensions. I could have modified the lift and done something like the ones in the In-Ground version of this lift but decided to keep them as-is and deal with any of the open sections later. I may just weld in plates to cover them if they annoy me enough.
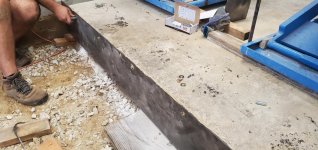
After cutting and jack hammering out the slab, I used ¼” thick x 10” wide flat bar steel around the perimeter for the “box”, I opted to do this because it would have been the same difficulty to pour a larger slab and put steel angles around the corners. The lifts are about 4” high so I left the depth of pit at 4 – ¼” . I figured I could just shim the lifts in case the pad was not level.

Once the flat bars were cut to size, I anchored + glued the them to the existing slab which was at only 2.5-3” thick at some spots. After the glue had cured, I cut the bolt heads and welded what was remaining to fill the gaps to further tie the existing slab to the steel plates. Some of the glue melted during this process, but anchors were already in place.

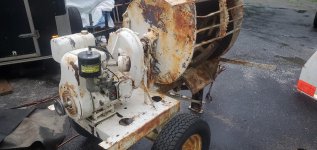
The existing slab is so soft that it cracked on some thin areas. I also had high and low spots all around due to the awful existing slab job which would later be addressed when the floor was prepped for coating. I welded the corners and rebar to the plates before ~1.3 cu yard (58 x 80lbs bags) were poured in to achieve a very strong ~7” thick slab. I also dug 12" deep holes and placed bent rebar down for extra strength, probably an overkill. I borrowed a broken down 1960s Wisconsin engine mixer for the concrete job. It has been sitting around for 8-9 years and needed all new points and condenser. Once repaired, I was able to dump 8 of 80lb bags at a time. I was incredibly exhausted, and my mask was falling off my face during the process. I definitely inhaled some concrete dust. It was really humid and hard to breath. I will never do this again, especially with 80lb bags. Calling a truck with 1.5 cu yard load would have been only $200 more. They have ¾ ton trucks with small mixers for this type of small pour. Not worth the hassle to pick up the bags, repair a mixer and dump manually. Never again but I wanted the bragging rights I guess.


Once the concrete cured (~30 days), I put the lifts in to anchor them in and then removed them before the Hellfire coating. The trolley lift I put in between the lifts make this a very easy process.


It is not 100% complete yet but I could not contain my excitement and wanted to share this with you guys as soon as possible.
Before:
Background
I have been looking into purchasing one of those in-ground dual scissor lifts for a long time after I saw the Install thread on here. The cost and the hassle of getting them from China put a hold to that. I had set an alert on Craigslist for "$500+ Scissor" and about a year later, I got lucky with an Atlas 9,000 above ground version at $1200, still new on pallets. Purchase of this lift and the hassle of only being able to use it at 1/2 lift height with 10' ceiling eventually led to the my Shop Makeover. I will give more details on the full makeover later.
Install Details
First of all, I do not recommend these lifts for trucks due to the required cross bars. Trucks have narrow frames. If you set the lifts at ~20 inches apart, you can get away without the support bars but then you only have 20" room. If you have the space, get 2 lost above ground and don't look back. If you have money, you can get flush 2 post in ground lifts in cassettes but that will run you over $15,000 including concrete work.
Anyway; I don’t think I have seen anyone who has done this way on this forum. The lifts I have are designed for above ground use. (https://www.gregsmithequipment.com/Atlas-SLP-9K-Full-Rise-Scissor-Lift). I could have eliminated the ramp portion of the lift but some trucks and cars have lift points that extend longer than the lifts which is why the In-Ground version has the pull out extensions. I could have modified the lift and done something like the ones in the In-Ground version of this lift but decided to keep them as-is and deal with any of the open sections later. I may just weld in plates to cover them if they annoy me enough.
After cutting and jack hammering out the slab, I used ¼” thick x 10” wide flat bar steel around the perimeter for the “box”, I opted to do this because it would have been the same difficulty to pour a larger slab and put steel angles around the corners. The lifts are about 4” high so I left the depth of pit at 4 – ¼” . I figured I could just shim the lifts in case the pad was not level.
Once the flat bars were cut to size, I anchored + glued the them to the existing slab which was at only 2.5-3” thick at some spots. After the glue had cured, I cut the bolt heads and welded what was remaining to fill the gaps to further tie the existing slab to the steel plates. Some of the glue melted during this process, but anchors were already in place.
The existing slab is so soft that it cracked on some thin areas. I also had high and low spots all around due to the awful existing slab job which would later be addressed when the floor was prepped for coating. I welded the corners and rebar to the plates before ~1.3 cu yard (58 x 80lbs bags) were poured in to achieve a very strong ~7” thick slab. I also dug 12" deep holes and placed bent rebar down for extra strength, probably an overkill. I borrowed a broken down 1960s Wisconsin engine mixer for the concrete job. It has been sitting around for 8-9 years and needed all new points and condenser. Once repaired, I was able to dump 8 of 80lb bags at a time. I was incredibly exhausted, and my mask was falling off my face during the process. I definitely inhaled some concrete dust. It was really humid and hard to breath. I will never do this again, especially with 80lb bags. Calling a truck with 1.5 cu yard load would have been only $200 more. They have ¾ ton trucks with small mixers for this type of small pour. Not worth the hassle to pick up the bags, repair a mixer and dump manually. Never again but I wanted the bragging rights I guess.
Once the concrete cured (~30 days), I put the lifts in to anchor them in and then removed them before the Hellfire coating. The trolley lift I put in between the lifts make this a very easy process.
Attachments


Last edited: