To avoid these ads, REGISTER NOW!

Atlas 8000 EXT 4 Post Lift Adventure

Paul_VR6

Well-known member
Joined
Dec 27, 2012
Messages
301
Location
Oxford, Pa USA
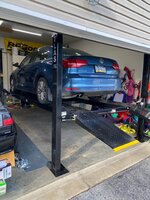
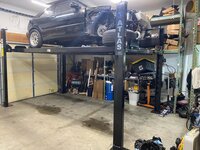
After pining for what seemed to be years over lifts... 2 post, 4 post, scissor, single post, quick jacks, maxjacks... I finally pulled the trigger on a lift.

https://www.gregsmithequipment.com/Atlas-Garage-Pro-8000-EXT

XH-PRO8000EXT-02.jpg


I wanted to take some time to document the experience (generally good) and a few of the things I ran into during the experience that may help some one someday.

Breaking this up into different posts so I can attach the relevant pictures below, so I am putting some reserved posts below so I can add as I go.

Shop thread: https://www.garagejournal.com/forum/showthread.php?t=302011

Why a 4 post?

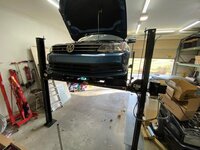
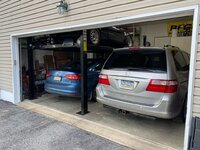
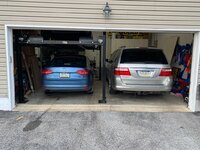
Well, short story is because a 2 post would turn my two car garage/single car shop permanently into a 1 car garage/shop and the SWMBO would not like that. In lieu of building a separate shop I have chosen to compromise (gasp!). I only have 11' of true ceiling height as well, and would have to pop into the ceiling for a 12' overhead lift. Not impossible but maybe a bit of a pain. I have 20' of depth and 24' of width to work with and this is just not quite enough room to fit a proper 8-9k 2 post lift and have room to easy access to our van and people moving around it quite frequently.

To figure all this out, I mocked several layouts out on the floor and made cardboard posts to test a few layouts. Almost every one would have a 2 post too far forward to do any engine pulling and not have the post in the way of the van's front doors. They would get banged up pretty bad as we knocked the cardboard over more than a few times testing layouts. The 4 post layout worked well with the posts being behind the van and in front of the front doors. Added bonus is that the 4 post could be moved to different spots if needed for different work. I can put it in front of my bench for engine work, or in front of my tool boxes if I needed more depth to pull an engine.

The added storage/work area under the 4 post made it a better choice than a mid or even high rise scissor which wouldn't have that benefit, and similar price/cost.

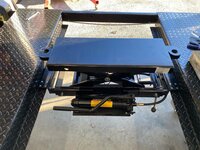
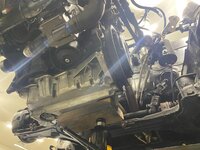
I did get a 3500lb bridge jack as well so I can dive right into working easily. I get the advantage of the 2 post in that everything is easy access and hoping this gets me mostly there with little downside. My race car is FWD so most of the "work" is only at one end, at least the other end is light and can be lifted with a small bottle jack in any case.

I did purchase quickjacks as well but will use those when I am at the racetrack and will store them in my trailer. I may put them on the lift occasionally if I need to lift both ends of the car at once (thinking alignments maybe) or get a second bridge jack some day.

Now onto the rest of the adventure...
 
Last edited:
To avoid these ads, REGISTER NOW!
OP
P

Paul_VR6

Well-known member
Joined
Dec 27, 2012
Messages
301
Location
Oxford, Pa USA
Buying experience

In general the guys at Greg Smith were great to deal with. I did run into one *major* snag as they shut down the Delaware store this year so I had to pick the lift up at the local freight terminal. Little added cost there vs the showroom pickup but timed things to a Black Friday Sale so my out the door price was almost identical. Called the order in, took about 10mins to confirm details and payment and that was that. Having to pick it up at the freight terminal caused some additional headache, but we will get to that next.
 
Last edited:
OP
P

Paul_VR6

Well-known member
Joined
Dec 27, 2012
Messages
301
Location
Oxford, Pa USA
Getting it home (adventure!) and unloading

Pickup

This one threw me for a loop and it took two trips but I got it done.

I have a F250 and enclosed trailer but the guys at the depot said an open trailer is best as they can't drive into a car hauler (too heavy). So..

I rented a 12' uhaul trailer and took the mini van down to the freight depot (Old Dominion in New Castle, DE). Exchanged pleasantries and checked out my rig. Likely not going to work (DOH). The lift is a solid 14' long and the way it is loaded puts all the weight on the forked end of the package. Because of this even if the end was hanging out, it would make the trailer very back heavy and not have enough tongue weight. We brainstormed a few different options for trying to get it loaded, but no good way to do it with what we had available. They only have small fork trucks for pallets and aren't really for heavy lifting at height. Could easily have been loaded with a gantry crane, or even an engine hoist, but I digress.

Called Greg Smith and talked through some options and of course they "never had that problem" but this depot probably never unloaded a lift before just moved between trucks bc of the Del store right up the road. DUH moment there at my expense, but whatever. Generally people pick them up with open car trailers. Ok, that's the new plan! Rented an open deck Uhaul car trailer and headed back.

Got the trailer loaded up without issues and strapped down nicely. The lift fit right between the ramps and the bridge jack on one runway. Towed home without issues.

6871d904ee5b9e43f8d5ca3924f7cf2c.jpg


218942faa421d79afe6afee84265c46c.jpg


Unloading

I figured that if I was creative I could unpack the lift by myself, or to be fair with the "help" of my 6yo daughter (who loves helping even though, well she's 6!). Short story is that it worked and required a little strategy, an engine hoist, some extra tie down straps for balance, some scrap wood and some furniture dollies. Hardest part was getting the runway with the cylinder unloaded as it's quite heavy. The pics should show how I did it. The smaller pieces I could carry by myself and the lighter ramp was cake after the heavy one.

1643c0540338bc5ed3744232655bf73e.jpg

90b2d789672cc17b7687dcae716cba96.jpg

9dea771c5cbc92dccf06d9c21ddb7cea.jpg


Had the lift sit a few days so I could watch assembly videos and pour over the manual a few times...
 

Attachments

  • 218942faa421d79afe6afee84265c46c.jpg
    218942faa421d79afe6afee84265c46c.jpg
    181.8 KB · Views: 6
  • 6871d904ee5b9e43f8d5ca3924f7cf2c.jpg
    6871d904ee5b9e43f8d5ca3924f7cf2c.jpg
    181.6 KB · Views: 4
  • 90b2d789672cc17b7687dcae716cba96.jpg
    90b2d789672cc17b7687dcae716cba96.jpg
    194.9 KB · Views: 4
  • 1643c0540338bc5ed3744232655bf73e.jpg
    1643c0540338bc5ed3744232655bf73e.jpg
    158 KB · Views: 6
  • 9dea771c5cbc92dccf06d9c21ddb7cea.jpg
    9dea771c5cbc92dccf06d9c21ddb7cea.jpg
    153.9 KB · Views: 6
Last edited:
OP
P

Paul_VR6

Well-known member
Joined
Dec 27, 2012
Messages
301
Location
Oxford, Pa USA
Assembly 1

In general I followed the instructions, which is probably a good thing. Watching a few videos of lift assembly helped with the basics as well so I would highly recommend that. I couldn't find a way to raise the lift arms with the crossbars in place. I had my wife help me stand them up and it wasn't bad at all.

Helper ready to help! I have to say out of all my kids she is the only one that was interested so we got some quality time when it wasn't too cold.

8415beee59a62218ef21c4b4a7caa714.jpg

I did manage to bring the one ramp in the garage "backward" so I had to bring it outside to spin it around. The furniture dollies were really helpful for that.

Getting the crossbars in took some thinking. The manual says to stand the columns and lift the crossbar up and let it slide back down. Seemed like a lot of lifting. I used some old sawhorses and the ramps themselves to basically slide the columns onto the crossbar, then lifted the columns up at the same time and shimmied them into place. Once in place I just lifted the crossbar to the first lock.

6c2ba5c565607a8f446191b7a8607a21.jpg

db7571ed614530d2eb6e5ed9cde2e4b5.jpg

Getting the ramps into place just took a jack and some spare wood. My trusty saw horses on their sides were about 1/2" above the lock height so I could get the one end bolted down before I shimmied the second set of columns into place.

88ad5f1a04699acaf6b8836d15d0d9d1.jpg

228450183694b3cde710e775cc207481.jpg

I knew the ramps had to be flipped over, and the empty ramp wasn't bad. The ramp with the hydraulic cylinder was a bit tougher as I did it alone. I ended up just putting wood down and "rolled" it over with some scrap 2x3 on one end. Took a heave, so I had some wood and the furniture dollies in place so that I could wheel it into position once flipped.

6e21f5db61fa062d6f0dad650cb899ee.jpg
 

Attachments

  • db7571ed614530d2eb6e5ed9cde2e4b5.jpg
    db7571ed614530d2eb6e5ed9cde2e4b5.jpg
    124.5 KB · Views: 5
  • 88ad5f1a04699acaf6b8836d15d0d9d1.jpg
    88ad5f1a04699acaf6b8836d15d0d9d1.jpg
    135.8 KB · Views: 4
  • 228450183694b3cde710e775cc207481.jpg
    228450183694b3cde710e775cc207481.jpg
    131 KB · Views: 4
  • 6e21f5db61fa062d6f0dad650cb899ee.jpg
    6e21f5db61fa062d6f0dad650cb899ee.jpg
    170.3 KB · Views: 4
  • 6c2ba5c565607a8f446191b7a8607a21.jpg
    6c2ba5c565607a8f446191b7a8607a21.jpg
    124 KB · Views: 4
  • 8415beee59a62218ef21c4b4a7caa714.jpg
    8415beee59a62218ef21c4b4a7caa714.jpg
    143.7 KB · Views: 4
Last edited:
OP
P

Paul_VR6

Well-known member
Joined
Dec 27, 2012
Messages
301
Location
Oxford, Pa USA
Assembly 2

The heavier ramp was a bit trickier with the weight. Luckily the same technique as the other side worked fine with the sawhorse on its side.

382c1f13bd116c88e6ca64bfac622185.jpg

Once both ramps were bolted at the back end, the column and crossbar assembly was shimmied into place and bolted in loosely. I then checked square and adjusted it within 1/4" which is about as good as I could get with my helper holding the tape.

d165b3b2c7a4e66f7051860e03786570.jpg

Had to use the engine hoist to put the jack in place, it's HEAVY

02a05d6653d3849b63a067d16265d49f.jpg

Little trick for the hydraulic power pack, it has two open slots at the top which you can hang the motor on to take most of the weight off. Once that's done you can put the lower two bolts in first, then remove the temporary ones to put into the upper holes. Thought I would need help here, but other than dropping the lock washers, it wasn't bad.

456d8390cf134d497e363092f3555aa5.jpg

After the hydraulic pack was in and hose run (I put the 90 fitting at the ramp FYI) I moved on to the lock assembly. The diagrams in the book were good enough for me to just do it with little drama. Many of the videos made this seem quite hard but when adjusted at full tightness at the ends, and the center at about 1/16" of end play it all worked pretty well. I did have to open the door inside the house to get the release lever installed, and if I had a longer lift or no door it would have been impossible. Glad I have good luck!

With all that done I got fluid into it and purged air. I did oops a little by filling it wit the lift still on the first lock and first time I went full down made a giant mess with excess fluid. Fill it about 1/2 way get it to raise and lower, then go full down and fill.

46e10d93138030e5785c661a87cb7e0b.jpg

At this point it's almost ready to use...
 

Attachments

  • 382c1f13bd116c88e6ca64bfac622185.jpg
    382c1f13bd116c88e6ca64bfac622185.jpg
    142.3 KB · Views: 4
  • d165b3b2c7a4e66f7051860e03786570.jpg
    d165b3b2c7a4e66f7051860e03786570.jpg
    137.9 KB · Views: 4
  • 456d8390cf134d497e363092f3555aa5.jpg
    456d8390cf134d497e363092f3555aa5.jpg
    74.5 KB · Views: 4
  • 46e10d93138030e5785c661a87cb7e0b.jpg
    46e10d93138030e5785c661a87cb7e0b.jpg
    98 KB · Views: 7
  • 02a05d6653d3849b63a067d16265d49f.jpg
    02a05d6653d3849b63a067d16265d49f.jpg
    155.1 KB · Views: 5
Last edited:
OP
P

Paul_VR6

Well-known member
Joined
Dec 27, 2012
Messages
301
Location
Oxford, Pa USA
Adjusting Tension/Leveling

reserved (still need to add pics)

The manual only showed one nut holding cables and I had two... and I guessed wrong, both nuts need to be above the plate. Fixed that and moved on to leveling, using a 3' level I adjusted each corner so that front back and side to side were level. It took more than I thought it would front/back was more than 1/4" over the 3' which is likely the slope of my garage floor. I adjusted the locks similarly to get it level while sitting on the stops. I found it easier to lift off the stops slightly to make the adjustment then go back down onto them to check.
 
Last edited:
OP
P

Paul_VR6

Well-known member
Joined
Dec 27, 2012
Messages
301
Location
Oxford, Pa USA
Lifting for the first time

My daily needed an oil change and for a mere $5 more I could now do it myself easily. Figured I'd lift a car with full coverage on it first 8)

The ramps went on without drama, though they are not light. One surprise is the bridge jack hits the floor before full drop so it needs to be somewhere out of the way to pull a car on. Or I have it on wrong, so I need to look into that.

6adbe94611a17d1b260a36cf3e479f47.jpg

d57e080d7b622e80378b09fcf69bdfc6.jpg

Car went up and down without incident and was the easiest and cleanest oil change I have ever done in my life. Maybe I will do the next one.
 

Attachments

  • 6adbe94611a17d1b260a36cf3e479f47.jpg
    6adbe94611a17d1b260a36cf3e479f47.jpg
    103 KB · Views: 9
  • d57e080d7b622e80378b09fcf69bdfc6.jpg
    d57e080d7b622e80378b09fcf69bdfc6.jpg
    141.9 KB · Views: 13
Last edited:
OP
P

Paul_VR6

Well-known member
Joined
Dec 27, 2012
Messages
301
Location
Oxford, Pa USA
Repositioning using the casters

reserved (still need more pics)

I had the lift on the right hand side of the garage just for assembly, but it needed to move to the other for at least awhile. I got the casters with the kit, so why not. They went together easily and the lift moved *extremely* easily with them on, almost too easily. I suggest moving it with two people to control it a little better. I got it slid into place pretty easily and back on the ground.

d37af925172053410ed40b7851b5ddd0.jpg

Perfect place to drag a car that can't move up on to the lift. This is another thing I didn't mention when I was thinking about the 2 post, I couldn't easily get a car in using this method and likely will get a winch setup for the lift as a car that can't move is a common occurrence here. Took about 10 minutes taking my time with the come-a-long and a chain.

2224a80188f1fbeead6cc7661b304f5b.jpg
 

Attachments

  • 2224a80188f1fbeead6cc7661b304f5b.jpg
    2224a80188f1fbeead6cc7661b304f5b.jpg
    143 KB · Views: 10
  • d37af925172053410ed40b7851b5ddd0.jpg
    d37af925172053410ed40b7851b5ddd0.jpg
    142.5 KB · Views: 10
Last edited:
OP
P

Paul_VR6

Well-known member
Joined
Dec 27, 2012
Messages
301
Location
Oxford, Pa USA
Lift in storage mode

I tried getting the van under the car and it *just* fits. I have to move the car to clear the garage door and get it up about another inch to get on the locks. My wife won't like parking under it, but it's possible if needed. I had to check

729fd805648be1a826d4bd4a911dcdcd.jpg

The more reasonable and common setup I will use. I can pull engines, transmissions, etc and set up my work area under the lift if needed and put it away to store my daily in bad weather.

8c90efa1705fc58a029cb061cbe139fe.jpg

It is very dark under the lift so I need to think about some added lighting.

bc27a6a0ca025c871de77204404d0d9f.jpg

f6648c0a4b488ebd1678139543575e1c.jpg

2dc285ea3221c803b77eab00357dce2e.jpg

All in all the storage portion was a success and soon I will try and tackle actually doing some heavy work with it pulling the drivetrain out of my Corrado...
 

Attachments

  • 729fd805648be1a826d4bd4a911dcdcd.jpg
    729fd805648be1a826d4bd4a911dcdcd.jpg
    105.5 KB · Views: 5
  • 8c90efa1705fc58a029cb061cbe139fe.jpg
    8c90efa1705fc58a029cb061cbe139fe.jpg
    118 KB · Views: 3
  • bc27a6a0ca025c871de77204404d0d9f.jpg
    bc27a6a0ca025c871de77204404d0d9f.jpg
    110 KB · Views: 3
  • f6648c0a4b488ebd1678139543575e1c.jpg
    f6648c0a4b488ebd1678139543575e1c.jpg
    138.9 KB · Views: 3
  • 2dc285ea3221c803b77eab00357dce2e.jpg
    2dc285ea3221c803b77eab00357dce2e.jpg
    159.8 KB · Views: 5
Last edited:
OP
P

Paul_VR6

Well-known member
Joined
Dec 27, 2012
Messages
301
Location
Oxford, Pa USA
Bridge jack review and working on things (finally!)


Updated 2/28/21

I did flip the bridge jack around so the handle is to the rear and put it up on the deck surface. Much better.

I had to pull my transmission (fwd transaxle) which is probably one of the tougher jobs I will do with the space constraints of the 4 post ramps. Its totally do-able just took some planning. Bridge jack to lift the car, bottle jack on the jack tray to hold the engine up while I dropped the trans. I had to do the final removal from up top because I had the car a hair too forward on the lift and couldn't get a good angle. Will be better next time.

64b909e225625c25b46446ae8c0f12d2.jpg

81b5bf967bca61e5e0d372ee175dfd13.jpg

b7204141a7b6a71c8cb18a6beb0abad9.jpg
 

Attachments

  • b7204141a7b6a71c8cb18a6beb0abad9.jpg
    b7204141a7b6a71c8cb18a6beb0abad9.jpg
    111.8 KB · Views: 5
  • 81b5bf967bca61e5e0d372ee175dfd13.jpg
    81b5bf967bca61e5e0d372ee175dfd13.jpg
    116.5 KB · Views: 8
  • 64b909e225625c25b46446ae8c0f12d2.jpg
    64b909e225625c25b46446ae8c0f12d2.jpg
    121.6 KB · Views: 6
Last edited:

ycmlda

New member
Joined
Dec 9, 2020
Messages
4
Location
Backyard
Thanks for sharing your Atlas lift install! I'm about to pull the trigger on their 408-SL lift myself and am so glad I stumbled across your thread. I have a few questions for you if you don't mind.

Did you have to run a new wire/breaker for the lift? (If so, what amp breaker?) Also very interested to know if you fine tuned the lock ladder system to a custom height? Lastly, how high do you need to lift to get off the locks?

Thanks
 
OP
P

Paul_VR6

Well-known member
Joined
Dec 27, 2012
Messages
301
Location
Oxford, Pa USA
Thanks for sharing your Atlas lift install! I'm about to pull the trigger on their 408-SL lift myself and am so glad I stumbled across your thread. I have a few questions for you if you don't mind.

Did you have to run a new wire/breaker for the lift? (If so, what amp breaker?) Also very interested to know if you fine tuned the lock ladder system to a custom height? Lastly, how high do you need to lift to get off the locks?

Thanks


Good questions. I am in the middle of a rewire and putting in a sub panel and have a dedicated 30a circuit ready. Oddly it came with a regular 15a plug on it and that is plenty for the light cars I have used it for (Jetta is 3200lbs give or take). I would think it would need more juice getting closer to the limit. I will swap the cord for a 10ga and 30a plug later. Will need it when I need to do the next set of motor mounts on the van.

For the locks I just set it so that about 1/2" was unthreaded past the bolt on the upper plate and adjusted from there until they were even. Its about 3/4" to get off the locks if its resting on them but I can try and measure a little better.

Glad the review helped. Seemed like there is always some unanswered questions with these things no matter how good the research.
 

MWitte

Well-known member
Joined
Nov 27, 2012
Messages
75
Location
St Louis, Mo
I have two bridge jacks on my Atlas lift. I set the arms a little wider than you did, so they sit on the runway surface like the jack tray does. With my lift on the floor, I can still slide my jacks. I did the same 90 degree fitting and hose route that you did - probably the best mod I've done. I also put LED light strips on the lower lip of the runways. There is clearance there with the bridge jacks resting on the higher runway surface.
 
OP
P

Paul_VR6

Well-known member
Joined
Dec 27, 2012
Messages
301
Location
Oxford, Pa USA
Thanks for the detail on the jack, I will change it this weekend. Would love to see how the led strips worked out and how much light they cast. I will probably mount single bulb leds on the posts but that will take a bit to do.
 
To avoid these ads, REGISTER NOW!

sps4runner

Active member
Joined
Dec 14, 2020
Messages
33
Location
southeastern Mass.
Top picture in #9 above: if you put the upper car on backwards, you should get more clearance over the (longer & lower) hood with the garage door.
I just ordered a lift and will be limited with a 9' 6" ceiling height but I think that will work for me.

Oops. down to 9' 5 1/2" with Racedeck!
 
OP
P

Paul_VR6

Well-known member
Joined
Dec 27, 2012
Messages
301
Location
Oxford, Pa USA
I find it real hard to believe that Greg Smith had never ran into this problem before....thats ****.


I was a bit surprised but this is the first 4 post they (depot) had to unload off the ramp to a trailer. They had moved lots from truck to truck to go to the store in De. I would hate to see them try and do the ext-l which is 3' longer
 

ycmlda

New member
Joined
Dec 9, 2020
Messages
4
Location
Backyard
Good questions. I am in the middle of a rewire and putting in a sub panel and have a dedicated 30a circuit ready. Oddly it came with a regular 15a plug on it and that is plenty for the light cars I have used it for (Jetta is 3200lbs give or take). I would think it would need more juice getting closer to the limit. I will swap the cord for a 10ga and 30a plug later. Will need it when I need to do the next set of motor mounts on the van.

For the locks I just set it so that about 1/2" was unthreaded past the bolt on the upper plate and adjusted from there until they were even. Its about 3/4" to get off the locks if its resting on them but I can try and measure a little better.

Glad the review helped. Seemed like there is always some unanswered questions with these things no matter how good the research.

Thanks for the info. It'd be great if you could measure how much lift is needed to get off the locks if you have the time. I'd be cutting it quite close to the ceiling so every inch helps.
 
OP
P

Paul_VR6

Well-known member
Joined
Dec 27, 2012
Messages
301
Location
Oxford, Pa USA
Posted some details on using the bridge jack and jack tray to drop the transaxle on my race car. Went pretty well and will get better with more practice. Not sad I didn't crawl on the ground once!

aa5d0c838014d4aba6e500ad7a530bdb.jpg
 

Attachments

  • aa5d0c838014d4aba6e500ad7a530bdb.jpg
    aa5d0c838014d4aba6e500ad7a530bdb.jpg
    143.5 KB · Views: 10

f4 plt

Well-known member
Joined
Feb 26, 2013
Messages
60
I have the same lift and it was delivered and installed in less than 2.5 hours by a great team that works for Greg smith. I bought it out of their Ft Worth store . This is my second of the same model and very happy with the price and quality. My F150 takes every inch of the lift . By the way I found that if I leave the ramps on that they can cause binding issues with the cross rod for the mechanical lock
 

Yankeefarmer

Well-known member
Joined
Jul 25, 2011
Messages
1,179
Location
Connecticut
The team that delivered and assembled my Advantage 4 post lift was on my site only 2 hours. They had removed the lift from its shipping rack at their facility, stowed the smaller components in their truck, and positioned the runways on their little trailer so they could set them onto the crossbars by backing the trailer into my garage.
 

ptschram

Well-known member
Joined
Sep 8, 2006
Messages
2,573
Location
Churubusco, IN
I find it real hard to believe that Greg Smith had never ran into this problem before....thats ****.

While Grant Smith is a wonderful gentleman, I wouldn't trust his father Greg to tell me the sky is blue.

Greg Smith told me his motto is "The customer is never right". After I'd bought a four-post lift, two jacking beams, oil drain, transmission jack and a bunch of other stuff at the same time-I'd sold one house, bought another and was outfitting my new shop to be run from home.

That transmissio0n jack never did work and Greg refused to replace it even when dragged all the way to Indianapolis from Churubusco, about 135 miles

When my best friend went to pick my lift up at the Indy store, they bashed the snot out of my trailer loading it. Didn't even apologize.

After 13 years, I love my lift. It is showing its age and I damn sure won't buy replacement cables for Greg "The customer is never right" Smith.
 

animex

New member
Joined
Mar 20, 2023
Messages
3
Did you ever upgrade the wiring and what is your experience with factory 110 wiring? Any hiccup going up? I'm getting Atlas 8000 EXT and planning to run 120v plug on 20AMP breaker but if I have to upgrade to 30AMP, may have to rejig the motor wiring to RV style plug.
 
OP
P

Paul_VR6

Well-known member
Joined
Dec 27, 2012
Messages
301
Location
Oxford, Pa USA
I installed a 30a plug in the ceiling but haven't needed to use it yet. I have been using the included cord on a 15a circuit since I have gotten the lift. One caveat is that my cars are relatively light and maybe only lifting 2000lb or so regularly. If you were to get closer to the max of the lift, you may need to think about it.
 
To avoid these ads, REGISTER NOW!
Top Bottom