To avoid these ads, REGISTER NOW!

11b30b4’s Craftsman 397.19350 Bench Grinder rebuild

11b30b4

Well-known member
Joined
Jul 16, 2020
Messages
1,028
Location
GA
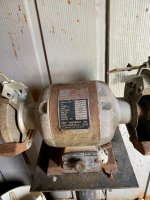
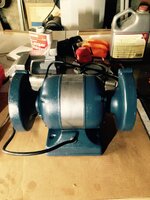
Back in mid-December 2020 I purchased a Craftsman ¾ HP Bench Grinder (397.19350) of Offer-up. I probably paid too much for the condition it was in, but I wanted something more than the more common 1/3 HP version.

View media item 109643
I have been busy rebuilding some classic Craftsman drill presses so this bench grinder sat until I could get to it. Now that I have the time, I have begun to rebuild it.

I ordered a replacement decal from Mattblast.

View media item 109642
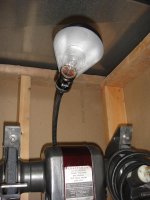
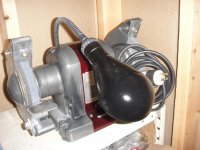
I disassembled the bench grinder and took several reference pics.

View media item 109636
View media item 109637
View media item 109638
View media item 109640
View media item 109641
View media item 109639
Most of the parts are now soaking in evaporust.

There were several parts missing on this bench grinder.
Lamp shade cover 4971958
2 wheel flanges 22001524
Wheel Cover RH 4971514
Quench Tray 4971780
Both eye shield packages 4998798
Grinding Wheel Coarse 7” x ¾” 36 grit 22001582
Grinding Wheel Fine 7” x ¾” 60 grit 22001583

In the rebuilding of this bench grinder I will not be using the wheel guards or covers, eye shields, or grinding wheels, so the only parts I really need to source are the lamp shade cover and the wheel flanges. Although it would be nice to have all the parts in case, I ever decided to sell it.

That is it so far. Thanks for the interest.
 
Last edited:
To avoid these ads, REGISTER NOW!

Nexoidian

Active member
Joined
Oct 22, 2020
Messages
37
Location
Michigan
I look forward to watching your progress. I am just about finished with my second block grinder. Hopefully this weekend I’ll finish it up. I guess I didn’t realize someone was producing labels for these. I’ll have to message Mattblast.
 
OP
1

11b30b4

Well-known member
Joined
Jul 16, 2020
Messages
1,028
Location
GA
Update,
So here are most of the parts disassembled and cleaned.

View media item 109790
Here is the center stator band painted with a hammered grey.

View media item 109791
I would have preferred darker shade but the only darker shade of hammered spray paint I could find is black.

I plan on seeing just how well the aluminum end frames shine up. If I can get a near chrome finish, then I will see how well the stator band contrasts. If necessary, I will strip the stator band and paint it hammered black or possibly a different color.

The replacement bearings arrived over the holiday and the gooseneck should arrive today or tomorrow.

That’s it for now.
Thanks for the interest.
 
OP
1

11b30b4

Well-known member
Joined
Jul 16, 2020
Messages
1,028
Location
GA
Torqueman2002, thank you.

Update,
As previously mentioned, I ordered the replacement goose neck, lamp holder socket, bearings, and I order some new arbor flange washer since one set was missing.

Over the weekend I sanded the two aluminum end frames. I started by sand blasting the end frames with aluminum oxide media. Next, I sanded the frames with a combination of hand sanding and abrasive buffing wheels in a Foredom. I started with 150 grit – 350 grit dry sanding. Next, I moved to 400 grit -1000 grit wet sanding (rinsing between each grit). There were some burs in one of the castings that I removed with a 220 grit sanding wheel before wet sanding. There were significant dings and scratches in both castings but overall, they came out nice.

View media item 109815
I also sanded the metal lamp shade. I would have preferred a nicer sheen but overall, they came out nice.

View media item 109816
Next, I applied Mothers aluminum polish and buffed the castings with a buffing wheel in a hand drill and in the Foredom. Again, everything came out nicely.

View media item 109817
Next, I assembled the grinder with all the new and refurbished components.

View media item 109818
Lastly, I did a bench test and everything ran like butter so I slapped the new decal on it and called it complete. As I stated previously, I did not plan on attaching the wheel guards, tool rests, or eye shields. I will be using this grinder with a brass wire wheel and a buffing wheel and I do not plan on actually grinding. I may in the future, refinish the remaining parts but unless I procure the missing RH wheel cover I don’t see the point.

Here are some finished pics. I need to order a set of rubber feet before I mount it. And if I can work out the plastic lamp shade that will be added as well.

View media item 109819
View media item 109820
View media item 109821
Thanks for the interest.
 

Nexoidian

Active member
Joined
Oct 22, 2020
Messages
37
Location
Michigan
It turned out great!

I’ve been getting the rubber feet from Lowe’s. They fit perfect and look just like the factory ones. I have on grinder with the factory feet and the ones from Lowe’s are perfect. I’ll attach a picture of the bag. I always have to scrounge around the drawers at Lowe’s to find them. But I always seem to find them. You can type in the part number on Lowe’s website or app and see if your Lowe’s has them

0x61Ib.jpg
 
OP
1

11b30b4

Well-known member
Joined
Jul 16, 2020
Messages
1,028
Location
GA
Nexoidian, Perfect! thank you for the info. That beats waiting a few day if I order them from ebay. Well, hopefully, I can have this thing mounted this weekend.
 

KatanaKid

Active member
Joined
Feb 13, 2010
Messages
29
I believe I have the same one stored away in working order . I will check ASAP .
What would one be worth if I decide to sell it ?
 
OP
1

11b30b4

Well-known member
Joined
Jul 16, 2020
Messages
1,028
Location
GA
KatanaKid, are you asking what a Craftsman 397.19350 block grinder is worth?
If so, that would depend on several things such as the condition it is in, how complete it is, and what similar grinders in your area are going for. I snagged this one for around 60 buck in its working but very used state. I have seen many others in my area in the 1/3 and 1/2 hp range gor for about 100 bucks. I would not purchase one for more than what I paid for this one and I look for stuff that needs to be rebuilt rather than good condition.

If you are looking to sell yours, I would recommend you search FB Market Place, Craigs List, and Offer Up in your area for bench grinders and block grinders and see what is available and what they are going for.

I hope that helps.
 

KatanaKid

Active member
Joined
Feb 13, 2010
Messages
29
KatanaKid, are you asking what a Craftsman 397.19350 block grinder is worth?
If so, that would depend on several things such as the condition it is in, how complete it is, and what similar grinders in your area are going for. I snagged this one for around 60 buck in its working but very used state. I have seen many others in my area in the 1/3 and 1/2 hp range gor for about 100 bucks. I would not purchase one for more than what I paid for this one and I look for stuff that needs to be rebuilt rather than good condition.

If you are looking to sell yours, I would recommend you search FB Market Place, Craigs List, and Offer Up in your area for bench grinders and block grinders and see what is available and what they are going for.

I hope that helps.

Thanks ! I need to get it out of storage . But as I remember it is in working order . Need to check into the HP though .
I like that model and may use it to replace the one in the garage .
You did a great job on the restoration !
 

JoCoSawdust

Well-known member
Joined
Nov 19, 2018
Messages
2,416
Location
Eastern NC
That's a very unique "spin" on that type of bench grinder. I like it! Looking forward to seeing the end result.
 

larry4406

Well-known member
Joined
Jan 27, 2006
Messages
18,962
Location
Northern Virginia
Very nice job!

Do you have a link to that metal lamp shade, socket, and goose neck? That is exactly what I want to add to my drill press.
 
OP
1

11b30b4

Well-known member
Joined
Jul 16, 2020
Messages
1,028
Location
GA
KatanaKid, thank you and good luck with digging through your storage. If you are anything like me, finding something in storage is a quest all of its own.

JoCoSawdust, Thank you. This was supposed to be the finished version since I was missing some parts and did not intend to rebuild any of the additional parts but that has changed, and I will talk about this in a minute.

Larry4406, thank you and absolutely but let me explain a bit then I will toss the links at the bottom of my response. I originally ordered a gooseneck from SnakeClamp for two reasons. First, on my usable Ryobi bench grinder the gooseneck was very weak and would vibrate and sag so I wanted a very stiff gooseneck and SnakeClamp has 4 levels of “strength” goosenecks with he stiffest being the Super-Duty which has a horizontal load capacity of 2.5 pounds. The second reason was the availability, the 18” super duty was available in chrome and only cost $24.95.

However, there are also two reasons I cancelled this order and went with a different brand. Fisrt, the ends of the SnakeClamp are threaded holes and you also need to purchase the threaded studs for both ends to make this usable for the grinder. Also, each end solid base is longer (taller) than the original gooseneck and would not look OEM. The second reason was that I had not done enough research. After sifting through the bench grinder thread, someone posted a link for the lamp socket and the gooseneck that were as close to OEM to not be noticeable. So here are the two links:

First is the gooseneck from Grand Brass Lamp Parts: https://www.grandbrass.com/item/pign18np/

Next, I ordered a pack of three light sockets from Amazon.
https://www.amazon.com/gp/product/B07CMQT6JD/?tag=atomicindus08-20

With the exception of the stamped name (I believe the originals were Leviton) and the small “set” screw on the mounting shaft, these look to be identical to the original. However, I ordered these also before I found the link in the grinder thread. You really want this one. It’s a Leviton and is exactly like the OEM part.
https://www.grandbrass.com/item/sol9347np/

Thanks to Vertguy and all the others who found these links and posted them in the grinder thread. Also if you are missing the gooseneck completely you will need the hex nut as well. Here it is:
https://www.grandbrass.com/item/nu233/

I can not help you with the lamp shade heat shield yet. Someone must be making a similar heat shield and I believe it is only a matter of time before I find a suitable replacement. As for the plastic shade, I am working on making replacements since they are no longer available.

I hope this helps.

Update,
Well a met with a GJ member yesterday to pick up a part I ordered from him and too my surprise, he had a few goodies he was willing to sell me.

As I previously said, I did not plan on refinishing the wheel covers, tool rests, eye shields etc… since I do not plan on using them. However, in the back of my mind, (OCD) I still wanted to get these parts at some point so I would have a complete grinder. Well here is the wheel covers I had when I left for work yesterday:

View media item 109835
And this is what I came home with:

View media item 109836
Holy ****! I now have everything I need to finish this grinder. The only real question is how I plan on refinishing everything. If these guys have anything to say about it, the wheel guards will get stripped, sanded, and polished.

View media item 109823
I believe the eye shield metal rims will get painted with the same grey hammered finish as the stator cover and the plastic lamp shade will also be painted.

Anywho, apparently this project is not completed yet.

Thanks for the interest.
 

KatanaKid

Active member
Joined
Feb 13, 2010
Messages
29
Went and looked today . I was wrong . Tucked in the corner of the bench for years , not able to see its face , and used regularly . And meaning to relocate it for years . Although its 1/2 HP .

And in storage , check this one out .
 

Attachments

  • 9E05C356-30DD-42F6-A2F6-B003A14EC6F9_1_201_a.jpg
    9E05C356-30DD-42F6-A2F6-B003A14EC6F9_1_201_a.jpg
    127.6 KB · Views: 46
  • AEDAC219-04D4-44EA-884F-5E2BC1EAC38C_1_201_a.jpg
    AEDAC219-04D4-44EA-884F-5E2BC1EAC38C_1_201_a.jpg
    135.8 KB · Views: 40
  • A0CFF844-D5BB-4782-B5A3-69904E386BFA_1_201_a.jpg
    A0CFF844-D5BB-4782-B5A3-69904E386BFA_1_201_a.jpg
    133.6 KB · Views: 44
  • C950AE19-E78B-4144-BD3F-6907E390BC1B_1_201_a.jpg
    C950AE19-E78B-4144-BD3F-6907E390BC1B_1_201_a.jpg
    141.7 KB · Views: 42

larry4406

Well-known member
Joined
Jan 27, 2006
Messages
18,962
Location
Northern Virginia
Thanks for the links for the gooseneck and light socket!

Where did you get your metal light shield? I would be content with that on my drill press.
 
To avoid these ads, REGISTER NOW!

lafester

Well-known member
Joined
Mar 1, 2017
Messages
2,191
Location
Northern CO
If you come across a source for side mount leviton sockets I've been looking for awhile.
When you get an older grinder with the Vimco lamp, those sockets are very fragile.
 
OP
1

11b30b4

Well-known member
Joined
Jul 16, 2020
Messages
1,028
Location
GA
Nexoidian, I believe the only extra parts I will have will be the two inner wheel covers and the left outer wheel cover, possibly come misc screws. I am happy to sell the extra parts, shoot me a PM.

KatanaKid, Regardless, both of those are good candidates to rebuild/ refresh.

Larry4406, I am sorry, but my metal heat shield came with my grinder.

After some serious looking, I found this:
https://www.mylampparts.com/product...MIq9GM35C37gIVUtbACh2SmAwoEAQYAiABEgKclPD_BwE

We only have one side view picture to examine this lamp shade. It is entirely possible the opening is more circular (like the more common parabolic shade) and less pear shaped but it looks fairly close to the OEM shade as far as I can tell. The mount ring is two pieces unlike the original shade but that’s a minor issue. I believe a bath in simple green for 2-3 days should help that green paint to come off with a wire brush. If anyone orders one of these, I would like to see more pics.

Lafester, can you post a pic or pm me one. I will keep an eye out.

Update,

I hand sanded all of the wheel covers and polished the left hand set.

View media item 109899
Also, I removed the glass from the eye shields and bent them back into shape. Next, I placed the eye shields and the quench tray in the simple green bath for 2 days.

That’s it for the update,
Thanks for the interest.
 
OP
1

11b30b4

Well-known member
Joined
Jul 16, 2020
Messages
1,028
Location
GA
Update,
Well, I have everything painted and /or polished and I am assembling the grinder. These pics were a test run before I mounted it.

View media item 110005
View media item 110006
View media item 110004
Next, I mounted it to my wall work bench.

View media item 110007
View media item 110008
View media item 110009
For the most part, this thing is done. I will paint the plastic lamp cover with the grey hammer spray paint after I get the bucks for the vacuum forming made up.

I still need to order some wheels for the grinder, and I am still missing one spark arrester, but I can fab one if I ever need to use them. Overall, I am very leased with how this thing turned out.

I will be ordering one of the metal lamp covers today and will report on it once I get it.

For the plastic lamp covers, I plan on making the bucks out of plaster using the original one I have as a master mold. Once I get further along, I will post my progress.

Thanks for the interest.
 
OP
1

11b30b4

Well-known member
Joined
Jul 16, 2020
Messages
1,028
Location
GA
Nexoidian, Pm responded.

For polishing, I soak the parts in Simple Green for 24 – 48 hours. This often removed the base layer of paint and I can get the rest off with a wire brush and hot water. On occasion, I need to remove the original finish with a paint stripper then resoak in Simple Green.

Next, I sand the parts. Stuff that is conical or round I place in my lathe and sand, but these parts are not suited for that, so they got sanded by hand. Depending on the finish I want and how bad the part looks, I will use files and low grit (80 -120) to remove burs and defects. On these parts I decided to not go to that level and I only started with 320 grit.

Sanding is a methodical process; I use a piece of foam floor mat (like from harbor freight) as a sanding block then wrap the paper around it. I dry sand with lower grits and go in order 80, 100, 120, 150, 220, 320. When I get to 400 grit, I wet sand for all higher grits 400, 600, 800, 1000, 1500, 2000, 2500. With each change in grit, rinse the part and ensure you are removing the previous sanding scratches. It is possible to achieve a mirror finish with just sanding but I cheat.

For these grinder parts, I wet sanded 320 grit – 1000 grit. Next, I used Mothers Mag & Aluminum Polish. Simply apply it with a rag then buff off with a buffing wheel. Since these parts have a lot of different geometry to them, using the buffing wheel on a grinder would be hard so I use a 3” cotton buffing wheel on a corded drill with the part clamped in a soft jaw vise.

Its not the best finish I could do but its good enough for me. There are working machines after all. I hope this answer your question. Please let me know if you need help with anything.
 

JZiggy

Well-known member
Joined
Dec 1, 2014
Messages
990
Location
Atlanta
Nice work getting those boogered eye shields back into like-new condition! The whole thing turned out awesome.
 
OP
1

11b30b4

Well-known member
Joined
Jul 16, 2020
Messages
1,028
Location
GA
JZiggy, thank you. Now I need to polish up that slow speed pulley before installing it on the 150 press.
 
OP
1

11b30b4

Well-known member
Joined
Jul 16, 2020
Messages
1,028
Location
GA
Cajunfirehawk, I am waiting for the delivery to the metal shade (heat shield) to evaluate it. As for the plastic shade. Rather than building a 3D model to use as a buck (mold) for vacuum forming, I have decided to cast bucks out of plaster from the inside of an actual plastic shade. Now I am waiting on the weather to cooperate before I cast it.

A different issue I have with the grinder is finding correctly sized wheels. As I previously said, I will be using this grinder to buff and clean, so I need a buffing wheel and a wire wheel size 7” with a ½” arbor. Apparently 7” wheels are hard to find and most of the wheels I did find have 5/8 arbors. Since I was not planning on running the wheels with the wheel covers in place, I figured I could use an 8 inch wheel. There seem to be a larger selection of 8” wheels, although almost all of them have 5/8 arbors.

So, I purchased an 8” extra thick (1”) buffing wheel with a 5/8 arbor and an extra thick 8” wire wheel that came with an assortment of arbor inserts. I used a 5/8” to ½” sleeve bushing to center the buffing wheel then I placed the flange washers on each side and locked it in place. I used the included ½” arbor inserts on the wire wheel then added the flange washers and locked it in place.

When I turned on the grinder, the vibration was significant. It looks like the wire wheel is out of round. I ended up taking both wheels off and putting on the 6” wire wheel and buffer wheels I had on my Ryobi (both have ½” arbors) and powered up the grinder and it ran smooth.

Either the issue is with the 8” wheels being too large? Or it is with them not being relatively round and centered. I plan on returning both 8” wheels.

My question for you all is #1, are 8” wheels something I should not run on a 7” machine? The clear just fine with the wheel guards off. #2 If I locate 7” wheels with ½” arbors, should I expect more vibration from the grinder than from the 6” wheels? I am fine with the 6” wheels if its what I need to go with, but I was hoping for wider and larger wheels with this grinder over the Ryobi.
 
OP
1

11b30b4

Well-known member
Joined
Jul 16, 2020
Messages
1,028
Location
GA
Good news guys, the metal lamp shade/ heat shield from my lamp parts is a good alternative if you need a lamp shade. The “Metal Green Parabola Shade” can be ordered from My Lamp Parts here:

https://www.mylampparts.com/product...MIq9GM35C37gIVUtbACh2SmAwoEAQYAiABEgKclPD_BwE

These run $9.95 but the company has a minimum order of $50.00 so if you order only 1 lamp shade, then you will be charged a $5.00 fee. This brings the cost to 14.95 plus shipping (~ $8.20).

On my 7” ¾ HP (397.19350) the metal lamp shade is part # 4971959. This lamp shade is a near copy of the factory part. The part number may be different for the various grinders but the metal lamp shade should be the same for all of them.

So how does this reproduction match up to the factory part? It is nearly identical in size, shape, and material. It is a simple piece of stamp steel. In fact, the only noticeable differences are the mounting collar and the absence of the top screw hole to mount the plastic shade.

Here are some side by side pics of an original shade and the reproduction.

View media item 110094
View media item 110096
View media item 110098
View media item 110095
View media item 110097
The ring mount on the original shade is integral to the shade.
View media item 110099
While the ring mount on the reproduction is a separate part that is attach by two small rivets, it can be swung but is fairly stiff and should be adequate for our purposes.

View media item 110100
So, anyone looking for a metal lamp shade for their grinder should consider this option. If you want to add the plastic lamp shade to the metal shade, this can be easily accomplished by drilling a hole in the top and using a small screw to attach the plastic shade.

Thanks for the interest.
 
OP
1

11b30b4

Well-known member
Joined
Jul 16, 2020
Messages
1,028
Location
GA
Cajunfirehawk, thank you.

Also, I posted on the BG thread but,
Guys, just a quick update.

I am still working on reproducing the plastic lamp shades.

I mocked one up and filled it with plaster to make the vacuum forming buck.

View media item 111338
The buck came out nice.

View media item 111339
My VF platen is 24”x 24” so this is only a test. If this works, I am hoping to form 4 shaded at a time.

Anyway, I need to clean up the buck and fill in the mounting screw depression in the buck them I do a pull and see what we get.

More to come.
 

exmaxima1

Well-known member
Joined
Jun 25, 2011
Messages
6,339
Location
Midwest
FWIW, some of the smaller model grinders had shades w/o the plastic shroud, and had no mounting holes. My 1/3hp roundtop is like that
 

Attachments

  • shade1.jpg
    shade1.jpg
    83.1 KB · Views: 20
  • shade2.jpg
    shade2.jpg
    139.4 KB · Views: 27
OP
1

11b30b4

Well-known member
Joined
Jul 16, 2020
Messages
1,028
Location
GA
exmaxima1, cool. I am only running the metal shade on my grinder and do not plan on adding the the plastic shade but some people stated an interest for the plastic shade. Most likely because it is no longer available.

Since I found an available replacement for the metal shade, I expect most people will run with that.

No big deal, its just a project I am working on, on the side.
 

Stanner

New member
Joined
Apr 12, 2022
Messages
1
What are the ratings on that starting relay. I've got the same grinder but I can't find any information on replacing that relay.
 
OP
1

11b30b4

Well-known member
Joined
Jul 16, 2020
Messages
1,028
Location
GA
Stanner, **** dude that thing is mounted and I have no idea. Shoot over to the grinder thread and ask someone there. I am sure they can give you all the information you ask for.
 

Jayman17

Well-known member
Joined
Feb 6, 2017
Messages
3,793
Location
Seattle, Wa
Great job 11b, your grinder came out great. I wanted you to check out my pre-pre block grinder I recently redid. I mentioned it to you on one of your other threads I think. First attempt for me, I hope you don’t mind me posting a photo here to show you. Thanks for all the great tips I pick up reading about your projects. I didn’t have the best before photo but you get the idea

Jay
 

Attachments

  • 2FBD9875-0ED5-41CC-84B6-CB213FE471FB.jpeg
    2FBD9875-0ED5-41CC-84B6-CB213FE471FB.jpeg
    390.9 KB · Views: 17
  • A8EAA991-6CCF-4D52-846D-A930463B8CA0.jpeg
    A8EAA991-6CCF-4D52-846D-A930463B8CA0.jpeg
    326.9 KB · Views: 15
  • D12618E2-18C3-488F-831A-8266ACC148D8.jpeg
    D12618E2-18C3-488F-831A-8266ACC148D8.jpeg
    336.4 KB · Views: 13
OP
1

11b30b4

Well-known member
Joined
Jul 16, 2020
Messages
1,028
Location
GA
Jay, that grinder is Old School Cool. Love the paint as well. Great job and feel free to post in any of my threads.
 

Jayman17

Well-known member
Joined
Feb 6, 2017
Messages
3,793
Location
Seattle, Wa
Thanks 11b, pictures aren’t the greatest but I was happy with the results. I have a few more projects in the pipeline.

Jay
 
To avoid these ads, REGISTER NOW!
Top Bottom