To avoid these ads, REGISTER NOW!

Between 705 & 1200 SQ/FT APEowner's "It's about time" shop build"

Workspaces between 705 and 1200 squarefeet.

APEowner

Well-known member
Joined
Oct 2, 2009
Messages
4,166
Location
Sunny, New Mexico
It's about time. I've lived in this house for about eight years now and a little before Thanksgiving I decided that I was ready to devote time and money to getting the shop setup the way I want it. When I mentioned that to my patient and supportive bride of nearly 30 years she said "It's about time!"

When I lived in NY I had a heated and cooled 24' x 40' detached shop that I used for my engineering consulting business and my car hobby. I don't have many pictures of that shop mostly because camera phones weren't as ubiquitous as they are now. Here's one of the few that I have.


One of the reasons that we bought the house that we did when we moved here to New Mexico was the size of the garage. It's not easy to find a large garage in Albuquerque and when you do they tend to be attached to a large house. After several months of looking for a large garage/small house combination we ended up buying a large house with an acceptably sized garage. We got it for a good price and decided that while 3,600 square feet of living space is silly for two people it was a decent investment and that we'd just have to put up with the luxurious accommodations in order to get the garage I wanted.

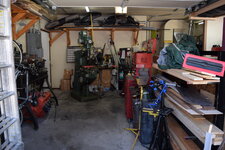
While I've had plans for converting the garage into a shop since we moved in a variety of things have prevented me from implementing them. I made the space more or less workable and just never got around to doing more. I've built three race cars, a bunch of engines and transmissions and a whole host of other projects in the space so it's not like it was unworkable. It was just unorganized, cluttered, cold in the winter and hot in the summer. My lathe was still disassembled from the move and covered with a bunch of junk and until 2018 my milling machine was sitting in my buddy's shop in NY in his way.

In the summer of 2018 the stars aligned in such a way that a trip to NY to pick up the milling machine could be tied in with a visit to Kansas city to do some performance driving instruction and a visit to New Albany Indiana to meet with a customer.

So, I hooked up the trailer,


headed to KC and played with super cars,


crossed the Mississippi,


visited with my customer and then went on to NY where I visited my parents and in-laws and moved the milling machine out of my buddy's way and into the trailer.


Moving the mill into the trailer went almost exactly like I had planned. I had built this sled ahead of time. We picked the mill up with the bucket on his tractor and set it on the sled which was on top of some steel tubing and winched it into the trailer.


The mill was right at the upper limit of what the tractor could lift and we had to have someone stand on the draw-bar to keep the back wheels on the ground but otherwise it went well.

With the mill strapped down I had an uneventful 2,000 mile trip back home. Once here I rolled the mill into the shop against the back wall where it's since been sitting and collecting dust and clutter.


Too be continued...
 
To avoid these ads, REGISTER NOW!
OP
A

APEowner

Well-known member
Joined
Oct 2, 2009
Messages
4,166
Location
Sunny, New Mexico
So, where was I? Oh yeah. Usable but cluttered shop that now, thanks to my trip to NY has another thing in the way.

I had done some some things. I had put in some lights and built a cabinet in the northeast corner. You can see some of the lights, the completed cabinet and the beginnings of another in this shot.


By Thanksgiving of 2020 I had completed the second cabinet. Here's some more build shots of that cabinet.


You can see the basic construction that I used on all of the cabinets. I put heavy stuff in them so I want them to be substantial. They're all 2x4 construction. 16" on center for the bottoms of the shelves. Yes the screws are loaded in shear but they're construction screws and rated for 500 pounds plus in shear and there's two in each joint. It'll be OK. There's a face frame made of 1 by that pretties up the fronts and sliding doors hanging from closet door tracks. You'll be able to see those in later pictures.

The shop is three bays with the doors on the east side. These next pictures are what it looked like around Thanksgiving of 2020.

This is standing with my back to the door of the house facing east. The pile on the right hand side is mostly stuff that's never been unpacked since we moved in eight years ago.


This is standing in the same spot looking at the southern bay. We tend to go in and out through this bay otherwise it would probably have collected even more junk.


This is shot from the northern bay looking west. That orange step is the biggest reason that more progress hasn't been made to this point. It runs along the whole west wall and the plan requires that it disappear from the north bay. It's really in the way. It's OK in the middle bay behind the tool box where the compressor, water heater and furnace are because the plans call for that area to be partially enclosed. In the southern bay it only sticks out into the shop area a little bit so it can stay there as well.


I knew that a friend of mine had bought a jack hammer for a project he did so I asked if I could borrow it. His reply was "You can have it! I don't ever want to use it again." That should have been a clue. Over a period of several weeks I spent an hour or so a night out in the shop jack hammering away,


loading broken up concrete into the back of my truck one five gallon pail at a time,


until 5,500 pounds of busted concrete later I had this.


I'm sure it would have been faster if I had rented some equipment but this was good exercise and the price was excellent and, if someone want's to borrow my jack hammer I'll say "You can have it! I don't ever want to use that thing again"

Now I had a hole in the shop floor that needed to be filled. Having done concrete work before and having learned from the jack hammer experience. I subbed that out.

I wrote a check and ended up with this.


I don't know what I thought I was taking a picture of when I took that shot but is sort of shows the floor.

With the floor in, my wife's blessing, encouragement and help I was out of excuses so I framed the new work bench.


Added the plywood top and some shelving inside what will be the bottom cabinets


and, cut some stainless for the tops. I really liked the stainless bench tops in my NY shop and wanted the same here.


I don't have access to a brake that will handle material as long as these benches and I like a lip on the front so stuff doesn't roll of so I'm using stainless steel angle for the front edges. You can see part of it in the above shot.

Here it is fully installed. At some point I'll go back and polish it. Or maybe not.


While framing the bench I also framed in the area around the furnace and compressor.


I call that area the parts room but it's not really a room because it doesn't have a door and I'm really keeping fasteners in there. Not parts. Remember those unpacked boxes from earlier? The contain, among other things, fasteners. I mounted panels for the Akro bins and hung some cabinets on the wall,


and started unpacking boxes.


I also dry walled the space.


And started on the upper cabinets


The walls in the shop are a knock down coating which is basically a bad tape and spackle job. There are several different ways to do it but I used a skip trowel technique that exactly matches the pattern in our master bedroom. It doesn't match the walls in the shop very well but this is a garage so I'm OK with it.


I apparent didn't take any pictures while I was installing the cabinet face frames and doors or of the painting process but here's how things look after those steps.


I also installed a pair of infrared heaters. You can see one of them in the picture above. They work great. I've got a thermostat controlled relay the powers the controllers. I leave the heat set at 55 when I'm not in the building and bump it to 65 when I'm working out there.
 
Last edited:
OP
A

APEowner

Well-known member
Joined
Oct 2, 2009
Messages
4,166
Location
Sunny, New Mexico
One more quick project will get this thread caught up to today.

This pile of sheet goods.


needs a home. And this shelf


needs to go away so that I can run the electric in a more socially and NEC acceptable way. The stuff that's on it also needs a home.

Like Gregor I like to start with a drawing. Unlike Gregor I can't draw worth a darn. I usually fire up Autodesk Inventor, create a 3d model and then a drawing. This project is pretty simple so I grabbed my trusty Rotring 600


and proceeded to demonstrate that like Gregor I'm into precision writing instruments, good tools don't magically give you good skills and that I should stick to CAD.


Well, I know what it's supposed to illustrate.

With the design work done I started cutting up stock on the horizontal bandsaw.


While the saw was running I took advantage of the fact that the shop was now organized enough that I could actually work on two projects at once and warm and tore down this.


to see why it left a significant oil smoke screen whenever it was running.

After a couple of hours I had this.


And, this.


More on the engine later.

Last weekend I setup the cribbing that I use for racecar setup, shimmed them level and started sticking steel together.


until I had this.


When the casters arrived earlier this week I did this.


And, that's where I'm at today.

There's still more to do in the shop and I'm going to try and document that and some other projects, like that engine rebuild in this thread.
 
Last edited:
OP
A

APEowner

Well-known member
Joined
Oct 2, 2009
Messages
4,166
Location
Sunny, New Mexico
Most of this past weekends shop time was spent taking measurements on the FT engine and figuring out what it is and what my options are for rebuilding it but I did get some paint on the materials rack and get it loaded up. Which turned this


and this


into this


and this


So, I can get serious about the electrical.
 
To avoid these ads, REGISTER NOW!
OP
A

APEowner

Well-known member
Joined
Oct 2, 2009
Messages
4,166
Location
Sunny, New Mexico
Well, so much for my plans to keep this thread up to date. Let's see if I can catch up. I'm going to start with the engine project that I mentioned in post #4. I did my usual poor job of taking photos so there's not going to be as much detail as I'd like here.

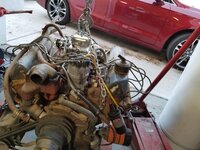
This engine is out of the 70 something Ford box truck that my local racing club uses at the track. For the last several years it's been laying down a smoke screen everywhere it went and we decided that maybe we should do something about that before something critical let go.

So, we pulled it out and brought it to my shop.


20201114_163226.jpg

Where I tore it apart.
20210116_100417.jpg
20210121_191925.jpg

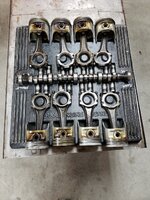
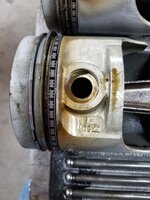
and found the most engine wear I've ever seen on an engine that didn't have an actual failure. It was just flat wore out. Checkout the wear on those oil control rings!
20210121_191932.jpg

The tensioner that's not even supposed to touch the cylinder wall is just about worn through. That's pretty much how the whole engine looked. Bearings to brass, valves flopping around in the guides and every seal brittle as heck.

Despite the wear there was nothing actually broken so it was pretty much a standard rebuild except that the block was already bored out as far as it could go. I sourced another block and sent the crank to the machine shop. Did a basic valve job, including new guides.


20210606_145043.jpg

Put it back together


20210605_125959.jpg

20210605_130005.jpg

and put it back in the truck. It ran all season and the only issue we've had is that it won't run if you forget to put fuel in it and it's harder to find on the track without the smoke trailing behind.
 
OP
A

APEowner

Well-known member
Joined
Oct 2, 2009
Messages
4,166
Location
Sunny, New Mexico
In this post I'm going to cover the electrical work that I've gotten done.

When I moved in there were three single bulb light fixtures for lighting and two electrical outlets in the whole shop. Shortly after I moved in I added some t8 lights and a 240v outlet and powered pretty much everything off of extension cords. There were several more, or less permanently strung around the shop.

When we last left off the electrical discussion I had moved a shelf out of the way so that I had room to add on.
1639437040017.png

Since then I've added a second panel dedicated to the shop and, a third panel to handle three phase generated by my rotary phase converter.


20210409_170436.jpg

Because the shop is attached to the house and my wife is very sensitive to smells I added an exhaust fan that I run all the time to keep the shop at a lower air pressure than the house. I had been using a cheap box fan propped up an a box leaning against a vent. This is a significant upgrade.

DSC_0042.JPG

The square box above the Phase Converter box houses the relay and controllers for the infrared heaters. This box allows both heaters to be controlled by a single, programmable wall mounted thermostat.


DSC_0044.JPG

I have it programmed to 55 degrees F at all times and I bump it up when I work out there which makes the programmability seem pointless but the reason I went with that is so that if I forget to set it back it'll do it on it's own when it reaches the next interval.

One of the things that I really wanted in this shop was the ability to either turn everything off at the door into to the house or, at least be able to tell when something is left on. Below are the switches and indicator lights by the door. Hard wiring the air compressor is one of the other things that I've accomplished. I'd been powering it off a 240v extension cord run over from the outlet by the breaker box.


DSC_0046.JPG
The zone lighting like the under cabinet lights below all have switches near them but they can also be turned on and off here by the door. I've labeled every junction box, outlet and switch with the panel and circuit breaker number that feeds it.


DSC_0032-2.JPG

You can sort of see the hard wired power strip mounted to the underside of the cabinet and the new outlet to the right of the tool box in the picture above. The shop PC is a Raspberry Pi 4 running Raspberry Pi OS. It's not a replacement for a real PC but it was cheap and is good for surfing the web, interacting the the 3D printer and checking the security cameras.

I still need to run the electrical to the north wall (to the right in this picture) for the lights under the cabinets on the right, a 240v outlet and some 120v outlets.

There's still work to do cleaning up the machine shop area but the milling machine, lathe and drill press are all operational.


DSC_0038.JPG
 
To avoid these ads, REGISTER NOW!
Top Bottom