To avoid these ads, REGISTER NOW!

Below 265 SQ/FT The Tool Temple - building a garage addition with my own bare hands!

All workspaces below 265 squarefeet.

mannydantyla

Well-known member
Joined
Jan 24, 2019
Messages
160
Location
LFK
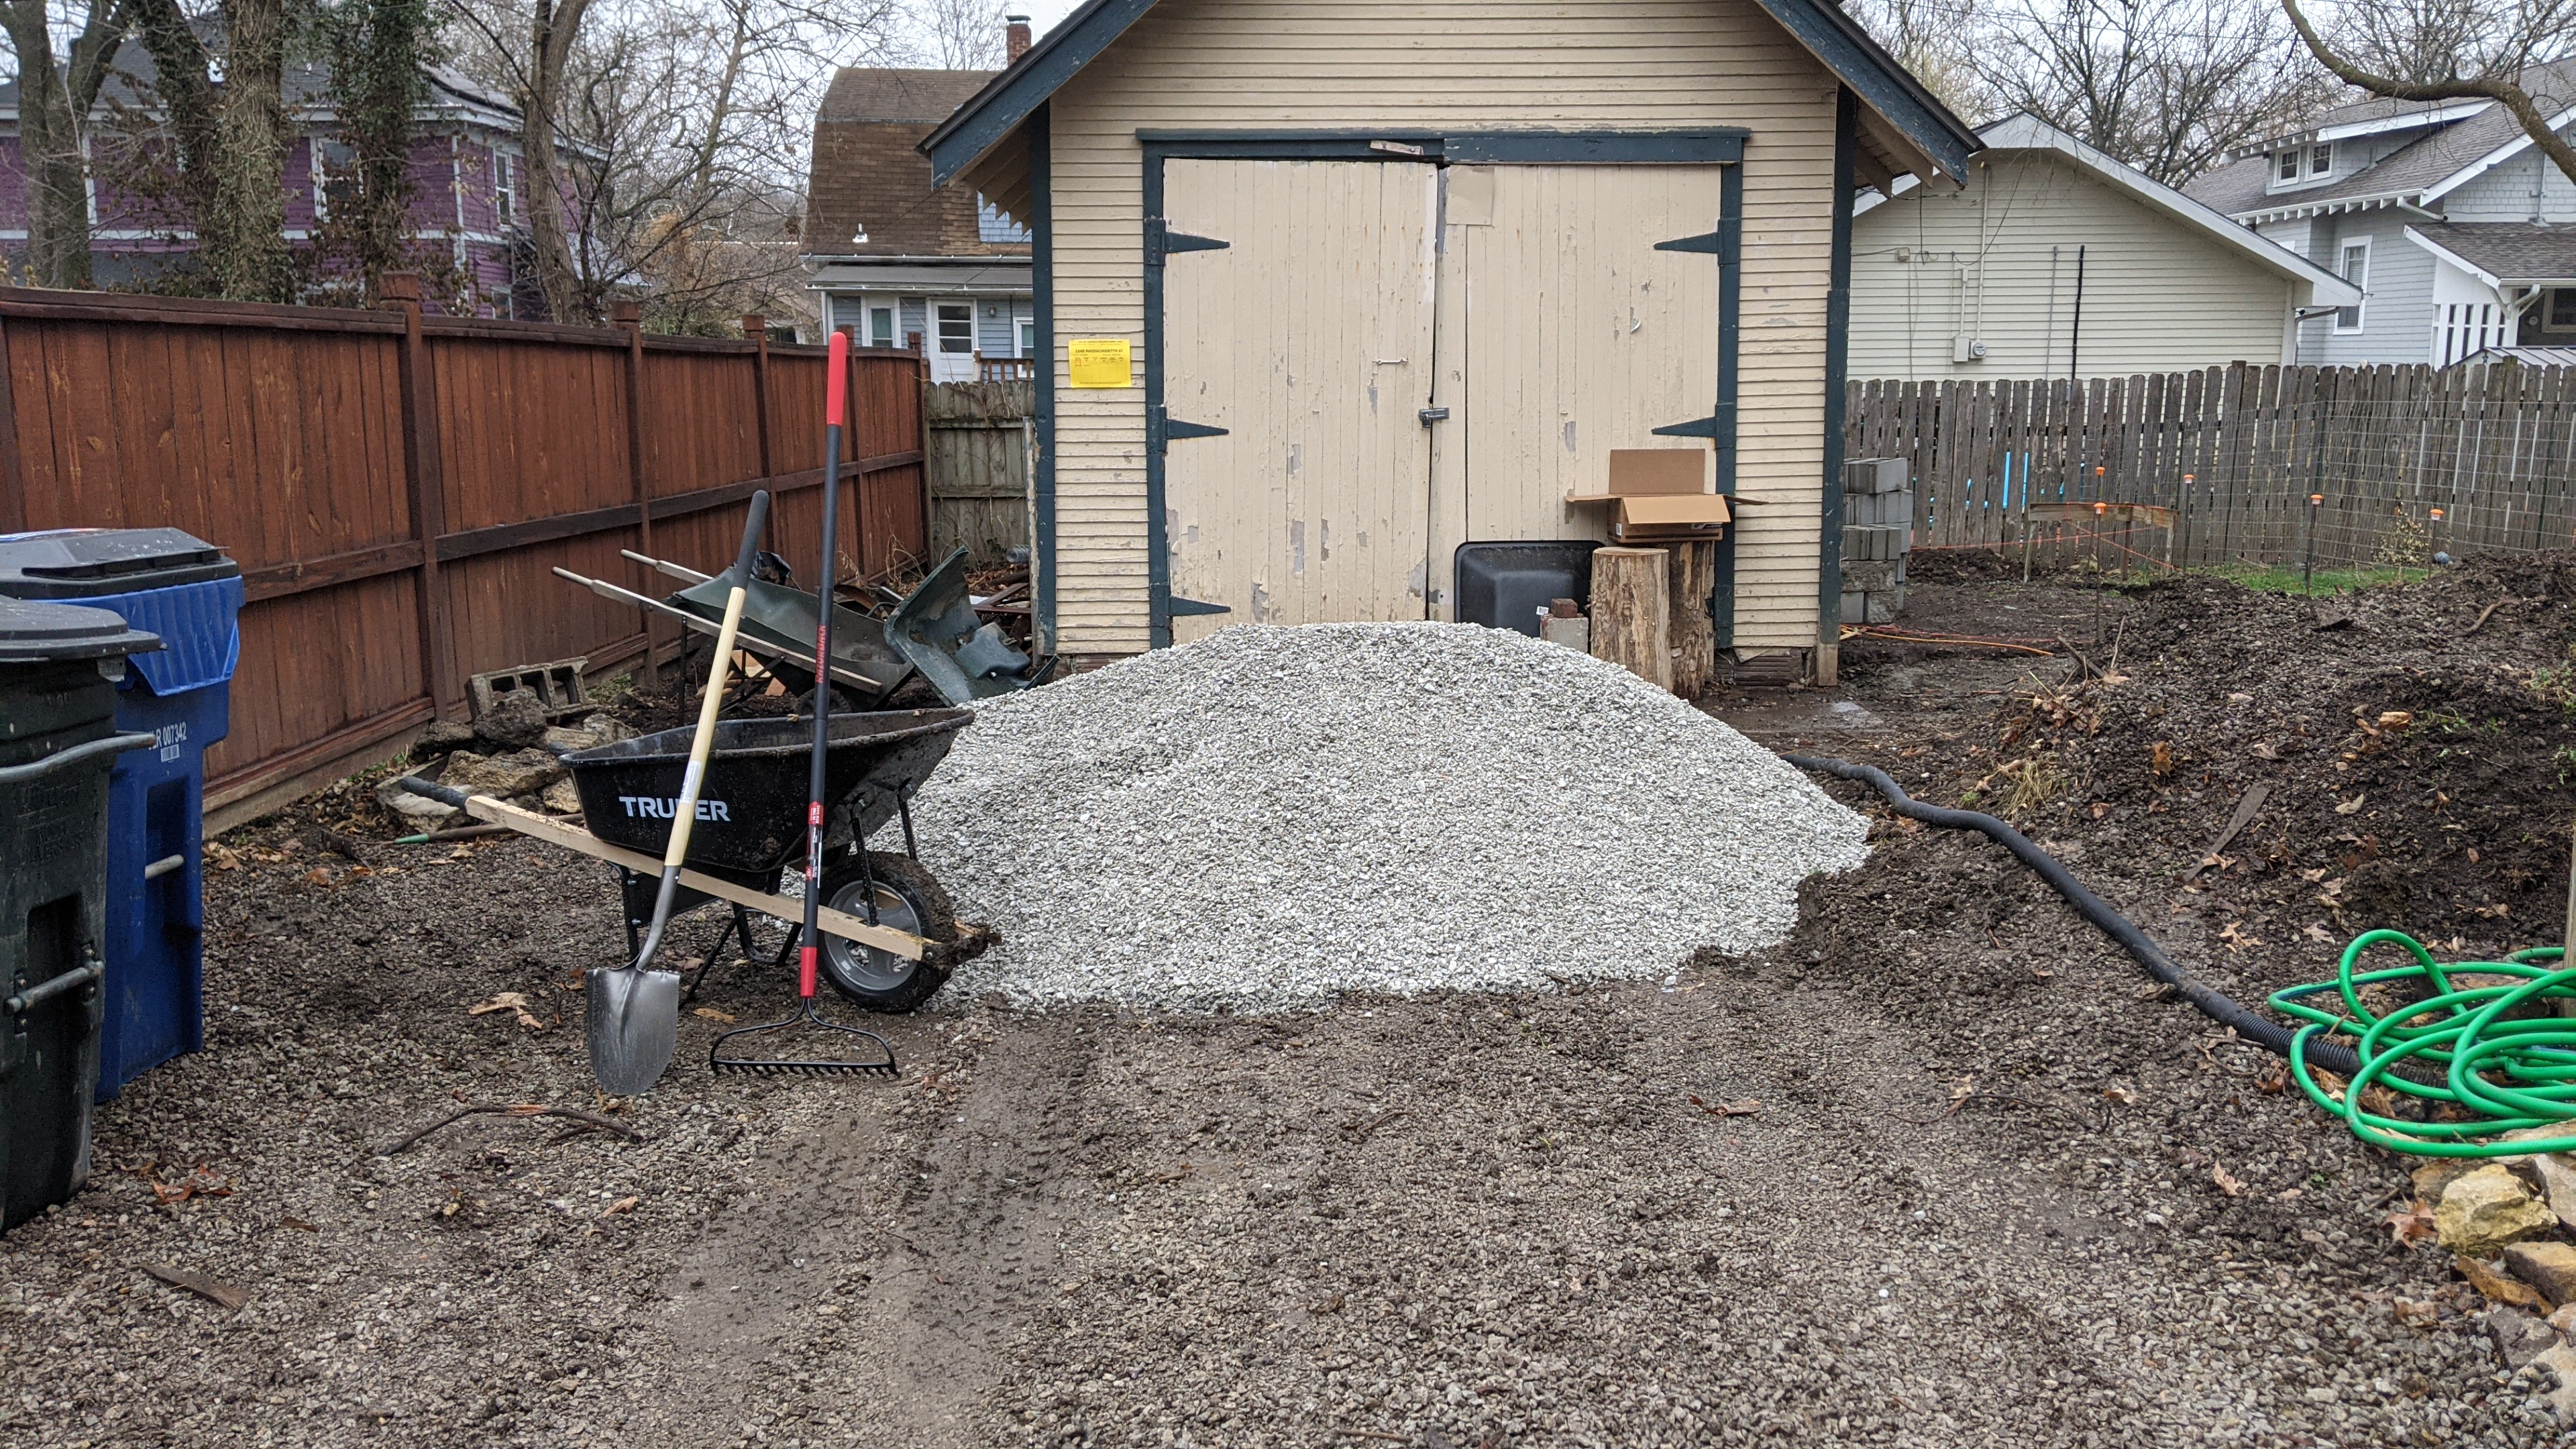
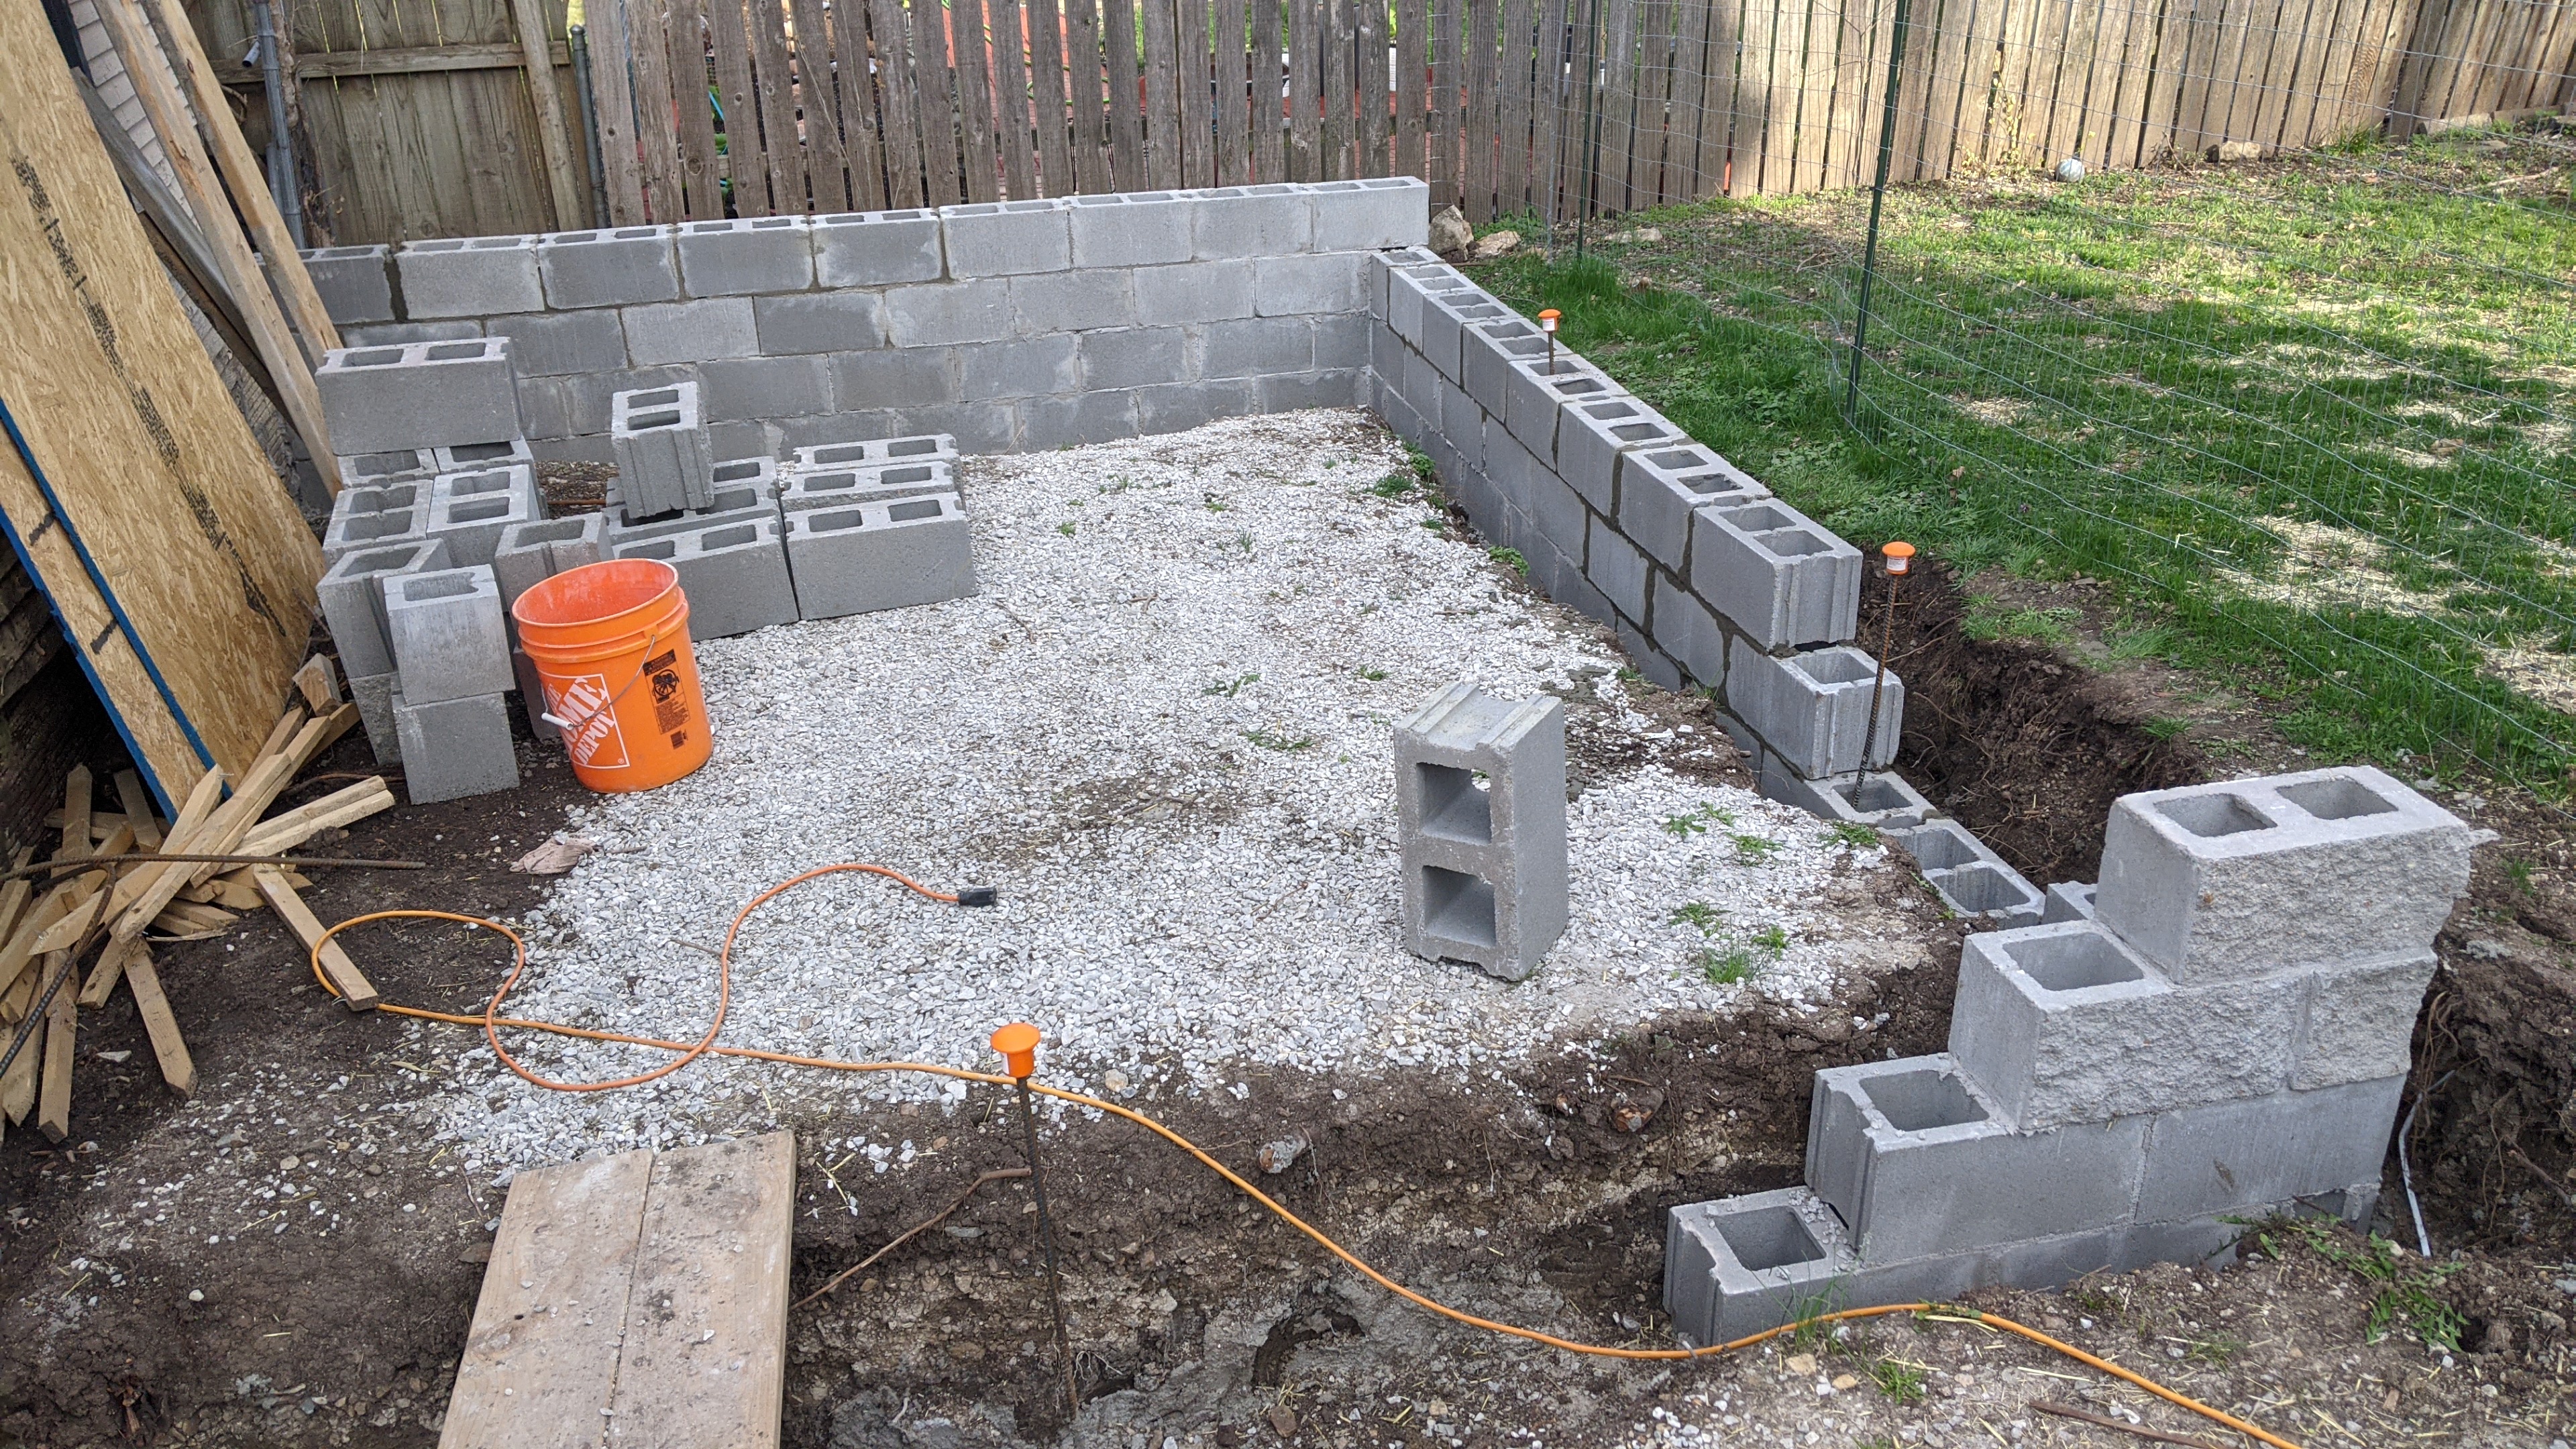
Here's the structure that will soon become my Tool Temple:

c02vu5zd1u561.jpg

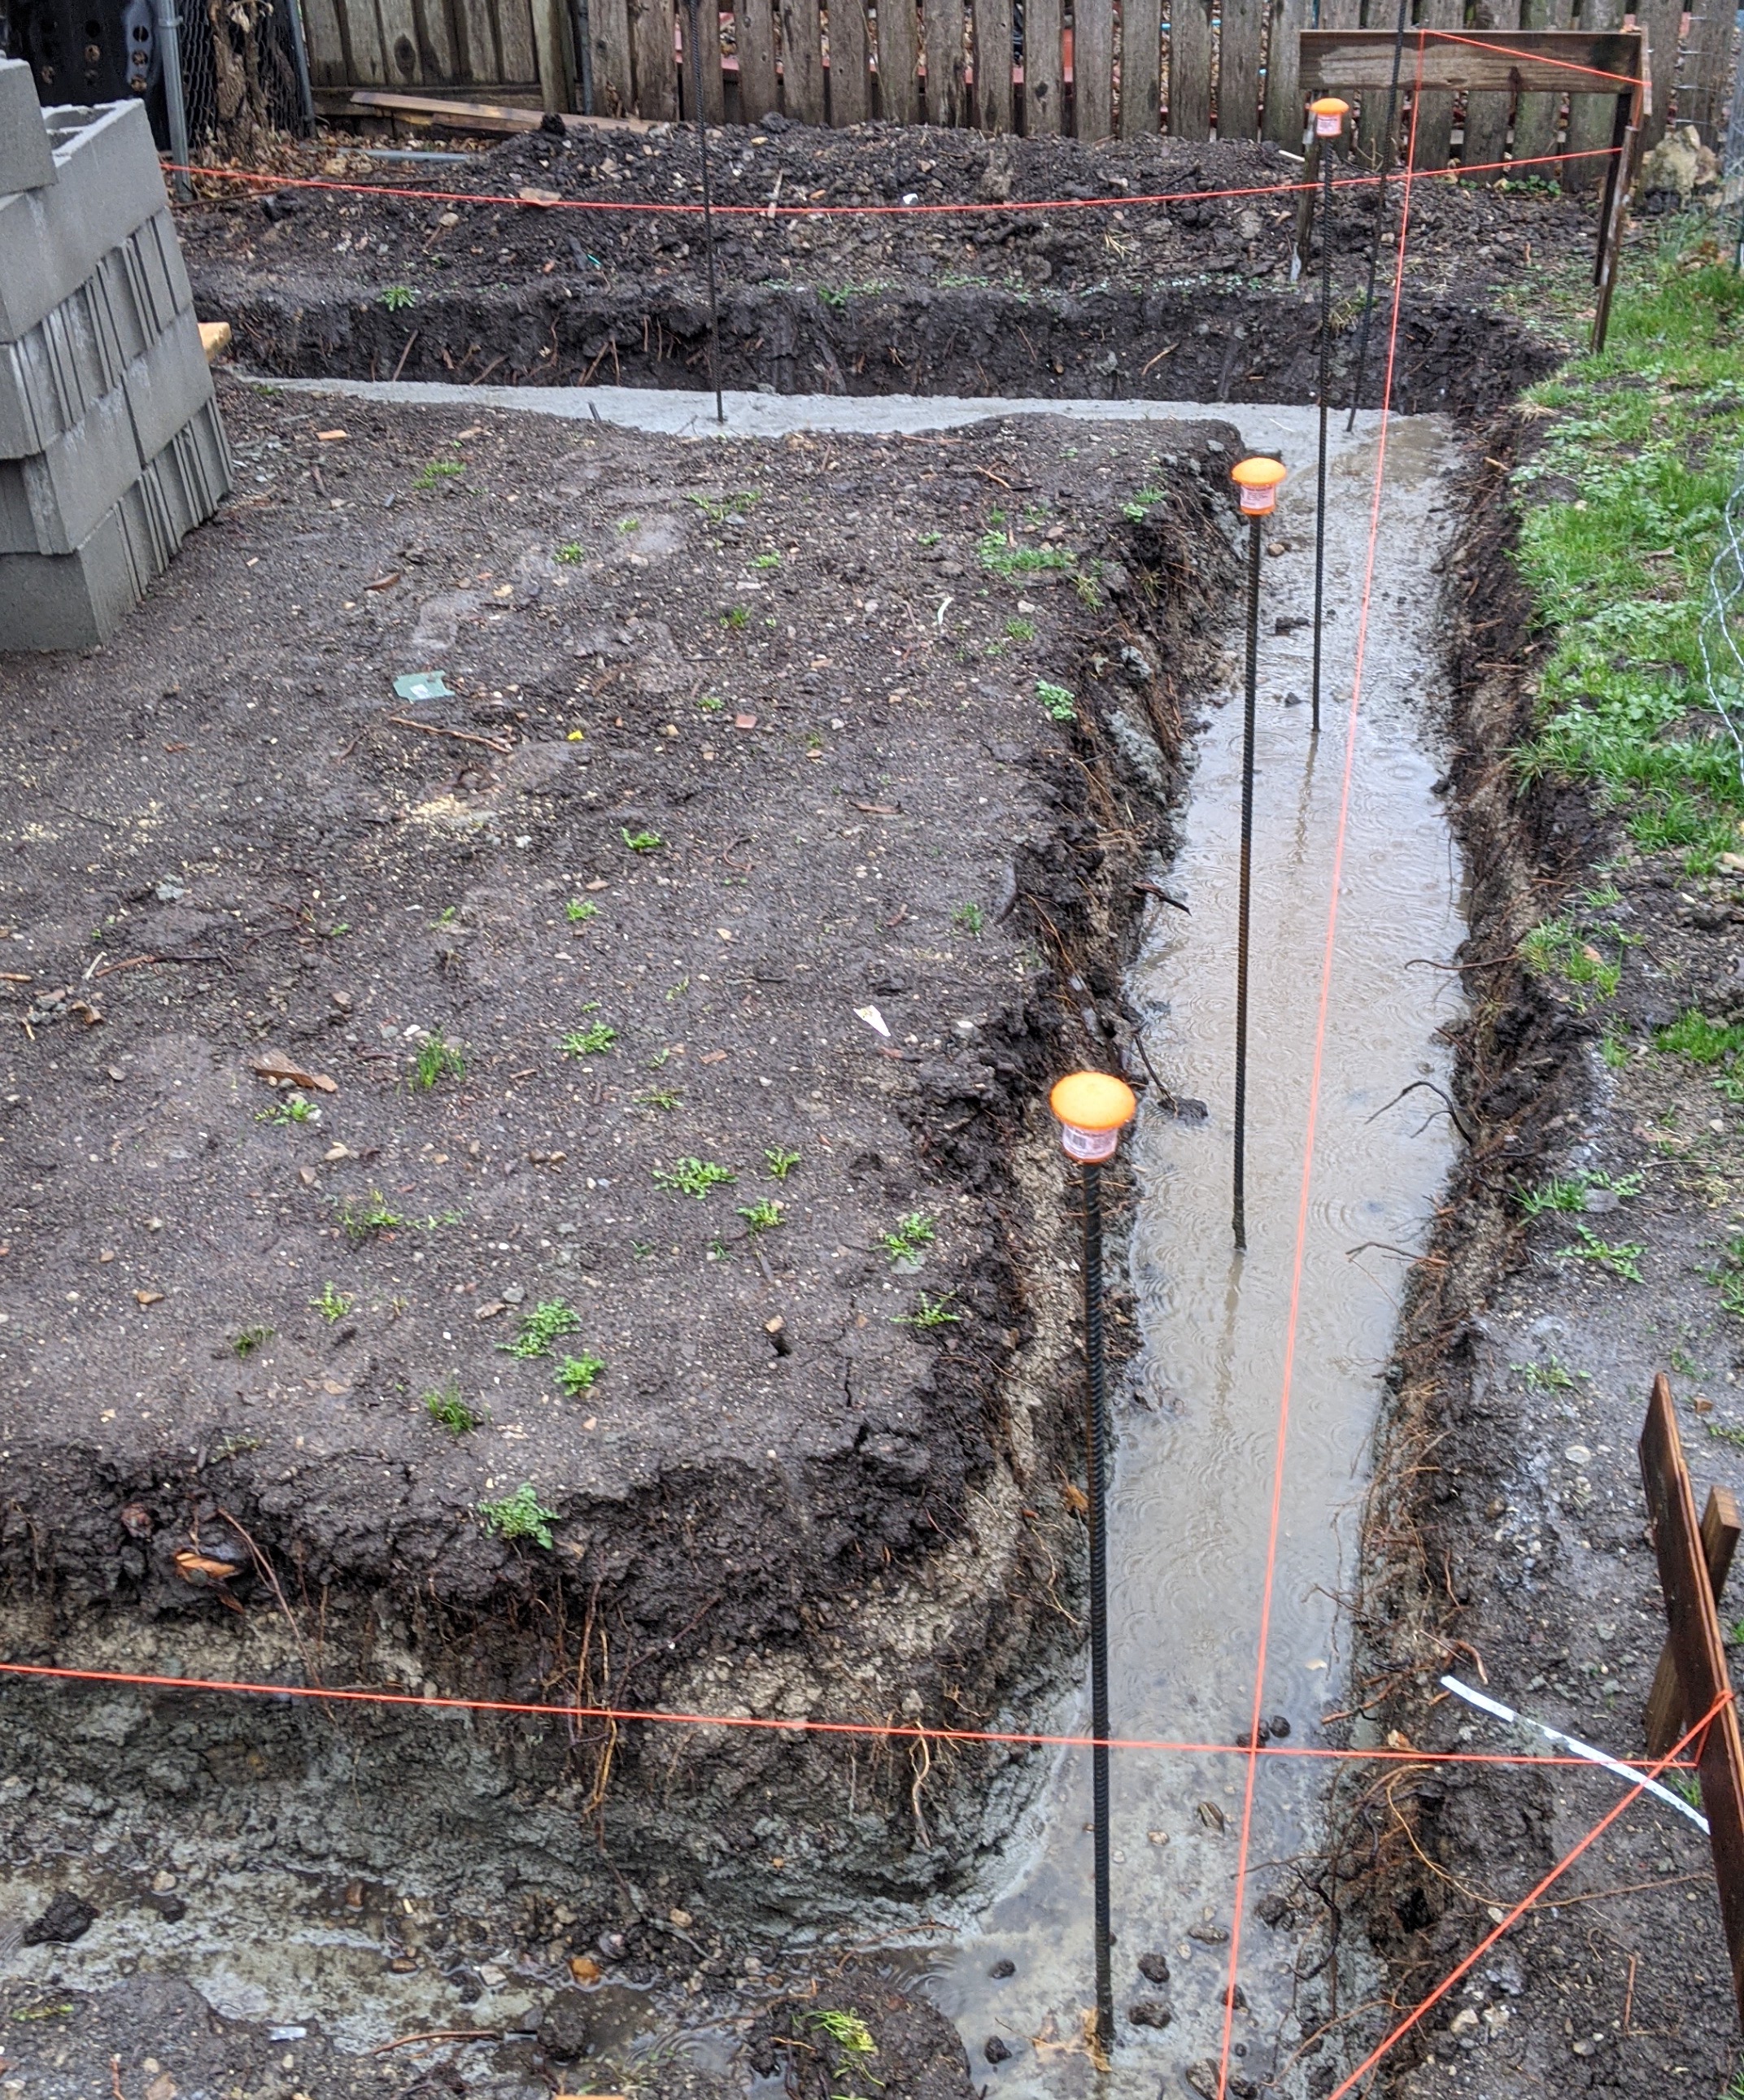
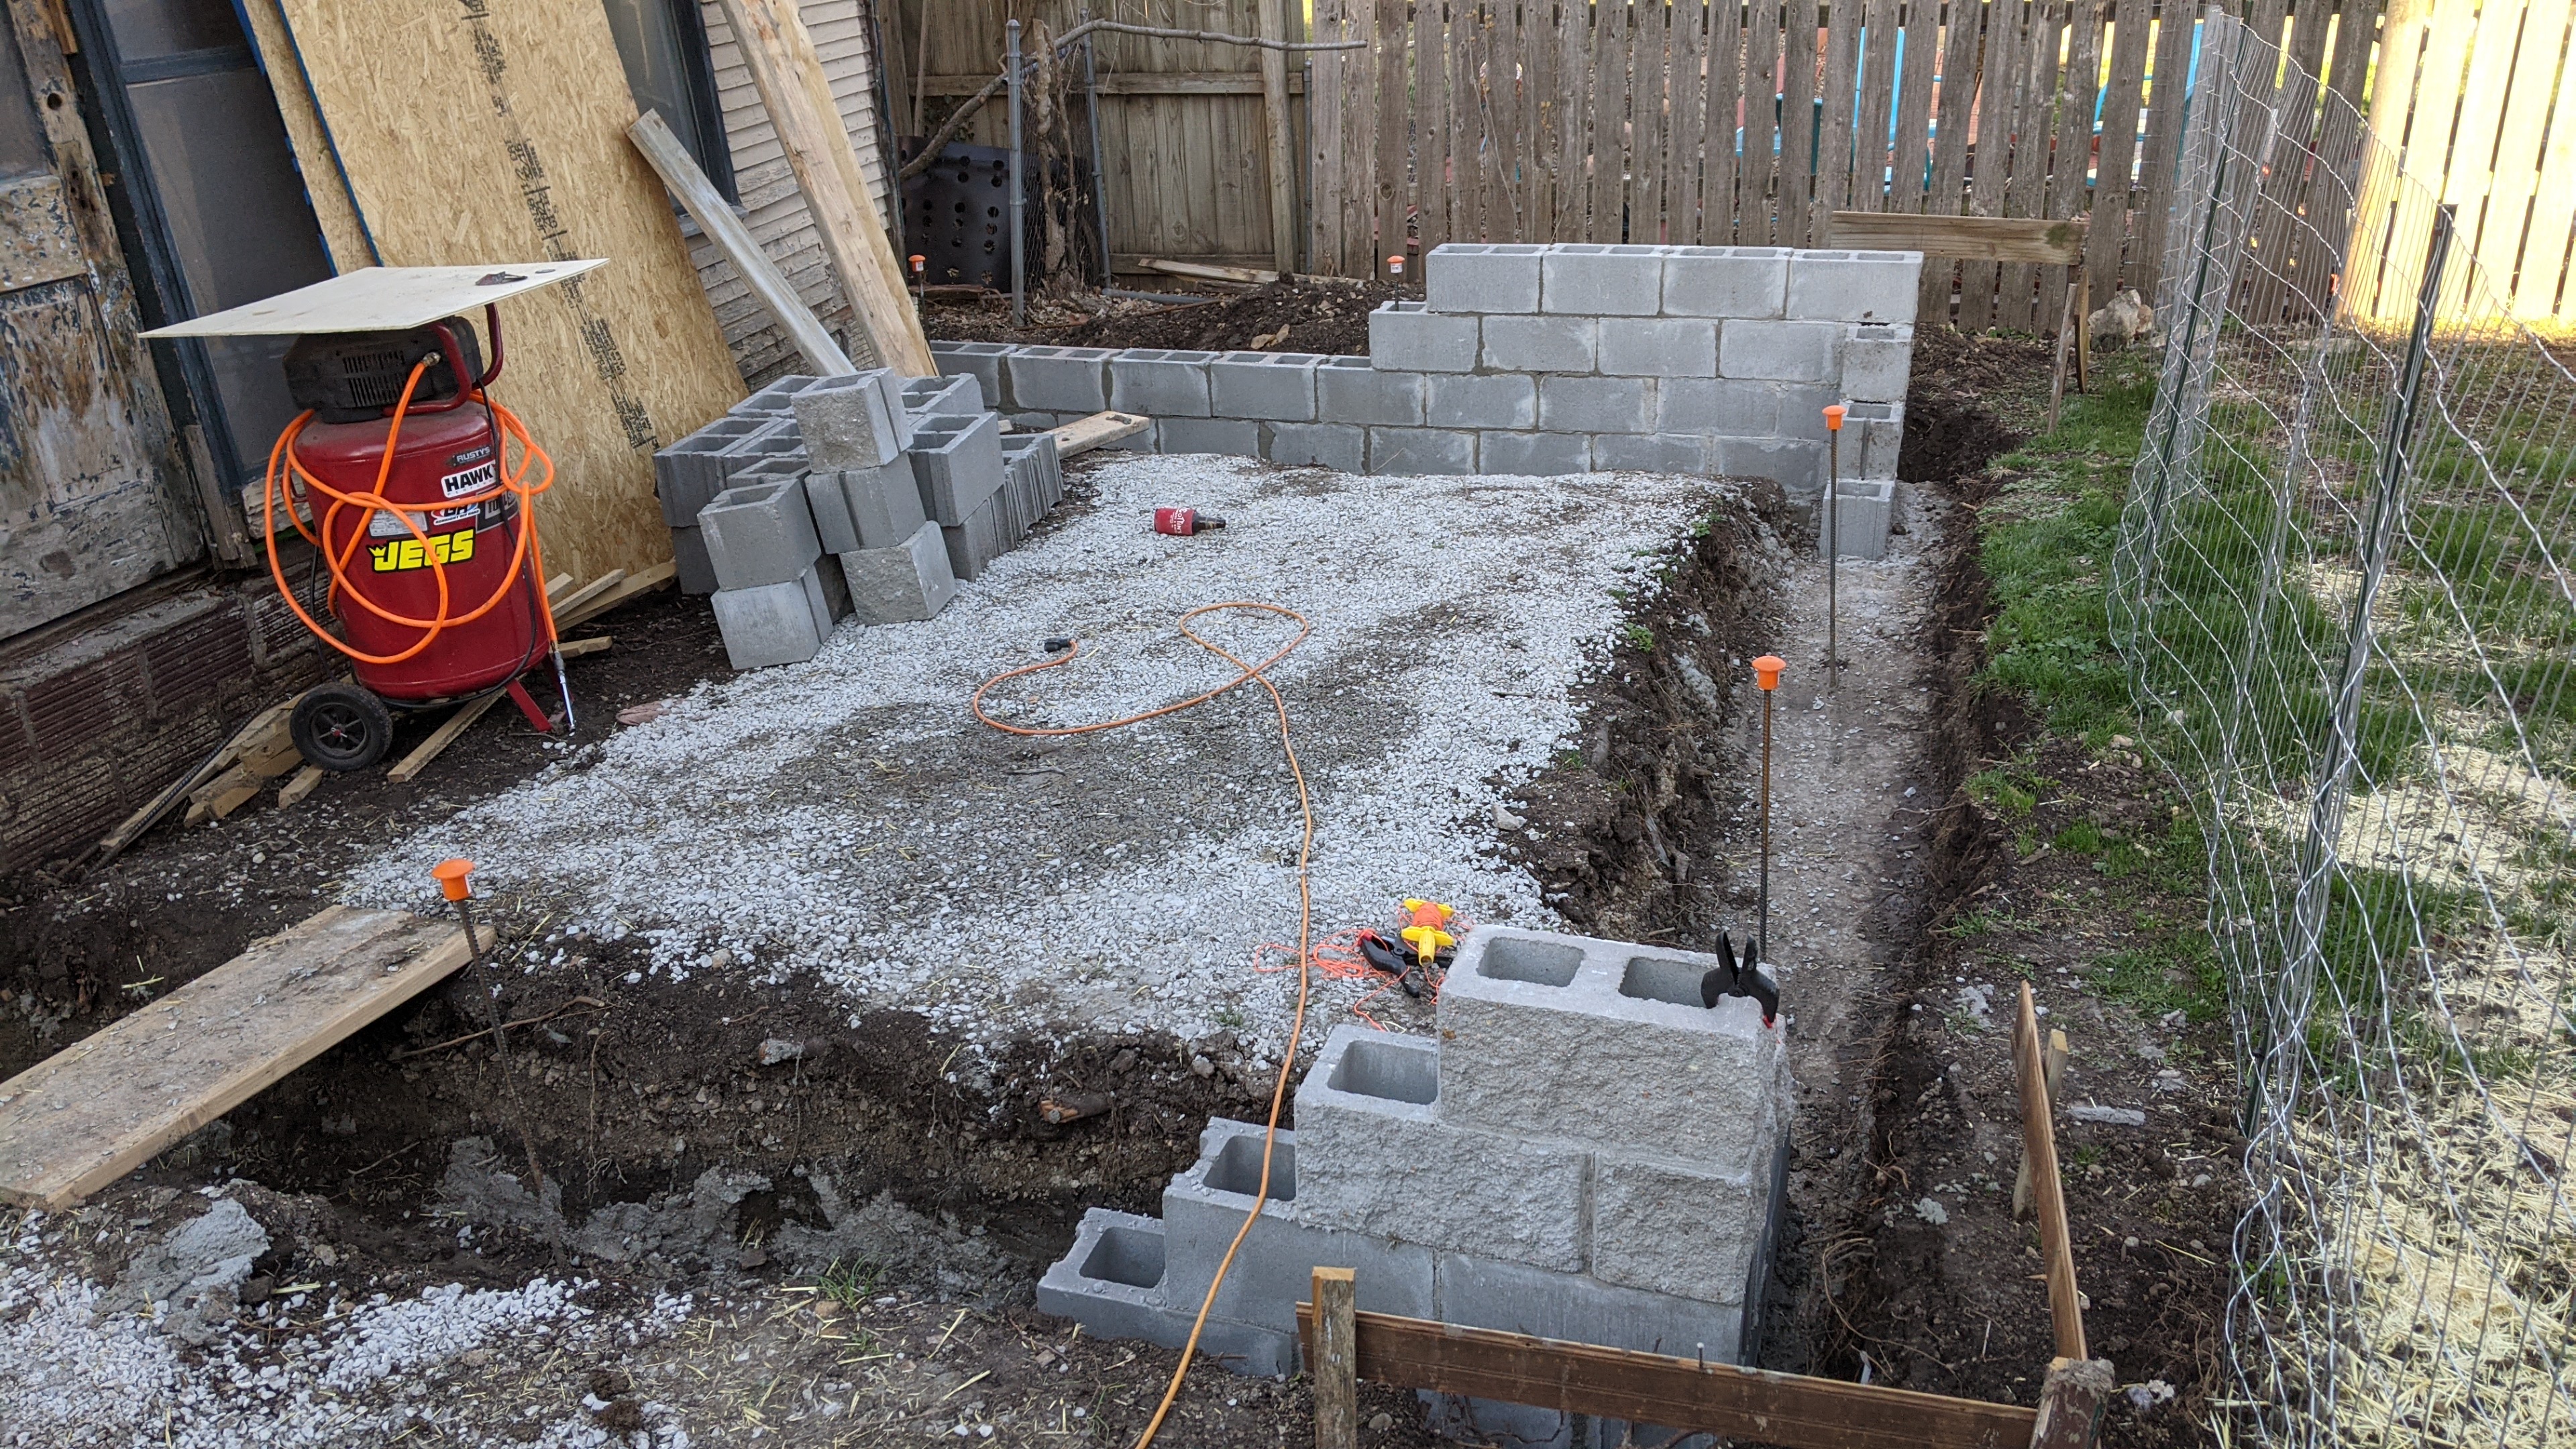
It is a humble 20x12 *************, ugly as all ******* hell, but I've decided not to demolish it and build new because of reasons. First among them is I cannot find a contractor that isn't booked into 2022. So I guess I'm doing all of this myself! Demolishing and building new is a lot bigger job than doing a tiny add-on so that is what I will do. Starting with the foundation.

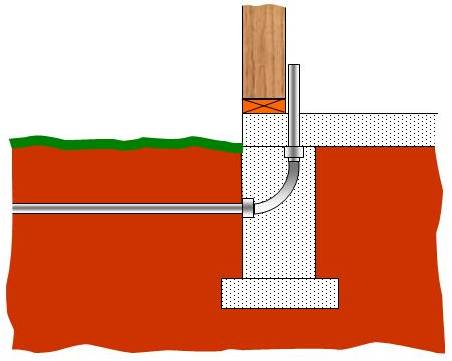
Here's the plans that I submitted to the city:

1540-massachusetts-floor-plan.jpg

foundation%20detail.jpg

1540-massachusetts-plot-plan.jpg

1540-massachusetts-elevation-plans.jpg


The plans have already been accepted by the city! The footprint size is something my wife and I hashed out and let's just say my 30x24 didn't leave enough room for her hot tub. I designed the plans such that the walls are exactly 8' tall (minus the cms stem walls) and, thus, 4x8 sheets of plywood siding will cover from top to bottom. I'm also adding a header beam between the old a new buildings, and I made the length just short enough that the city won't require me to hire a mathematician to calculate the load bearing and all that. Many other factors such as that have gone into every detail that I just don't have time to explain right now. But, disclaimer, this is my first time doing anything like this so I'm sure they're not perfect.

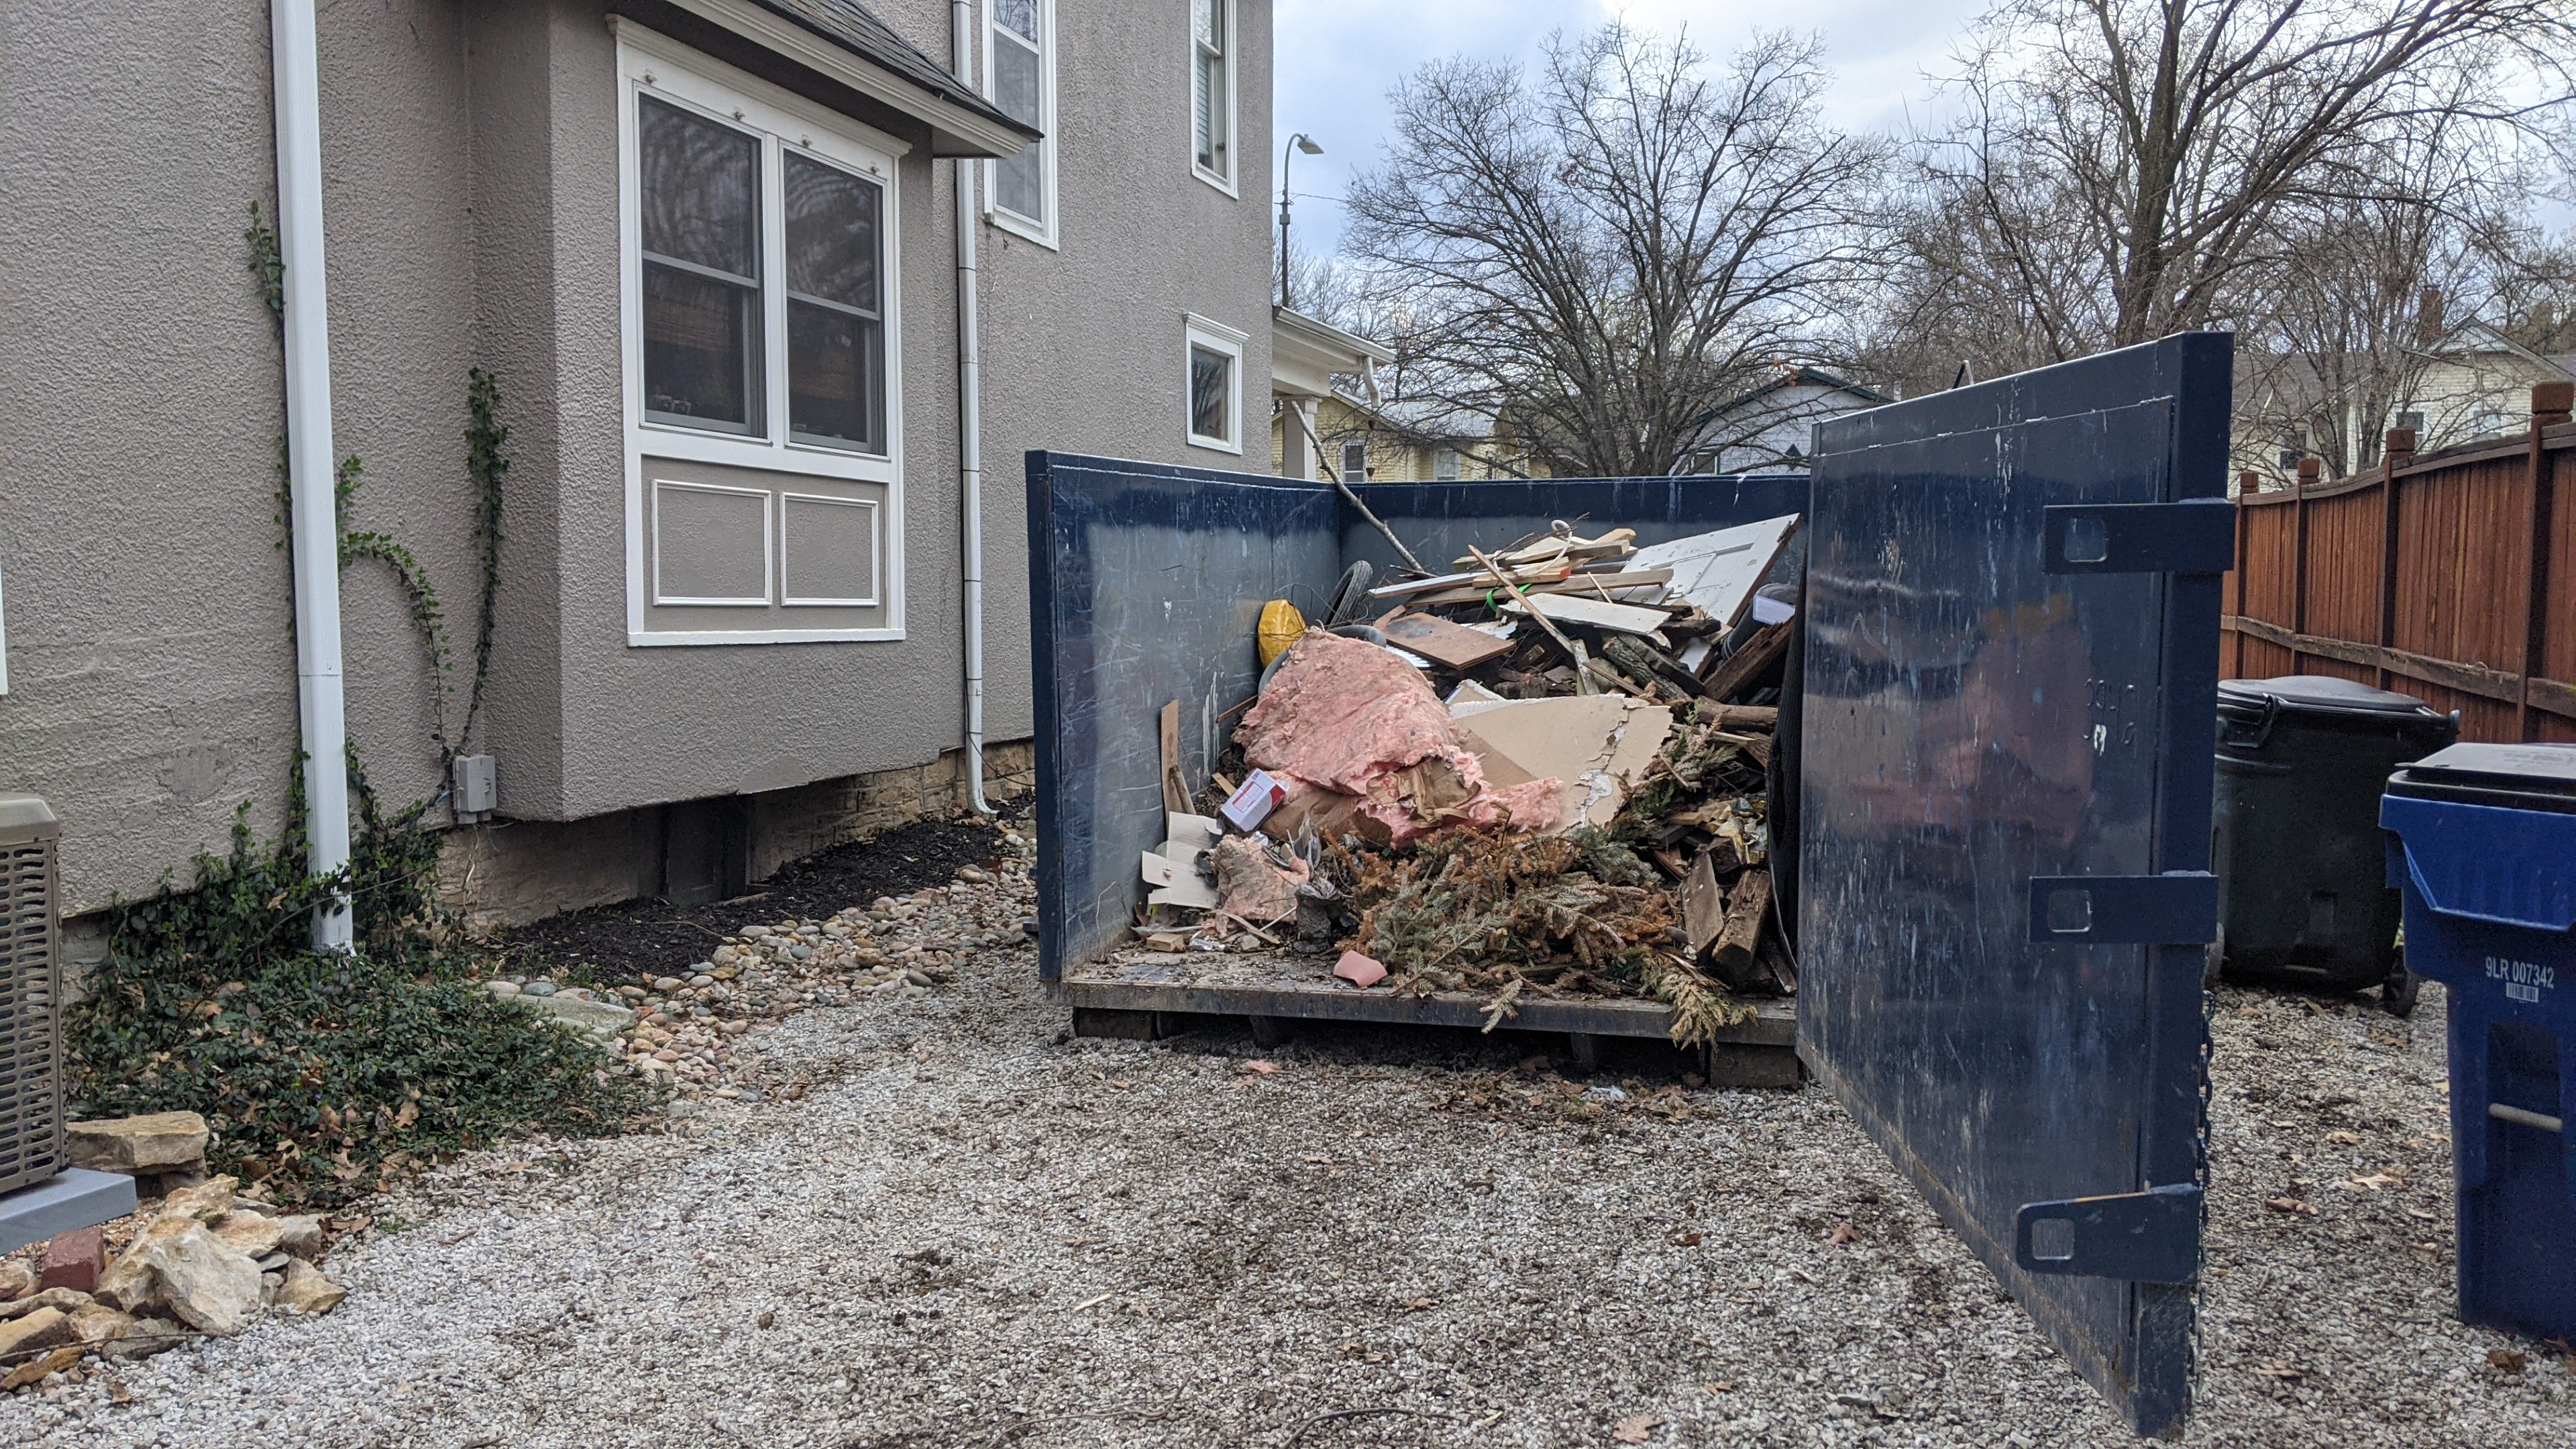
I've already had to drop two large-ish trees (a hackberry and a siberian elm) and rent a stump grinder to pulverize as much of their remains as I could. New trees will be planted, less weedy ones.

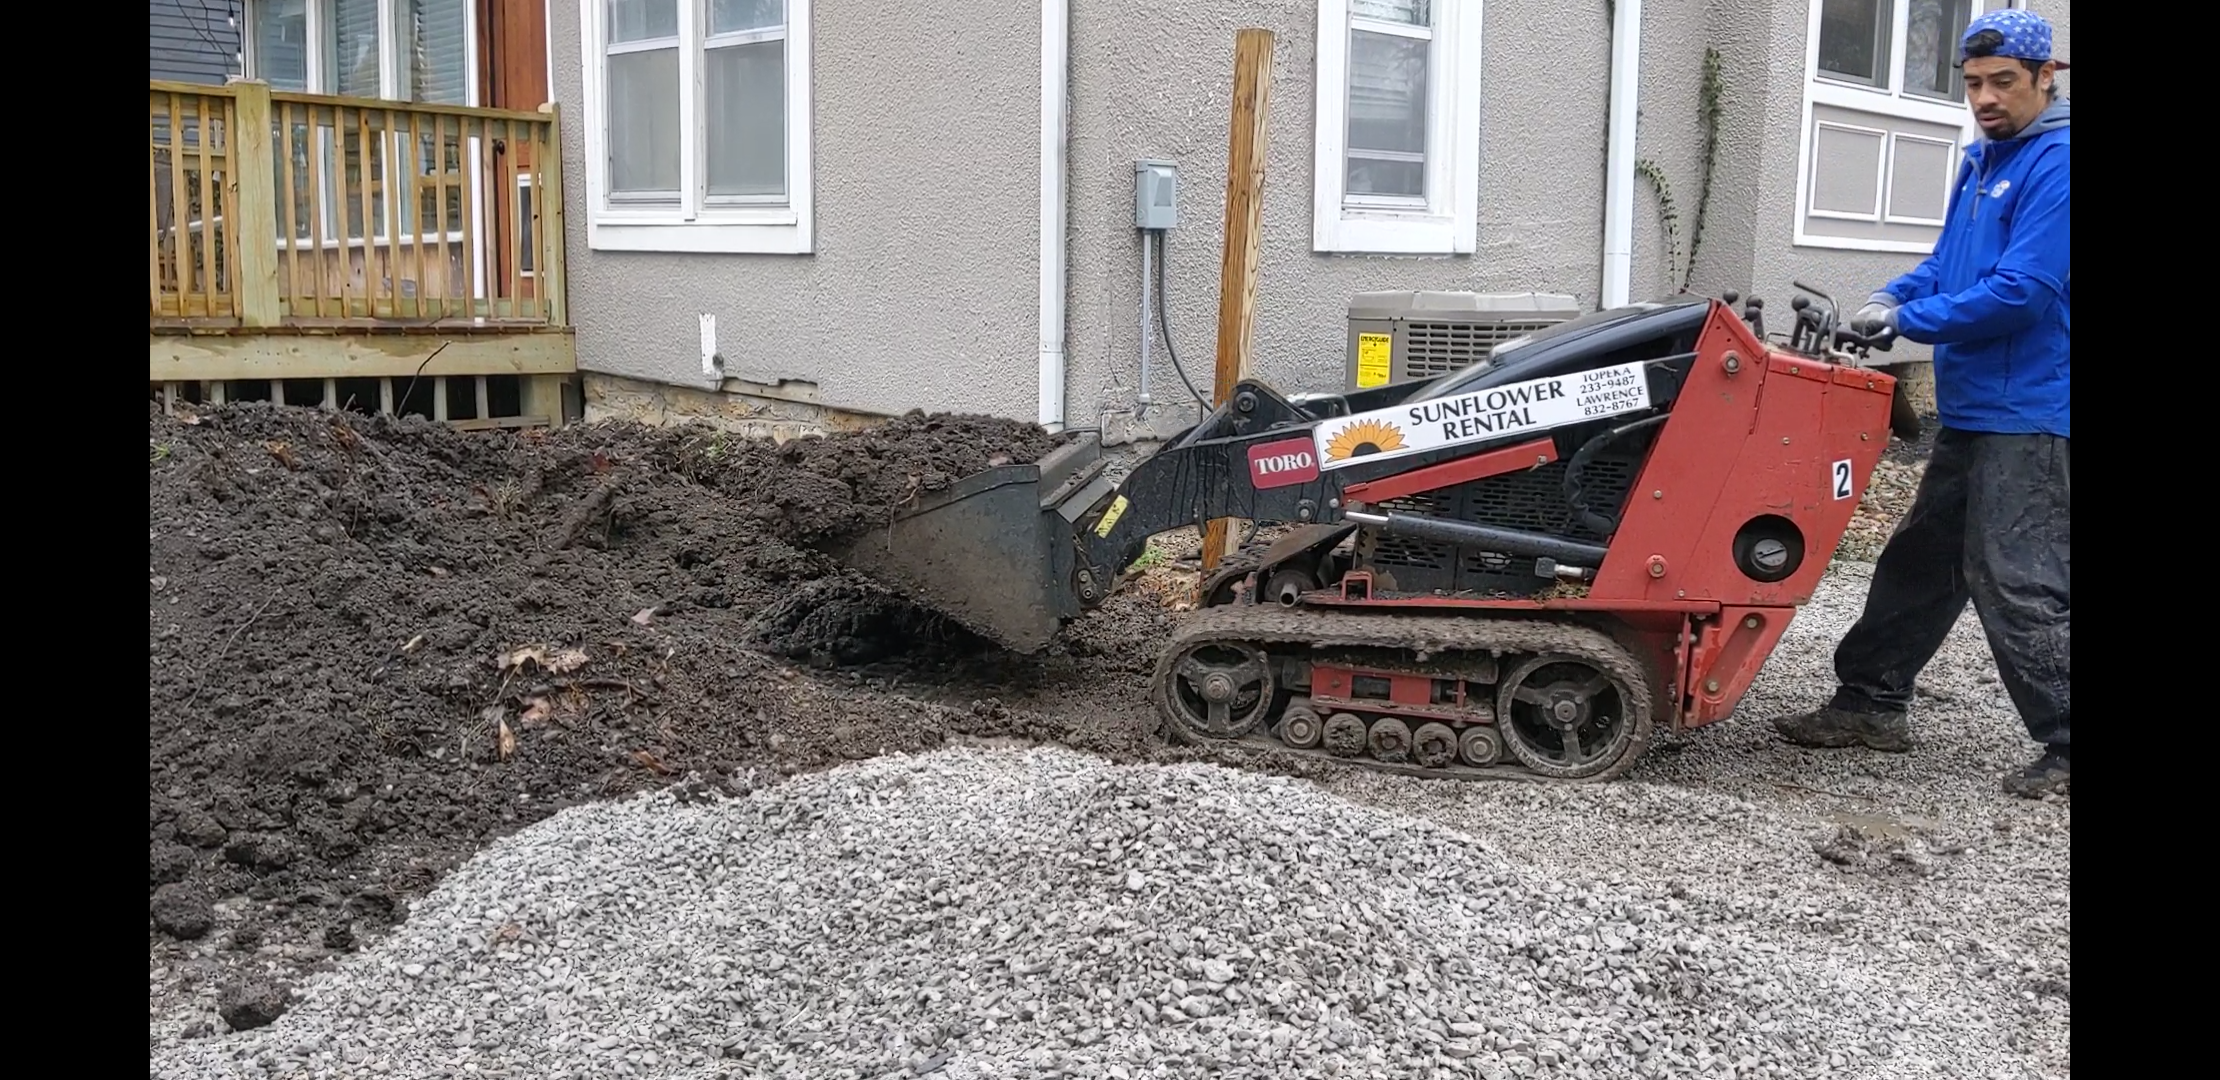
Tomorrow I'm picking up the mini excavator rental to dig the foundation trenches! it will be my first time with an excavator. Actually, I'm thinking about having my pregnant wife take over operating the excavator while I run around with the measuring stick and wheel barrel and everything else.

Wish me luck!
 
Last edited:
To avoid these ads, REGISTER NOW!

CombatNinja

Well-known member
Joined
Aug 24, 2013
Messages
1,456
I predict your wife knocks down that ramshackle shed with the excavator in the first 20 minutes. :D

But good luck anyways...
 

captain14

Well-known member
Joined
Dec 19, 2012
Messages
7,023
Location
Near College Park Maryland 20740
Good luck. We have had other GJ members that have done similar additions to their old garage. Please keep us updated on your progress.

As always, we need pictures along with your story. If you run into an issue, post them here so someone can help out.
 

Shootinok

Well-known member
Joined
Aug 16, 2016
Messages
710
Location
Oklahoma USA
It’s great that you have the willfulness to tackle it yourselves. Bravo!
Regardless of the structure, this will definitely build memories for the two of you. Try very hard to remember that when things aren’t going the way you thought they would.

Also my advice is to resolve to finish it completely. You may have the urge to get things moved in and “we’ll get to that later”. Don’t do it. Finish your plan completely and you’ll be proud of it when it’s done.


Sent from my iPad using The Garage Journal mobile app
 

karoc

Well-known member
Joined
Dec 19, 2017
Messages
1,994
Location
Hemphill Tx
Also my advice is to resolve to finish it completely. You may have the urge to get things moved in and “we’ll get to that later”. Don’t do it. Finish your plan completely and you’ll be proud of it when it’s done.

I can testify to that statement, biggest mistake I ever made. Well there's been few more, but enjoy ride.
" Tool Temple" I like that
 
OP
M

mannydantyla

Well-known member
Joined
Jan 24, 2019
Messages
160
Location
LFK
Thank you everyone!! I was a little worried that the comments I would receive would be along the lines of "you're not going to be able to do this safely" or "you need to hire a professional." But what I'm seeing this morning is very encouraging so thank you again.

A little more info now that I've had some coffee:

  • yes the old garage is very rough, but the roof is brand new and 3 out of the 4 walls are good. It's better than it looks...?
  • The wall that is leaning (you can see it in the picture pretty easily) is because the foundation moved. However I'm replacing that wall with a header so that problem will be solved. The header will be in between the new and old structures.
  • The reason that wall's foundation moved is because the blocks that the wall is sitting on where never filled with concrete and rebar. Only mortar was holding them up. However there's only two courses of blocks and below that is a solid concrete wall that goes very deep. So my plan is to replace the old blocks with new ones (not all, just the ones that really need it) and fill them with cement. Mainly at the back corner where it will meet the new wall.

I'm off to pickup the rental equipment and start digging!
 
Last edited:

Dan in Pasadena

Well-known member
Joined
Feb 18, 2009
Messages
13,110
Location
Pasadena, CA
This will be a fun project to watch. Though maybe not as "fun" to build. A lot of work but it will be satisfying as all get out to complete each step.

Personally, I'd break down the project into steps, put the on a white board somewhere and take great. satisfaction in checking them off as I completed them.

Best of luck and there are a lot of guys here that spent their lives/careers in the engineering and construction business (like me, though heavy civil so building huge transit replete structures)so we may be able to offer ideas and help.
 
OP
M

mannydantyla

Well-known member
Joined
Jan 24, 2019
Messages
160
Location
LFK
The foundation trenches have been dug!

I picked up the machine and its trailer because they wouldn't deliver for me on a Saturday, and I had to use my '66 F100 with manual drum brakes on all four. I do not recommend anyone else try this on a truck like that! I will never do it again. I'm paying them today (Monday) to take it back for me. It's only 2 or 3 miles away but the I think I heard my rear tires locking up when I would stop. And when I would start from a stop, my truck would do a one-wheel burnout every time. Something may have been wrong with the trailer brakes.

PXL_20210227_162558940%20copy.jpg

(yes I **** at backing trailers up. and yes I carved that peace sign stump sculpture :rocker:)

On Friday, I marked out the perimeter. I used line levels and a tape measure, and I measure the diagonals until they were close enough. But when we were digging, the lines got screwed up and re-drawn again so many times that they could have been off by a few inches.

Screen%20Shot%202021-03-01%20at%2011.02.14%20AM.png

And here's the result:

154447841_902715540301796_5176525216661349277_n.jpg

I'm sure some hand digging will be needed to widen here and lower there, but I'm happy with it. We also leveled out the area in the middle. After the stem walls are built, I'll fill it with gravel or whatever is needed for the 4" of concrete.

However that is not the whole story.

On Sunday, my friends all came over. I think at one point we had eight people, one baby, and three dogs. I asked for help but I didn't think everyone would come over at once! So there was a parking issue I had to deal with so we could get a trailer back there and load some of the dirt into it.

But the biggest problem was that when my buds where there, each one of them had their own idea of how to best do this job, and each one of them wanted to be the one operating the machine. I was trying to be patient but it boiled over when Johnny pushed a bunch of dirt into the first trench that I had dug the day before and it was perfectly level and at the right depth. Oops.

But after a while our gears stopped grinding and started meshing and we were able finish digging and we even had a little fun.

Here's my wife:
155483179_437203434164245_4119331932236946723_n.jpg

Here's Anthony. He actually does this sort of work of a living so it was nice to get his help and experience on this.
154689520_1218896575172225_703552319625264282_n.jpg

Then the girls wanted to have some fun too:
154253155_100606245407763_1915082490414214477_n.jpg

And even the baby boy got in on the fun! He LOVES tractors, I think that's the only word he knows how to say other than mommy and daddy, so this was blowing his mind.
154805471_260412782224099_3329670275758860488_n.jpg

A few mistakes where made:
- I accidentally clipped the barge board's rafter tail with the roof of the excavator and it's split now. I think I'll glue it and screw it.
- I couldn't dig a small trench for the underground electrical conduit because I started piling up the dirt on top of where I would need to dig that. But there would have been other problems, including an old sidewalk that I found burried under several inches of dirt. I will need to get under that somehow, or just bust it up with sledge hammer.
- I hurt my back. Probably from the very first thing I did: unloading the machine from the trailer. I had to then get the trailer off of the truck hitch and the trailer jack wasn't low enough so I tried to lift up the tongue of the trailer but I didn't use my knees. It didn't hurt until I started digging by hand and wasn't using a good technique. I need to be more careful in the future.
 
Last edited:
OP
M

mannydantyla

Well-known member
Joined
Jan 24, 2019
Messages
160
Location
LFK
Here's my to-do list:

  1. remove stumps ✅
  2. remove old fence and put in something temporary ✅
  3. repair old garage foundation ✅
  4. get approval from city ✅
  5. rent a mini excavator ✅
  6. dig footing trench and move driveway material around to correct the grade ✅
  7. install footing forms, rebar, etc.
  8. dig holes for footings for posts that are holding up the header beam
  9. FOOTING INSPECTION
  10. poor footings
  11. get a dumpster from the city
  12. demo the south wall and the garage interior and throw everything in the dumpster
  13. pour footers to support the new beam and posts
  14. replace South wall with 14’ header beam
  15. replace old door with new garage door w/ opener
  16. get dumpster removed by the city
  17. rent a ditch witch
  18. dig a small trench for the underground electrical conduit (and for a drain pipe in the driveway)
  19. build block walls on top of footing
  20. back fill with dirt from digging the tenches, and get rid of the rest
  21. get the gravel, rebar, and sand for the slab
  22. SLAB INSPECTION
  23. pour the slabs
  24. (at this point, it might be possible to abandon these plans and pay for a Tuff
  25. Shed built on this foundation)
  26. build stud walls
  27. build roof and connect to old roof
  28. FRAMING INPSECTION
  29. do electrical
  30. ELECTRICAL INSPECTION
  31. siding
  32. paint
  33. HISTORIC INSPECTION
  34. FINAL INSPECTION
  35. interior drywall and insulation
  36. floor epoxy paint?
  37. workbench and shelves
  38. move everything in!
  39. build permanent fence
  40. plant a tree

Let me know if you spot any problems
 
OP
M

mannydantyla

Well-known member
Joined
Jan 24, 2019
Messages
160
Location
LFK
I need some advice before I start building the forms for the footings.

In my plans, I said I was adding horizontal and vertical rebar. However I took a closer look at the code book today and I believe that rebar is only necessary in the footers for when building in seismic zones. (Is that right?)

So I'm thinking about not doing the rebar if it's not needed. But will the inspector not pass the footing inspection if it's not as described in the plans? Even if it meets code? If the inspector doesn't pass it then I guess I would just add rebar, or change the plans and re-submit.

On the other hand, not much rebar is needed and it is cheap and it's probably a good idea. Vertical rebar will make sure the blocks don't shift, like what has happened with the old structure's foundation a little. And horizontal rebar will make sure it is strong and doesn't sag. Which might be important because the area back by the fence gets a lot of water when it rains hard. It can actually pool up to my shins, almost to my knees, until it overlfows a burm in the neighbors yard and makes its way downhill. My whole property is lower than the street it's on, and the neighboring apartment complex is nothing but concrete and roof (all run-off, no drainage) and it ALL drains towards my garage. So that is why the old foundation has problems. I fixed the biggest problem already (the footer was crumbling, I formed a repair and underpinned what I could).

So, I guess I answered my own question lol
 

Shootinok

Well-known member
Joined
Aug 16, 2016
Messages
710
Location
Oklahoma USA
Definitely put in rebar.

Concrete handles compressive stress and shear stress well, but it performs poorly when it comes to tensile strength. In fact, the tensile strength of concrete is only about 10-15% of its compressive strength.

Rebar significantly improves the tensile strength of concrete.

Think about your footer with compressive stress on the top. When a structural member bends from compressive stress on the top, the bottom stretches.
That means the bottom of the member experiences tensile stress.
Unreinforced concrete in this condition will break and eventually move.

The verticals dowels not only keep the block from shifting, but those cells filled with grout create little columns in the wall.


Sent from my iPhone using The Garage Journal mobile app
 

cortina64

Well-known member
Joined
Dec 31, 2013
Messages
110
Location
Brisbane, Australia
Looking forward to seeing the progress with the changes to your garage.
Thought I had seen your 66 F100 before, really enjoy your YouTube Videos, the 67 VW Squareback was a great build.
Warren
 
OP
M

mannydantyla

Well-known member
Joined
Jan 24, 2019
Messages
160
Location
LFK
Looking forward to seeing the progress with the changes to your garage.
Thought I had seen your 66 F100 before, really enjoy your YouTube Videos, the 67 VW Squareback was a great build.
Warren

Wow! Thank you! I love hearing when people have seen my videos on YouTube. Just yesterday, I had an HVAC guy over to work on our furnace and he said that him and his son have watched my videos because they have a Squareback and are not sure what to do with it.

Do you think I should make a video or two about this garage build and upload it to my channel? I have a little bit of footage but I don't really have the time and resources to produce a whole full-featured series of videos. It takes a lot of work. But I thought I'd at least make one video.
 
OP
M

mannydantyla

Well-known member
Joined
Jan 24, 2019
Messages
160
Location
LFK
You guys think I should order a concrete truck, or just get a pallet of cement mix and rent a mixing machine and do it myself? The footings are only 12x8 and a total length of 40'. About at small as it gets for a footing job. But I have until Wednesday afternoon before the rains come, according to the forecast.

Hell yeah make a video. BTW, what name are your videos under on Youtube? Same "mannydantyla" as here?

This Old Jalopy.
 

240sxguy

Well-known member
Joined
Jan 6, 2009
Messages
1,157
Location
Madison, wi
If it were me I'd see what the truck costs, the time saved might be well worth the extra expense since you have rain in the forecast.
 
To avoid these ads, REGISTER NOW!
OP
M

mannydantyla

Well-known member
Joined
Jan 24, 2019
Messages
160
Location
LFK
Yeah I just calculated how many #60 pound bags of concrete mix I would need: 74 bags. Thats 4440 pounds! My back already hurts so I think I will spend any amount of money to pay for a truck to mix it and deliver it to me!
 

readhead

Well-known member
Joined
Dec 8, 2012
Messages
6,175
Location
Durango, Co.
You are looking at less than a yard which will probably be a short load charge. I would mix it myself but I already have a mixer. With another guy you can mix and place in less than an hour but a truck will be faster and a lot less work.
 

240sxguy

Well-known member
Joined
Jan 6, 2009
Messages
1,157
Location
Madison, wi
Yeah I just calculated how many #60 pound bags of concrete mix I would need: 74 bags. Thats 4440 pounds! My back already hurts so I think I will spend any amount of money to pay for a truck to mix it and deliver it to me!

Hopefully it's not too expensive, that's a lot of weight.
 
OP
M

mannydantyla

Well-known member
Joined
Jan 24, 2019
Messages
160
Location
LFK
I just passed the footing inspection! And I called the concrete trucking company and they're coming tomorrow before noon! Just in time before it is forecasted to rain hard for the next 4 or 5 days starting on Wednesday or Thursday. The concrete truck will run me about $350, fyi.

I was REALLY stressed out the inspection because there was so many things he could have failed me on. But in the end he didn't seam to be concerned about anything that I thought he would be concerned about. Wasn't concerned about the depth of rebar dowels in the old foundation wall, or the footings for the posts not being deep enough, or the trenches being slightly off, or the spacing of the vertical rebar, or anything. Only thing he was concerned about was the horizontal rebar and how I only had one while all others he has seen had two. But my plans didn't specify the number of rebar and therefor he didn't care.

So I'm feeling a lot better now that the inspection is over. And my back is starting to feel much better too, although it hasn't not been sore and tired for over a week!

Onto the pictures...

So after digging the trenches, the first thing I did was set up some batterboards (should have done that before digging) and used some string, line levels, and a tape measure to get the outer dimensions of the walls.

PXL_20210304_225443433.jpg

Then I used a plum bob to transfer the position of the string lines to the floor of the trenches. I made a white dot every 6 feet, then connected the dots with a 6' level.

PXL_20210306_001853991.jpg

Then it was time to do the rebar. I asked over the phone with the city if the vertical rebar could be stabbed into the wet concrete and they said no. But the inspector that I just met with told me that it would have been fine!

PXL_20210306_231759186.jpg

And do you see those stakes in the bottom of the trenches every 6 feet? There's one or two visible to the right. They're pounded into the ground such that the very top of each stake represents the level that the footer needs to be poured at. This is how I will be sure that the footer is level and at the correct depth!

The first trench we dug, we were scooping the dirt in the wrong direction (I didn't want to put the machine into the correct position to scoop the dirt in the direction of the trench, because that would have torn up my lawn) so I had to build a little form. In the end I questioned what was more work: building a form, or growing new grass.

PXL_20210306_231820941.jpg

I also needed to dig holes for footers for the posts that are holding up the header beam between the new and old garages. Those are going on the inside of the old garage, because the wall is leaning outward at bottom.

So I got a sledge hammer and started smashing. I expected gravel under the 5" concrete slab, but instead there was huge blocks of concrete rubble mixed with sand. And ~14" under that... another concrete slab!!

PXL_20210308_165733507~2.jpg

So I have a new theory on the history of this structure. At one point it must have been raised up. They probably raised the whole thing up and put it on two layers of concrete blocks (which they didn't fill with cement or mortar). And then they poured anew slab 18" above the old one. They did this because there's rain runoff problems, it gets a little flooded, all the other neighbors had their garages raised up too. But they did a **** job: the slab has a huge crack in it, and the blocks on the foundation walls are moving a lot and their some huge gaps.

I reluctantly showed this to the inspector but he said not to worry, it won't be holding up that much weight, and I should sleep soundly knowing that my garage footings will be more than enough.

One last picture: the dirt pile. Should I build some sweet dirt jumps?? That was always a dream of mine when I was growing up.

PXL_20210304_225019752.jpg
 
Last edited:
OP
M

mannydantyla

Well-known member
Joined
Jan 24, 2019
Messages
160
Location
LFK
The concrete truck came yesterday and we got the footers poured!

I was too busy running around and pouring the concrete to get any pictures, except for this one of Johnny and the top of his head:

PXL_20210309_175202586.jpg

Thankfully Johnny had lots of experience with concrete so he knew what to do right away and that helped a lot. We had to use a wheelbarrow for about half of the job, and then we where able to just pour it straight from the shoot to the trench to fill in the other half.

PXL_20210309_224300971.jpg

My plan to level the concrete to the tops of the wooden stakes (the ones that I pounded into the ground at the exact height and level that the concrete needed to be poured at) worked out well, except that one or two of them got knocked over when the concrete was poured in because I didn't hit them into the ground deep enough.

PXL_20210309_224201143.jpg

So I had to use my new 6ft level in some spots to make sure the tops of the footing was level. Theres concrete stuck to it now but it was worth it because if the footing's surface isn't level then the whole structure will not be level.

If I was more clever, I possibly could have set the first course of blocks straight into the wet concrete. But I didn't think about that until it was too late.

And unfortunately I didn't quite order enough concrete and I didn't have enough for the two holes that I dug in the inside of the old garage, that will be footers for the posts for the header beam.

So I had to go to the store and buy 12 bags of dry mix, which I though was more than enough. Nope. I needed 14 bags!

PXL_20210310_192904466.jpg

So that job is done and now I can start building the CMU block wall, and I can also knock down the old wall and install the header beam. It doesn't matter much which one I do first so I'll just see which I feel like doing next.
 
Last edited:

captain14

Well-known member
Joined
Dec 19, 2012
Messages
7,023
Location
Near College Park Maryland 20740
I’m wondering why you just didn’t make the addition the same size front to back as the old garage?
Zoning or were you at the maximum size allowed?

Concrete is over and done with. I did 20 bags with 2 trips in a car one evening after work in my late 20’s . Lots of work just moving and mixing the bags.

Did you have any extra forms set up for a sidewalk, stepping stones, etc if you had any extra instead of just dumping it.?
 
OP
M

mannydantyla

Well-known member
Joined
Jan 24, 2019
Messages
160
Location
LFK
I’m wondering why you just didn’t make the addition the same size front to back as the old garage?
Zoning or were you at the maximum size allowed?

Concrete is over and done with. I did 20 bags with 2 trips in a car one evening after work in my late 20’s . Lots of work just moving and mixing the bags.

Did you have any extra forms set up for a sidewalk, stepping stones, etc if you had any extra instead of just dumping it.?

Why it's 16' long and not 20' long like the old garage is, is because at the time I thought that if the add-on was less than 200 sq ft then the city wouldn't require as many hoops for me to jump though. 16' by 12' is 196 sq ft. But in the end I don't think that helped at all, I was mistaken.

But I decided not to change my floorplans. It makes more sense for the layout of my backyard to have it be a little smaller, this makes room for a̶ ̶l̶i̶t̶t̶l̶e̶ ̶h̶o̶t̶ ̶t̶u̶b̶/̶p̶a̶t̶i̶o̶ ̶a̶r̶e̶a̶ ̶f̶o̶r̶ ̶m̶y̶ ̶n̶o̶w̶ ̶p̶r̶e̶g̶n̶a̶n̶t̶ ̶w̶i̶f̶e̶ a play area for the future son or daughter. And I also want to plant a tree in that corner. And I just didn't want the project to be too big for me. 16' trusses instead of 20' trusses, for example. I might be regretting this though when I'm trying to fit a lathe or something into the addition.

I am loving this thread! Post as many photos as you can! Great work!

Ok will do!

Here some better photos taken with my wide angle lens so you can see a little more of the yard.

DSC06058.jpg

DSC06052.jpg

Here's my little collection. The '67 VW Squareback needs to be painted but I'm not doing that without a place to park it inside. I've done that once and, never again lol. The motorcycle is a '74 Honda CL200, and I also have a '67 Honda CA160 inside the garage waiting to be painted and converted to electric.

DSC06060.jpg

You know what... I just realized I never shared any before pictures of the garage. So here they are!

BEFORE

When I'm finished with the add-on I will build a lean-to on this side:

92572321_213725886579972_3654576572088342128_n.jpg

I sadly had to remove this tree, but it was only a siberian elm:

92706831_2469407870023990_7114745427118103283_n.jpg

92843825_2875289815889175_7797365591415640910_n.jpg

92832453_2489194808060287_9126929784488666394_n.jpg

I took the photos the day we moved in, a little less than a year ago. I think you can still see the moving truck in the above photo! I had to clear all the trash out before I could move my stuff in, it was a pain.
 
Last edited:

Buzz Lightyear

Well-known member
Joined
Jun 18, 2010
Messages
260
Location
Wiltshire, UK
Here's my little collection. The '67 VW Squareback needs to be painted but I'm not doing that without a place to park it inside. I've done that once and, never again lol. The motorcycle is a '74 Honda CL200, and I also have a '67 Honda CA160 inside the garage waiting to be painted and converted to electric.

DSC06060.jpg

Nice squareback! I like the patina or has it gone past that into terminal rust?
 

Prospecter

Well-known member
Joined
May 16, 2015
Messages
2,392
Location
Maine
Cement Truck v. by hand. I've mixed by hand, with a mixer, and used a truck. I'd never again not bring in a truck if it was feasible. Just so much easier.
 
OP
M

mannydantyla

Well-known member
Joined
Jan 24, 2019
Messages
160
Location
LFK
It’s hard to tell but is your electric just one overhead wire or is that something else at the front gable?

No pictures of the Ford F100 or was that just visiting?

Yup that was overhead 120v wiring. Replacing with underground 240v.

That's my F100 too, all original long bead. My wife hates it, lol, I told her I'd sell it after the garage is finished.

Nice squareback! I like the patina or has it gone past that into terminal rust?

Thanks, yeah the patina is nice, I've fixed almost all of the major rust. But I'm tired of the patina thing, it's really ugly in person. Time for paint.
 
OP
M

mannydantyla

Well-known member
Joined
Jan 24, 2019
Messages
160
Location
LFK
Time for an update!

I had about 2.5 tons of gravel delivered about two weeks ago.


I spread it around by hand. So clean! For now...


I made a ditch so that when it rained, the rain would go towards a little rain garden area rather than towards the garage or house. The sump pump also discharges into this drain. Seems like it goes off every 10 minutes.


This is the rain garden, I dug it a lot deeper after taking this photo and will fill it up with compost and sand, and will plant a bald cypress and some swamp loving plants. The sump pump water will drain into this so it will probably never dry out.


And then my friend came over to get some of the dirt he needed for a job, he used a stand-behind skid steer. It made a huge muddy mess and I'm still no happy about it, but I can't complain really.


I got a dumpster for all the trash that was piling up behind the garage, you can see some of it in the above photos. It's about half full and I didn't even start on demolishing the wall that I'm replacing with a header beam.


It rained...


The rains finally stopped and I was able to get started on the block walls. Took me a little while to get all the mud off of the tops of the footers. I used a high pressured spray nozzle on the end of a hose to wash away the mud, and used a broom to sweep/push the water to an area where it could drain away.


I'm going to fill only the cores that have vertical rebar. But I'm also going to fill all the cores of the top row. To do this, I'm placing a strip of aluminum mesh (for a window screen) in the mortar between the 3rd and 4th (top) rows, so that the mortar doesn't fall all the way down. I saw this idea in a book somewhere. Do you think it is a good idea?


That is as far as I got before I hurt my back from lifting the blocks. It's a worse than when I hurt my back at the start of construction. I was almost feeling 100% before I hurt it again.

So I'm going to need to pay somebody to do the rest of the block walls for me. I can't risk hurting my back again. I think building and raising the walls will be a piece of cake compared to the foundation!
 
Last edited:
OP
M

mannydantyla

Well-known member
Joined
Jan 24, 2019
Messages
160
Location
LFK
Anything wrong with bringing up the buried electrical cable from the inside of the garage wall instead of the the exterior of the wall?

conduit%20underground%202%20cr.jpg
 
OP
M

mannydantyla

Well-known member
Joined
Jan 24, 2019
Messages
160
Location
LFK
Here's another quick (possibly dumb) question: If I'm using plywood siding, does that also act as the exterior wall sheathing? Or do I need both a layer of plywood siding and a layer sheathing?

Depends on your inspector. Most areas require a disconnect on the outside. Give him a call and find out.

Thanks, I'll check that out for sure. Actually I need to get the electrical permit still so I will ask at that time. If the don't allow it then that is fine, I just want to hide it a little because we plan on landscaping that area and little and adding a patio and making it nice.
 
Last edited:
To avoid these ads, REGISTER NOW!
Top Bottom