To avoid these ads, REGISTER NOW!

Craftsman Style Garage Project, 28X32 with apartment

Sharps

Well-known member
Joined
Aug 23, 2009
Messages
153
I have been lurking here for a over a year, these are the perspectives of a 28' deep X 32' wide garage build I have just started. The basic excavation, footings block foundation and gravel are completed. Project budget is $30,000.00 total including interior finished upstairs condo. I am a GC doing almost all the work myself or with my best subs and prices are low this time of year in my region, SE Tennessee.

Let me know what you think about the plans. I will give updates with construction pictures later this week.

Thanks for all the ideas that I have gotten from you guys this year.

16lyzh3.jpg
 

Attachments

  • Small Revised- A3-0 - Perspectives.jpg
    Small Revised- A3-0 - Perspectives.jpg
    128 KB · Views: 293
Last edited:
To avoid these ads, REGISTER NOW!
OP
S

Sharps

Well-known member
Joined
Aug 23, 2009
Messages
153
DAY 1

Footing excavation was completed in 90 minutes after the corners were laid out. The footing was lined with gravel and then with three rows of # 5 rebar, fully overlapped and tied with #5 90’s at each corner. Gravel was placed in 35 minutes with the skid steer. The rebar was ******* in two hours by me and a friend of mine. We finished at about 1200 hours and waited for the building inspector. He showed up a little later, but we were able to begin pouring at 1400 hours. We finished with the footing and tool clean up at 1515 hours.

11jveaa.jpg


The footing was laser leveled with grade stakes in the corners and the along the sides and back. It was then poured with 3,500 psi concrete with short strand fiber. The footing is 12” deep concrete over 4 inches of gravel, and is 24” wide. Total yardage was 9.5 yards using a 6 slump, pump mix that we pulled by rake to the back wall and down both sides. After the pour we used the laser to check the footing to make sure it was within +/- 1/4” all the way around. Total pour took 40 minutes with three guys, and the truck operator.

117z5mf.jpg


DAY 2

Excavation of the inside of the footing area level with the concrete was done by using the mini excavator. All the excess soil was moved to a single pile to keep the area around the footing cleaned up.

2dwe1aa.jpg


Interior of footing (the final pad area) was covered with 3 inches of gravel using the skid steer and was then compacted. Sorry about the foggy, mist in the photo.

34no214.jpg


DAY 3

(370) 8” concrete blocks were laid 5 courses high. The 3 man crew started at 9 AM and finished at 5 PM. The weather continued to deteriorate and then it snowed that night. Now it’s too wet to work until 11/06 about midday.

r7426u.jpg
 
Last edited:

waltmcq

Well-known member
Joined
Nov 22, 2006
Messages
252
Location
PT
I'm a little confused is the footprint 28x30? So the top floor will be maybe 15x28?
 
OP
S

Sharps

Well-known member
Joined
Aug 23, 2009
Messages
153
I'm a little confused is the footprint 28x30? So the top floor will be maybe 15x28?

Sorry about any confusion. The layout has the garage doors facing the street. The garage is 32 feet across the front with a two story section on the left. The exterior dimensions are 28 deep X 16 wide on the two story section and 24 deep X 16 wide on the single story portion.

The apartment should be 15 wide X 27 deep when finished out.

HTH
 

Jeepskate

Well-known member
Joined
Apr 28, 2009
Messages
218
Location
Mid-Ohio
Looks good, but for Craftsman I'd add more architectural details that fit with the style. It's my favorite style, so I'm probably a little pickier about it than most folks. It basically looks like some of the old farmhouses with additions on them around here without those details. I'd add some inserts to the upper panes of the windows and some details to the eaves and overhangs to make it pop and cement the Craftsman style. Look here for some inspiration: http://architecture.about.com/od/housestyles/ig/Bungalow-Pictures/
 
OP
S

Sharps

Well-known member
Joined
Aug 23, 2009
Messages
153
Looks good, but for Craftsman I'd add more architectural details that fit with the style. It's my favorite style, so I'm probably a little pickier about it than most folks. It basically looks like some of the old farmhouses with additions on them around here without those details. I'd add some inserts to the upper panes of the windows and some details to the eaves and overhangs to make it pop and cement the Craftsman style. Look here for some inspiration: http://architecture.about.com/od/housestyles/ig/Bungalow-Pictures/


Thanks for the comment. The perspectives shown are the output by Revit, I have minimized the detail in the perspectives for simplicity while working with the subs. Once the structure is in the dry and ready for the architectural details, I will add those.

I am a huge fan of the old farm house and suggest anyone with interest in the federal period homes, and early styles of homes in our country to pick up a set of the White Pines Series of Early American Homes. Great books with tons of period molding and structural details.

This project is kind of a blend of the craftsman / bungalow with some (hopefully Cool) updates.
 

Jeepskate

Well-known member
Joined
Apr 28, 2009
Messages
218
Location
Mid-Ohio
Thanks for the comment. The perspectives shown are the output by Revit, I have minimized the detail in the perspectives for simplicity while working with the subs. Once the structure is in the dry and ready for the architectural details, I will add those.

Got ya' :thumbup:

I am a huge fan of the old farm house and suggest anyone with interest in the federal period homes, and early styles of homes in our country to pick up a set of the White Pines Series of Early American Homes. Great books with tons of period molding and structural details.

Cool...I'll look for those. I'm a big fan of the classic 4-square farmhouses but couldn't get my wife into one (didn't want to do the renovations). Ended up with a faux Cape Cod with some Craftsman hints. Planning to add a few more details.

This project is kind of a blend of the craftsman / bungalow with some (hopefully Cool) updates.

Can't wait to see the details.
 
OP
S

Sharps

Well-known member
Joined
Aug 23, 2009
Messages
153
DAY 4

All of the 8” blocks were filled with 3,500 psi concrete mixed with long strand fiber, filling the block was accomplished using a truck mounted line pump to keep the cost down. A three man crew started at 4 PM and was finished by 5 PM including cleaning all of their tools and washing out the pump and lines. All of the anchor bolts required to attach the pressure treated plate were placed as the concrete firmed up. The anchor bolts were located at the sides of all corners and then at four foot intervals along the walls.

t9uyrb.jpg
 
Last edited:

Weber1

Well-known member
Joined
Oct 26, 2009
Messages
61
Location
Bexley, Ohio
I hope i am not commenting too late, but if you are truly going after a "craftsman style " piece of architecture, one of the details that would really help pull off the look is to have exaggerated (2' to even in some cases 4') overhangs and rakes. Take a look at some of the craftsman style homes or "bungelow" done in the 1940's by people such as Greene and Greene and other architects that were doing homes back then. Deep overhangs gave them the ability to have shaded porches and doorways protected from the elements. It also gave the craftsmen am opprtunity to do really nice carved brackets or even simple supports and columns. To me this attention to detail and your exterior materials are what will make your garage successful from an architectural standpoint. I don't know if you are using trusses or stick framing your roof but you can design both your rafters or your trusses to give you the deep overhangs, if it is not too late of coarse. Good luck! Hope everything works out. It sure will be great useful space.
 
OP
S

Sharps

Well-known member
Joined
Aug 23, 2009
Messages
153
Tiny House / Backyard Office to almost match the garage, built over the summer.

This is a small backyard office that is about 90% complete that will be very similar to the garage. Some trim work on the exterior and finishing out the interior (exposed purlins, although fake) will make it look more complete. Total cost about $8,000.00 built out of SIPs with a custom metal Galvalume roof, and LP Smartside siding. The entire build took 100 man hours, plus 24 hours to paint it. The foot print is 12’ deep X 16’ wide with a 4’ X 6’ porch. Eave height is 10’.

Maybe this will give an idea of the direction I am going. Note the front step is a big rock ($25.00) delivered by and local rock mason and installed by me with a skid steer.

2wd8vvd.jpg
 
Last edited:
OP
S

Sharps

Well-known member
Joined
Aug 23, 2009
Messages
153
Day 5 Tuesday, December 15th, 2009
5-1/4 hours X 4 men

Pressure treated plates, bottom plates, and 2X6 walls with headers over windows on complete first floor and double top plates installed. Extra bracing for the wind.


Day 6 Wednesday, December 16th, 2009
8-12 hours X 3 men

24 foot long 24 inch deep double laminated beam installed to tie first floor roof and second floor flooring together, floor joists for second story installed with joist hangers.
Second floor walls and some exterior sheathing installed.


Day 7 Thursday, December 17th, 2009
8-1/2 hours X 3 men

Second floor ¾ inch T&G decking installed

First floor roof system with 16 foot long X 18 inch deep double laminated beam installed with 2X10 rafters and barge rafters

Second floor roof system with 28 foot long X 18 inch deep double laminated beam installed with 2X10 rafters and barge rafters


Day 8 Wednesday, December 23, 2009
5 hours X 3 men

First and second floor roof system decking installed and Perma R roof wrap installed.

Windows picked up at Home Depot and delivered, Jeld Wen wood primed model Low E.

An additional 18 sheets of OSB sheathing had to picked up to complete job.

All the exterior sheathing was installed for the first and second stories with 5 openings at windows on the second floor left open for access for additional materials to the top by ladder until the stairs are completed.

28b9rtg.jpg


v4nnro.jpg


fk5w1t.jpg


zjgg0o.jpg


2rppit0.jpg


ion3iw.jpg


rbyudh.jpg


2nbesup.jpg


24nicer.jpg
 
OP
S

Sharps

Well-known member
Joined
Aug 23, 2009
Messages
153
Christmas Eve update...

Day 9 Wednesday, December 24, 2009
6-1/4 hours X 3 men

First and second floor house wrap installed with window openings cut out using the “I” pattern and the opening edges taped with Dupont tyvek tape.

4 of 5 windows were installed on the first floor.

7 of 9 windows were installed on the second floor.

2w2edxe.jpg


30ngi9c.jpg


2zpt7yc.jpg


6e3hjs.jpg
 
Last edited:
OP
S

Sharps

Well-known member
Joined
Aug 23, 2009
Messages
153
Thanks for all the compliments. Hopefully it will turn out well.

Awesome build! How will you access the second floor?

Currently the access to the second floor is planned to be by a staircase on the back wall that will have plumbing, electrical and mechanical systems underneath it. As currently designed the staircase will only use 3-1/2' X 8-1/2' of the top floor square footage.

However, I have all weekend to plan something different...
 
Last edited:
To avoid these ads, REGISTER NOW!
OP
S

Sharps

Well-known member
Joined
Aug 23, 2009
Messages
153

Day 11 Tuesday, December 29, 2009

0805 to 1715 (1/2 hour lunch), tools picked up and trucks gone at 1730.
4 men Overcast, 30F
Flashing and trim around side windows and second floor windows on the rear and west side. Then man door and last window on first floor openings were cut and installed. First floor window flashing and trim installed, door untrimmed. Door opening cut out with Stihl concrete saw, opening wrapped with Tyvek and taped edges and 3068 9 lite, metal, man door installed. Door had a couple of small dents and was bought for $100.00 at Lowes ($184.00 MSRP), saved $84.00.

Roof installed over man door, framing, decking, roof wrap and metal, no cap. Rear gable trimmed out, ready for the shake material.

Day 12 Wednesday, December 30, 2009

0815 to 1715 (45 minute lunch), tools picked up and trucks gone at 1730.
4 men overcast, 40F
Siding on the West side installed, man door trim installed. Soffit installed on West side with soffit vent. Stick frame over garage door for roof projection was completed and temporary supports were put in place, roof wrap and metal roofing installed. Both garage door openings were filled in from rough block opening to finished door R.O. size of 9’ 1½ ” and wrapped with Tyvek.
Tyvek wrap was completed across front (South) side and the right (East) second floor side. Final second floor window installed on East side and all remaining windows trimmed out and flashing was installed above each.


Window trim detail for Jim, picture frame style with lap siding butting up to the frame. This style of trim architectural depth to the window when it is painted and contrasts with the siding.

2mqniv5.jpg


Siding in progress on side and rear.

24ne3yx.jpg


Siding complete on rear, except for cedar shakes in gable, roof installed over man door on side. Man door and last window installed on first floor.

6r0gf5.jpg


View from the front with both side and additional roof over garage door in process. Garage door R.O. completed and wrapped.

29z5w5v.jpg


First story roofing being installed also showing lower roof and last second story window installed.

xembs.jpg
 

993James993

Well-known member
Joined
Feb 24, 2008
Messages
524
This is a beautiful project and build. I love your garage and look forward to more photos.

Thanks for posting the window detail.
 
OP
S

Sharps

Well-known member
Joined
Aug 23, 2009
Messages
153
Jim, I am glad the picture helped, and thanks for the compliments.

Here is a quick update from yesterday.

Day 13 Thursday, December 31, 2009

0820 to 1730 ( 30 min lunch), tools picked up and trucks gone at 1745.
4 men misty, foggy, overcast, 40F all day

Garage door R.O. trimmed out. Soffit installed on East side with soffit vent, and all Trim and Siding on the first story completed. Triple Wind Platform for stairs installed in northwest (back left) corner with all the stringers cut by 1100. Corner trim and lap siding on front of the two story side of the garage was started. Hurricane straps/clips installed on tail end of all rafters on both floors completed.

Triple wind stair platform from the second floor

156bmno.jpg


Stair stringers cut and stored against wall

zlztjd.jpg
 

KM1013

Well-known member
Joined
Jan 10, 2010
Messages
67
Location
Reading, PA
What a great thread. I've been looking for a long time for a home with a nice garage for my son and myself to do work. Sadly, with my budget I can't find a thing. This tread is inspiring considering the low price tag on this project. I realize you're doing the work yourself. I'm hoping to learn a thing or two by following along. Maybe there is hope for me yet.
 
OP
S

Sharps

Well-known member
Joined
Aug 23, 2009
Messages
153
I hope this thread will show that you can build inexpensively if you are careful with your resources. So far I have a huge list of things that I will change on the next build to make things faster and more effective from a materials study that I have been working on.

Update for Sunday night...

Day 14 Wednesday, January 6, 2010

0900 to 1715 (30 min lunch), tools picked up and trucks gone at 1725.
2 men clear, 20F warming to 30F

More soffit installed on 2nd floor East side with soffit vent, remainder of exposed OSB wrapped with Perm R wrap, additional Trim and Siding on the first story and second story in the front completed.

Day 15 Thursday, January 7, 2010

0820 to 1415 (15 min lunch), tools picked up and trucks gone at 1415.
2 men overcast and snowing 25F, began snowing at 1030

Siding installed on 2nd floor East side, Metal Roofing on back (North) side installed on single story section of garage. Roof cap, eaves, rake and drip edge not installed yet, waiting on all trim and roofing to be completed and then custom metal will be formed.

Continued to snow all night and piled up 1-1/2 inches with the temperature staying in the 20's since then. Way too cold for me to work on anything outside until it warms up some tomorrow.

24yoepw.jpg
 

1320stang

Well-known member
Joined
Dec 28, 2006
Messages
4,563
Location
Edmond, OK
Let me start be saying I'm not trying to start anything....

I'd like to see a list of materials and prices. I don't see how you can build that for under $30K. I'm just finishing up a 16x16 addition that has a 8 foot deep porch on two sides that the only thing I farmed out was the concrete. Everything else I did myself with the exception of the roofing which my dad helped me. I have three 3x5 windows and a 6x7 french door as well as another 6x7 interior french door. I'm into it for over $20k.
 
OP
S

Sharps

Well-known member
Joined
Aug 23, 2009
Messages
153
Let me start be saying I'm not trying to start anything....

I'd like to see a list of materials and prices. I don't see how you can build that for under $30K. I'm just finishing up a 16x16 addition that has a 8 foot deep porch on two sides that the only thing I farmed out was the concrete. Everything else I did myself with the exception of the roofing which my dad helped me. I have three 3x5 windows and a 6x7 french door as well as another 6x7 interior french door. I'm into it for over $20k.

No worries.

I established the budget for the project after determining the final size and getting the quotations from the vendors on materials. I know the amount of time it will take to build from a man hour standpoint, so the ability for me to build within the budget is not an issue.

When I have it all wrapped up on the outside and the materials purchased for the interior, the material list and the costs will be posted. This is to serve several purposes, the first show the current costs of construction and the other is to provide some of the members here the motivation to build simply.

I plan on posting all the successes and failures of the build when it is completed.

Many of the expensive items that people use in garage builds can be built from scratch if you want to do the work. The garage doors planned for this build will not be the $1,000 - $1500 per opening units with automated openers, but hand built swinging doors from local sawmill cut lumber. The flooring and much of the trim work in the apartment will also be from the local sawmill (poplar is planned at this point). Interesting fact on the local lumber, I can buy poplar boards up to 16' in length and 16" wide for $0.55 per b.f. in other words the 9' X 8' garage doors will cost $150.00 per opening for all fasteners, materials and hinges for a door that is 2-1/2 inches thick.

I can also get other cool lumber to **** up the apartment such as chestnut, sassafras, red and white oak, cucumber (yep, apparently there is a cucumber tree according to the mill) and maple for $2.00 per b.f. or less. An example of cool flooring that I have used before and is inexpensive is 1-1/8 poplar with random mixed widths from 8"-12", at $.0.55 per b.f., I can expect to buy 555 b.f. including a 10% overage for waste for $304.92 cash. That is cheaper than 2nd quality laminate at the salvage stores.

I hope this keeps people interested in the thread, and for examples of how to use a 16' X 28' apartment or other small space, i use the http://contests.apartmenttherapy.com/2009/small-cool/ for design and layout ideas.

HTH
 
OP
S

Sharps

Well-known member
Joined
Aug 23, 2009
Messages
153
Nice build, the apartment is smaller than I want to build but the garage space is near where I'm at now.

The budget allowed this size, but with another $10,000.00, I could have done substantially more.

In fact a great size for the apartment side would be 24' wide X 32' long with 8' walls upstairs with an 8/12 or 9/12 roof pitch, but the cost would be driven up by about $10,000.00 to $15,000.00 depending on trim level.

I grew up in a variety of places and have lived in all types of environments, that being said, it is my belief that if we were to build what we truly need and not what we think we "want" and have it paid for with no debt, we could all be happier and enjoy life a bit more.

At this point in my life, I am starting my second attempt at a minimalist lifestyle. It will take me two or three years to get there though.
 

e3pres

Well-known member
Joined
Sep 5, 2006
Messages
168
Location
Chattanooga, TN
I grew up in a variety of places and have lived in all types of environments, that being said, it is my belief that if we were to build what we truly need and not what we think we "want" and have it paid for with no debt, we could all be happier and enjoy life a bit more.

I couldn't agree more. My wife and will start building a 30X48 garage with a full second story this summer. Once we complete the structural work, we are going to slowly finish the upstairs as living space. All this will be done with cash. Once the market bounces back, we will sell our house, pay off the mortgage and move into our modest, but paid-for home. I figure if we put what we are paying to a mortgage into savings, we can add-on or build a separate structure for a permanent home in just a few years after that.

:thumbup:
 

UncleJoe

Well-known member
Joined
Dec 2, 2008
Messages
908
Location
New Bern NC
Great post, good build. I will look forward to the lessons learned version and the final budget. I have a feeling you will be closer to your goal than some would think.

Good thoughts on the minimal lifestyle. My wife and I have been debt free for 8 years now. The only bills are groceries, utilities, insurance and taxes. We have not sacrificed much as I look back over the last 8 years we have traveled whenever we wanted, taken cruises bought some toys like a motorcycle all with cash and all within our means and we did not hit the lottery to do it. Less is really more sometimes.
 
OP
S

Sharps

Well-known member
Joined
Aug 23, 2009
Messages
153
More progress! Although it has been slow this week with the cold and ice, we managed to get a few days of work completed as the temperatures crept above freezing in the afternoon for the last three days of the week.


Day 16 Wednesday, January 13, 2010
0845 to 1730 (30 min lunch), tools picked up and trucks gone at 1730.
2 men slightly overcast morning 26F at 0800

Siding installed on 2nd floor East side, Metal Roofing on second story section of garage. Will wait until later in the week to install the roof cap, eaves, rake and drip edge after all exterior trim and roofing is completed.


Day 17 Thursday, January 14, 2010
0830 to 1745 (30 min lunch), tools picked up and trucks gone at 1745.
2 men clear skies, 26F at 0800 warming to 40F

Cedar Shake installed in front and rear gables. Fascia and Rake installed on second story, drip edge installed on second story.

* It takes 2 minutes per man X 2 men to handle, measure, cut and install each piece of cedar shake including measuring and installing the backing felt. Average number of shake installed per hour is 30 pieces with 2 men, or roughly $1.00 per shake installed with 6” and 6-1/2” exposure at an hourly rate of $15.00 per man/hr.


Day 18 Friday, January 15, 2010
0910 to 1500 (10 min lunch), tools picked up and trucks gone at 1500.
3 men clear skies, 26F at 0800 warming to 48F

More fascia and rake installed on first story roof, almost all of the rake and drip edge as been completed on the second story. 75% of roof cap with fiber roll vent installed on second story.

Removed 4 joist ends to accommodate 81” overhead clearance for stairs.
Completed layout of bath, entrance, closet, interior trim design, and proposed kitchen layout.

Interior walls framed for bathroom, closet, entrance door R.O., shower floor pan reinforced with PT box to prevent flexing in the shower floor and any leaks from developing in shower drain connection (I know it's overkill, but it takes 5 minutes and was done with PT drops. This way I never have to worry about it and it is a more solid feeling under foot in the shower.)


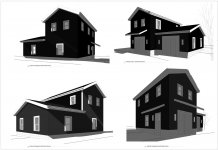
Front gable with Cedar Shakes installed

15p34au.jpg


Rear View with Shakes installed in gable

282htdy.jpg


Interior wall framing with shower set in place

10eoj77.jpg
 
Last edited:

DrDugit

New member
Joined
Sep 23, 2009
Messages
4
Why did you decide to go with a stick built roof rather than pre-built trusses?
 
To avoid these ads, REGISTER NOW!
Top Bottom