To avoid these ads, REGISTER NOW!

Smallish attached 2 car, from @%#^ mess, to '60's pop-art retro service station/diner

Ripped

Well-known member
Joined
Feb 1, 2010
Messages
334
Hello all

Now that my car project is coming up on completion this year, it's about time to tackle the garage.

It's been a real challenge working in a garage this small. Each night, with each little project, wifey needs to park her car in the garage. Thus everything needs to get put away. Often this is in a big hurry. I am tired, the project is taken longer than I figured, time runs out, and I end up tossing everything in a pile or on the work bench, or on the floor, just so I can get her car inside before bed time!

The other thing that's a challenge, is when the wife finds space, her $#!t ends up in the garage somehow, also ;)

It's going to take some innovation, to create more space, in such a small footprint.

I'd also like to get rid of that center (structural) post. This is going to be pricy, as I'd have to get an engineered beam, or steel beam to span the present location of the beam. I'd also need to recess this into the floor joists above the garage, in order to keep head room. More on this later.

The other thing is, the garage MUST be fully functional. It cannot just be a pretty face. I am constantly building things (carpenter/builder by trade) and doing other various projects.

So dust control, clean up and cover up (of unused equipment) is of prime importance.

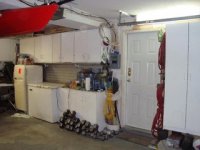
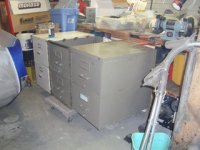
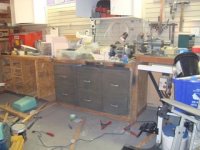
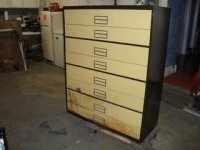
Anyways what it pretty much looks like now; (aka the big mess)


I can, and do, build/make lots of stuff.
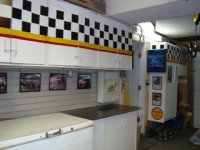
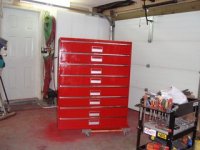
Below, is what I did, when I renovated my home-office (no the garage will not look like this);


Thanks for any tips and advise, and I look forward to learning about lots of tips and tricks, from the rest of you guys :)
 

Attachments

  • DSC00742.jpg
    DSC00742.jpg
    39.1 KB · Views: 1,511
  • 000_0266.jpg
    000_0266.jpg
    29.6 KB · Views: 1,632
  • 100_3332.jpg
    100_3332.jpg
    31 KB · Views: 1,652
  • DSC00746.jpg
    DSC00746.jpg
    51.7 KB · Views: 1,527
  • DSC00745.jpg
    DSC00745.jpg
    53 KB · Views: 1,536
  • DSC00744.jpg
    DSC00744.jpg
    51.2 KB · Views: 1,447
  • DSC00743.jpg
    DSC00743.jpg
    42.7 KB · Views: 1,474
Last edited:
To avoid these ads, REGISTER NOW!

rickairmedic

Well-known member
Joined
May 31, 2005
Messages
4,165
Location
louisville ,Ky
Ripped the office looks great . The garage looks like mine :D. Now the real question everybody will want answered is that a real Shelby or a clone :D.


Rick
 
OP
R

Ripped

Well-known member
Joined
Feb 1, 2010
Messages
334
Ripped the office looks great . The garage looks like mine :D. Now the real question everybody will want answered is that a real Shelby or a clone :D.


Rick
We did have a real '68 GT500 stick, before wife and I were married, 25+ yrs ago but couldn't afford to keep her.
So the answer is no. Not real, but we're going to drive it a lot, so don't have to worry about a little road rash, here or there ;)

Your garage is big compared to mine. I built my 67 El Camino in a 16x22.

Wow that's amazing! Good work.
 

Kevin54

MEMBER EMERITUS
Joined
Jan 12, 2005
Messages
29,341
Location
Urbana, Ohio
The office turned out great. I like the work on the ceiling. Since you're a carpenter, you can send the Mustang my way. I can kick the wifes car out to keep it in a garage. :lol_hitti

Take a look at XYZ's Camaro garage and look at his soffits storage area around the perimeter of the garage. Tons of useful storage at ceiling height. Also Jack Olsen has a lot of great tips on storage.
 
OP
R

Ripped

Well-known member
Joined
Feb 1, 2010
Messages
334
office looks great...can't wait to see what you w the garage!
Thanks, I tend to go overboard with things, so it's going to be interesting ;)

nice trimwork in that office!

Thanks, lots of cutting, fitting and painting

Good job! Love the mustang too!! I like the way its headed! Good luck with it all!
Thanks, definitely getting to the fun part of the restoration. When It goes out for final paint, I hope to be putting the finishing touches on the garage

The office turned out great. I like the work on the ceiling. Since you're a carpenter, you can send the Mustang my way. I can kick the wifes car out to keep it in a garage. :lol_hitti

Take a look at XYZ's Camaro garage and look at his soffits storage area around the perimeter of the garage. Tons of useful storage at ceiling height. Also Jack Olsen has a lot of great tips on storage.
I'm quite sure that my wife would love it, if I got rid of the Mustang as it gets more attention than she does some nights ;)

Yeah great suggestions, both of those gus have some great ideas integrated into their garages.


--
Today I went to the metal shop and checked out some products and polished metal, and various hardware. Looked at some garage flooring options at the 'depot.

The gears are definitely turnin'

I think my plan of action will be to dejunk, and organize the garage functionally.

I already started dejunking today.

I have plans to repaint the old 1960's beer fridge, and maybe the chest freezer, in keeping with the garage theme.
(notice the filing cabinet in my office which was repainted and I installed chrome mouldings on. I also painted flames on my paper shredder LOL)
 
OP
R

Ripped

Well-known member
Joined
Feb 1, 2010
Messages
334
Yeah, I definitely will paint the fridge. I don't know what, yet... but it's on the agenda.

I've been messing around for the past couple nights. Definitely making progress. Should be able to post some pics in a few days.
I can see where finally organizing my tools properly, is going to be a big help in working more efficiently, instead of navigating the junk pile!

I got a couple file cabinets for free, from work, and am going to look at another good possibility for a tool storage metal multi-drawer type cabinet in the next few days for under $30
 

RobSmith

Banned
Joined
Feb 5, 2009
Messages
562
Location
NSW Australia
Just a thought...you work with wood so you make a lot of dust...put your planers, router table, circular saw, etc on wheels so you can make the mess outside. If you have those snow winters forget this idea and design a BIG vacuum system. ;)
 
OP
R

Ripped

Well-known member
Joined
Feb 1, 2010
Messages
334
Just a thought...you work with wood so you make a lot of dust...put your planers, router table, circular saw, etc on wheels so you can make the mess outside. If you have those snow winters forget this idea and design a BIG vacuum system. ;)

That's a really good idea. I have to remake or weld up a better system for my table saw, anyway
 
OP
R

Ripped

Well-known member
Joined
Feb 1, 2010
Messages
334
A few pics of my little bit of a start

My file cabinets (free from work) I decided to cut into 2 drawer section and weld them together, to replace my under bench storage.

I was simply tired of leaning way into the back of the bottom shelf and trying to fing my tools. This is going to be a lot better.
Ineed to get 3 more two grawer cabinets now ;)


I just have to get a set of handles (once I get all my file cabinets) which all match, then i will install them all at the same height/layout etc.

My craigslist find today
A steelcraft metal multi drawer file cabinet (of some sort) for $25
This is going to be perfect for a second tool box.

The drawer lockout is not fuctional, but even if I can get it working, i am going to tether it to the wall with chain or cable, just in case more than one drawer gets suddenly open, by accident.

Just the outside is a little messy.

inside the cabinet is like brand new;

all steel with high quality heavy duty drawer sliders
 

Attachments

  • DSC00763.jpg
    DSC00763.jpg
    51.5 KB · Views: 467
  • DSC00762.jpg
    DSC00762.jpg
    48.1 KB · Views: 467
  • DSC00764.jpg
    DSC00764.jpg
    51.4 KB · Views: 482
  • DSC00765.jpg
    DSC00765.jpg
    40.9 KB · Views: 462
Last edited:
OP
R

Ripped

Well-known member
Joined
Feb 1, 2010
Messages
334
I guess all that body-work practice on the car, has given me some skill with a scuffing pad and a spray bomb or two.

Here is the file cabinet, that I bought for $25 after one night's work;


Moved it into place, for now;
 

Attachments

  • DSC00768.jpg
    DSC00768.jpg
    48.5 KB · Views: 629
  • DSC00767.jpg
    DSC00767.jpg
    48.2 KB · Views: 677
  • DSC00766.jpg
    DSC00766.jpg
    46.3 KB · Views: 816
Last edited:
OP
R

Ripped

Well-known member
Joined
Feb 1, 2010
Messages
334
Painted up and trimmed the file cabinets, with some aluminum etc.

I don't know exactly what I will put in the center opening. Maybe an air hose reel will fit, however it is no the ideal spot for this.

I'll think about it.
Maybe a slide out, nuts and bolts storage... again not so handy, and kind of in the way, if I put it there.

The opening is about the right size, though.


Some time in the future, I'll need to get some identical handles, and place them all at the same elevations. It is hard to get identical file cabinets for free or a cheap price, though ;)

Now it's time to do a rough organization of everything on the work benchs, so I can clean things up further.
 

Attachments

  • DSC00769.jpg
    DSC00769.jpg
    51.7 KB · Views: 581
Last edited:
OP
R

Ripped

Well-known member
Joined
Feb 1, 2010
Messages
334
Great paint job on those file cabinets! :bowdown:

Thanks, I am trying to do everything that I can, on a budget.
So far I am about $100 into the big file cabinet
and $130 into the under bench cabinets including $37 for the aluminum checker plate.
 

kfainf

Well-known member
Joined
Jul 28, 2007
Messages
300
Looking great so far. I like the paint jobs on the file cabinets for sure.
 
OP
R

Ripped

Well-known member
Joined
Feb 1, 2010
Messages
334
My little weekend project. I picked up two retractable cord reels. This allowed me to stow away all my extension cords.
So that's what I am gearing for. More efficient use of space.

Next I want to get a retractable air hose reel. This will hopefully allow me to get rid of my extra air hoses, and coil air hose, which is a PITA.

So I have a place for one hise reel, between the file cabinets. Then I'd like to get a 5/8" hose reel for a car wash hose,and add a second air hose reel, beside that (for filling car tires etc.)

Anyway to finish off the weekend, I installed a piece of laminate ($5) that was an off-cut. It kind of looked like a retro style pattern and is nice and glossy finish. Added a chrome edge trim.
The I painted one section of the upper cabinets. I kind of used a "shell" colour pattern.

Looks better, I think.


more to come.
 

Attachments

  • DSC00775.jpg
    DSC00775.jpg
    43.8 KB · Views: 527
Last edited:
To avoid these ads, REGISTER NOW!
OP
R

Ripped

Well-known member
Joined
Feb 1, 2010
Messages
334
Got a few metal cabinets for free from work.


The signs that i bought were kind of antiqued, so I tried to blend that into the cabinets.

This one will have some kind of car parts in it, I am guessing;


I just have to install a couple handles and mag latches or key latches.

They are nice sturdy cabinets, and the price was right ;)
 

Attachments

  • DSC00915.jpg
    DSC00915.jpg
    33.5 KB · Views: 338
  • DSC00913.jpg
    DSC00913.jpg
    27.1 KB · Views: 303
  • DSC00914.jpg
    DSC00914.jpg
    25.1 KB · Views: 296
Last edited:
OP
R

Ripped

Well-known member
Joined
Feb 1, 2010
Messages
334
... Did you just use the new signs and paint the edges to 'antique' them? Thats a pretty slick idea if you did! Looks good man!

The signs had kind of rust-like edges, which i had to cut two off, to fit the cabinet.
I decided to antique the cabinets to match.
It's a great way to use up old cans of spray paint.
Just spray on some spots of corrosion clour, that you want in the background.
Let dry(mostly)
The spray on the top colour.
While wet, use a plastic bag, with various levels of force, shape and duration. this will texture the wet top coat and pull through the base colours. As the bag gets tackier, it will rip through more layers of paint.

It works great. Like the "rag off" technique used by home designers to texture walls.


Any progress on the car? ...
I am thinking for a new nickname for the car. Maybe "obstinate" or "argue" or "disagreeable"

I shouldn't be surprised, it's always been like this, from the start of restoration. Nothing has been simple and easy.

An oil leak, thought to be 1st a cam plug, then a rear main seal, turns out to be oil starvation on the #5 main.
DSC00857-1.jpg


So out comes the engine again :mad: (4X)

I should have been in final paint this month.

I think I am going to buy a punching bag. a big one :lol_hitti
 

WANTSOM

Active member
Joined
Mar 31, 2010
Messages
28
Location
Sydney, Australia
I had the same problem with my small 2 car attached when I was doing my Mustang resto and later the race car. You need things at hand to work on the car, but need them organised as well. Then the car stuff is in the way to clean up properly so you stop work on that to clean up. Then you re-start work on the car and the garage becomes a shambles again. I think its just called a "working" garage. Your project is coming along great. Love the 'stang btw.
 
OP
R

Ripped

Well-known member
Joined
Feb 1, 2010
Messages
334
I had the same problem with my small 2 car attached when I was doing my Mustang resto and later the race car. You need things at hand to work on the car, but need them organised as well. Then the car stuff is in the way to clean up properly so you stop work on that to clean up. Then you re-start work on the car and the garage becomes a shambles again. I think its just called a "working" garage. Your project is coming along great. Love the 'stang btw.

Like you said, definitely a working garage. I have to say, though, after only being able to be at the 25% level of reorganizing the garage, it is a heckuva lot easier to work in.
Just the unplanned stuff, is getting in the way of completing some of the stuff that will make my garage much more functional.
Funny I was tracing the oil leak, to eventually get it fixed and do a nice floor on the garage.

I am coming to the realization that having a nice floor, in a garage that works hard, may just be a pipe dream ;) of mine.

That bearing is seriously toasted ! Any Idea what the cause was ?

Very toasted. #4 was starting to go
Crank was barely marked, con rod bearings were good.

So the failure was caught in time.

No idea what caused this, other than it was oil starvation, and the #5 bearing is the last one to get oiled on an FE top-oiler.

I checked the pan/pickup clearance dipstick readings/ vs pan volume, blockage

you-name-it

Could have been a momentary burp in the oil pickup. I am going to be running an oil accumulator from this point forward.

Frustrating... the only side benefit, is that I can complete the air conditioning install and the aftermarket suspension components without the engine in the car. This makes it a little easier.

I'd love to have had my work benches all finished and renovated, before this happened, though.
 
Last edited:
OP
R

Ripped

Well-known member
Joined
Feb 1, 2010
Messages
334
I always love tool purchase justification.

With the Ford lower control arm eccentric eliminator kit costing between $59 - 89 plus shipping, I thought that I could easily make that.

So I went to one of the close discount tool shops. Picked up a 5" cross slide drill press vise (on sale) and got some metal cut, for less than it would have cost me to order and have the parts delivered.

So a couple hours of drilling, and I have paid for a new tool, that I'll get years of use from.

I was designing a receiver hitch style bench mount system for my vice, grinder, etc.
I got my 1st price from the hitch shop, just for the receiver section $375 :shocking:

I am trying to justify a welder upgrade, as my cheapo (bought used) astro 110 mig has always been stretched to the limit.

Maybe if I can buy some cheap steel or used trailer hitches from a wrecker or something, I can swing that in a couple months.
 
OP
R

Ripped

Well-known member
Joined
Feb 1, 2010
Messages
334
Well the improvements (so far) to the garage have really helped make this unforseen work go a lot smoother.

I really wish I had already had the time to install my (more) lighting and finshed a couple other little projects before the motor decided to do it's thing again.

Oh well, a lot of long late nights, to get it back to this point. I hope that I never have to do this (engine) again :mad:

Anyway I'm really tired. Maybe in a week and a half, it'll be a fading bad memory.

DSC00917.jpg
 
OP
R

Ripped

Well-known member
Joined
Feb 1, 2010
Messages
334
Got my work bench tops, for free, from my work. They were throwing out a lot of "bad veneer" doors.

So I picked up 4, solid core doors. These should make for a nice series of bench tops.


Don't know how I am going to finsh them yet. I was going to cut them and skin them with metal. I am rethinking this, since they look really good, actually.

Just need something durable to protect the veneer.
 

Attachments

  • IMG_2210.jpg
    IMG_2210.jpg
    34.5 KB · Views: 127
Last edited:
OP
R

Ripped

Well-known member
Joined
Feb 1, 2010
Messages
334
An amazing thing happened tonight.

I was working on the garage tonight,
Wife comes in, and says; "Hey, it's starting to look NICE in here!":)
Proceeds to grab a rag and some cleaning stuff and starts cleaning off the cabinets, freezer, fridge...
and then...
MY TABLE SAW:thumbup: (it's got a 72" deck and rail on it) It was dirty.

Okay, I'm thinking, don't say anything, she's starting to buy into the "man cave" thing :bounce:

It kind of energized me to do a little more stuff tonight;

The North wall is looking much better;


Inside my "ford" cabinet is my safety stuff, mech gloves, ear plugs etc


Inside my "turtle wax" cabinet, is of course, car wash stuff;


Inside my sprinkler parts cabinet, is my first aid stuff;


I started working on a new sturdier test stand for my engine, as I am going to do a run up and test for oil leaks etc, prior to putting it back into the car.
I got rid of the other temporary stands that i made, because I did not think I would be taking the engine out again :(

Hoping that reverse psychology will work. If I build a really good test stand, I'll never need it again, and the bad luck will be over ;)
 

Attachments

  • DSC00924.jpg
    DSC00924.jpg
    31 KB · Views: 335
  • DSC00926.jpg
    DSC00926.jpg
    32.9 KB · Views: 324
  • DSC00925.jpg
    DSC00925.jpg
    29.4 KB · Views: 317
  • DSC00927.jpg
    DSC00927.jpg
    31.1 KB · Views: 322
  • DSC00922.jpg
    DSC00922.jpg
    35.1 KB · Views: 328
Last edited:

darkbuddha

Well-known member
Joined
Aug 8, 2009
Messages
126
Location
Sorrysota Flarduh
I have to say that it's very inspiring to see a working garage that is making progress while in use. And even more inspiring to hear your missus was drawn to helping keep it nice. That is nearly unbelievable in my mind right now... of course, my wife thinks I should be focusing on stuff inside the house first. Yeah, right. ;)
 
OP
R

Ripped

Well-known member
Joined
Feb 1, 2010
Messages
334
I have to say that it's very inspiring to see a working garage that is making progress while in use. And even more inspiring to hear your missus was drawn to helping keep it nice. That is nearly unbelievable in my mind right now... of course, my wife thinks I should be focusing on stuff inside the house first. Yeah, right. ;)

Thanks. A lot of the tips, from looking at other garages on the forum, and other innovative tools usages, have helped increase the speed at which I can get things done, in the garage now.

It's really helped me work better and faster. So naturally I want to keep the improvements coming.

The hardest thing, is trying to be patient, while these unforseen problems with the 'stang get worked out. The other thing, is trying to find my tools, now that I have organized them :confused:

Next thing, is that I need to get a nice (neon/lighted) garage clock, so that I can keep track of time, and keep the wife happier and stop having to chase me from the garage at bed time.

I hear you on the house stuff. I just hope that I can get the majority of the garage done, before wifey wants the house repairs started ;)
 
OP
R

Ripped

Well-known member
Joined
Feb 1, 2010
Messages
334
Gettin there & Looking good!!

Thanks for the encouragement.

I am hoping to get a start on my big benches this week.

The run up stand worked great for the engine. I made it out of scrap hunks of metal, hardwood, and plywood.
I had to fight for about 3 hours to get it to go, but it finally did. I made a tongue in cheek video, just to have a little fun after all the long nights.

I hope to have all of the testing done in a couple days, and drop the engine back in, at which point I'll have room in the garage to complete a few other things. I think I spotted a few areas of seepage (428's have a funny intake- valve cover gasket layout) which i'll try and track down before dropping it back into the car.
 
OP
R

Ripped

Well-known member
Joined
Feb 1, 2010
Messages
334
I'm loving the vibe...keep up the good work!

Thanks

Why don't you try a pull a part place by you for the receiver? Probably be real cheap

Good idea, I was thinking of an auto wrecker too. I am hoping next week, to get back at the garage improvements.

A little more of the long nights. It's definitely A LOT nicer working in a garage that is only semi-organized, instead of a complete shambles (as it was) the a/c installation is an incredibly long an arduous install. It makes the engine re & re look like a piece of cake.

DSC00936.jpg


DSC00939.jpg
 

tornadoalleycruiser

New member
Joined
Feb 23, 2010
Messages
4
? i know i'm a newbie/lurker.. .. YOu running regular pex for the airline in the background by your bench? or is it ALpex? Don't want this thread off topic just curious. No need to discuss safety needs etc of airlines..
 
OP
R

Ripped

Well-known member
Joined
Feb 1, 2010
Messages
334
Enjoyed reading this thread. Thanks
your welcome

? i know i'm a newbie/lurker.. .. YOu running regular pex for the airline in the background by your bench? or is it ALpex? Don't want this thread off topic just curious. No need to discuss safety needs etc of airlines..
It's durapex.

my older kid is a plumber, and we may redo it. I think he'd like to do it in copper, but the pex holds the pressure and does not sweat, stays clean, so is okay for my medium size compressor. Maybe guys who have the high volume shop compressors would use something different.
 
To avoid these ads, REGISTER NOW!
Top Bottom