
Hi I have been reading her for a while and thought I'd put somthing back,
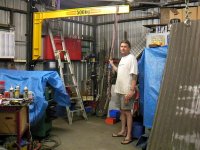
I have been having a hard time lifting things on and off the mill and the lathe for some time and usually had to get a hand off someone (usually my son) to give me a lift. The problem is not age but a broken disc in my neck and after a MI scan and surgery (the operation was unsuccessful) the doctors told me I had an 80 year old spine at the ripe old age of 38 that was 4 years ago. About 12 months ago I had the son in-law help lift the 250mm (10”) rotary and he nearly dropped it, so I decided to build a crane to do the lifting as I still wanted to lift things on my own but safely.
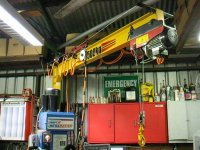
After some research on the internet (not much out there) I built this jib crane last year but only put it up at Christmas. It was made of scrap that I picked up in a dumpster and the main post a mate gave to me.
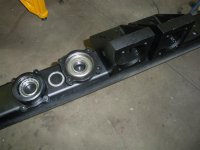
The beam is 150mm x 75 (6"x3") and is 2.3 mtrs (7.5ft) long made up of 2 pieces welded together. The vertical leg is 1mtr (3.2ft) long.
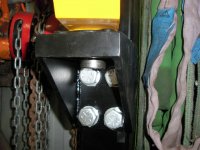
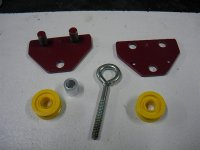
The bearings retainers are from the rear diff of a Nissan 720 4x4 pickup with a standard 30mm inner bearing in the top retainer and the bottom one with the original taper bearing from the axle. There is a 40mm (13/4”) square trailer axle machined at both ends to suit the bearings welded to the back of the crane. I made plates up to go around them and welded them to the crane as extra insurance.
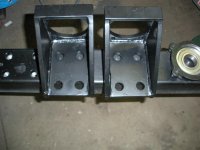
I made the brackets up to hold the bearing retainers out of 10mm (3/8") plate and they bolt onto the 100x100mm (4"x4") thick wall post. They bolt on to the post with 4 x 20mm (3/4) HT bolts top and bottom. I welded the nuts to a 300mm x 90 x 6mm ((1’x 3 1/2”x1/4”) plates top and bottom and then slid the plates inside the post while it was laying on the ground. A couple of small countersunk bolts hold them in place until the post goes up and the bolts go in. The top plates are 150 x 150x 10mm (6”x6”x3/8) with the same 20mm bolts and the bottom plate is 300x175x20mm (1’x7”x3/4) with 5x 16mm (5/8) pins into the concrete. I made the dummy bolts at the bottom because it has to be removed to another location latter. They have a hex head but no thread and are hammered 75mm (3”)into the tight fitting hole in the concrete.
You will see in the photo that I made up some temporary angle brackets with thread bar to do the final adjustments to the post when the crane was up, before welding the bottom. I was lucky I did that as when I first put it up it needed to go higher than I thought. So I lifted it 150mm higher and had to redrill more holes and plug up the old ones.
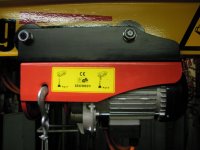
The beam trolley is made up to suit the electric winch my wife bought me for a Christmas present. I had an old beam trolley that I got the wheels off.
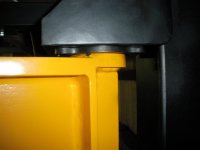
Just after getting it up I decided I needed a cable festoon for the electric wires so I found a deal on eBay plastic wheels and made some trolleys up out of 3mm (1/8”) plate.
I made it so the controller is separate from the winch and left provision for the power controls that I will be fitting latter to move it in and out and side to side.
I haven’t used it much as I am doing renovations on the house but it will be a big help in the future.
All up it only cost me $25Aus dollars and that was for the stickers and the festoon wheels.
This is the first time I have put together a post so I hope I haven’t left anything out and I hope it’s understandable.
Davo
I have been having a hard time lifting things on and off the mill and the lathe for some time and usually had to get a hand off someone (usually my son) to give me a lift. The problem is not age but a broken disc in my neck and after a MI scan and surgery (the operation was unsuccessful) the doctors told me I had an 80 year old spine at the ripe old age of 38 that was 4 years ago. About 12 months ago I had the son in-law help lift the 250mm (10”) rotary and he nearly dropped it, so I decided to build a crane to do the lifting as I still wanted to lift things on my own but safely.
After some research on the internet (not much out there) I built this jib crane last year but only put it up at Christmas. It was made of scrap that I picked up in a dumpster and the main post a mate gave to me.
The beam is 150mm x 75 (6"x3") and is 2.3 mtrs (7.5ft) long made up of 2 pieces welded together. The vertical leg is 1mtr (3.2ft) long.
The bearings retainers are from the rear diff of a Nissan 720 4x4 pickup with a standard 30mm inner bearing in the top retainer and the bottom one with the original taper bearing from the axle. There is a 40mm (13/4”) square trailer axle machined at both ends to suit the bearings welded to the back of the crane. I made plates up to go around them and welded them to the crane as extra insurance.
I made the brackets up to hold the bearing retainers out of 10mm (3/8") plate and they bolt onto the 100x100mm (4"x4") thick wall post. They bolt on to the post with 4 x 20mm (3/4) HT bolts top and bottom. I welded the nuts to a 300mm x 90 x 6mm ((1’x 3 1/2”x1/4”) plates top and bottom and then slid the plates inside the post while it was laying on the ground. A couple of small countersunk bolts hold them in place until the post goes up and the bolts go in. The top plates are 150 x 150x 10mm (6”x6”x3/8) with the same 20mm bolts and the bottom plate is 300x175x20mm (1’x7”x3/4) with 5x 16mm (5/8) pins into the concrete. I made the dummy bolts at the bottom because it has to be removed to another location latter. They have a hex head but no thread and are hammered 75mm (3”)into the tight fitting hole in the concrete.
You will see in the photo that I made up some temporary angle brackets with thread bar to do the final adjustments to the post when the crane was up, before welding the bottom. I was lucky I did that as when I first put it up it needed to go higher than I thought. So I lifted it 150mm higher and had to redrill more holes and plug up the old ones.
The beam trolley is made up to suit the electric winch my wife bought me for a Christmas present. I had an old beam trolley that I got the wheels off.
Just after getting it up I decided I needed a cable festoon for the electric wires so I found a deal on eBay plastic wheels and made some trolleys up out of 3mm (1/8”) plate.
I made it so the controller is separate from the winch and left provision for the power controls that I will be fitting latter to move it in and out and side to side.
I haven’t used it much as I am doing renovations on the house but it will be a big help in the future.
All up it only cost me $25Aus dollars and that was for the stickers and the festoon wheels.
This is the first time I have put together a post so I hope I haven’t left anything out and I hope it’s understandable.
Davo
Attachments
-
 IM000201 (Large).jpg114.5 KB · Views: 994
 -
 IM000208 (Large).jpg109.2 KB · Views: 826
 -
 picture7 391 (Large).jpg87.1 KB · Views: 823
 -
 picture7 392 (Large).jpg90.6 KB · Views: 935
 -
 IM000197 (Large).jpg126.2 KB · Views: 975
 -
 IM000196 (Large).jpg143.4 KB · Views: 1,139
 -
 picture7 394 (Large).jpg144.2 KB · Views: 1,179


.jpg")
.jpg")
.jpg")
.jpg")
.jpg")


