To avoid these ads, REGISTER NOW!

Rebuilding a Series II Bridgeport

A_Pmech

Well-known member
Joined
May 8, 2007
Messages
8,002
Location
IL
Last week I received a surprise from fellow GJ member Jxxxoxxe. In the mail was a 3-ring binder containing a complete copy of the parts and operation manual for my Series II Bridgeport. Jxxxoxxxe, who recently got his own Series II mill as documented in this thread was kind enough to copy his manual as I have none. Thanks again!

Although the DoAll rebuild is not yet fully completed, receiving the Bridgeport manual has prompted me to begin the next rebuild thread!

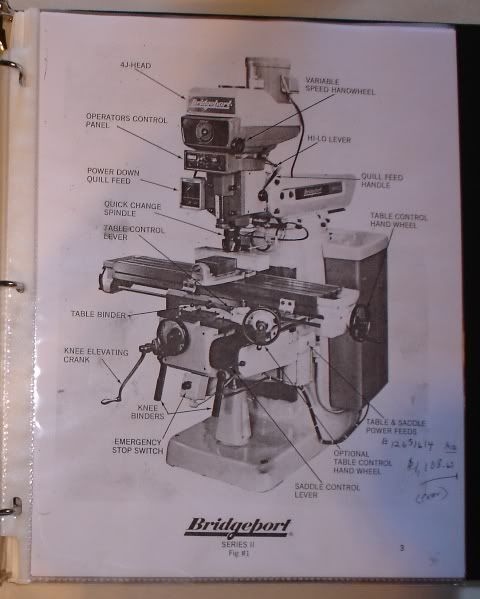
Here's a page out of the manual showing the general layout of the machine:

1.jpg


History of the Series II machine.

According to an ex Bridgeport employee, the Series II machine was built based on information gathered from a mailed customer survey sometime in the late 1960's. Due to the survey response, the Series II was designed to overcome customer-perceived shortfalls of the Series I machine.

However, the machine did not sell very well, possibly due to it's high price and was eventually discontinued after approximately 8,000 units were produced. This page reports a base price for the Series II Standard at $65,000. By comparison, over 370,000 copies of the Series I machine in it's various forms have been produced since 1938 and the current base price for a Series I machine is approximately $15,000 according to kneemills.com, Hardinge Bridgeport's website.

Officially, the Series II 4J head Bridgeport is no longer supported.

Specifications

For those familiar with a Series I machine, it's fairly convenient to to take most of the specifications and double them to arrive at approximate specifications of the Series II. A few of the more important ones:

Weight: Approximately 5,000lbs as opposed to 2,100lbs for the Series I

Spindle motor: 4HP as opposed to 2HP on the Series I

Spindle Taper: Erickson #40 Quick-Change (NMTB-40) as opposed to R-8.

Table size: 10" x 58" as opposed to 9" x 42"

Several other features stand out on this machine besides it's overall size. First, three DC motors provide power traverse on all axes. One motor provides power up and down to the knee, a second motor provides power feeds and rapids to the table and a third motor, operating though a harmonic drive, runs the quill downfeed. The quill downfeed is rated at 900lbs of thrust.

Spindle speeds are slightly slower than a Series I 2J head, 50-3500 RPM as opposed to 60-4200RPM.

"Before" photos

2.jpg


3.jpg


4.jpg


5.jpg


That's all for now! I'll be adding more information to this first post when I start this rebuild.
 
Last edited:
To avoid these ads, REGISTER NOW!

TheGrooveking

Well-known member
Joined
Dec 30, 2007
Messages
3,233
Location
An alternate reality in a parallel universe.
Killer machine, I am envious.....I have a Bridgeport Series I machine, which I love, but a series II would allow me to machine some larger items. You can really hog with that mill, very nice machine BTW. There were a few companies who offered CNC retrofits to series II mills.

I rebuilt my Series I using Rockford ballscrews and had my table and saddle reground by American Grinding.

http://www.rockfordballscrew.com/

http://www.americangrinding.com/

TheGrooveking
 

jxxxoxxxe

Well-known member
Joined
Feb 15, 2007
Messages
265
Great start John...I will definitely be watching this thread...My wife deserves all the credit for the manual reproduction...

I need to post a few more pictures of mine to compare. Mine is actually green in color, and does not have the power quill feed....Mine does seem to have quite a bit more electronics though...

Here's my control panel for comparison...

millmove10.jpg


What serial number is yours? Mines 952 I believe, which I think puts in being built in 1974..Here's one of the few serial lists I've found that include the series II..

http://www.machinemanuals.net/web_pages/bridgeport_milling_machine_serial.htm


I cant wait to see this, after seeing the DoAll thread...I think I'll be happy with just getting mine cleaned up, and maybe some new paint...


:beer:
 

dieseldodge01

Well-known member
Joined
Sep 27, 2009
Messages
603
Location
Ohio
Bridgeport has some nice machines. My dad has one he bought years ago, its an old Series I. Works great for what we use it for. That Series II looks high tech compared to his.
 

DavidB

Well-known member
Joined
Feb 6, 2010
Messages
734
Location
Navarre, FL
I'm looking forward to watching this thread! Are you going to do a complete rebuild like on the Do All?
 

hischj

Well-known member
Joined
Jan 11, 2010
Messages
64
Location
Evansville, IN
Here is a link to the best and cheapest parts dealer for bridgeports. I repair machines for a living and have found no one better. If they don't have it new they will sell you used at an unbelievable price. Also in every order they send a digital copy of prints and part lists for all bridgeport mills. Good luck with the rebuild.

http://www.machinerypartsdepot.com/

Jerry

P.S. anyone can download prints off their website for free.
 
Last edited:
OP
A

A_Pmech

Well-known member
Joined
May 8, 2007
Messages
8,002
Location
IL
Killer machine, I am envious.....I have a Bridgeport Series I machine, which I love, but a series II would allow me to machine some larger items. You can really hog with that mill, very nice machine BTW. There were a few companies who offered CNC retrofits to series II mills.

I rebuilt my Series I using Rockford ballscrews and had my table and saddle reground by American Grinding.

http://www.rockfordballscrew.com/

http://www.americangrinding.com/

TheGrooveking

Thanks for the links, Grooveking!

A lot of people dislike the 4J head machines because the head is so heavy it's hard to nod and tilt. However, I prefer 40-taper to R-8, so the choice was easy. It's nice to be able to move the head, but I don't do it very often. The larger work envelope was a big factor in my decision to purchase the machine.

A 50-taper spindle is likely in the future, so this will be set up as my "good mill" with DRO to cover the majority of day-to-day manual work. I'll leave the metal munching to a yet-to-be-located #4 or #6 universal.

Jxxxoxxxe said:
What serial number is yours? Mines 952 I believe, which I think puts in being built in 1974..Here's one of the few serial lists I've found that include the series II..

http://www.machinemanuals.net/web_pa...ine_serial.htm

I don't recall offhand... 2702 comes to mind, but don't quote me! I think mine is a little later than yours, due to the difference in the front panels. Thanks for the serial # list, I've been trying to find one for the Series II machines.

I received the diagrams, thanks! They're actually wire lists I think, but should be enough to figure out what that rats nest is in the bottom of the E-cabinet. It's had the DC drive replaced at least once, so I'm sure that will be fun to figure out. This will be a full re-wire just like the DoAll.

If I can be of help with your machine, let me know! :)

dieseldodge01 said:
Bridgeport has some nice machines. My dad has one he bought years ago, its an old Series I. Works great for what we use it for. That Series II looks high tech compared to his.

Most of the complication is related to the power feeds. Strip all those away and what remains is a big and heavy Series I without the mechanical quill feed. Looking forward to using this one. :)

DavidB said:
I'm looking forward to watching this thread! Are you going to do a complete rebuild like on the Do All?

Indeed. This will be a component-level rebuild.

hischj said:
Here is a link to the best and cheapest parts dealer for bridgeports. I repair machines for a living and have found no one better. If they don't have it new they will sell you used at an unbelievable price. Also in every order they send a digital copy of prints and part lists for all bridgeport mills. Good luck with the rebuild.

http://www.machinerypartsdepot.com/

Thanks for the link Jerry! This machine is in pretty good shape I think. According to the guys who worked in the shop, it was rarely used. Most preferred to beat on the row of Series I machines. We'll find out!

Arkangel06 said:
Where are you getting all this stuff to rebuild?

The Iron Fairy. :beer:
 
Last edited:

mjozefow

Well-known member
Joined
Apr 9, 2009
Messages
2,111
Location
Lafayette, IN
Clearly you stepped on a large iron nail when you were little. Instead of getting tetanus like a normal person, the rusty iron became a part of you. You have the sickness. :beer:

I await with anticipation.
 
OP
A

A_Pmech

Well-known member
Joined
May 8, 2007
Messages
8,002
Location
IL
Awesome!

Now hurry up, i'm gonna need some stuff made soon, ok, ese?
emot-ese.gif

I'm hurrying! :p

mjozefow said:
Clearly you stepped on a large iron nail when you were little. Instead of getting tetanus like a normal person, the rusty iron became a part of you. You have the sickness.

Yeah, I definitely have the sickness. :)
 
OP
A

A_Pmech

Well-known member
Joined
May 8, 2007
Messages
8,002
Location
IL
Cleaning up the Collet Chucks

Along with the Bridgeport I also got a shop-built box that contained four Erickson Quick-Switch collet chucks and a couple sets of TG-100 collets from 3/8" to 1".

I don't have a "before" photo of the box and tooling, but here's a "nearly finished" photo:

6.jpg


On the left, the large spanner wrench is used to tighten and loosen the spindle nut which clamps the tools into the spindle. On the right, the large hexagonal block is used for tightening the collet chuck clamp nuts.

The block is clamped in a vise, a collet chuck is dropped into the block and turned until the slots of the chuck align with the exposed bolt heads. Then the nut can be snugged with a 2 1/4" wrench (not shown).

Here's a collet chuck installed in the block with a 5/8" finishing endmill:

7.jpg


A photo of a collet snapped into the collet chuck clamping nut:

8.jpg


Finally, a photo of a collet chuck I haven't overhauled yet. This was the cleanest one of the lot. While apart, I'm installing new thrust bearings in the nuts:

9.jpg


I also got a Kurt D-80 swivel vise with the machine which needs to be rebuilt. While essentially undamaged, it is covered in coolant goo:

DSC06049.jpg
 
OP
A

A_Pmech

Well-known member
Joined
May 8, 2007
Messages
8,002
Location
IL
Any updates on this one, or is the floor your big project for now?

The floor is my big project for right now.

That big pile of hardwood in the garage is sitting right where the Bridgeport will go.

:)

selohssa said:
I always enjoy reading your threads. They are very well documented and easy to understand even for a guy like me

Thanks! I enjoy being able to share my work with others.

:beer:
 
To avoid these ads, REGISTER NOW!

promaster60

New member
Joined
Sep 6, 2011
Messages
2
Location
lansing mi
I just picked up a series 2 bridgeport 1979 thats needs work, does anybody have a copy of a parts manual ? or manual MINE has metric dials ( i dont like ) but it is a beast compared to my tree .
 

BillyEmery

New member
Joined
Oct 2, 2012
Messages
1
I am looking for a copy of just some info out of this manual for the bridgeport series 2 mill,
 

NASTYZEN

Well-known member
Joined
Jun 11, 2010
Messages
2,823
Location
St-Colomban,Que. Canada
My Mighty Comet looks an awful lot like your Bridgeport. I need to replace the spindle brngs real soon. Did the head brngs last year.
15,000 rpm would be so much better.
 

Beaumont67

Well-known member
Joined
Apr 10, 2011
Messages
526
Location
St. Thomas, Ontario
Congrats A_Pmech - Very nice mill indead...they Bridgeport was always the Cadillac of machines.

I did plant Industrial Engineering work in a manufacturing plant (starting in 1980) and our Tool Room had a few BridgePort's.
- A good work friend of mine did become the Tool Room supervisor & technical upgrade guy, and he converted one mill to CNC using some of the hardware/software system (coding/graphics) in conjuction with the new Mori Seiki CNC lathe package, purchased for the company shop.
- If memory serves me correctly, I think the BridgePort's were made in London, Ontario, Canada...and facility shut down decades ago, before CNC was invented (next city over from me).
- the CNC milling retrofit, was a huge success & very cost effective (in a production enviroment), on an old machine that was already paid for...using the new lathe computer system to talk to the old mill
 
Last edited:
OP
A

A_Pmech

Well-known member
Joined
May 8, 2007
Messages
8,002
Location
IL
thread resurrection! Any updates??

Not really.. The B&S surface grinder has been keeping me pinned down. I'm currently retrofitting a monitored series-progressive lubrication system to the ways and axis nuts. It's been... More complicated than I expected. I'll make a progress update on that soon.

Beaumont,

Thanks! This machine is in very sound condition and I run it every day, although it's pretty crappy looking I've turned out a lot of good work with it. I have been researching cnc conversion kits and there's a fair chance I'll buy a toolroom cnc kit for the machine once I get it rebuilt. As things progress I plan to add at least one machining center and one turning center, but it would be nice to have a toolroom cnc turret mill for simple stuff. This machine will continue to fit that bill.
 
Last edited:

howard soo

New member
Joined
Nov 28, 2013
Messages
3
hi i am rebuilding too...can you please share some opinion to me too..actually i need the user manual ...thanks a lot


my email address : [email protected]

thanks and best regard..
howard soo
 
OP
A

A_Pmech

Well-known member
Joined
May 8, 2007
Messages
8,002
Location
IL
Thread resurrection!

A few weeks ago the power feed motor brushes began arcing pretty badly. I knew the power feed motor commutator was in pretty sorry shape, mostly from brush dust mixed with oil caking in the mica gaps. I also knew if I let the commutator continue arcing for much longer I'd need to rebuild it. Rebuilding a comm is NOT for the faint of heart.

With that in mind, I tore into the machine and pulled all the power feed equipment as well as the power knee drive. I use this machine every day, so realistically I can't be without it for more than a week or so. After removing the drives I installed enough of the manual feed parts to get the machine running again while I worked on the motors. Unfortunately, I haven't taken many photos due to time constraints.

Here's a photo of turning the knee drive commutator:

Armature_zps54b604b9.jpg


Meanwhile, I also rebuilt the air counterbalance knee. The original leather U-cup seal was replaced with a Buna-N seal, which required re-machining the counterbalance piston and follower plate. Here's the final fitting of the seal to make sure I have the squish correct:

020920141156_zpsd9a174ac.jpg


While the epoxy was curing on the air knee, I started stripping parts off the machine faster than a hood rat stealing rims off a Caddy. I'm going to paint the bottom half of the machine and get it operational again. Then, when the power feeds are completely done I'll pull the table, saddle and knee to clean the ways, nuts and replace the wipers. Then, I'll put it all back together and install the power feeds again. Sounds like a game of musical chairs? Yup...

bridgeport12_zps34fb3a0f.jpg


You wouldn't believe the amount of nastiness I cleaned off the machine by the time that photos was taken. I resorted to scrubbing with Purple Power followed by hosing the **** out with hot tap water and mopping it off the floor. The inside of the knee was half full with chips and 30 years of rotten coolant mixed with way oil. I spent two hours scrubbing in here:

bridgeport13_zpsd4c03424.jpg


Speaking of the power feeds the reason why the feed motor failed was because of a faulty pump shaft seal, which allowed worm drive grease to coat the armature. When I bought the machine the power feed drive was bone dry. Here's what happens when you run a worm gear reduction without oil:

bridgeport14_zpseb457fe3.jpg


A close-up of the carnage:

bridgeport15_zpse4a27266.jpg


Let's see, we have scoring, metal displacement and pitting all on one gear specimen! Needless to say, this is a custom gear and Bridgeport no longer supports the machine. Materials are on the way to re-make the worm and worm wheel. This should be fun!

Here's where it stands tonight. I started in on stripping off the multiple layers of porch paint using methylene chloride stripper, in addition to the original gray paint, primer, sprayable casting filler and casting primer. At last, down to bare metal! I'm using a carbide tipped scraper and the thing is amazing for taking off casting filler.

bridgeport16_zpsbcc22082.jpg
 

justanengineer

Well-known member
Joined
Apr 5, 2011
Messages
7,722
Location
Motor City
Looks good thus far, the only question remaining is what color is the repaint going to be? Im wagering machinery gray but hoping for something bright and different...Ducati Red perhaps?
 
OP
A

A_Pmech

Well-known member
Joined
May 8, 2007
Messages
8,002
Location
IL
Looks good thus far, the only question remaining is what color is the repaint going to be? Im wagering machinery gray...

You get a cookie! :thumbup:

It will be the same color as the Do-All. Actually, I color matched the paint off of it.

If I was to do such a thing, it would have to be neon orange, my favorite color.
 

yaidunno

Well-known member
Joined
Feb 10, 2011
Messages
1,336
Location
WI
Does this mean you have a gear hobbing machine in your arsenal? Looking forward to seeing the progress of this one.
 
OP
A

A_Pmech

Well-known member
Joined
May 8, 2007
Messages
8,002
Location
IL
I'm glad this thread is back!! Can't wait to see how it goes. Mind if I ask why you took off half of the chuck jaws on the lathe?

The chuck can be used as a two-jaw, 3-jaw or 6-jaw chuck. I mostly use it as a 3-jaw for convenience. When I need to hold something "squishy" like a ring, I'll add the other three jaws.

yaidunno said:
Does this mean you have a gear hobbing machine in your arsenal?

One day!

I'll be using a lathe trick to make this one.
 

Trucky

Well-known member
Joined
Apr 26, 2011
Messages
1,747
Lathe trick, eh?

We'll need plenty of pictures and maybe even a video!

See, I wish I could do this kind of stuff. Maybe in 20-30 yrs ;)
 
To avoid these ads, REGISTER NOW!
Top Bottom