To avoid these ads, REGISTER NOW!

Two Car Garage Build in Lancashire, England

Gareth

Well-known member
Joined
May 23, 2007
Messages
151
Location
Lancashire, England, UK
Garage Build in Lancashire, England - V.1 and V.2!

The first part of this thread (to post 233) relate to my first attempt to build a garage. From then on it's my attempt to build an improved version at a house we intend to never leave.

Garage Version 1

As you can see from my 'Join Date' I have been lurking on this site for a long time, and I am finally in the position to build my own decent garage.

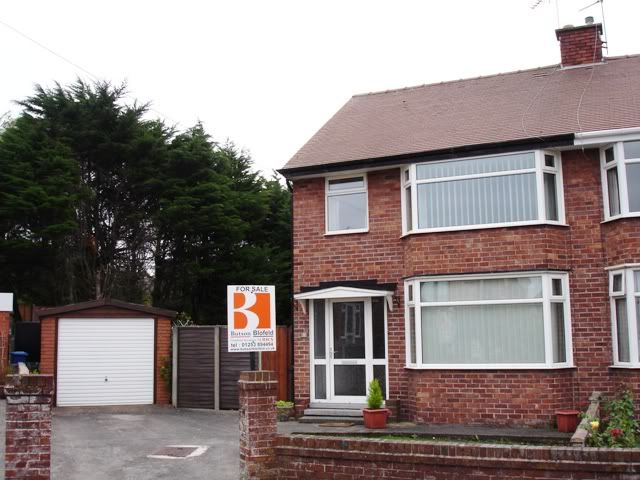
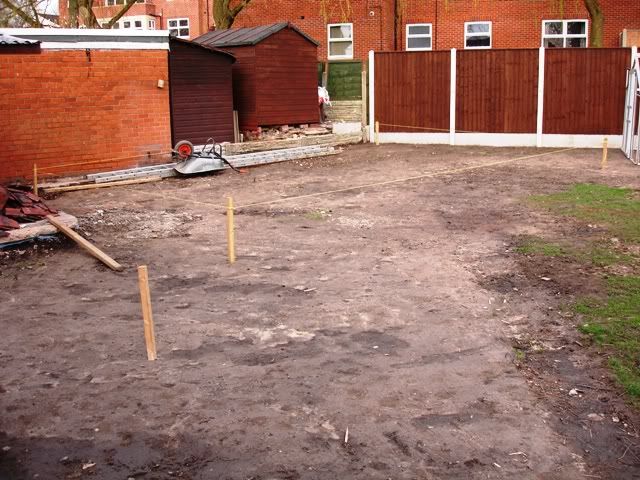
After spending the last 6 months clearing the site, work has finally started on my two car garage / workshop. My wife and I purchased the house last November, but due to work commitments we will not be moving into it in the forseeable future (we currently live 80 miles away from the house!) and this has given us the perfect opportunity to build a decent garage/workshop and extend/renovate the house without having to live on site.

Before I could start on the garage, I had to cut down 27 very large trees, move a greenhouse and break up around 100 sq foot of dense concrete (and shorten the existing concrete sectional garage) before I could clear the site! The existing garage will be going just as soon as the new garage is watertight.

The plan is to build a 18ft x 26ft garage which is basically a long two car garage. I'm going for a cavity wall construction (1ft total wall width) rather than a single block wall to keep the options open in the future regarding the potential use of it. The best bit about it is the fact that it will have a full height room above the garage (9ft useable width, 6ft 7 headroom over at least a third of the width and 26ft long).

The gables are quite substantial with the ridge being at a height of over 16ft above ground level, and I was surprised not to have any issues with gaining planning permission.

There will be a waterproof self coloured render finish over the concrete blocks, with stock brick on the bottom few courses to tie it in with the house a little. I'm also putting in cavity wall insulation to make it a bit easier to heat in the winter, and there will be 3 windows in the side of the garage, 1 in the front over the door, and 2 Velux-type windows in the roof.

Here is the approved plan for the garage:

GaragePlans.jpg


It doesn't show the cavity walls and the roof windows (which aren't a planning issue anyway) as I didn't want it to look as though it might be used for anything other than a garage, which might have made the process more complicated if any questions were asked. I have no intention of using it as anything other than a garage though, as you'd expect!

There have been several changes to this plan, none of which should cause any issues with planning. The side door is now at the rear of the garage, and there are 3 tall/narrow side windows rather than the two shown on the plan.

:)
 
Last edited:
To avoid these ads, REGISTER NOW!
OP
G

Gareth

Well-known member
Joined
May 23, 2007
Messages
151
Location
Lancashire, England, UK
This is the house as we found it last Summer while we were enjoying a week off work back in the area me and my wife grew up in. I'm not sure if it was the alcohol we'd had over lunch that day, but we put in a spur of the moment offer which was accepted! Luckily we don't have to live there while all the alterations are carried out. I reckon it will take 12 - 18 months to make it habitable again....

FrontofHouse.jpg


All those trees were in our garden, all 27 of them and most of them much taller than the house! :wtf:

The site of the new garage, directly behind the existing one:

ExistingGarage.jpg


The first job, started the day after we got the keys was to start chopping down trees. They were all horrible Leylandiis, so no loss to anyone. We've planted quite a few nicer replacements to do our bit for the environment.

At least 5 weekends of solid work, with the help of family and friends, saw the trees gone. The easy part was cutting them down - the hard part was logging them and getting rid of the horrible foliage which wouldn't burn without an incredible amount of smoke.

Clear.jpg


Trees2.jpg


OldFence.jpg


Just when I thought the hard bit was over, I started on trying to dig out the stumps. I spent an entire weekend with the help of my dad and two mates, and we managed to get ONE out! There was no option but to pull down the (admittedly awful) fence and get a JCB in. Best £90 I have spent so far.

JCB1.jpg


JCB2.jpg


JCB3.jpg


:)
 
OP
G

Gareth

Well-known member
Joined
May 23, 2007
Messages
151
Location
Lancashire, England, UK
Me and my Dad then shortened the existing garage by around 6 foot, which was a relatively easy job, and means there is a (relatively) dry and secure area for building materials and equipment.

ShortenedGarage.jpg


Then Easter this year was spent putting up the fence, which I couldn't have done without the help of my Dad, a few mates, and even my wife, my Mum and one of my wife's friends got involved painting the fence panels! Oh, and my 86 year old Grandad was around, acting in more of a 'supervisory' roll. My Dad nearly hit him with a spade at one point. :bounce:

NewFence.jpg
 
OP
G

Gareth

Well-known member
Joined
May 23, 2007
Messages
151
Location
Lancashire, England, UK
I then spent a while marking out both the garage and house extension to check that everything worked 'on the ground' as well as on paper.

MarkedOut.jpg


MarkedOut2.jpg


The height of the garage will restore the privacy to the house/garden taken away by the new apartments, and the gap between the house and the garage is large enough to get a car/trailer through, which was always the aim.

:)
 
OP
G

Gareth

Well-known member
Joined
May 23, 2007
Messages
151
Location
Lancashire, England, UK
I then served what's known in England as a 'Building Notice' on the local authority before the real work commenced. Due to the size of the structure, various stages of the build need to be inspected by the Building Officer, and structural plans confirmed with him. It is possible to submit detailed plans first, but this costs more and is a more rigid process.

As I'm reasonably competent with DIY, I served the notice without any plans and the process assumes to a large degree that you (and your builder) know what you are doing. Obviously, if any work is not done to the satisfaction of the Building Officer it has to be corrected before a completion certificate will be granted. It does give you the freedom to make changes as you go along and I anticipated wanting to make changes as I went along.

Not a fun way to spend the equivalent of $400 US (£270).
 
OP
G

Gareth

Well-known member
Joined
May 23, 2007
Messages
151
Location
Lancashire, England, UK
I took a few days off work to go and get started with the builders.

Considering I woke up on Day 1 at 6.45am to heavy rain, the day turned out to be particularly successfu. :)

I was greeted by this site at 8.00am, just as promised by the builders:

FirstThing.jpg


We then marked out again, to be 100% sure that it was how I want it. That's the main contractor on the left and me on the right:

MarkingOut.jpg


The first earth was then 'broken' which was a particularly satisfying moment, after over 7 months of planning it:

BreakingEarth.jpg


The ground conditions couldn't have been much better, with a good firm base only 8 inches below the top soil, and no sign of any unwanted interference from tree roots which were a potential complication. The trenches were dug to a depth of 2ft at the front, going back to around 3ft at the back due to the slope of the site.

The first trench:

FirstTrenchDug.jpg


Earth piled up very quickly:

EarthPilingUp.jpg


And was disposed of using a 'Grab Wagon' which can hold around 2.5x 8 cubic yard skips. It took 3 full loads to get rid of all the excavated material which due to my naivety was an unexpected expense.

GrabWagon.jpg


The end of Day 1 saw the trenches completely dug, the slab levelled to the correct depth, and all the material taken away. The Building Inspector turned up towards the end of the day and gave us the OK to pour the footings.

ExcavationComplete.jpg


I'm very pleased with that for a day's work! :beer:
 
OP
G

Gareth

Well-known member
Joined
May 23, 2007
Messages
151
Location
Lancashire, England, UK
Looks good! Are the footings being poured tomorrow?

Cheers. :)

I'm a few days behind with the photos, but I've reached floor slab level now. I'm currently back at work, so 100 miles from the build which is frustrating to say the least. Unless I can get some more time off, I'll be limited to weekends and providing instructions to the builders by telephone.

I'll post some more photos as I sort through them, and provide some more details about the garage, the design of which is evolving as it's built!
 
Last edited:
OP
G

Gareth

Well-known member
Joined
May 23, 2007
Messages
151
Location
Lancashire, England, UK
Day 2 saw the footings poured first thing in the morning, and then everything had to grind to a halt while the concrete set. I used 7 1/2 cubic yards of C20 concrete for the footings, giving a minimum 14 inch depth for the footings which is way more than the minimum requirements specified by the Building Inspector. The lay of the land makes the footings look off level, but they are dead straight and its the floor area needs further excavating and levelling, especially in the right rear corner. The land drops and rises in all directions which has made things slightly harder than usual, especially with regard to the slab height and DPC (damp proof course).

MixerArrives.jpg


FootingsPoured.jpg


By late afternoon the concrete had set hard enough to walk on, and then the blocks arrived. The unhelpful delivery driver refused to lift them into the driveway using his crane as apparently he is not allowed to do so, as he would have to pull into the drive partially. So he dumped 7 packs of dense concrete blocks (over 500 blocks weighing 42lb each) on the road outside, and me and my wife had an hour and a half to move them all before the next delivery arrived. The hot weather (for England!) made it a horrible job to do, but we got it done, and then enjoyed a few beers in the sun. :thumbup:
 
OP
G

Gareth

Well-known member
Joined
May 23, 2007
Messages
151
Location
Lancashire, England, UK
did you put rebar in there?

No - a borehole indicated it wouldn't be necessary due to the excellent ground conditions, which was confirmed when the footings were excavated. The Structural Engineer and the Building Officer both agreed it was not necessary. The ground was rock solid so I'm not at all worried.

Great stuff Gareth.

Will be watching this build.

Thanks - I've been watching your thread with interest. :)

Great start!

Subscribed:thumbup:

I think progress may slow down a little, especially with the weather today, but I'm fortunate in that I'm not really in any rush. I have a single car garage where I live now, and also have the benefit of a 3 car (plus work area) unit which I rent only a short walk from my house. I'd rather get it done properly, and exactly how I want it rather than rush anything. Plus slowing it down helps with paying all the invoices I seem to be getting!
 
OP
G

Gareth

Well-known member
Joined
May 23, 2007
Messages
151
Location
Lancashire, England, UK
The builders arrived nice and early on Day 3 to get started, and soon had a course laid out all the way round to get the final size. I put in the trunking for the water and electric/cat5/telephone wires ready for casting into the slab. You can see the trunking in the front right corner and the rear right corner. The water will go in at the back, and the electric, etc will go in at the front.

FirstBrick.jpg


OuterCourse.jpg


13 tonnes of recycled ******** arrived first thing in the morning, ready for the slab base. The builders worked very hard in the hot weather and got to slab height on the inner course and things are looking very good now. The stock bricks are rested on just to work out how many will fit to a row.

SlabHeight.jpg


And that's how it looked at the end of Day 4. I've had the specs through from the structural engineer now for the roof (attic) trusses, and the final work needed from the structural engineer is in relation to the beam for across the top of the double door opening. I've decided to go for a manufactured UB and plate design rather than a purpose made lintel costing over twice as much, and not being as strong.

:)
 
Last edited:
To avoid these ads, REGISTER NOW!
OP
G

Gareth

Well-known member
Joined
May 23, 2007
Messages
151
Location
Lancashire, England, UK
Looks great so far! How many courses of the red brick are you planning?

6 courses above slab level and 2 beneath, with a self coloured waterproof render above. Only 3 or 4 courses may show in the end - I am undecided on this point and still looking for inspiration!
 
OP
G

Gareth

Well-known member
Joined
May 23, 2007
Messages
151
Location
Lancashire, England, UK
Day 5 saw the rest of the ******** moved onto the excavated slab, levelled and compacted.

HardcoreDown.jpg


Then 3 tonnes of sand blinding went down, before everything was compacted again.

SandBlinding1.jpg


SandBlinding2.jpg


On day 6 the main contractor was ill, but the brickie worked on the back wall and one side of the courtesy door. I'm very pleased with the standard of the brickwork, especially when the brickie himself admits that he is not as good as the main contractor at laying stock bricks.

Backwallgoingup.jpg


DoorOpening.jpg


:)
 
OP
G

Gareth

Well-known member
Joined
May 23, 2007
Messages
151
Location
Lancashire, England, UK
Day 7 started with them filling the cavity to just below slab height with drymix concrete. The builders didn't think it was necessary, but I asked them to do it as the relatively low cost of 1.5 cubic yards of drymix was the additional peace of mind to me.

CavitiesFilled.jpg


The builders then started to cast in the slab. A damp proof membrane was laid on the sand, and A252 mesh laid over that, around 1/3 way from the bottom of the slab.

10 cubic yards of a fairly 'sloppy' C20 concrete mix arrived in two loads, and had to be barrowed into place which must have been a tiring job!

DPConslab.jpg


SlabCast1.jpg


SlabCast2.jpg


SlabCast3.jpg


SlabCast4.jpg


The floor was then 'bull floated' to give the best possible finish.

Powerfloat1.jpg


Powerfloat2.jpg


And that's as far as they had got when I travelled over for the weekend - I was relying on my Dad to take the photos for me while I was back at work 100 miles away, which has been really frustrating! I was really pleased, and the slab has dried giving a very smooth finish which should be just right for the epoxy floor I'm planning.

I got a little work done myself, mainly finalising the dimensions/design for the roof trusses, and making the final decision regarding the window type, size and positions. I also filled in the outer trenches with ********, and compacted it down before levelling off with earth. Looking much tidier now.

Backlevelled.jpg


:)
 
Last edited:
OP
G

Gareth

Well-known member
Joined
May 23, 2007
Messages
151
Location
Lancashire, England, UK
Think I would have made the back wall parallel with the fence.. :)

The garden is a very strange shape! It's parallel to the driveway, which was far more important to me than the back fence. Plus, it means I can fit a log store behind it. :)

The plan on the first page might make it clearer, if it's clear enough to see the location plan on the bottom right hand side.
 
OP
G

Gareth

Well-known member
Joined
May 23, 2007
Messages
151
Location
Lancashire, England, UK
On day 8 the LHS wall went up, leaving the inner course at that height to allow the retraint straps to be attached. I'm doing something relatively unusual in that my design is to have the roof trusses sitting on the outer course, where as over here it is much more usual to have them resting on the inner course. I've done this to maximise the headroom in the room(s) above the garage, while still allowing enough clearance for the sectional main door to open into.

LHWallgoingup.jpg


Parallel.jpg


The picture above shows what I was attempting to explain in my reply to ZRX61 above. The boundary line runs in between my garage and the neighbours garage, about 8 inches out from his garage, which allows me the overhang for the gutters, etc. without encroaching onto his land.

Morelikeaboxnow.jpg


On day 9, the builders formed the posts for the front opening. I asked them to build the post out of solid block for additional strength, rather than leave a cavity. I'm not worried about any thermal transfer issues or damp, as the insulated door will sit behind the opening, and a waterproof render will be used anyway.

LHPost.jpg


I asked them to leave all the uncut edges of the blocks on the inside, as the render on the outside will cover the rough block edges.

They also built the RHS wall to sill height and I had to make a 200 mile round trip in the evening to confirm the window positions and size, mainly as I had changed my mind since the original plans were prepared.

RHWallgoingup.jpg


:)
 

Buzz Lightyear

Well-known member
Joined
Jun 18, 2010
Messages
260
Location
Wiltshire, UK
Where in Lancashire are you? :thumbup:

Cryptic answer - All over. :D

I live in Rossendale but I work for an NHS trust based in Preston and cover pretty much the whole of Lancashire.

Whereabouts are you?

Looking good by the way. My current house only has a single garage but my wife says that the next one will either be a double garage or have room to build one. YAY!!!!!!
 
OP
G

Gareth

Well-known member
Joined
May 23, 2007
Messages
151
Location
Lancashire, England, UK
After I had marked the windows out, day 9 saw the window openings marked out, and the RHS post formed.

Windowssetout.jpg


The unusually hot weather over here is slowing work down as we're not used to it! Luckily I'm not paying the builders on a daily basis. :D

Day 10 saw the wall plate height reached, and the wall plate set on the LHS boundary. I have to say how impressed I am with the accuracy of the builders. No dimension is more than 1/4 inch out, and most are within 1/8 inch. They didn't strap them down as I said I would do that once I had worked out the truss positions.

WallPlate1.jpg


WallPlate2.jpg


Day 11 saw the wall plate in place on the RHS wall.

WallPlate3.jpg


:)
 
Last edited:
OP
G

Gareth

Well-known member
Joined
May 23, 2007
Messages
151
Location
Lancashire, England, UK
I was then on site over the weekend, and did a few little jobs. The beam I was originally going to use over the door was a 'Catnic' type beam, with a price approaching £1000 inc tax ($1500). I couldn't face paying this, so I spoke to a structural engineer and came up with the specification for a more 'agricultural' (and cheaper) beam. It's also stronger and easier to install. And the best part was that a family friend made it for me for £225 ($330) including delivery!

Galvanising would have been almost the same again, but worse than that was a 10 day delay. I instead opted to mechanically clean the beam (grinder and knotwheel) before washing it down and giving it two coats of Rust-Oleum Cold Galvanizing Compound 1085 which I'm hoping will be sufficient.

I'm very impressed with the quality of the beam, but it's incredibly heavy!

Beam2.jpg


Beam3.jpg


Beam3.jpg


I also had my dog (and his brother who is my parent's dog) round with me, getting in the way most of the time!

Dogs2.jpg


But I can't bring myself to shut him inside when he's so happy outside with me.

Dog1.jpg


:)
 
OP
G

Gareth

Well-known member
Joined
May 23, 2007
Messages
151
Location
Lancashire, England, UK
My Dad (and my wife's Dad) came round and gave me a hand to lift the beam into place, which wasn't as awkward as I was expecting. I had got some slate sheets ready to level the beam with, but it was bang on level which was good to see.

Beamon.jpg


I made sure the dog was in a safe place while we were lifting the beam..... :lol2:

Dog2.jpg


I then fastened the restraint straps to the wall plates, at much closer intervals than the minimum specified by our Building Regulations.

Straps.jpg


And here is how it's looking right now. To say I'm pleased is an understatement! :)

Lookinggood.jpg


The next job is to get the inner courses to wall plate height ready for the trusses which should be arriving on Thursday. I threw up a scaffold tower ready for them to do the blockwork on the gables, so it should be looking like a proper building this time next week. I'm just in the process of deciding whether to do the roof myself to save money or get a roofer in to save time!
 
OP
G

Gareth

Well-known member
Joined
May 23, 2007
Messages
151
Location
Lancashire, England, UK
Cryptic answer - All over. :D

I live in Rossendale but I work for an NHS trust based in Preston and cover pretty much the whole of Lancashire.

Whereabouts are you?

Looking good by the way. My current house only has a single garage but my wife says that the next one will either be a double garage or have room to build one. YAY!!!!!!

The house is right in the centre of Poulton-le-Fylde, near Blackpool. I'm currently looking for jobs in the area, ideally in Preston, despite the football team! Where I live now has a single garage which I've managed with for the last 6 years. I can hardly imagine what it will be like to have so much space!
 

51rider

Well-known member
Joined
Dec 21, 2009
Messages
502
Location
London, England.
Good to see a UK presence on here

There are a few of us:thumbup:

Looking good. That's nice brick & block work too. I like the lintel solution. I 'm looking to use a glulam beam myself as in all probability, I'll be building a timber frame structure.

Are you able to post a better link to the plans, I can't see much from those on the post.
Where are you stairs going?

I think you said you were going to Epoxy the floor, if so, which product do you intend using? I've been doing some 'net searching on the subject in prep for my build.
 
To avoid these ads, REGISTER NOW!
Top Bottom