To avoid these ads, REGISTER NOW!

Garage build - Modern, Shed Roof, Rain Screen Siding

platinum overcast

Well-known member
Joined
Aug 4, 2010
Messages
71
It's time for everybody's favorite; the build thread. First of all I want to thank the community here in the GJ forums. I've lurked for a while now and have picked up a ton of inspiration. Hopefully I can give a little back and pick up some more advice along the way.
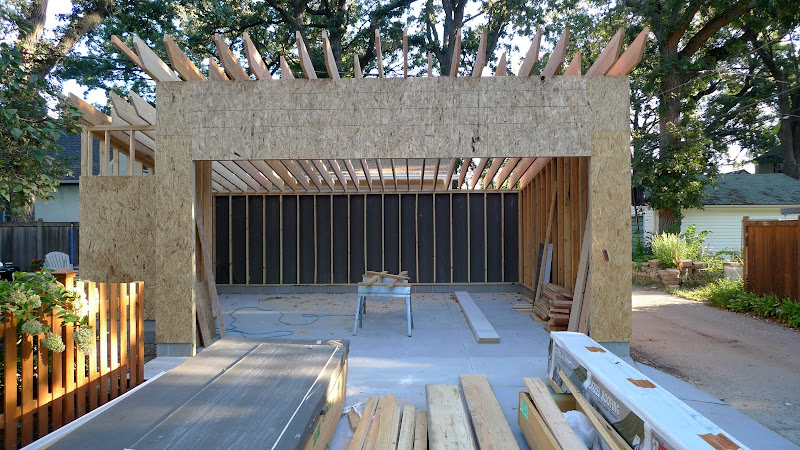
The basics:
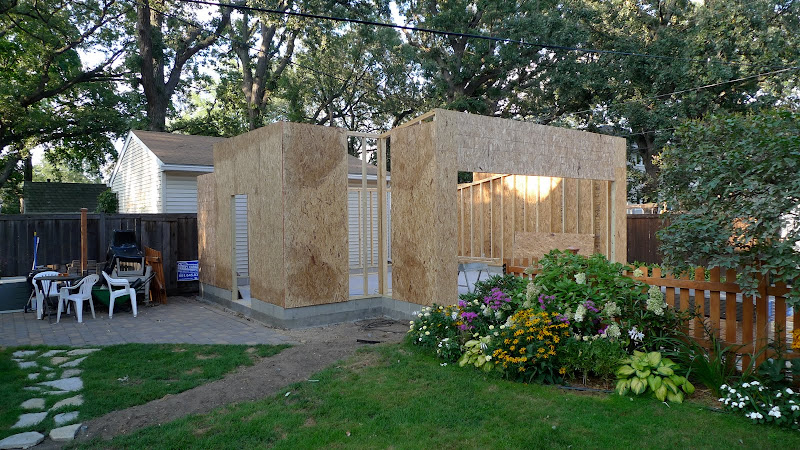
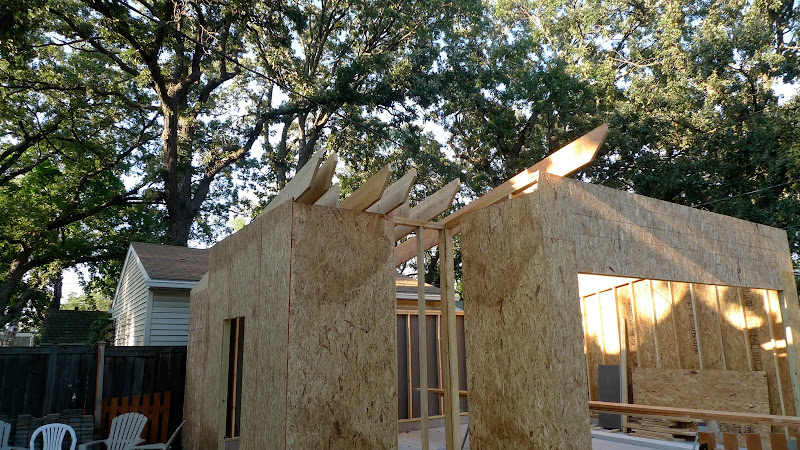
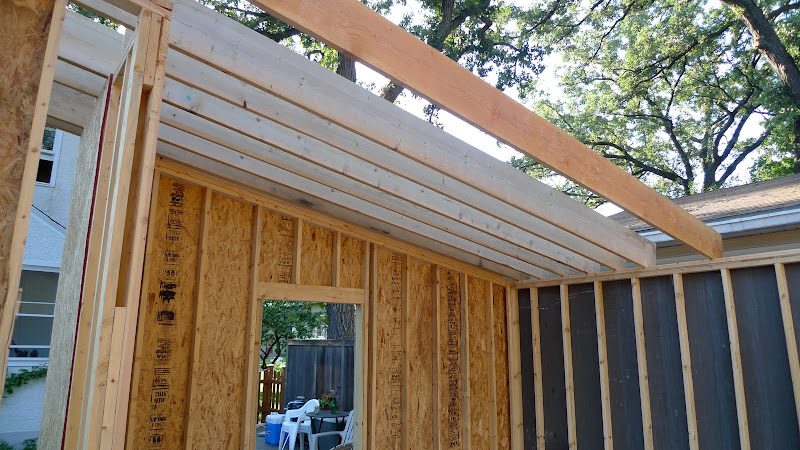
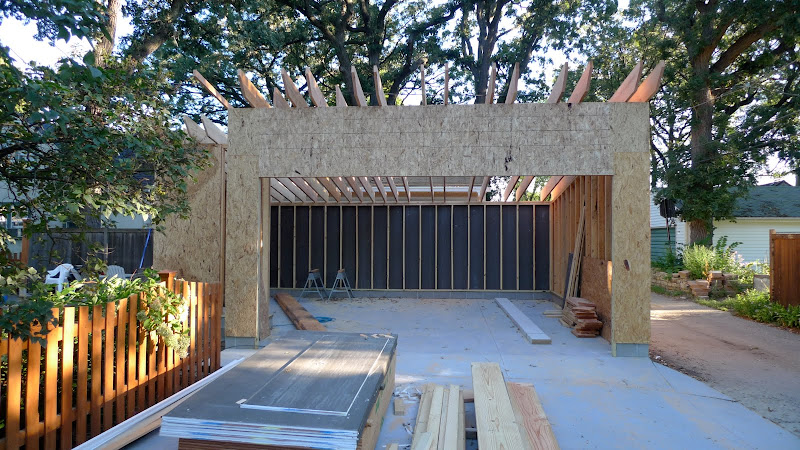
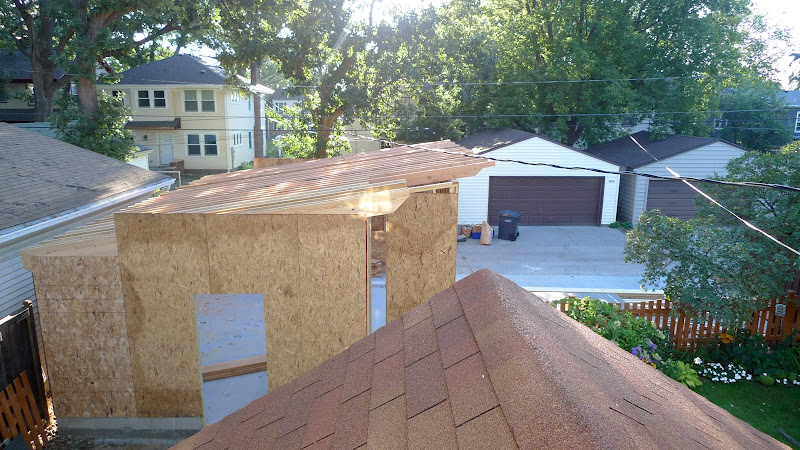
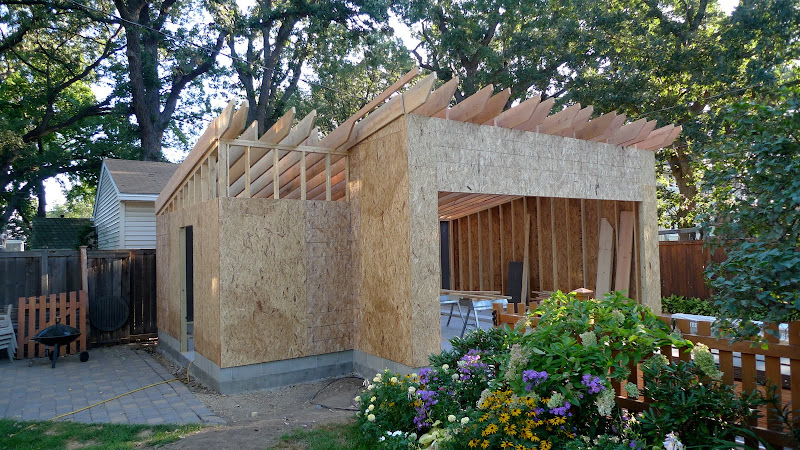
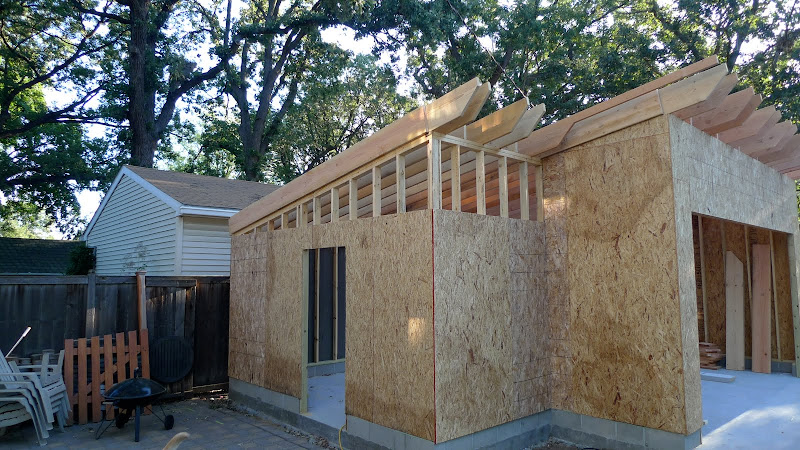
Shed roof, standing seam steel - 2/12 pitch.
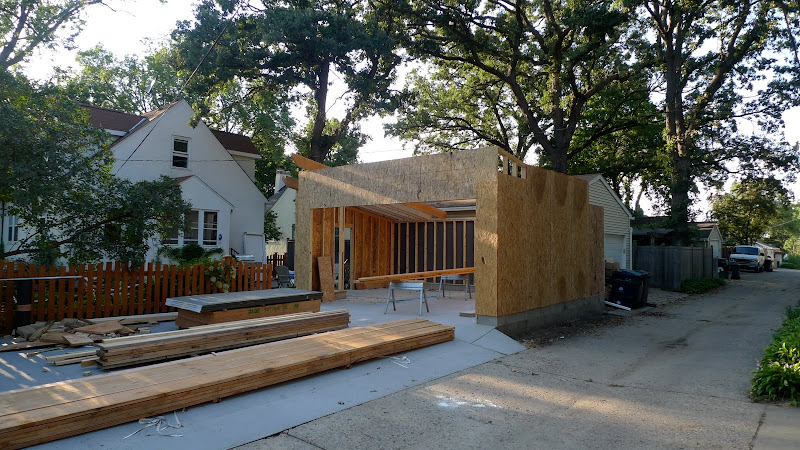
Roughly 20x20 - with a bit extra.
Rain screen style siding - Minerit fiber cement panels siding for most of it. Ipe on the yard side.
Partial clear story. Using the standard Polygal, 10mm thickness, clear.
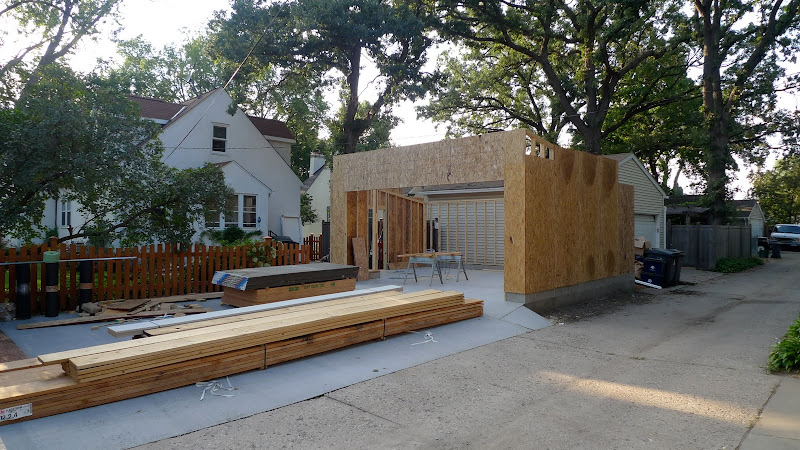
16x8 Raynor Centura door.
Liftmaster 3800 opener.

I'll probably add more as decisions are made.

We're having a contractor do part of the build (concrete, framing, electrical) and doing the rest ourselves (roof, siding, OHD, interior). It's a tough to figure out where to make the split between having it done and doing it ourselves. This seemed like a reasonable plan to save a little on the cost, get the visible details just how we want them, and learn in the process.

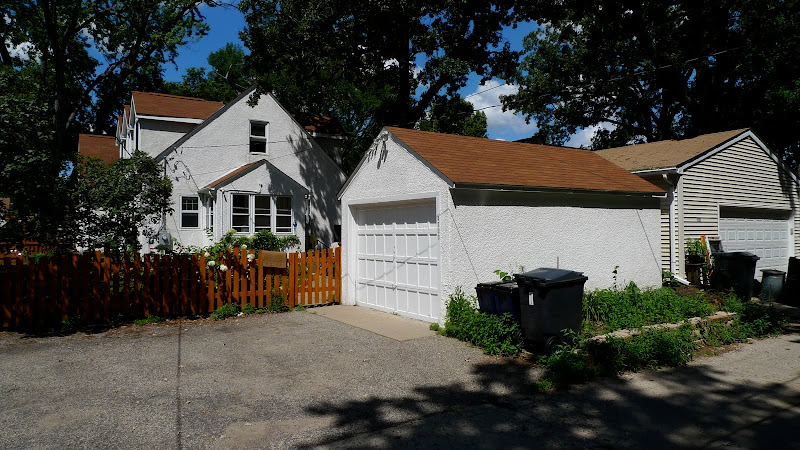
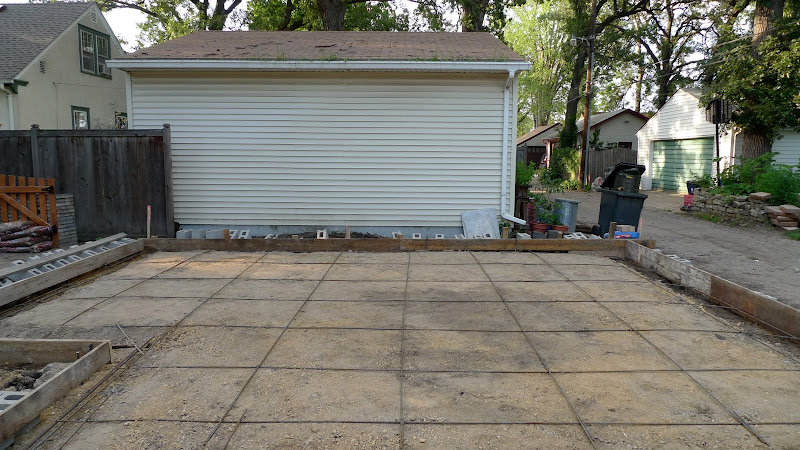
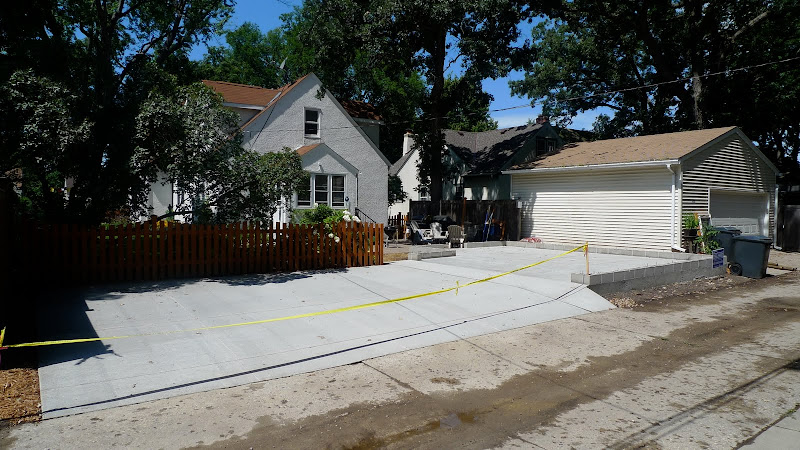
First a couple pictures of the old garage. It's a single car 12x20. We think it was built in the early 50s, house is 1929. At some point they cut some studs at the back wall to fit a 70's land yacht. It sat about 7-8' off the alley property line so we were able to add space for two car without eating up much of the yard. We decided to take a little extra as you'll see further on.

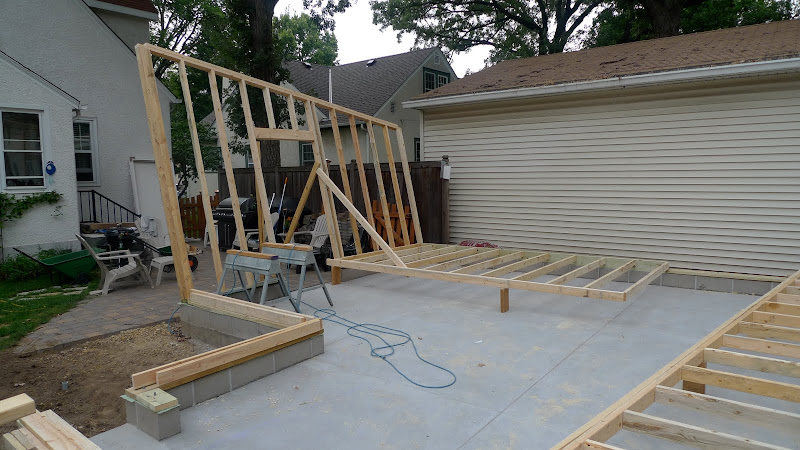
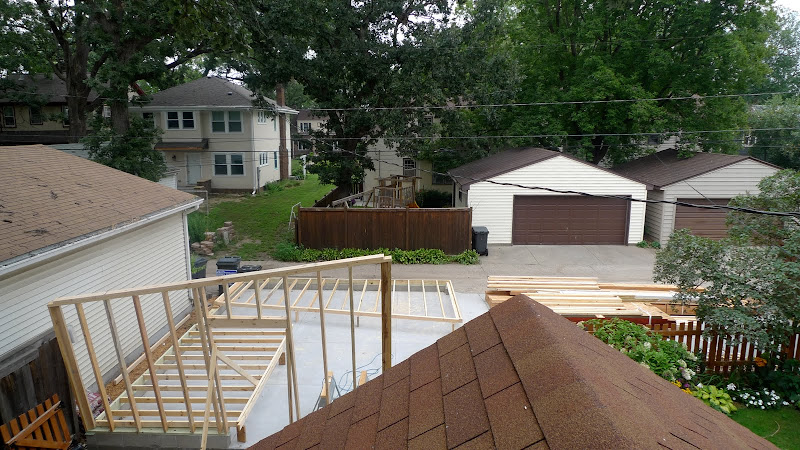
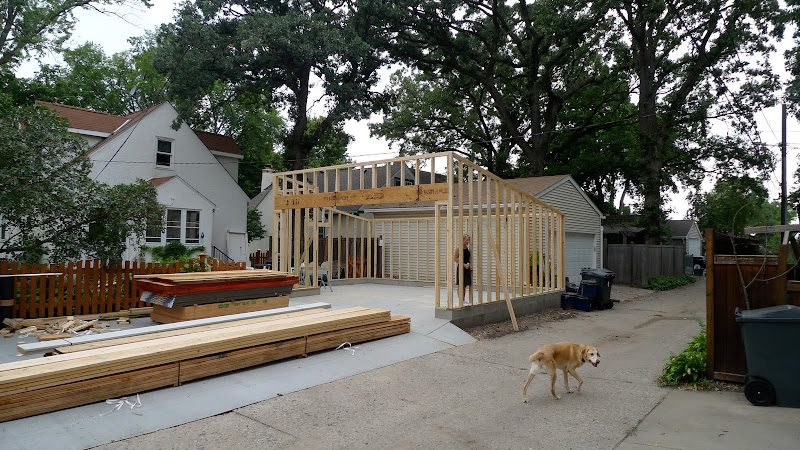
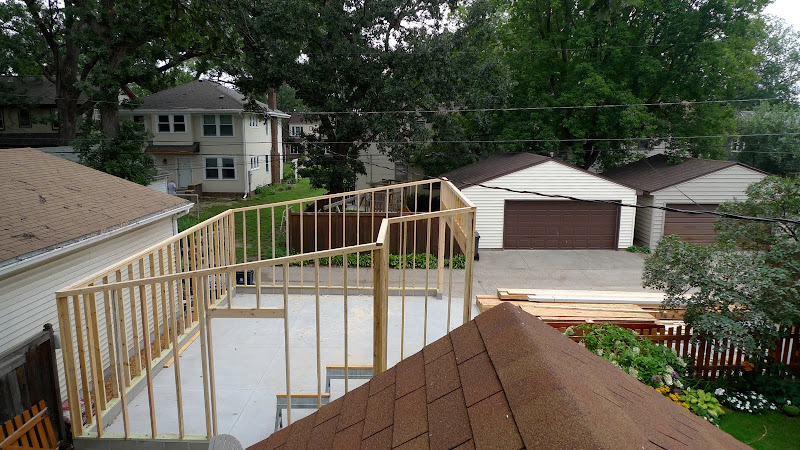
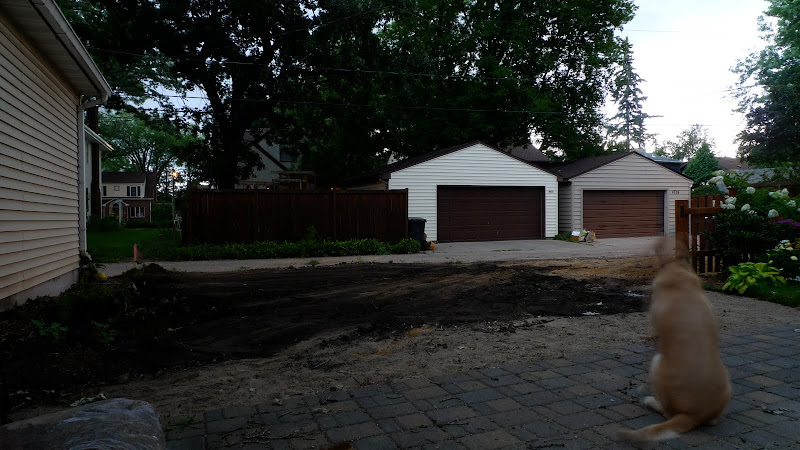
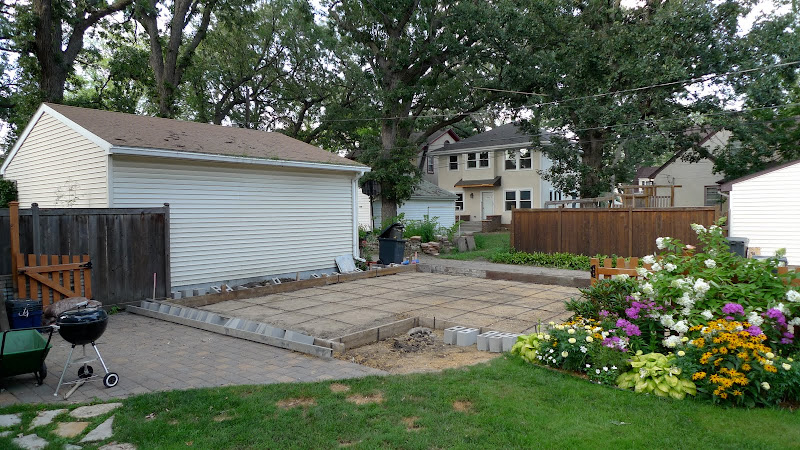
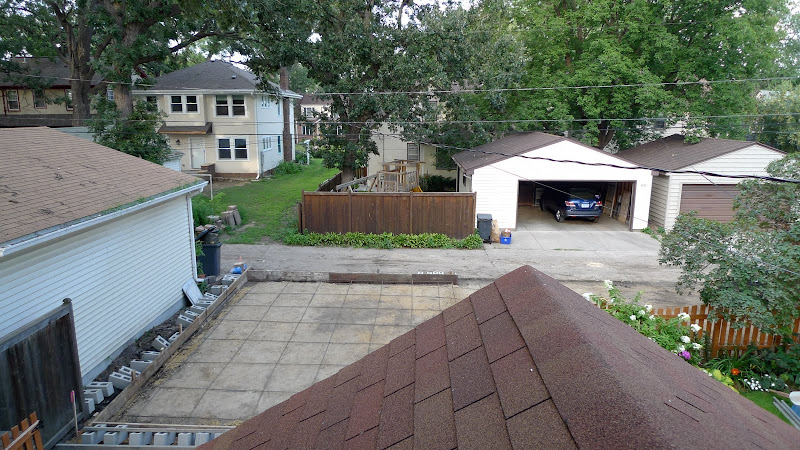
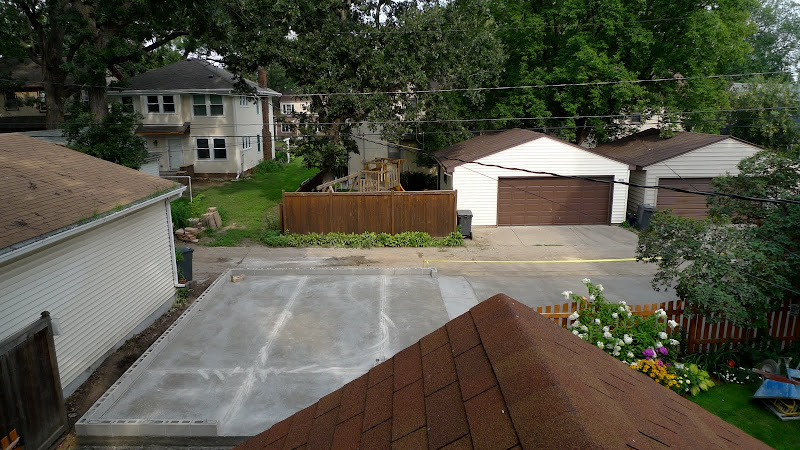
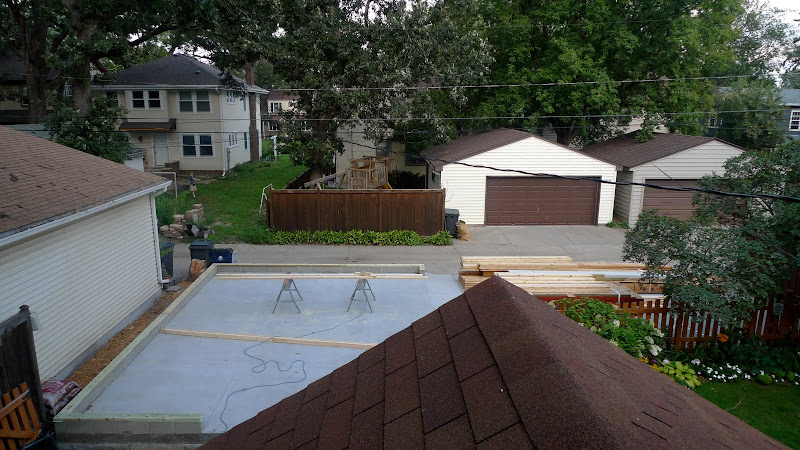
From the upstairs window. We've transplanted the small garden at the edge of the patio, hence the mud pit. It's not the best view, but makes for a nice consistent reference as the build progresses.
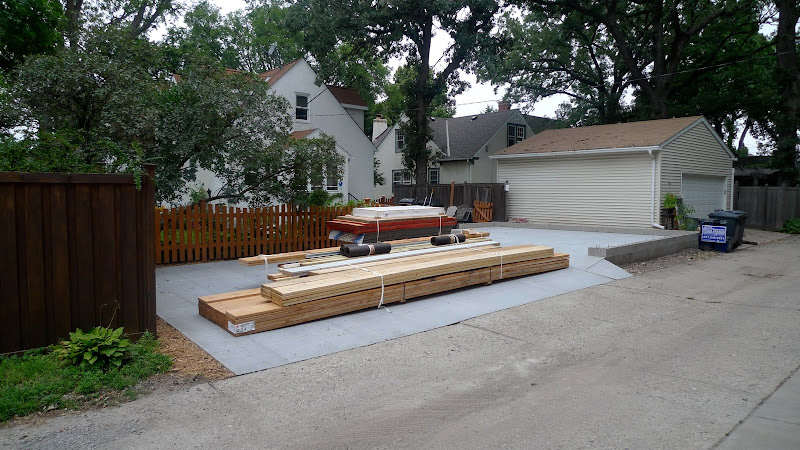
P1000907.JPG


From the alley.

P1000927.JPG
 
Last edited:
To avoid these ads, REGISTER NOW!
OP
P

platinum overcast

Well-known member
Joined
Aug 4, 2010
Messages
71
The house.

A couple of the house itself from last fall. I had to get a picture of the freshly mown lawn.

P1000531.jpg

The previous owners put in the crazy dormers. Four on one side, three down the other. It's over the top on the outside, but makes the interior really interesting.

P1000532.jpg
 
OP
P

platinum overcast

Well-known member
Joined
Aug 4, 2010
Messages
71
Masonry

On to the masonry. It's a monolithic slab, 4 inches thick. 4000 psi, rebar at 36" OC. One course of block. Hand troweled in the garage, broom finish on the driveway. Driveway is 4 inches also. Saw cut expansion joints. Pretty happy with how it turned out so far, but time will tell. We had great weather for the pour and the following days. I tried to keep it well watered to the point of ridicule from friends and neighbors.


Formwork from the yard:
P1000939.JPG


Formwork from the driveway:
P1000945.JPG


Formwork from the upstairs window again:
P1000946.JPG


Poured:
P1000955.JPG


From the window:
P1000954.JPG
 

ChristopherLutz

Well-known member
Joined
Jun 17, 2010
Messages
270
Location
Flower Mound, TX (DFW)
You have a beautiful home - oozing with character, thanks for the pics.

I'm a fan of the laser like line in the yards you have between houses: "mine has no leaves on the lawn - yours = leaf city" :)

It's very cool you'll be able to add the space for the 2 car - what an upgrade for you personally and I'm sure it will add equity should you ever sell.

Where are you located (roughly - not specific)- area is gorgeous.
 
OP
P

platinum overcast

Well-known member
Joined
Aug 4, 2010
Messages
71
That is a gorgeous house!!
I'll be watching the thread for updates on the new garage.

Thanks Al. Nice job on your build, and the truck is pretty neat too.

is this your first garage on this property? im sorry its hard to tell what lot is what.

Yeah, it'll be our one and only garage. It's butted up as close to the property line as code allows - 12 inches to the adjacent lot, and 12 inches to the alley right of way. In the alley that's more like 18 inches off the concrete.

You have a beautiful home - oozing with character, thanks for the pics.

I'm a fan of the laser like line in the yards you have between houses: "mine has no leaves on the lawn - yours = leaf city" :)

It's very cool you'll be able to add the space for the 2 car - what an upgrade for you personally and I'm sure it will add equity should you ever sell.

Where are you located (roughly - not specific)- area is gorgeous.

Thanks for the kind words. We're in Minneapolis.
 
OP
P

platinum overcast

Well-known member
Joined
Aug 4, 2010
Messages
71
Framing - Day 1

Material was delivered on August 17th, two and half weeks after the slab was poured. We're not in much of a hurry as the fiber cement siding panels won't be available until the end of Sept at the earliest.

P1000963.JPG


Framing, day one. Not much to see. Treated 2x6 sill plates fitted to the J-bolts all around. Our carpenter works alone so the pace is a little slower. We'll trade schedule for quality anytime.

P1000965.JPG
 

floridaguy

Well-known member
Joined
Oct 16, 2008
Messages
142
Location
In the garage
I like where this build thread is going:thumbup:.

When i first looked at this picture I thought you had four garages
P1000907.JPG


It is sort of cool having what looks to be an ally way for just garage entrance, also all of the garages across the ally way seem to look similair.
 

20V'er

Well-known member
Joined
Jan 2, 2006
Messages
150
Location
Minneapolis, MN
Thanks for the kind words. We're in Minneapolis.

Haha, I looked at the first pictures and thought wow this looks just like south Minneapolis.

My last house was 46th and Portland, moved outside the loop for a bigger lot a few years back, but I sure miss things like walking to Pepitos or watching the marathon. Maybe someday I'll move back to the area but try and find something on the west side of 35.
 
OP
P

platinum overcast

Well-known member
Joined
Aug 4, 2010
Messages
71
Framing - Day 2 and 3

Framing, Days 2 and 3.

Walls starting to come together. A little over 8 ft interior wall height in the back, sloping up to something like 11.5 feet at the OHD.
P1000968.JPG


From the window.
P1000971.JPG


Framing Day 3. Now we're getting somewhere.
P1000973.JPG


Balloon framing on the walls. There was some discussion about potentially using studs the same height as the back and then adding wedge shaped pony walls above. Not sure why they decided to do it this way, but it does look pretty cool. The header is a double 1-3/4 x 14 LVL.
P1000974.JPG


P1000978.JPG


P1000982.JPG
 

tatra

Well-known member
Joined
Dec 2, 2007
Messages
4,785
Location
pirate contest city
could've sworn it was my city, winnipeg...........lot's of houses look similar to yours around certain parts of round here..........
 
OP
P

platinum overcast

Well-known member
Joined
Aug 4, 2010
Messages
71
Framing - Day 4

Wall sheathing started. 7/16 OSB. Thought about plywood, but the price delta was significant. Amazing how much the price of this stuff fluctuates. The back wall will be 5/8 gyp on both the interior and exterior - Firewall needed if less than a certain distance from the neighbors garage.

P1000986.JPG


P1000984.JPG
 

rustylocke

Well-known member
Joined
Jul 24, 2006
Messages
56
Location
Dublin,TX
Dig the house fella. My wife says she loves it, as she walks by the computer. She wants to see the inside if you can. No pressure, from me, but her, that's another story. I'll be subscribing.
 
OP
P

platinum overcast

Well-known member
Joined
Aug 4, 2010
Messages
71
platinum overcast,

Is there a reason why you went with the roof line design? What will the roof be?

The roofline was more of an aesthetic decision than anything else, but brings a whole set of compromises and benefits with it. We were sure that we wanted to keep the orientation facing the South, and at the same side of our lot. We'll include a couple clearstory elements, so hopefully the rake helps with the natural light. To keep the pitch relatively low (2/12) we're driven to a standing seam steel roof, instead of asphalt shingles. The single pitch shed style hopefully makes the steel roofing easy enough for us to install ourselves. No complicated flashing, eaves, valleys, etc.

Dig the house fella. My wife says she loves it, as she walks by the computer. She wants to see the inside if you can. No pressure, from me, but her, that's another story. I'll be subscribing.

No worries. I'll see if I can find some good ones of the interior. I have some from the previous owners sale listing, but I'd rather show it with more of our style. I'll keep digging.
 
To avoid these ads, REGISTER NOW!
OP
P

platinum overcast

Well-known member
Joined
Aug 4, 2010
Messages
71
Framing - Day 5

Rafters starting to go up. 2x12s, 12" OC. The spacing seems like overkill, but I'm not a structural engineer. It should look pretty cool once they are all in place. The tails overhang two feet at the front edge. We're holding back every third one to flush with the framing. We'll likely do some sort of clearstory blocking, but we haven't worked out all those details just yet.

The 24 length 2x12s are all Doug Fir, the shorter ones in the yard side bump out are Hem-Fir. Slight color difference but I sort of like it.

P1000990.JPG


P1000988.JPG


P1000989.JPG
 

Motown 454

Well-known member
Joined
Sep 25, 2008
Messages
1,359
Nice garage, I like the way the house looks with the doormers. The extra room in the garage will be great. Keep the pictures coming.
 

lupinsea

Well-known member
Joined
Mar 30, 2010
Messages
261
Cool beans, man.

I love the simplicity and modern form of the shed roofs. The build I'm doing right now has a similar approach with a simple shed roofed structure.

Shed Project: New Construction Build Thread


Good move on hiring out the concrete. Sort of wish I had the budget to do that. The footing and foundation walls were easy enough but finishing a large flat slab area was trickier than I thought. Having a pro do it is wise.

If you don't mind, I have some info Requests?

Top Plates?
Can you snap some pictures of the top plates that run perpendicular to the wall studs? I'm curious how your builder framed that up. With my little shed I simply took the 2x4's and tilted them on edge without cutting anything flush with the framing. I was debating between this and taking 2x6's and ripping them with a bevel on two sides so everything would flush out with the face of the studs. In the end I figured it didn't matter provided an edge of the 2x4's was flush with the stud face to provide adequate support for the sheathing. Part of the reason for doing this was so that I didn't need to bother cutting out bird's mouths for the rafters to sit on the top plate. Speaking of which . . .

Rafter Attachment?
How are you attaching the rafters? Just toe nailing from each side or are you using some metal clips? On my small shed building (6'x12') I just toe nailed. Between that and the blocking on the ends I figured it's very sturdy but on my big shed building I'm thinking of using some metal clips.

Blocking and Eaves?
Out of curiosity, have you figured out how you're doing the blocking yet? I like the idea of cutting every other (or third?) rafter flush with the wall face so that the eaves don't look cluttered with rafter tails, especially on a 12" o.c. spacing.

Because of the now, what, 36" o.c. spacing for the rafter eaves what do you plan on using for the eave soffit material? If you put a thicker material that can span the 36" distance how do you plan on flushing it out with the roof sheathing over the interior area? Or do you plan on using the same material across the entire roof area? In our office we'll often do a 2x car decking for the eaves (1 1/2" thick, but the rafter tails are sometimes a pair of 2x6's nailed to eaither side of the main rafter (cut flush with the wall). This lets us set the 2x6's down ~1" from the top of the 2x12 rafters so that the top of the car decking flushes out with the top of the roof sheathing.

For my shed I did a 24" o.c. rafter spacing and then used two layers of 1/2" plywood. Mostly the two layers were to keep nails from the roofing from poking through for a cleaner look. But I'm not sue I'd want to span any more than 24" with this system.

Rain Screen System?
How are you doing your rain screen system? Is it going to be an open gap panelized system over furring strips? Or a lapped siding over furring strips? And if it's going to be gapped, what's the plan for the weather resistive barrier.

This is an area I'm struggling with on my shed. The current plan is to use a double layer of Fortifiber's 60 minute Type D building paper. But I'm still a bit concerned with any weathering despite 98% coverage with the gaped fiber cement panels. There's an uber fancy, black poly weather resistive barrier available locally but it's insanely expensive.

BTW, very nice with the Ipe wood. That's some gorgeous stuff.

Anyways, I'll definitely be subscribing to see how your project comes along. Looking great so far.
 
OP
P

platinum overcast

Well-known member
Joined
Aug 4, 2010
Messages
71
Hi Lupinsea. I've been following your build thread too, it's very impressive. Your attention to detail goes far beyond what we're doing here. If we were doing the work ourselves so far we might be sweating the fine details in a similar manner, but since it's slightly out of our hands it's a lot less stressful. I could see myself at the lumber yard sorting through a huge pile of lumber to find only the best of a given grade, but I'm trying to choose my battles on this one. There will be plenty of details to sweat as we do our part. As a poster in your thread said, you're really applying a more furniture level of finish to what is typically purely functional. It's beautiful.

Let's see if I can answer some of your questions. I'll try to snap some photos in the morning to clarify if needed.

Top Plates
These are all standard, in a horizontal plane. No chamfers. The angled plane of the top surface of the side rake walls intersects the front edge of the plate on the back wall. The studs along the rake are chamfered to match the slope however.

Rafters
Birdsmouths at front and back, sitting on the level plates. Toenailed for now, but there's a box of Simpson Strongties kicking around the site. I suppose those will go on at some point.

Blocking
The held back rafters actually give us an alternating 12" and 24" spacing for blocking. The roof will be sheathed with 3/4 ply. I'm pretty comfortable with spanning the 24" with the 3/4 ply.
For the blocking itself, we are thinking about doing Polygal for some or all of the sections across the front. It probably won't provide a whole lot of light, but hopefully gives a nice glowing effect at night with the lights on. Not sure how we'll detail that just yet.

Rain Screen
Ahh, the rain screen. It's a mysterious beast isn't it? All of the typical garage specialist contractors we talked to were befuddled. I'm sure we could find a few that do it around here, but not on garage budget. Not even on a more unique garage budget.

So we're doing it ourselves. We're using Minerit HD, 5/16 thick. 4x8 panels, mounted on 1x2 and 1x4 furring, with the EPDM strips. Open 3/8 gaps all around. We're going with dead simple 15# felt. We too thought about the Vaproshield, but the price was staggering. If worse comes to worse someday, at least it would be easy to pull the panels and replace right? :)

The Ipe will mount the same way. It is beautiful stuff.
 

lupinsea

Well-known member
Joined
Mar 30, 2010
Messages
261
Thanks for the replies and answers.

And you're right, the gapped rainscreen systems definitely befuddle most of the contractors I've talked to to say nothing of the guys at the lumber yards.

I check on the Vaproshield. It's sounds like a great product but holy **** is it expensive. IIRC, an 800 sf roll was something like $480. Two 400 sf rolls of 15# felt are ~$22ea around here or $44 for the same coverage. So the Vaproshield is 9 times more expensive than the felt.

As to the felt vs. other options.

I'm 98.5% sure I'm going to be using the Fortifiber Super Jumbo Tex 60 minute building paper and double layering it instead of the 15# felt. Based on the research I've done:

  • The Super Jumbo Tex is made out of virgin fibers pressed much smoother than the 15# felt.
  • The felt is more, um, spongey and can absorb water easier.
  • The 15# felt is good on roofs which is what it was designed for. But is not great on walls though it certainly works well and has been used that way for ages to good effect. The issue being that it can tear a bit more easily on the nails, IIRC. Vs. the Super Jumbo Tex which was specifically made for walls (like most building papers).
  • And I think the Super Jumbo Tex a bit more pliable and less likely to crack when wrapped around corners.

One of the projects in our office I"ve been working on has used the 60 minute building paper, specifically the Fortifiber stuff and it's walls have been exposed for a good long time before the siding went up and the stone was installed. It seemed to hold up well.

As for the cost, it's pretty comparable to 15# felt:

400 sf roll of felt = ~$22 locally
240 sf roll of Super Jumbo Tex = $13.50 (or $27 for 440 sf and two rolls)

There is also something called WeatherTex and HydroTex made by the same company. They are a two-ply hybrid house wrap. The inside layer is the polymeric house wrap and the outer layer the Super Jumbo Tex 60 minute paper. But according to the company's own data it looks like a double layer of the regular Super Jumbo Tex provides about the same water hold out as the Weather Tex. Not sure what the Weather Tex runs.

http://www.fortifiber.com/ask.html

I'll be ripping down 5/4 x 6 cedar deck board to 1/2" thickness and using those for my furring strips.
 

lupinsea

Well-known member
Joined
Mar 30, 2010
Messages
261
Forgot to ask . . .

Are you nailing or screwing your siding onto the furring strips?

And if screwing (I'd assume exposed pan head screws or something similar), are you pre-painting the panels before installation or painting afterwards (and painting right over the screws)?

I was figuring on just nailing up my panels. It seemed like it would be much less hassel with maintenance down the road. Someday the shed will need repainting and the thought is that I can just roller right over the nails and not have to worry about painting around any exposed fasteners or what not.

The downside is that if I have to pull a panel that it would be much harder and more likely to damage a panel trying to get the nails out. But the only reason I can see having to pull a panel is if there's a problem with the weather resistive barrier (15# felt, building paper, house wrap, etc.).

I decided to use a fiber cement board, too, similarly gapped. Though instead of 4x8 panels I'm going with the 12"w x 12 ft long siding planks. Cost per sq ft is the same, they're the same thickness, but they come pre-cut (12" wide) for a little different proportion of panel. I will be cutting them down to a 1 ft wide x 6 ft long panel, however.

It should look similar to this:

modern-outdoor-shed-739167.jpg
 
OP
P

platinum overcast

Well-known member
Joined
Aug 4, 2010
Messages
71
Hi Lupinsea. We're screwing into the furring with large pan head screws provided with the siding. With the predrilled holes and the pan heads, I think the idea is to allow for some float. We're leaving the panels unpainted.

What fiber cement product did you decide on? Apologies if you covered it in your thread.
 
OP
P

platinum overcast

Well-known member
Joined
Aug 4, 2010
Messages
71
Framing - Day 6

More rafters in place. Starting to get the feeling of the exposed eaves with the rafter tails.

P1000992.JPG


P1000995.JPG


P1000998.JPG
 
OP
P

platinum overcast

Well-known member
Joined
Aug 4, 2010
Messages
71
Framing - Day 7

Really coming together now. All rafters in place, sheathing held back for the clearstory on the yard side. Those two walls will be sided in ipe below the Polygal type stuff above.

P1010037.JPG


P1010038.JPG


The clearstory from the inside:

P1010039.JPG


P1010040.JPG
 

jocool1585

Well-known member
Joined
Nov 23, 2008
Messages
142
looks like an awesome project! what are the plans for finishing out the inside?
 
OP
P

platinum overcast

Well-known member
Joined
Aug 4, 2010
Messages
71
looks like an awesome project! what are the plans for finishing out the inside?

Thanks. We're pretty pleased so far.

On finishing the inside, there's several factors. We'd like to take advantage of the energy tax incentives, which will require insulating the walls. With the 30% back on the roof, OHD, man door and insulation it should basically allow us to do it "for free". Of course, by that time we'll be pretty strapped for cash. We'll probably put down an epoxy floor, not sure on the timing. I'd like to get it in this fall before it gets a season of salt and sand.

On the electrical, we're having them put in a pretty bare bones set of lights, outlets and switches. I plan to go back and improve the setup once we have a little more time and cash. I think it might also be good to live with the space for a little while and figure out how we will really use it.
 

lupinsea

Well-known member
Joined
Mar 30, 2010
Messages
261
Hi Lupinsea. We're screwing into the furring with large pan head screws provided with the siding. With the predrilled holes and the pan heads, I think the idea is to allow for some float. We're leaving the panels unpainted.

What fiber cement product did you decide on? Apologies if you covered it in your thread.

Ah, cool.

The James Hardie siding products are very common up here and are the default fiber cement panel for the NW, pretty much. So that's what I'm going with. It's a 5/16" thick fiber cement material, sounds similar to what you're using.

I was going to take 4x8 sheets and rip them down to 16" wide planks since the proportion of such looked good for the shed. But after talking to some people familiar with the material it didn't sound like this was a good idea. The fiber cement blades still throw off a lot of nasty dust you don't want to breath. And it's gritty enough and fine enough that it gets into tools and chews up bearings and such.

Ideally some power shears are used to nibble through the cuts and I can borrow a pair from a friend. They work quick for short cuts but I don't think they'd be too cool for the long rips.

So instead I'll be using the HardiePlank siding products. There's a 12 1/4" wide x 12 ft long plank that'd work very well, too. No need to rip it, only cut it into 6 ft lengths (for the plank proportions I want) which shouldn't be too bad. Two 12" cuts per board. No long ripping cuts.

And as mentioned, I'll probably just nail it up. I have the nails already for my nail gun and I'll dial the nail gun way back so it doesn't over penetrate.

I'd much rather do the screws but they cost more (did I mention I already have the nails), I'm not keen on having to pre-drill bazillions of little holes, and for future maintenance I'm not sure how to really do an efficient paint job if I'm trying not to coat the SS screws.

So not quite as cool as the exposed fasteners but less costly, faster to install, and easier future maintenance.
 

Dan0myte

Well-known member
Joined
Nov 18, 2009
Messages
92
Location
Regina, Saskatchewan
Haha, I love the fact that all the rainwater is going to be channeled back towards the neighbour's yard.

I'm hoping you have good relations with them next door? In the event of a major downpour where the eaves get plugged with leaves, they could end up with some water issues in that little garage of theirs.
 

cdottrot

Well-known member
Joined
Nov 21, 2008
Messages
96
Location
Oshawa, ON
I really like the clearstory idea, I'm going to investigate that further...it may present a reasonable option for doing a shed-style build.
 
OP
P

platinum overcast

Well-known member
Joined
Aug 4, 2010
Messages
71
A bit late, but I would have triple jacked the main door header.

Hi Dave. I'm not a carpenter but I'm trying hard to learn some of the vocabulary. I'll get a photo of the front wall as they framed it up, I don't think I have a clear one posted. On the front wall, I don't know what to call the parts.
 

georgiadave

Well-known member
Joined
Dec 13, 2007
Messages
423
Location
Marietta, Georgia
Jack studs are used to support headers, and do not go all the way to the top of the framing. All of the weight of the building above the header, plus snow load from that flattish roof, will have to pass through the two jack studs on each side of the door. Consider that without the door a regular wall would have been a stud every 16 inches to carry the load. Also, the rafters run perpedicular to the door opening, so the roof is not helping hold the building square in that plane. I would not be surprised if the building racks under the load, making it difficult to open the doors. You might consider some bracing in the corners.
 

lupinsea

Well-known member
Joined
Mar 30, 2010
Messages
261
Typical 2x4 and 2x6 stud walls that are spaced 16" o.c. have more to do with providing sufficient support for sheetrock than they do with load carrying capability.

You could yank out about every other stud in a typical stud wall and it'd be perfectly fine for supporting the structure. But the sheet goods like drywall or OSB / Plywood sheathing would be a bit wobbly if you pressed against them.

That said, you need a certain amount of bearing surface to support a beam. And that is dependent upon the loads the beam is carrying. I don't know what those are for this building. Given that the garage door header is supporting the rafters running perpendicular to it, it might be a fair amount of design load. So best to double check on this. And again, the 2x4 / 2x6 itself might very well likely carry the load, especially given that it's mated to the king stud and both are probably nailed into the plywood sheathing. So the stud isn't likely to buckle. But you have to be concerned about crushing the wood fibers of the beam resting on the top of the stud.

Just something to check into.

As for the roof holding the building square . . . once the roof sheathing goes on it forms a shear diaphragm. Much like floor sheathing or the OSB / Plywood wall sheathing, it acts as a big massive shear panel that keeps the frame itself from racking. Part of the key, however, is having good blocking to help transfer the resistive shear forces from the wall into the roof diaphragm.

This was something of a concern when you mentioned putting in clear plastic for the blocking to create some clerestory natural light openings. It's also a slight issue with the smaller portion jutting into the back yard that you want to do the same to. It's a great idea and probably would be structurally ok. Especially since that is a triangular area that somewhat self-braces with the diagonal top plates of the wall.

So, check the studs supporting the garage door beam and the need for solid blocking above the wall and between the rafters.
 
To avoid these ads, REGISTER NOW!
Top Bottom