To avoid these ads, REGISTER NOW!

Garage floor epoxy project: lots of pics

munkey

Well-known member
Joined
Jun 1, 2010
Messages
129
Location
Louisville, KY
Hey guys,

This forum was incredibly useful to me as I re-did my (crappy) garage's floor over the past month or so. I took a bunch of pics and hope that some of you find them interesting. No comments on how lame my garage is (especially the walls, which need repainting badly!)

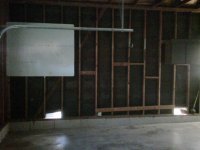
My garage is a small, unattached 1-car garage. The house is from around 1950; I don't know anything about the garage in particular, except that the floor was in bad shape and had been repaired sub-optimally (understatement) in the past. I've seen pics of a number of similar garages on here.

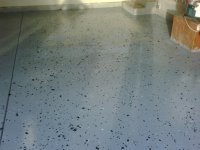
After moving stuff out and cleaning the floor with Behr concrete cleaner:
1.jpg


I actually was doing my mother-in-law's garage at the same time (a much more modern 2-car attached garage that came out nicely; those pics some other time) so I rented the Edco grinder I've seen recommended here.
2.jpg


After I ground the floor with it, which went fairly smoothly, I rinsed the dust out and noticed a ton of spots that just didn't dry out like they should have. I was horrified to discover the reason for this: pits in the floor that had been filled with some sort of MULCH (!!!!) and then skim coated with some sort of concrete. I'm guessing some previous owner needed a cosmetic fix for water/salt damage that would last just long enough to sell the house.
3.jpg


As soon as I started tapping around with a hammer, I began uncovering dozens and dozens of such pits. Many of them were several inches long and almost an inch deep. Here's a pic early into the discovery process:
4.jpg


Some of the pits were filled with what seemed to be a brittle coal-like material, perhaps some form of asphalt. I was unable to completely remove that stuff, but other holes were stuffed with this:
5.jpg


Pits:
6.jpg

7.jpg


After a lot of grueling work just to prep these pits, I got to work using EpoxyShield Concrete Patch, which is a 100% solids epoxy filler. I highly recommend this product, since it works well, cures hard, and is probably locally available. I needed between 1 and 2 kits @ about $20 each. Mostly patched:
8.jpg


As it turned out, the Edco grinder wasn't sufficiently aggressive to prep the other garage I was working on, and I wanted to grind the edges better anyways, so I rented the standard Bosch 1773AK concrete grinder that I've heard about on here. It did such a good job that I ended up doing the entirety of both floors with it by hand. In retrospect, the Edco grinder was unnecessary (and very heavy to lift!) and I shouldn't have even bothered with it. The Bosch tool did an amazing job. After hand-grinding, repatching a few bad spots, and then re-grinding those spots:
9.jpg


The rest of the pics will follow soon -- I have a few things to do today before I finish the write up.
 
To avoid these ads, REGISTER NOW!
OP
M

munkey

Well-known member
Joined
Jun 1, 2010
Messages
129
Location
Louisville, KY
Finally getting ready to paint! In terms of labor, the job was probably 85% done at this point. If you count research and buying materials, even more.
10.jpg


The epoxy I used is Sherwin Williams' Tile Clad (http://protective.sherwin-williams.com/detail.jsp?A=sku-26226:product-6857), which is a two part solvent based epoxy. I chose it for a number of reasons: cost, local availability, a good SW manager nearby who was able to give me helpful pointers and reasonable prices, and familiarity with the product (this was my third time using it.) I contemplated using a 100% solids product but I thought it might be overkill for this job. Given the condition of the rest of the garage, my uncertainties over the long term prospects for ANY coating on this old concrete (probably no vapor barrier, water and ice in winter, etc.), and the fact that I probably won't live at this house long term, I felt Tile Clad was a decent compromise between the high end stuff and the Lowe's/Home Depot stuff.

The process, while messy, is fairly straightforward: get a bunch of drop cloths, rags, paint bucket pourers, plastic buckets, drill stirs, paint tray liners, nitrile gloves, chip brushes for cutting in, Wooster Epoxy Glide roller covers, and get to work! I mixed part A and part B individually with drill stirs, mixed them together at 1:1 with a third drill stir, and let it sweat in for 20-30 mins. I cleaned up some of the mess and made final preparations while waiting. Then mix again with power agitation; for the primer coat, I first reduced the mixture about 20% with SW's reducer #54.

My plan was to apply one reduced primer coat, one full strength coat, and then another full strength coat that would hold the flakes. Those three coats would then be clear coated with two coats of Rexthane, which is a SW one-part aliphatic moisture cure urethane. The Rexthane provides UV protection and seals in the color chips, and is an awfully durable finish in its own right.

This is after the primer coat was applied. The first few strokes with the roller were absolutely the highlight of the project -- it was like using a magic eraser, covering up the nasty old concrete with high gloss epoxy. It is at that moment that you get the first glimpse of why you did all that prep work, and get to see your color choice in its full glory (in my case, "Steely Gray".) You can see how the concrete really ***** the reduced mixture into its pores. The patching work is still clearly visible from the right angle. The reduced mixture was fairly easy to work with and getting even coverage was not difficult.
11.jpg


Another look:
12.jpg


Second coat applied at "full strength". It is significantly stickier and harder to work with, but the Epoxy Glide rollers worked beautifully. Over a couple epoxy projects, I definitely gained experience with varying the pressure to feather the edges and avoid lap marks. (Afterwards, I put some tape on the floor at certain spots that I thought ended up a little thin and hand-brushed a little extra there before starting the third coat.)
13.jpg


After the third coat, I broadcast the flakes -- about 5 lbs, ordered from Original Color Chips and including 1lb of glow in the dark flakes (I made a separate thread about this.) Spiked shoes are essential for these projects and ensured the flake-spreading went smoothly. (I used them for all 5 coats just so I could walk around naturally without stepping in wet epoxy... I would recommend using them even for flake free finishes.)
14.jpg


As is well documented here, sweeping, scraping, and vacuuming the flakes is a critical step. This next picture shows why! I used a metal-bladed long handle floor scraper from Lowes, and used it aggressively. I was surprised how roughly I was able to attack the epoxy without it flinching. The floor was dramatically smoother to walk on after scraping and vacuuming.
15.jpg


Working at night in the summer has its hazards: throughout the project, these guys (among countless other species) loved crawling toward my bright lights. I caught this one in the act:
16.jpg


I definitely removed my fair share of six and eight legged critters stuck in wet epoxy, again thanks to the spiked shoes. Eventually, it was time for the Rexthane topcoat. The key is to put it on EXTREMELY thin or it will bubble. It is tempting to put on a thicker coat because it looks nice and shiny, but thin coats are the way to go. I saved some glow in the dark flakes and put them in this first clearcoat to make sure they were on top of the other flakes and highly visible. This was probably unnecessary, but worked without issues. After the first coat:
17.jpg


The second clearcoat was easily the most difficult layer to apply because you need to view the surface at extreme angles just to be able to tell what has and hasn't been done already. After the final coat:
18.jpg


And then it was done! If it lasts at least a couple years I'll be happy... it was a lot of work but also kind of fun to see the transformation. The garage is much brighter overall and I'm no longer scared of my floor. Back in action (floor is very glossy but hard to tell from this photo):
19.jpg


This week, I'm repairing the asphalt at the edge of the driveway and installing a rubber threshold at the epoxy/concrete transition as many of you here have done. Maybe next year the walls, etc. will get the attention they deserve. Thanks for reading, questions/comments are welcome!
 

BL50

Well-known member
Joined
Feb 13, 2010
Messages
88
Location
Michigan
Thanks for the great write up ... very informative. What a difference ... nice job!
 

Call me the Breeze

Well-known member
Joined
Jul 28, 2009
Messages
1,385
Location
Sebring Fl
So how does the glow in the dark flakes look ? Do you have to leave the door open during the day to "charge" them or do you have to use lighting to "charge" them?
 

rickey1013

Well-known member
Joined
Oct 29, 2009
Messages
103
Location
Hayward, CA
Do not worry about walls I started with the floor as well bought house 1 year ago. I then moved to the walls and then the bench and lights and fans and so on. I like the color choice the floor was a lot of work but I am glad I took the time.
 

Attachments

  • IMG00066-20090624-1822.jpg
    IMG00066-20090624-1822.jpg
    151.8 KB · Views: 276
  • IMG00067-20090624-1822.jpg
    IMG00067-20090624-1822.jpg
    140.2 KB · Views: 248
  • IMG00122-20090827-1855.jpg
    IMG00122-20090827-1855.jpg
    132.7 KB · Views: 347
  • IMG00137-20091009-1135.jpg
    IMG00137-20091009-1135.jpg
    148 KB · Views: 271
  • IMG00147-20100723-1848.jpg
    IMG00147-20100723-1848.jpg
    136.4 KB · Views: 293
To avoid these ads, REGISTER NOW!
OP
M

munkey

Well-known member
Joined
Jun 1, 2010
Messages
129
Location
Louisville, KY
Thanks for the slippery tires warning -- not sure I would have really even thought about it, but now I definitely will.

Lets see a night shot.

So how does the glow in the dark flakes look ? Do you have to leave the door open during the day to "charge" them or do you have to use lighting to "charge" them?
I will try to do a night shot sometime... I need to learn the long term exposure options on my camera and figure out a way to stabilize it at the right angle. So far it seems that they don't "save up" enough sunlight to be visible for very long after sunset. But, they do glow quite noticeably after the garage light has been on for only a couple minutes. I'll get back to you once I figure out how long it takes for them to dim after full exposure to light.
 

Dominico

Well-known member
Joined
Jan 13, 2010
Messages
288
Location
Michigan
Nice before and after pictures. I can appreciate the amount of work that went into the finished product. Great job it looks 100% better!
 

kyles974

Well-known member
Joined
Aug 22, 2010
Messages
881
Location
Florida/Alabama
Nicw work! Ya should be proud.
I can't wait to see the night pic!

As being a "newbie" here, I say thank you for you posting your before and after.

Inspiring! :thumbup:
 

aqr81

Well-known member
Joined
Jul 20, 2010
Messages
1,127
Location
Central Valley, Ca.
A lot of work for you but a great outcome. Nice work Munkey. You had everything thrown at you in terms of problems to arise and you didn't give up. The results show and you should be proud of your accomplishment. Thanks for taking the time to post the pics showing the steps involved.
 

slickgt1

Well-known member
Joined
Oct 11, 2010
Messages
1,674
Exactly, I want to see a night shot. How are those glow in the dark flakes working?
 
OP
M

munkey

Well-known member
Joined
Jun 1, 2010
Messages
129
Location
Louisville, KY
Hey, whats the deal with necro'ing my thread from 2+ years ago? :) The floor is holding up great... when clean, it's the same as the day I put it down. There are no scratches, tire marks, or other defects. So far, I am very pleased with the results.

The glow-in-the-dark flakes are cool, but I don't see them very often under normal circumstances. Because of the way that they need to be "charged", the only time I really notice them is when the garage door has been open for a while and the sun has just gone down. Other than that scenario, in order to see them I would have to enter the garage, turn the light on for at least several minutes, turn the light off, and then re-enter the garage without turning on the light. This just isn't a sequence that happens very often. I rarely even touch the lights because the garage door opener automatically turns a bulb on for 5 minutes whenever the door is operated.

(I did take some night shots at one point, but they were never very interesting. I'll try to remember to get a picture next time my buddy with a nice camera and tripod comes by. It is difficult/impossible for a regular ol' point and shoot camera to capture the effect accurately.)
 
To avoid these ads, REGISTER NOW!
Top Bottom