To avoid these ads, REGISTER NOW!

6 Car Garage??? Money Pit

justbummin1

Well-known member
Joined
Sep 23, 2010
Messages
175
Location
North West Illinois (The West Coast)
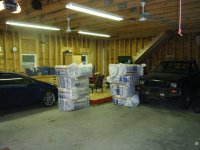
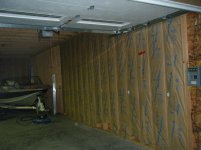
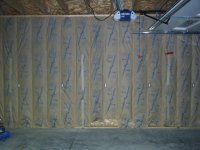
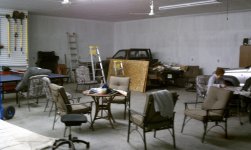
So I have been watching everybody's stuff on here for a while now (unfortunately I didnt hear about this site tell I already had the shell put up:( ) and finally decided it was time to share my project even though some of your projects and attention to the smallest details make me feel very inadequate:bowdown:
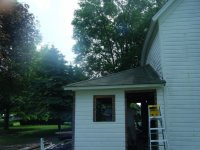
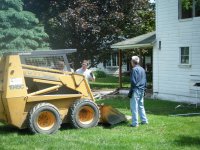
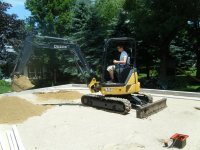
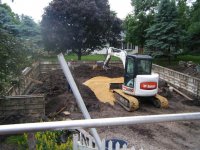
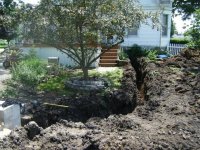
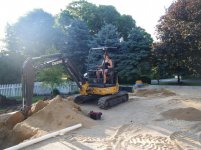
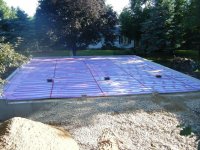
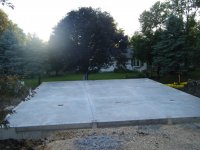
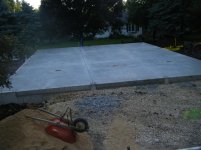
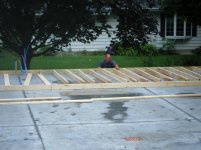
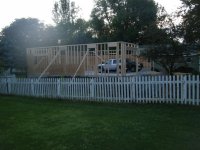
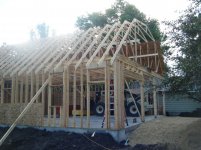
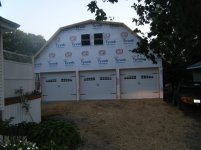
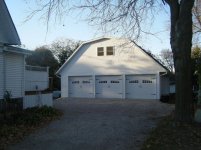
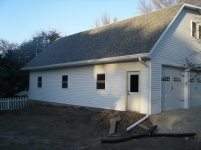
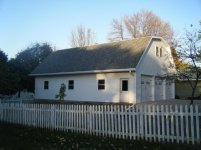
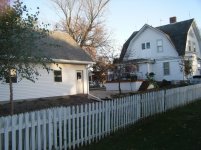
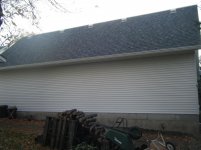
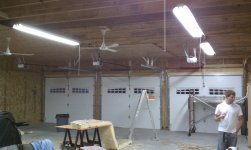
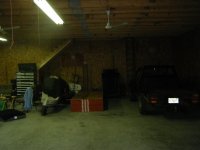
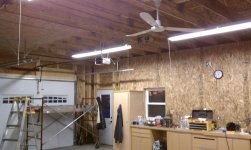
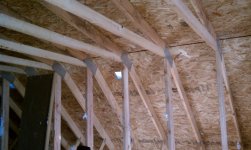
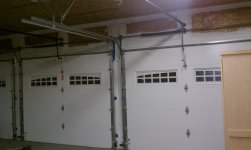
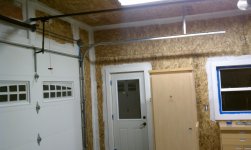
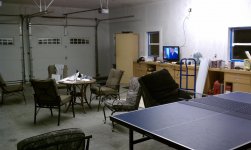
. We decided to tear down the old 20x30 garage/barn thing and build a 36x42 3 car wide by 2 deep (biggest I could fit and still have functional) garage with a 16 foot wide loft upstairs. I was going to tear down the old have a local concrete guy do his thing and I would do the rest along with my son. Then reality hit me and decide to have my contractor/brother-in-law put up the shell and trim and side it and I could not spend every spare minute of my summer working on the money pit! BEST DECISION EVER!!!
 
To avoid these ads, REGISTER NOW!
OP
J

justbummin1

Well-known member
Joined
Sep 23, 2010
Messages
175
Location
North West Illinois (The West Coast)
Foundation and under ground/floor work. Wanted to have infloor heat, 3 floor drains along with gas/water/sewer/cable & power. I boat on the Mississippi River and everybody always says boat stands for B-break O-out A-another T-thousand. So what the hell does garage stand for? Because all this **** adds up in a hurry but the upside is when its done it will be right and nice!
 

Attachments

  • DSCF0590.jpg
    DSCF0590.jpg
    147.5 KB · Views: 357
  • DSCF0576.jpg
    DSCF0576.jpg
    150 KB · Views: 330
  • DSCF0575.jpg
    DSCF0575.jpg
    149.6 KB · Views: 388
OP
J

justbummin1

Well-known member
Joined
Sep 23, 2010
Messages
175
Location
North West Illinois (The West Coast)
Trenched from the house to the new garage for water/sewer and gas. and had to let my wife play with the toys too! Also ran drain lines from floor drains(3 of them) Then layed down 2.00" foam and ran PEX for future heat.
 

Attachments

  • DSCF0592.jpg
    DSCF0592.jpg
    154.9 KB · Views: 392
  • DSCF0598.jpg
    DSCF0598.jpg
    146.9 KB · Views: 560
  • DSCF0601.jpg
    DSCF0601.jpg
    152.7 KB · Views: 581
OP
J

justbummin1

Well-known member
Joined
Sep 23, 2010
Messages
175
Location
North West Illinois (The West Coast)
Took awhile between weather and weekends on the boat and o yea that whole work thing that always seems to get in the way of all the fun that we all like to have. underground stuff is in and covered and the floor has been poured. You may notice that the floor was poured flush with the top of the wall. Thats because I didnt want a ledge around the base that I would have to notch cabinets etc to sit back against the wall flat. Concrete guys didnt pitch the floor the way I wanted really but to late now!
 

Attachments

  • DSCF0610.jpg
    DSCF0610.jpg
    143.1 KB · Views: 331
  • DSCF0609.jpg
    DSCF0609.jpg
    141.8 KB · Views: 318
  • DSCF0608.jpg
    DSCF0608.jpg
    149.8 KB · Views: 260
OP
J

justbummin1

Well-known member
Joined
Sep 23, 2010
Messages
175
Location
North West Illinois (The West Coast)
First days work!!! Time for the fun part finally!!! Man am I glad I had my brother in law Andy and his guys do this, they do not jack around! Had to pull in a couple future residents to see how they would fit. Kind of a kid on Christmas morning thing:bounce:
 

Attachments

  • DSCF0614.jpg
    DSCF0614.jpg
    137 KB · Views: 393
  • DSCF0615.jpg
    DSCF0615.jpg
    141.1 KB · Views: 387
  • DSCF0616.jpg
    DSCF0616.jpg
    142.4 KB · Views: 719
  • DSCF0618.jpg
    DSCF0618.jpg
    143.9 KB · Views: 486
  • DSCF0619.jpg
    DSCF0619.jpg
    144.7 KB · Views: 441
OP
J

justbummin1

Well-known member
Joined
Sep 23, 2010
Messages
175
Location
North West Illinois (The West Coast)
A couple of days later the trusses arrived while I was on a work trip so my dad and son played rigger/forklift operator for my brother-in-law and they set all the trusses. Figures i didnt even get to play with the big toy I just had to pay for it. Next day they came back and sheeted the roof. Again what takes them a day would take me weeks after work.
 

Attachments

  • DSCF0639.jpg
    DSCF0639.jpg
    146.4 KB · Views: 577
  • DSCF0638.jpg
    DSCF0638.jpg
    144.7 KB · Views: 699
  • DSCF0637.jpg
    DSCF0637.jpg
    141.8 KB · Views: 583
  • DSCF0640.jpg
    DSCF0640.jpg
    151.6 KB · Views: 491
  • DSCF0641.jpg
    DSCF0641.jpg
    147.7 KB · Views: 490
  • DSCF0643.jpg
    DSCF0643.jpg
    146.6 KB · Views: 492
OP
J

justbummin1

Well-known member
Joined
Sep 23, 2010
Messages
175
Location
North West Illinois (The West Coast)
Roof is shingled, walls sheeted and wrapped doors and windows installed. Some of you guys probably noticed when we framed it up originally I was going to put a 8 foot wide by 7 tall overhead door on the north end of the west wall. I was one of those things that sounded you until you see it up and look at it. There was about a 4 foot elevation difference between the floor and the yard level so we scratched the overhead and put in another window. I wanted 3 - 10 foot by 8 foot tall doors so that meant I needed at least a 9'6" ceiling height so there isn't any sense in going through and trimming any of the studs lets just let the ceiling height be what ever it ends up which was 10'6". The garage doors and openers are from Raynor door, VERY nice insulated doors that operate smoothly and quiet. Like everything else for the most part you get what you pay for!
 

Attachments

  • DSCF0648.jpg
    DSCF0648.jpg
    140.2 KB · Views: 545
  • DSCF0649.jpg
    DSCF0649.jpg
    142 KB · Views: 458
  • DSCF0650.jpg
    DSCF0650.jpg
    137.6 KB · Views: 550
  • DSCF0710.jpg
    DSCF0710.jpg
    127.4 KB · Views: 451
  • DSCF0653.jpg
    DSCF0653.jpg
    138 KB · Views: 699
OP
J

justbummin1

Well-known member
Joined
Sep 23, 2010
Messages
175
Location
North West Illinois (The West Coast)
Once it was closed up now I could start electrical and insulation. The bad part is we also started moving "stuff" back in from the storage unit that we rented to put everything in while the old garage was torn down waiting for this one. We decided to go with 2x6 wall studs so we where able to use R-19 insulation in the walls and then the plan is to use 7/16" OSB for the walls and ceiling. Basically I am cheap, I don't like taping and sanding drywall and I like the added strength of OSB when something falls over against a wall. Electrical I wanted outlet lots of outlet so they are about every 4 feet around the whole garage plus in the ceiling for openers, cord reel etc... As far as the lighting goes we are putting in 9 - 8 foot HO T12 lights on 3 banks/switches

Rob
 

Attachments

  • DSCF0663.jpg
    DSCF0663.jpg
    142.3 KB · Views: 487
  • DSCF0664.jpg
    DSCF0664.jpg
    142.4 KB · Views: 467
  • DSCF0665.jpg
    DSCF0665.jpg
    145.1 KB · Views: 547
  • DSCF0666.jpg
    DSCF0666.jpg
    143.6 KB · Views: 559
  • DSCF0667.jpg
    DSCF0667.jpg
    145.7 KB · Views: 454
  • DSCF0672.jpg
    DSCF0672.jpg
    145.6 KB · Views: 433
  • DSCF0671.jpg
    DSCF0671.jpg
    143.7 KB · Views: 453
OP
J

justbummin1

Well-known member
Joined
Sep 23, 2010
Messages
175
Location
North West Illinois (The West Coast)
Siding and trim is all on now! So at least to the outside world it looks done now but we all know are you ever really done? Still have to put up the lights over the overhead doors and beside the man door but that wont be a big deal. Stay tuned
 

Attachments

  • DSCF0699.jpg
    DSCF0699.jpg
    144.5 KB · Views: 363
  • DSCF0700.jpg
    DSCF0700.jpg
    141.2 KB · Views: 437
  • DSCF0702.jpg
    DSCF0702.jpg
    141.2 KB · Views: 359
  • DSCF0703.jpg
    DSCF0703.jpg
    142.8 KB · Views: 432
  • DSCF0705.jpg
    DSCF0705.jpg
    146.7 KB · Views: 394
  • DSCF0707.jpg
    DSCF0707.jpg
    147.7 KB · Views: 326
  • DSCF0709.jpg
    DSCF0709.jpg
    139.4 KB · Views: 311
To avoid these ads, REGISTER NOW!
OP
J

justbummin1

Well-known member
Joined
Sep 23, 2010
Messages
175
Location
North West Illinois (The West Coast)
So with the help of my right hand man/son we started sheeting the inside. Only about a hundred sheets of OSB literally to put up between the walls and ceiling. Thankfully I had a friend loan me a sheet lift to do the ceiling. Another example of any idiot can do the job with the right tools so yep I got them! Biggest problem is working around all the stuff that keeps coming in. We enclosed the steps along the back wall so that we could keep the garage separate from the loft area for heating mostly due to the fact that it wont be finished off for a few years more then likely. We put slat board up on that to hang all of the misc shovels rakes etc... and then behind that wall will be heating and future air compressor. Before we built the wall we where looking at the space at the bottom of the stairs and couldn't figure how we would be able to go through the doorway make a 90 degree turn to the right and up the stairs with anything of any size or length like say a sheet of drywall in the future. So I made basically a big piano hinge and mounted it to the wall then made about and 8 foot section of the wall pivot out so if need be you just open the wall for the large stuff maybe a couple times a year and the rest of the time you just use the normal door. I will take pic's this weekend to show this better.

Rob
 

Attachments

  • IMAG0342.jpg
    IMAG0342.jpg
    142.8 KB · Views: 615
  • DSCF0713.jpg
    DSCF0713.jpg
    146.3 KB · Views: 473
  • DSCF0711.jpg
    DSCF0711.jpg
    142.8 KB · Views: 468
  • IMAG0343.jpg
    IMAG0343.jpg
    145.8 KB · Views: 510
  • IMAG0344.jpg
    IMAG0344.jpg
    143.8 KB · Views: 545
  • IMAG0345.jpg
    IMAG0345.jpg
    145.4 KB · Views: 579

ambenz

Well-known member
Joined
Dec 12, 2010
Messages
4,236
Location
NW Chicago Suburbs
Boy, what a great thread!
I sure am enjoying all your pictures and your Garage!!!!
I am "Green" with envy!
Drogar-greenlbg.gif
 

LSVLance

Well-known member
Joined
Jul 17, 2010
Messages
298
Location
Peoria, AZ
I like how you built the garage to compliment the house, very nice. I can totally relate to the long and expensive process of building the garage of your dreams, I'm 9 years into mine and can remember each step you are documenting like it was just yesterday.

Keep up the good work and keep posting pics as you go.
 

gatewaysysop

Well-known member
Joined
Nov 11, 2008
Messages
3,285
Location
Arizona
Definitely a nice setup, I am thoroughly jealous, especially of the depth the whole thing has. I also really like how you made it match the house, really looks nice. Keep the pics coming! :beer:
 

MPH

Active member
Joined
Aug 23, 2010
Messages
30
I like your house and garage style. What style is that? Craftsman, cottage, etc?

MPH

....have I seean that house in a scary movie before?:eek::lol:
 

Mr Mushman

Well-known member
Joined
Jul 7, 2009
Messages
113
Very nice built ! ! ! it's great to have the room to go that big ! ! ! Can't wait to see more pictures ! !
 
OP
J

justbummin1

Well-known member
Joined
Sep 23, 2010
Messages
175
Location
North West Illinois (The West Coast)
Thanks everybody for all the positive feed back. We looked at just putting up your standard box but just couldn't bring ourselves to do it because it just wouldn't have looked right so whats a little more $$$$ lets do this and that's pretty much how this whole project has gone. I know I will NEVER get my money back out of it if we sell but It should make it way more sell-able when we do decide to move on (which we thought would have been 2 years ago when my son got out of high school but since you cant give a house away still might as well upgrade what we have) I attached a couple of pictures from a few years ago showing the house and in the one picture you can see the old garage in the back ground. The house was built in 1914 and we bought it almost 20 years ago and we are the third owners and the only one to have kids or pets live in it. So we have "lived" in it a little more then previous owners but that's what they are for right?

MPH - I'm not really sure what style you would call it but when we first looked at it we thought of Amityville Horror as well.

So anyway we got all the OSB up and the goal was to get the heat hooked up before Thanksgiving (in laws where coming and I needed a place to hide) so I took a day off and got to the real work. I bought everything I needed at Menard's for this, distribution manifold, Integrator panel (which includes pumps, valves, expansion tank, etc) and the micro boiler. Got gas line run, hooked up all the in-floor loops (5 of them) all the piping between everything. Filled the system as directed (I actually read the instructions for once!) No leaks in anything so plug in the power and...... what do you know it all worked like it was supposed to:headscrat This was all by like noon so I guess it was worth the money! Very quick and easy system to work with, everything was PEX with push fittings and it all worked great. Even my son who was helping was like I thought plumbing was supposed to be hard? anybody can do this.
 

Attachments

  • DSCF0304.jpg
    DSCF0304.jpg
    152.3 KB · Views: 370
  • DSCF0305.jpg
    DSCF0305.jpg
    151 KB · Views: 439
  • IMAG0368.jpg
    IMAG0368.jpg
    141.9 KB · Views: 426
  • IMAG0367.jpg
    IMAG0367.jpg
    143.9 KB · Views: 509
  • IMAG0365.jpg
    IMAG0365.jpg
    141.6 KB · Views: 515
OP
J

justbummin1

Well-known member
Joined
Sep 23, 2010
Messages
175
Location
North West Illinois (The West Coast)
A couple of you have asked for pictures of the upstairs. As for now it is just a dumping ground for everything that went from the old garage to the storage unit to back home. Question what to do with this? I don't know take it upstairs seemed to be the theme of the day so that is why it looks like it does now until we can get all the cabinets in and start putting everything away and organizing. After we got the ceiling in we blew it full of insulation about 16 inches deep. So here a a couple of pics but please don't judge on the mess! I thought I would have had this done months ago but live and learn!
 

Attachments

  • IMAG0451.jpg
    IMAG0451.jpg
    143 KB · Views: 345
  • IMAG0452.jpg
    IMAG0452.jpg
    146.3 KB · Views: 369
  • IMAG0453.jpg
    IMAG0453.jpg
    144.8 KB · Views: 337
  • IMAG0454.jpg
    IMAG0454.jpg
    140.9 KB · Views: 326
  • IMAG0455.jpg
    IMAG0455.jpg
    146.2 KB · Views: 304
  • IMAG0458.jpg
    IMAG0458.jpg
    140.5 KB · Views: 326
OP
J

justbummin1

Well-known member
Joined
Sep 23, 2010
Messages
175
Location
North West Illinois (The West Coast)
Well now that there is heat:thumbup: it is time for my least favorite thing to ever do in a garage, PAINT! The Friday after Thanksgiving I started priming all the OSB walls and ceiling with Zinsser 1.2.3 primer/sealer which ended up taking about 9 gallons. OK let me just apologize upfront for "borrowing" a few color choices from some of the really nice builds that I have seen here on garage journal. I went with a Ultra White gloss exterior paint for the ceiling and top 2/3 of the walls then the light gray gloss for the bottom 1/3. Did I already say how much I hate to paint??? This project has not done anything to change that either!

Rob
 

Attachments

  • IMAG0384.jpg
    IMAG0384.jpg
    140.4 KB · Views: 285
  • IMAG0383.jpg
    IMAG0383.jpg
    147.9 KB · Views: 290
  • IMAG0382.jpg
    IMAG0382.jpg
    139.9 KB · Views: 314
  • IMAG0385.jpg
    IMAG0385.jpg
    143.1 KB · Views: 345
  • IMAG0386.jpg
    IMAG0386.jpg
    139.7 KB · Views: 389
  • IMAG0387.jpg
    IMAG0387.jpg
    143.5 KB · Views: 384
  • IMAG0390.jpg
    IMAG0390.jpg
    145 KB · Views: 401
To avoid these ads, REGISTER NOW!
Top Bottom