To avoid these ads, REGISTER NOW!

New shop, time to build

sdetweil

Well-known member
Joined
Jul 11, 2008
Messages
55
Location
near Austin Texas
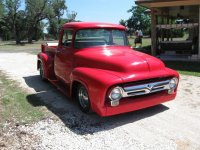
I do custom cars & trucks as a hobby (hope to carry that forward after real work ends).. and the finished cars don't like being in the same shop where the work is going on.. sparks and dust and all..

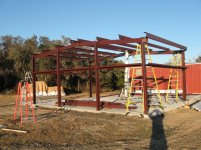
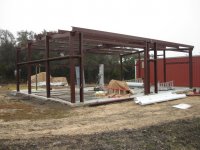
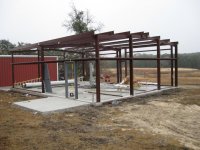
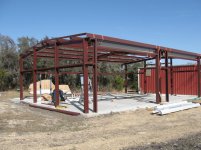
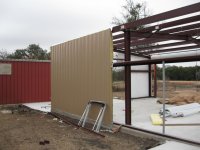
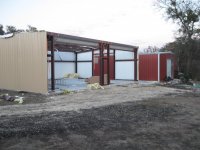
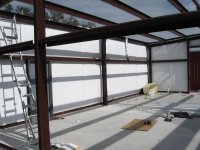
So I am building a second 30x40.. slab is down and the building kit arrived today..

I've been reading here and seems like a reasonable project.

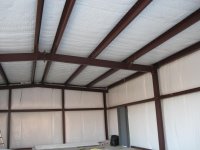
I didn't have the building ordered prior to the slab, so we didn't know where to put the bolts, and had weld plates installed instead. We have a 200amp miller Mig welder so we should be all set.. rest is bolt together..

Will post pics along the way, we start assembly sunday.

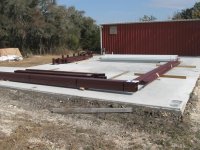
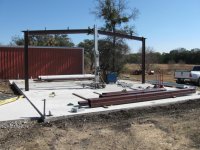
here is the parts on the slab
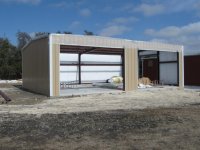
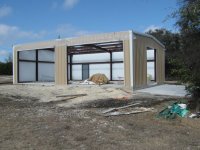
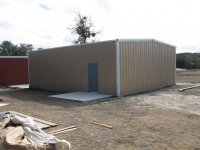
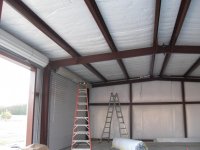
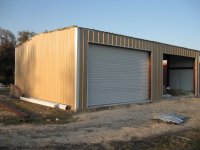
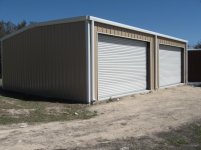
30x40, with one 10x10 roll door on one end, and 2-16x10 roll doors on one side ( this kept the custom building prices down)..
slab is 3500psi, 12in deep on the near bay, for a 4post lift.
14 in footer all the way around.

Sam
 

Attachments

  • building 01.jpg
    building 01.jpg
    147 KB · Views: 355
  • building 03.jpg
    building 03.jpg
    149.6 KB · Views: 377
  • JARRELL A3.jpg
    JARRELL A3.jpg
    64.3 KB · Views: 358
  • engine 001.jpg
    engine 001.jpg
    147.9 KB · Views: 324
Last edited:
To avoid these ads, REGISTER NOW!
OP
S

sdetweil

Well-known member
Joined
Jul 11, 2008
Messages
55
Location
near Austin Texas
Day 1 of assembly, 6 hours of work.. first bay framed out

Sam
 

Attachments

  • newshop 002.jpg
    newshop 002.jpg
    148.2 KB · Views: 337
  • newshop 004.jpg
    newshop 004.jpg
    146.5 KB · Views: 336
  • newshop 007.jpg
    newshop 007.jpg
    149.3 KB · Views: 383
OP
S

sdetweil

Well-known member
Joined
Jul 11, 2008
Messages
55
Location
near Austin Texas
Day 2 framing complete.

raining morning of day 3.

Sam

std building w 1-10x10 door opening.

we added openings for 2-16x10 doors on the side.
 

Attachments

  • newshop 003.jpg
    newshop 003.jpg
    138 KB · Views: 239
  • newshop 002.jpg
    newshop 002.jpg
    144.5 KB · Views: 213
  • newshop 001.jpg
    newshop 001.jpg
    144.3 KB · Views: 226
Last edited:
OP
S

sdetweil

Well-known member
Joined
Jul 11, 2008
Messages
55
Location
near Austin Texas
got the eve angle installed, and the 2-16ft roll up doors mounted (while I had the lift equipment).

I have to reinforce the door mounting plates by tying into the eave strut. 1 done, 3 to go.
Once I get the skin on then I will finish the door install and adjust.

base angle and door mounted this weekend I hope.

Sam
 

Attachments

  • new shop 002.jpg
    new shop 002.jpg
    148 KB · Views: 205
  • new shop 003.jpg
    new shop 003.jpg
    149.6 KB · Views: 225

keduner

Well-known member
Joined
Oct 16, 2010
Messages
272
Location
Parker Colorado
Hi sdetweil: Your building is looking good. I'm just wrapping up a 30X40X14 steel frame (Heritage). We got ours insulated and closed in before the cold weather hit in Colorado. Good luck.
 
OP
S

sdetweil

Well-known member
Joined
Jul 11, 2008
Messages
55
Location
near Austin Texas
no, unfortunately.. its been raining regularly lately and we haven't gotten any time to start on the siding.. was hoping for this weekend as I have monday off.. so three days would have done it.. rain ..... I've got a couple guys ready to help so its just a weather thing.

I did get all the base angle and the walkdoor installed on the one dry windy day last weekend

need to lay the insulation down to cut it. .. and these sheets are like razorblades in the wind..

Sam
 

ambenz

Well-known member
Joined
Dec 12, 2010
Messages
4,236
Location
NW Chicago Suburbs
Sam, nice garage space so far, your truck is very cool!
I am guessing this new garage is gonna be a showcase with signs, finished walls and tiled floors?
Thanks for sharing your progress!
 

red69ss

Well-known member
Joined
Oct 31, 2010
Messages
126
Location
south carolina
Nice build, and I like the truck! I can understand your need for a seperate building to work in, I have a 30 x 40 and have three finished cars stored in it and I am currently trying to build another one. Everytime I go out to work I have to move all three, set up and work, then clean up an put them back in. It's a real pain and if it's raining I can't do any dirty work. I want to build on a working/dirty area in the future.

I know you are really going to enjoy having this seperate area for dirty work. congrats!
 
OP
S

sdetweil

Well-known member
Joined
Jul 11, 2008
Messages
55
Location
near Austin Texas
Nice build, and I like the truck! I can understand your need for a seperate building to work in, I have a 30 x 40 and have three finished cars stored in it and I am currently trying to build another one. Everytime I go out to work I have to move all three, set up and work, then clean up an put them back in. It's a real pain and if it's raining I can't do any dirty work. I want to build on a working/dirty area in the future.

I know you are really going to enjoy having this separate area for dirty work. congrats!


this one is the clean room!.. I have the 30x40 (red building in the pics) construction room. have 2 in progress already.

right now I need to weld and grind on one of the chassis. I need to roll it over.. this will take 2/3 of the 30x40 space.. and its raining and the green truck doesn't do water!..
my enclosed car trailer is holding the 56 truck (pic) which needs front chassis work too.. so I need some place to set the front clip and hood.. but the green truck is in the shop taking up space.. (hope she didn't hear that!)

Sam
 

Attachments

  • paint 052.jpg
    paint 052.jpg
    148.7 KB · Views: 93
OP
S

sdetweil

Well-known member
Joined
Jul 11, 2008
Messages
55
Location
near Austin Texas
Sam, nice garage space so far, your truck is very cool!
I am guessing this new garage is gonna be a showcase with signs, finished walls and tiled floors?
Thanks for sharing your progress!

thanks.. nah.. this is still gonna be a working space.
4 post lift, compressor, welder.. I will epoxy the floor once I can get the roof on and floor dry again.

Sam
 
OP
S

sdetweil

Well-known member
Joined
Jul 11, 2008
Messages
55
Location
near Austin Texas
finally got some decent weather over the weekend and Monday.. so we have been putting up the walls..

a lot more physical than we had planned on, working with the insulation..

3 walls done, easy wall to go.

1st day we battled unexpected winds. MUCH nicer with no/little wind.

Sam
 

Attachments

  • shop 001.jpg
    shop 001.jpg
    135.8 KB · Views: 209
  • shop 005.jpg
    shop 005.jpg
    126.4 KB · Views: 238
  • shop 004.jpg
    shop 004.jpg
    129.7 KB · Views: 190
  • shop 010.jpg
    shop 010.jpg
    141.3 KB · Views: 196
  • shop 008.jpg
    shop 008.jpg
    130 KB · Views: 216
Last edited:
OP
S

sdetweil

Well-known member
Joined
Jul 11, 2008
Messages
55
Location
near Austin Texas
walls done.. no time yet for roof.. trim on to stop rain onto insulation

Sam
 

Attachments

  • shop 003.jpg
    shop 003.jpg
    140.7 KB · Views: 171
  • shop 004.jpg
    shop 004.jpg
    145.9 KB · Views: 166
  • shop 001.jpg
    shop 001.jpg
    143.8 KB · Views: 173
To avoid these ads, REGISTER NOW!

Motown 454

Well-known member
Joined
Sep 25, 2008
Messages
1,359
Thats going to be a nice shop. More crappy weather for you guys. Can't cath a break. It looks good. I love the pick up.
 
OP
S

sdetweil

Well-known member
Joined
Jul 11, 2008
Messages
55
Location
near Austin Texas
progress report..

I decided I didn't have the time or skill to put the roof on, but I found local guy to do it.

roof is on, trim to go, and one big door is working.. (need some chain to do the other, it will be here tomorrow)..

still need to find a 10x10 rollup door, and get power run to the building..

Sam
 

Attachments

  • shop 005.jpg
    shop 005.jpg
    132.5 KB · Views: 142
  • shop 004.jpg
    shop 004.jpg
    134.2 KB · Views: 128
  • shop 003.jpg
    shop 003.jpg
    132.9 KB · Views: 157
  • shop 002.jpg
    shop 002.jpg
    140 KB · Views: 128

cnyeco1

Well-known member
Joined
Feb 3, 2009
Messages
326
Location
Oklahoma City, Oklahoma
Hey there.

I am up here in Okc. and was just wondering if you would tell me what one of these building kits runs. I have a buddy that built one about 8 years ago same size, and he said he had around $20,000 in it with electrical and concrete. Does that come close to what the prices are now?

I am planning on building the same size or maybe a 30x30 depending on the lot size I get.

Thanks in advance.
 
OP
S

sdetweil

Well-known member
Joined
Jul 11, 2008
Messages
55
Location
near Austin Texas
Hey there.

I am up here in Okc. and was just wondering if you would tell me what one of these building kits runs. I have a buddy that built one about 8 years ago same size, and he said he had around $20,000 in it with electrical and concrete. Does that come close to what the prices are now?

I am planning on building the same size or maybe a 30x30 depending on the lot size I get.

Thanks in advance.

the building kit cost $7500 including the insulation(insulation was 1400)(see http://www.muellerinc.com/building/prefab_kits.php).
as I am only 35 miles from the plant, delivery was only $200)
The slab cost me $4200 (3.50/sqft) including steel.

I am still working on the electric. I have the wire for to the building. just need to trench and connect to the master breaker panel (pole mounted 75ft away) wiring inside the building will be another . $300-400, me doing all the work.

I found the big doors used for $400 each, including tracks.
had to buy one chain drive.

so I am guessing $13500 total. and $1000 labor to put the roof on, 14,500 final.

sam

I got quotes of 15000 for the building, material and labor (no doors), installed on top of the existing slab or 8000 labor to assemble the kit on the slab. so , I saved 7000 by doing 7/8s of the install.
 
Last edited:
OP
S

sdetweil

Well-known member
Joined
Jul 11, 2008
Messages
55
Location
near Austin Texas
outside finished.!!

electrician here yesterday, working an estimate, as we need to repair a power to the house problem at the same time.

Sam
 

Attachments

  • building 003.jpg
    building 003.jpg
    144.1 KB · Views: 116
  • building 002.jpg
    building 002.jpg
    143.5 KB · Views: 87

iride47

Member
Joined
Sep 25, 2010
Messages
8
Looks good. I am subscribing to this thread as I have a building very similar I am about to put up.
 

John in OH

Well-known member
Joined
Jun 2, 2007
Messages
2,444
Location
SE Ohio & Eastern Virginia
Nice building! Steel construction looks like a good, simple construction technique.

Wondering what kind of jack/hoist you used to lift the truss members? I don't think I've ever seen a vertical hoist like the one you used. Is there a specific name for this hoist? What was your rental source?
 
OP
S

sdetweil

Well-known member
Joined
Jul 11, 2008
Messages
55
Location
near Austin Texas
Nice building! Steel construction looks like a good, simple construction technique.

Wondering what kind of jack/hoist you used to lift the truss members? I don't think I've ever seen a vertical hoist like the one you used. Is there a specific name for this hoist? What was your rental source?

its called a material lift, typically used to put air conditioner units and ducting work in place on overhead locations. If you watch the meuller setup video, this is what they used as well. http://www.muellerinc.com/downloads/prefabvid.php see section 4.

this unit from Sunbelt rental (as part of the Lowes Hardware location) was a 24ft unit, lifting 650 lbs (to 24ft!)..
http://www.sunbeltrentals.com/equipment/category.aspx?id=s502
a week rental was $180.. we got the frame up in 3 work days.
folds and rolls into the back of a pickup, laying down. single person can move it into/out of the pickup.. I did.

the central beams only weighed around 300lbs. (w12x10, 10bs/ft*30)
we used it to lift the 16ft rollup doors as well, which weigh in at almost 400.

On the rollup doors, I used some pallet rack shelf supports (4000lb) I had, to give us an 8ft spread between the lift straps. Could have done the same for the main beam as well. but I didn't feel any issue cranking it up..(we used some non-slip rubber pad and ratchet strapped the beam to the lift arms) then we stood and bolted the main beam risers to the lifted cross piece, and left it there.

I poured the slab before I knew exactly what building I was putting up, and how it attached to the slab. I had someone install metal weld plates into the slab at pour time so I could weld up, or weld the bolt up legs to the plates. just made it a little more work/and unstable during the post raising.. my son had to weld the legs as I held them in place. (another reason for leaving the lift in place all week.

yes, the kit was easy, all bolt together. the end wall sections were tricky .. we put up the corner, attached the roof eave piece to it, bolted the next support to that roof piece (10ft out), and then swung the roof piece up by lifting the free leg. we strapped the corner piece to my dually front grill for extra support (welded to the floor as well). this was the most challenging spot.. course we could have used the material lift, but it was busy holding the main beam. we used my electric impact wrench, and loctite on the bolts.

Sam
 
Last edited:

green.bubbly

Well-known member
Joined
Dec 14, 2008
Messages
2,156
Location
Lafayette, LA
Nice building! Steel construction looks like a good, simple construction technique.

Wondering what kind of jack/hoist you used to lift the truss members? I don't think I've ever seen a vertical hoist like the one you used. Is there a specific name for this hoist? What was your rental source?


I am building a 24x24 Mueller building. The lift would have been nice but nothing a out of shape 45 year old and a strong 24 year old son could not handle. At least with a 24x24 building. The hardest part was the 24 foot long girts on the sides. And extra hand would have made it a little easier but a little rope and ingenuity worked as well.


I poured the slab before I knew exactly what building I was putting up, and how it attached to the slab. I had someone install metal weld plates into the slab at pour time so I could weld up, or weld the bolt up legs to the plates. just made it a little more work/and unstable during the post raising.. my son had to weld the legs as I held them in place. (another reason for leaving the lift in place all week.

yes, the kit was easy, all bolt together. the end wall sections were tricky .. we put up the corner, attached the roof eave piece to it, bolted the next support to that roof piece (10ft out), and then swung the roof piece up by lifting the free leg. we strapped the corner piece to my dually front grill for extra support (welded to the floor as well). this was the most challenging spot.. course we could have used the material lift, but it was busy holding the main beam. we used my electric impact wrench, and loctite on the bolts.

Sam


The impact wrench certainly made things go a lot better and quicker. My only complaint was the lack of step by step instructions but it was not that hard to figure things out. I hope my building turns out as nice as yours looks.

Not sure if you feel the same but building it myself was half the fun. Sure, it is taking longer than I planned but when it is done, you can proudly tell people you built it. :rocker:
 
OP
S

sdetweil

Well-known member
Joined
Jul 11, 2008
Messages
55
Location
near Austin Texas
I am building a 24x24 Mueller building. The lift would have been nice but nothing a out of shape 45 year old and a strong 24 year old son could not handle. At least with a 24x24 building. The hardest part was the 24 foot long girts on the sides. And extra hand would have made it a little easier but a little rope and ingenuity worked as well.

The impact wrench certainly made things go a lot better and quicker. My only complaint was the lack of step by step instructions but it was not that hard to figure things out. I hope my building turns out as nice as yours looks.

Not sure if you feel the same but building it myself was half the fun. Sure, it is taking longer than I planned but when it is done, you can proudly tell people you built it. :rocker:

yes, at LEAST half the fun.. I really enjoyed it!.. I watched the Mueller video online, so it was fairly clear, and the drawings showed each connection and what bolts to use.

only spot I missed was putting the door trim on BEFORE the siding on the 1st piece, and cut it too small.. so had to go get another piece of R panel.

sam
 
OP
S

sdetweil

Well-known member
Joined
Jul 11, 2008
Messages
55
Location
near Austin Texas
Smart man...:thumbup:...take care of the better half's electrical problem 1st and have one bill...who's to say what the new garage elec. install cost??:bounce:

yeh, looks like the original owner, self builder did some crazy electrical stuff.

rather than one straight pull into the house in a closed conduit, he ran out the main panel to a splitter, then to another splitter(below), then to the house..

not really so bad, except one of the splitter locations has the splitter & wires submerged when it rains.. and that WILL fail eventually..
(pic attached)

to fix that, every other wire run is too short, and has to be redone.

fun..

Sam
 

Attachments

  • powerbox 001.jpg
    powerbox 001.jpg
    91.6 KB · Views: 80

slammed85

New member
Joined
Jan 15, 2012
Messages
2
Thinking of doing this myself as well. What kind of lift is that and did you rent it or do you own it? Any list of special tools you've needed during the build would be appreciated. Thanks!
 
To avoid these ads, REGISTER NOW!
Top Bottom