MBeaty
Well-known member
I stumbled across an older Craftsman machinist vise a while back. Originally I did not know too much about it, but soon found some information.
Here is an image of a 1960 Craftsman catalog that has the same vise in it.

I am not sure how long they made this style for, but I would venture to guess that it was from somewhere around 1960. From the "Vise's of GJ" thread, the consensus is that during this era, the Craftsman line of vises were re badged Columbians.
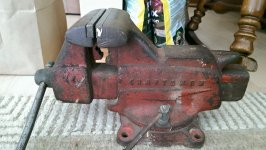
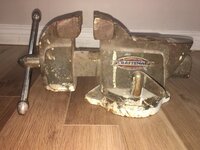
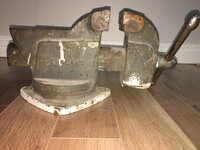
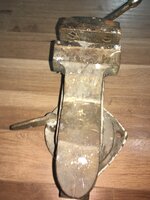
Here is what the vise looked like when I first got it. The model I have is the 4 inch variant.


As you can see from the pictures, the vise was definitely in "used" condition, but everything functioned perfectly fine. The wear is kind of interesting. It was definitely hit with a hammer quite often, but there were no signs of cracks and surprisingly the handle was almost perfectly straight. Just for reference, the other vise in the picture is also a Craftsman. It is a home owners vise rather than a machinist vise. Both are 4 inch vises, but as you can see there is a considerable difference between the two. Also, you can tell on the machinist vise, that the anvil potion of it was used, leaving the surface quite rough. I used a mill to machine this surface back to being flat.
After disassemble and a thorough cleaning I found a few issues that needed to be addressed. The brass washer on the end of the lead screw definitely showed some years of wear on it. It probably would have been good for another 40-50 years of use, as it the material was only about half worn, but I decided to make a replacement for it. I started with some brass stock and cut the basic shape, using a file to clean up the edges.

The next thing that I noticed that was bothersome to me was the slop between the handle and the lead screw. Just like many other well used vises, the handle had slightly deformed the end of the lead screw, thus giving it some slop. With the handle fully extended there was about 1 inch of play at the end of the handle. At first I was just going to live with this, but then I figures I already have it apart, why not fix it completely. To fix this problem, I first cut one of the flanges off the end of the handle to allow it to be removed.

This was quite a difficult cut to make. I hate to purposely cut up quality old tools, but I knew in the end it would be better. Also my goal was to make a usable vise, rather than a perfectly restored unit.
After the handle was removed, I used a 0.750 inch drill bit and drilled out the existing hole in the end of the lead screw to this larger diameter. For reference, the original handle diameter was about 0.625 inches. Once the hole was enlarged, I used some steel stock I had sitting around and turned down a bushing. The inside diameter of the bushing was 0.625 inches and the OD was 0.750 inches in order to fit the enlarged hole in the lead screw.


As you can see in the previous pictures, the sleeve was inserted into the enlarged hole. After being lightly pressed in, I tig welded around the perimeter of the sleeve. The welds were then cleaned up by chucking the whole lead screw into the lathe. After the lead screw was cleaned up, the handle was put back in place and the end was welded back onto it.
The body of the vise was not terribly rusty, but I decided to give it a good cleaning so that it could be painted nicely. Both the static and dynamic jaw were sandblasted.

It looks quite funny seeing the old cast iron this “naked.” With the surface so clean, you can clearly make out the “T” shaped replaceable jaws that these vises used. It was my original intention to remove the jaws and make some new aluminum jaws for the vise. This plan however was quickly shot down. Out of all of the pins on the vise that hold the jaws on, I could only find the top of 1 pin. The rest had been hit and smashed enough that it was impossible to even find where the pins were.
After getting the vise nice and clean, I decided that something had to be done about the vintage Craftsman Crown Badge on the side. I felt like this badge was important to the “character” of the vise, so it deserved a little attention.

Here is what the badge looked like before. Some of the edges were a little rough. Also, the “N” in Craftsman had been smashed to the point of almost not being recognizable and there was a cut at the base of the “R”

With a little bit of patience, a small file, a small flat blade screwdriver, a chisel, and a ball pein hammer with a very light touch, I was able to clean the badge up. It is by no means perfect, but I was able to knock some of the dents out and most importantly was able to bring relief back to the letter “N.”
In the mean time I had painted both the dynamic and static jaws. The paint job was nothing elaborate; it was simply done with Rustoleum “Machine Grey” paint from a rattle can. I was not too worried about the finish, because I actually prefer the looks of a vise that has had some use to it.")
After all of the painting was done, it was time for final assembly. After assembly I was still disappointed that I could not remove the stock jaws. They closed pretty nicely, but were not perfectly flat and the dynamic jaw closed slightly lower than the static jaw. Because of this is decided to machine some magnetic jaw inserts to cover the stock ones.
Starting with some aluminum flat stock, I machined a pocket that would sit around the existing jaw. Then I machined 2 recesses in the back of each pocket. In each of these recesses sits a small magnet. These are strong enough to hold the jaw inserts in place.

You can see the detail in the back side of the jaw inserts in this picture.
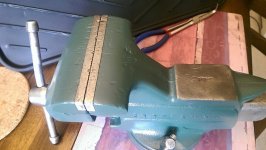
Now it was finally time to assemble all the parts. Here is the final product.


You can see in this picture that the Craftsman badge cleaned up quite nicely. I could not get it perfect, which is why I avoided trying to paint it with a more detailed color scheme. I actually had sprayed some flat black paint on it just to sand it back off to find the low spots. With most of the paint removed from the high areas, I was quite happy with how it actually looked, so I just left it that way. The original rivets to hold the badge on were drilled out and replaced with 4-40 screws.

You can see the new brass washer and the complete handle in this picture.

In this picture, you can see the jaw inserts on the finished product. IN order to get a nice fit from the jaw inserts, I put them on both jaws of the vise, and then clamped the entire vise onto the mill. I then machined the top of the inserts down so that both inserts were perfectly level with each other. Unfortunately this was not the most stable way to hold the parts for milling, so the surface finish left a little to be desired. It will do for a working vise though. If you look closely in the picture, on the bottom left hand side you can see the top of the one jaw remaining pin that I could find.

I stamped a “F” and a “R” into the inserts so that I will be sure to put them on the respective jaws so that everything lines up.
All and all I think it turned out pretty good. Some day I would like to tackle removing the jaws, but it may be easier to just accept this vise as it is and get another one to work on. Now I just need a workbench to hook this vise too
Here is an image of a 1960 Craftsman catalog that has the same vise in it.
I am not sure how long they made this style for, but I would venture to guess that it was from somewhere around 1960. From the "Vise's of GJ" thread, the consensus is that during this era, the Craftsman line of vises were re badged Columbians.
Here is what the vise looked like when I first got it. The model I have is the 4 inch variant.
As you can see from the pictures, the vise was definitely in "used" condition, but everything functioned perfectly fine. The wear is kind of interesting. It was definitely hit with a hammer quite often, but there were no signs of cracks and surprisingly the handle was almost perfectly straight. Just for reference, the other vise in the picture is also a Craftsman. It is a home owners vise rather than a machinist vise. Both are 4 inch vises, but as you can see there is a considerable difference between the two. Also, you can tell on the machinist vise, that the anvil potion of it was used, leaving the surface quite rough. I used a mill to machine this surface back to being flat.
After disassemble and a thorough cleaning I found a few issues that needed to be addressed. The brass washer on the end of the lead screw definitely showed some years of wear on it. It probably would have been good for another 40-50 years of use, as it the material was only about half worn, but I decided to make a replacement for it. I started with some brass stock and cut the basic shape, using a file to clean up the edges.
The next thing that I noticed that was bothersome to me was the slop between the handle and the lead screw. Just like many other well used vises, the handle had slightly deformed the end of the lead screw, thus giving it some slop. With the handle fully extended there was about 1 inch of play at the end of the handle. At first I was just going to live with this, but then I figures I already have it apart, why not fix it completely. To fix this problem, I first cut one of the flanges off the end of the handle to allow it to be removed.
This was quite a difficult cut to make. I hate to purposely cut up quality old tools, but I knew in the end it would be better. Also my goal was to make a usable vise, rather than a perfectly restored unit.
After the handle was removed, I used a 0.750 inch drill bit and drilled out the existing hole in the end of the lead screw to this larger diameter. For reference, the original handle diameter was about 0.625 inches. Once the hole was enlarged, I used some steel stock I had sitting around and turned down a bushing. The inside diameter of the bushing was 0.625 inches and the OD was 0.750 inches in order to fit the enlarged hole in the lead screw.
As you can see in the previous pictures, the sleeve was inserted into the enlarged hole. After being lightly pressed in, I tig welded around the perimeter of the sleeve. The welds were then cleaned up by chucking the whole lead screw into the lathe. After the lead screw was cleaned up, the handle was put back in place and the end was welded back onto it.
The body of the vise was not terribly rusty, but I decided to give it a good cleaning so that it could be painted nicely. Both the static and dynamic jaw were sandblasted.
It looks quite funny seeing the old cast iron this “naked.” With the surface so clean, you can clearly make out the “T” shaped replaceable jaws that these vises used. It was my original intention to remove the jaws and make some new aluminum jaws for the vise. This plan however was quickly shot down. Out of all of the pins on the vise that hold the jaws on, I could only find the top of 1 pin. The rest had been hit and smashed enough that it was impossible to even find where the pins were.
After getting the vise nice and clean, I decided that something had to be done about the vintage Craftsman Crown Badge on the side. I felt like this badge was important to the “character” of the vise, so it deserved a little attention.
Here is what the badge looked like before. Some of the edges were a little rough. Also, the “N” in Craftsman had been smashed to the point of almost not being recognizable and there was a cut at the base of the “R”
With a little bit of patience, a small file, a small flat blade screwdriver, a chisel, and a ball pein hammer with a very light touch, I was able to clean the badge up. It is by no means perfect, but I was able to knock some of the dents out and most importantly was able to bring relief back to the letter “N.”
In the mean time I had painted both the dynamic and static jaws. The paint job was nothing elaborate; it was simply done with Rustoleum “Machine Grey” paint from a rattle can. I was not too worried about the finish, because I actually prefer the looks of a vise that has had some use to it.
After all of the painting was done, it was time for final assembly. After assembly I was still disappointed that I could not remove the stock jaws. They closed pretty nicely, but were not perfectly flat and the dynamic jaw closed slightly lower than the static jaw. Because of this is decided to machine some magnetic jaw inserts to cover the stock ones.
Starting with some aluminum flat stock, I machined a pocket that would sit around the existing jaw. Then I machined 2 recesses in the back of each pocket. In each of these recesses sits a small magnet. These are strong enough to hold the jaw inserts in place.
You can see the detail in the back side of the jaw inserts in this picture.
Now it was finally time to assemble all the parts. Here is the final product.
You can see in this picture that the Craftsman badge cleaned up quite nicely. I could not get it perfect, which is why I avoided trying to paint it with a more detailed color scheme. I actually had sprayed some flat black paint on it just to sand it back off to find the low spots. With most of the paint removed from the high areas, I was quite happy with how it actually looked, so I just left it that way. The original rivets to hold the badge on were drilled out and replaced with 4-40 screws.
You can see the new brass washer and the complete handle in this picture.
In this picture, you can see the jaw inserts on the finished product. IN order to get a nice fit from the jaw inserts, I put them on both jaws of the vise, and then clamped the entire vise onto the mill. I then machined the top of the inserts down so that both inserts were perfectly level with each other. Unfortunately this was not the most stable way to hold the parts for milling, so the surface finish left a little to be desired. It will do for a working vise though. If you look closely in the picture, on the bottom left hand side you can see the top of the one jaw remaining pin that I could find.
I stamped a “F” and a “R” into the inserts so that I will be sure to put them on the respective jaws so that everything lines up.
All and all I think it turned out pretty good. Some day I would like to tackle removing the jaws, but it may be easier to just accept this vise as it is and get another one to work on. Now I just need a workbench to hook this vise too