

DeadSock
Well-known member
Let me describe what I've uncovered so far ...
This is an attached garage 20x20, with 2 gable walls.
One gable is fully attached to the house.
The other gable is a full exterior wall.
Ridge is a single 2x6.
One eave wall is half attached to a 2 story addition to the house (the other half exterior wall with a 3x3 window).
The other eave is an exterior 16x7 garage door opening.
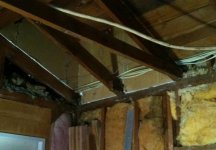
The rafters are 2x6 at 2'oc.
No collar ties.
Walls are 2x4, sheathed with the 60's equivalent of T111.
I stripped the interior ... sheetrock for the interior sided walls and the severely deteriorating particle board for the exterior sided walls. (only insulation exists currently on the interior sides). There was some (sagging) particle board haphazardly spanning the ceiling "joists" (see below) that has been extracted.
Now for the good (actually bad!) parts.
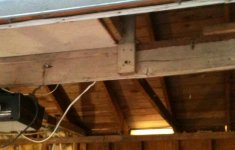
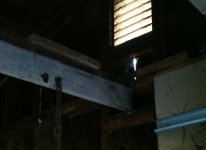
The gable to gable span is a single 2x8 (looks like leftover TG flooring) to act as a "beam". As a plus, it's not even sitting on the top plate, but is instead notched to fit bellow it, and then supported by 2x4 blocks nailed to the side walls. There are 3 braces nailed to this "beam" running vertically to support? the ridge. Probably should mention, not like it's a surprise, this "beam" is sagging from some cracks that have developed. The ridge has a minor hogs back from this sagging (perhaps 2" over the 20' span)
It gets better (or worse as the case may be).
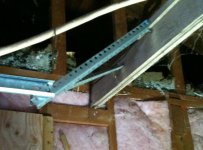
The ceiling "joists" are simply 12' 2x4 spanning the 10' distance, resting on the "beam" and nailed together to make the 20' span. Oh, and it's not like these are also at 2'oc like the rafters, they are only every other (aka 3 of these at 4'oc). It almost looks like someone cut the intermediate ones away (WTF?). The PO also had stored Xmas decorations and also a 40 pound box of leftover VAT tile up there (and yes, I know where the VAT was installed and will "encapsulate" it since I didn't want to pull it from a slab anyway).
So, think I should address some of this? (tongue firmly in cheek).
I'm thinking of replacing the beam with 2 2x12's sitting on the top plate (with a 4x4 to carry the load to the slab). Then running 2x6 at 2'oc resting on top of the beam to tie in the rafters. I'd run 3 4x4 braces from the beam to the ridge too. Should I consider a steel beam (for a trolley?) instead?
Can't be worse than what's been (barely?) holding the pace up for 40+ years right?
Some questions tho ...
Sound like a plan?
Any ideas on how to temporarily support the "structure" while I replace stuff? In order to get a new beam in place, the 3 ceiling "joists" from eave to eave need to come out. Would temporary posts supporting the ridge be sufficient to hold everything up while I fit a new beam/joists/braces?
This was an "as-is" foreclosure we've remodeled and recently moved into. I knew that "beam" was an issue going in, some of the rest has been a surprise tho.
Other than a poorly framed window opening in the kitchen (that has now been properly done), this is the only real "WTF we're they thinking" aspect we've come across.
P.S. I'll get some pics up tonight if possible.
This is an attached garage 20x20, with 2 gable walls.
One gable is fully attached to the house.
The other gable is a full exterior wall.
Ridge is a single 2x6.
One eave wall is half attached to a 2 story addition to the house (the other half exterior wall with a 3x3 window).
The other eave is an exterior 16x7 garage door opening.
The rafters are 2x6 at 2'oc.
No collar ties.
Walls are 2x4, sheathed with the 60's equivalent of T111.
I stripped the interior ... sheetrock for the interior sided walls and the severely deteriorating particle board for the exterior sided walls. (only insulation exists currently on the interior sides). There was some (sagging) particle board haphazardly spanning the ceiling "joists" (see below) that has been extracted.
Now for the good (actually bad!) parts.
The gable to gable span is a single 2x8 (looks like leftover TG flooring) to act as a "beam". As a plus, it's not even sitting on the top plate, but is instead notched to fit bellow it, and then supported by 2x4 blocks nailed to the side walls. There are 3 braces nailed to this "beam" running vertically to support? the ridge. Probably should mention, not like it's a surprise, this "beam" is sagging from some cracks that have developed. The ridge has a minor hogs back from this sagging (perhaps 2" over the 20' span)
It gets better (or worse as the case may be).
The ceiling "joists" are simply 12' 2x4 spanning the 10' distance, resting on the "beam" and nailed together to make the 20' span. Oh, and it's not like these are also at 2'oc like the rafters, they are only every other (aka 3 of these at 4'oc). It almost looks like someone cut the intermediate ones away (WTF?). The PO also had stored Xmas decorations and also a 40 pound box of leftover VAT tile up there (and yes, I know where the VAT was installed and will "encapsulate" it since I didn't want to pull it from a slab anyway).
So, think I should address some of this? (tongue firmly in cheek).
I'm thinking of replacing the beam with 2 2x12's sitting on the top plate (with a 4x4 to carry the load to the slab). Then running 2x6 at 2'oc resting on top of the beam to tie in the rafters. I'd run 3 4x4 braces from the beam to the ridge too. Should I consider a steel beam (for a trolley?) instead?
Can't be worse than what's been (barely?) holding the pace up for 40+ years right?
Some questions tho ...
Sound like a plan?
Any ideas on how to temporarily support the "structure" while I replace stuff? In order to get a new beam in place, the 3 ceiling "joists" from eave to eave need to come out. Would temporary posts supporting the ridge be sufficient to hold everything up while I fit a new beam/joists/braces?
This was an "as-is" foreclosure we've remodeled and recently moved into. I knew that "beam" was an issue going in, some of the rest has been a surprise tho.
Other than a poorly framed window opening in the kitchen (that has now been properly done), this is the only real "WTF we're they thinking" aspect we've come across.
P.S. I'll get some pics up tonight if possible.

 ) ... I'm planning on putting in a 12x7 (could even go to 10x7). So will be adding some additional framing at that eave.