To avoid these ads, REGISTER NOW!

So I may need to finish my radiant heat DIY and have questions.

Fastback

Well-known member
Joined
Oct 5, 2010
Messages
518
Location
Indy
I was going to count on someone else to install this stuff (Family member) but now I may be on my own, I really dont do a lot of plumbing but I am willing to learn...I dont even know how to fill this thing once it is made up, but I have taken on larger tasks with less resources in the past, so here goes, besides I think it may be a nice DIY project.

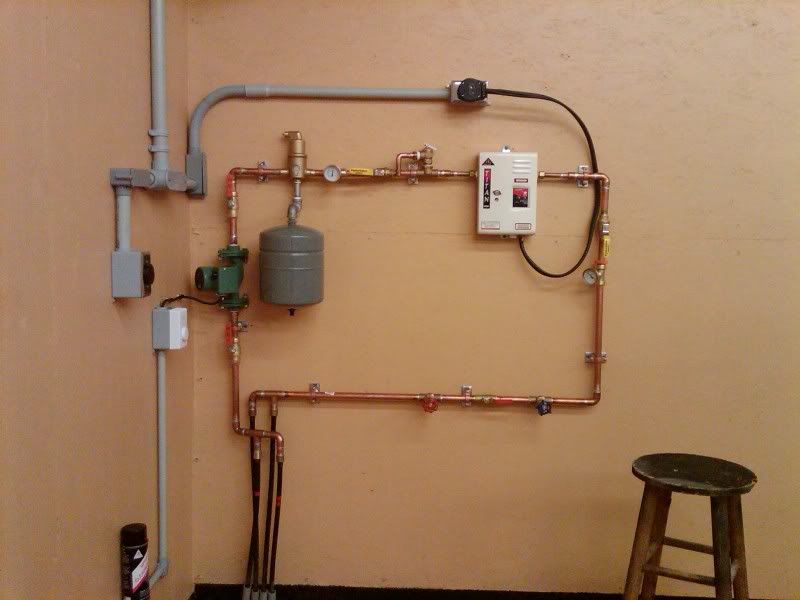
I already have a tankless electric hot water heater and two loops of 1/2 PEX in the slab and I need to purchase and connect everything to make it work. I want to keep this system as tiny, compact and as simple as I can.

I have a Menards near me that sells many of the parts needed circulation pumps and manifolds etc.. I like the idea of buying local when possible but I have a few things that are confusing me.

With my closed system will I need any type of mix circuit or mix pump? If my heater sees more than .25 GPM of flow it turns on, and since I have no tank I just dont see the point in having anything like that?

I know I will need some sort of relay box that sees the thermostat or temp sensor and turns on the pump, once the pump is flowing the rest is automatic.

I see that I need an expansion tank that will allow me to pressurize the system to a specific PSI, but will that help deal with air in the line or will I still need some kinda air bleeder?

Fill and purge valves? What are those and where would they go in a system like this?

Does anyone have a good drawing of a small system without recirculation or a good link that may point me in the right direction?

:bowdown:


EDIT:

I see this at Northerntool, can anyone explain it in detail?

456331_lg.jpg
 
Last edited:
To avoid these ads, REGISTER NOW!

Ginmn

Member
Joined
Dec 15, 2010
Messages
8
Good day,

I've been researching radiant systems and have worked with Pex for potable plumbing within my home, so the next logical step would be to install in slab and in house heat. So, yes I have not installed a system such as what you are talking about, but I feel rather capable given investigation.

I'm interested in knowing how your system install finished.

The picture you've attached to this post contains of course the Seisco system control / heater, but for simplicity starting on the bottom left at the copper pipe then moving up and right:

copper pipe - cold water input
top of elbow - looks like a back flow preventer
T - input water can take 1 of two directions (cold bypass to slab / cold to heater)
white pex - untempered cold to slab
dial gauge - pressure / temperature indicator (input water temp/pressure)
seisco - tankless water heater
top of the brass T - air/steam purge valve or max pressure purge valve
yellow handle - on/off valve
next to the valve in the T - possibly a purge or safety valve
red bolted device - circulation pump
blue handle garden hose purge or expansion tank isolation valve
Gray tank - expansion tank
white line - heated water to slab
metal shelf / drip & spray guard
red lines - system input to slab

Above describes the panel which is a basic system for a small non-zoned system.

Off to the left, the white box on the wall is the thermostat, and above is the electrical supply.

Although your system is closed and the heat will turn on a circulation pump should be used for best operation. The cost of the pump is minimal but will improve performance (at least that's what I've been told).

The expansion tank is needed not for "pressurizing" the system, rather is a safety feature because of water expansion. It is strongly recommended to purge all air from the system having a purge valve installed.

I don't see why you're so against having a pump installed. Even though input pressure will move solution through the heater, a recirculation device allows for resting of the heating unit and keeps "cold" spots from developing.

I'm interested in knowing if you got everything installed and working?
 
OP
F

Fastback

Well-known member
Joined
Oct 5, 2010
Messages
518
Location
Indy
Sorry, I am not against having a pump, I just dont want a mix pump/bypass circuit that is typically used in a tank style system.
 
OP
F

Fastback

Well-known member
Joined
Oct 5, 2010
Messages
518
Location
Indy
So.... Nobody has a good site that lists whats needed for a basic system? I have no idea what kinda purge valve to use and some of the other small parts are still a mystery? I am going to use a Taco 007 pump from the looks of things but could still benefit from advice on relay boxes and other parts? (The TACO relay box looks like a pretty good deal tho)
 

Novicaine

Well-known member
Joined
Oct 17, 2010
Messages
53
Location
Central Illinois
Can your heater tolerate cold water coming into it?
If so, your setup will be simple, you won't need a mixing circuit, unless you want to limit the temp going to the floor (but not needed for a concrete garage floor).

For the control part: You won't need the Taco controller. Since the heater will come on when it senses flow, just get a ~$80 110v thermostat at any hardware store and plug the circulator into it. Then when the thermostat calls for heat, it'll kick on your 110v circulator, which will create flow which will kick on your heater.

For the water loop, you want to put the pump on the output side of the heater, and put an air separator with expansion tank hanging from it in front of the pump (so it's in a low pressure area) and at the highest location. Try to keep a straight pipe area in front of the pump inlet to avoid cavitation.

Go from the output of pump into the floor loops. Go out of the floor loops into the heater.

Put some shutoff values and couplers in there so you can replace the heater or pump if needed. To fix, assuming water, just put a boiler drain value at a low spot in the system for draining, but hook a hose to it to fill the system.

Menard's should have everything you need. They have a nice Honeywell air separator also.

Disclaimer: I'm no pro.
 
Last edited:
OP
F

Fastback

Well-known member
Joined
Oct 5, 2010
Messages
518
Location
Indy
Can your heater tolerate cold water coming into it?
If so, your setup will be simple, you won't need a mixing circuit, unless you want to limit the temp going to the floor (but not needed for a concrete garage floor).

For the control part: You won't need the Taco controller. Since the heater will come on when it senses flow, just get a ~$80 110v thermostat at any hardware store and plug the circulator into it. Then when the thermostat calls for heat, it'll kick on your 110v circulator, which will create flow which will kick on your heater.

For the water loop, you want to put the pump on the output side of the heater, and put an air separator with expansion tank hanging from it in front of the pump (so it's in a low pressure area) and at the highest location. Try to keep a straight pipe area in front of the pump inlet to avoid cavitation.

Go from the output of pump into the floor loops. Go out of the floor loops into the heater.

Put some shutoff values and couplers in there so you can replace the heater or pump if needed. To fix, assuming water, just put a boiler drain value at a low spot in the system for draining, but hook a hose to it to fill the system.

Menard's should have everything you need. They have a nice Honeywell air separator also.

Disclaimer: I'm no pro.

That is all great info!

What about filling the system? Any tips?

Thanks!
 

Eggman

Well-known member
Joined
Dec 29, 2010
Messages
82
Location
St. Louis
Definately put the 90* ball valves on either side of the heater, pump and the expansion tank. Sounds like you are using an instant on water heater, you won't have to be concerned with the return water temps. However, if I was wanting to fill the system, I would put an air bleeder on the highest point of the system (to vent the air out) and a fill valve and a pressure regulator combo on the input side directly on the incoming water line following another ball valve to shut water off to the entire system. (Some municipalities require a backflow preventer.) This way, you don't have to stand there and burp the system as it works all the little air bubbles out as the water circulates. You'll also want to find out what the ratio of glycol is for your area. Most sytems also have the circulating pump on the return side of the heat source. Meaning the cooler water goes through the pump prior to the heat source to help keep the pump cool and to aid in pre-heating the returning water a bit for the heat source.

HTH,

Eggman
 
OP
F

Fastback

Well-known member
Joined
Oct 5, 2010
Messages
518
Location
Indy
Thanks for the advice.

I am still trying to figure out the pump deal, if it is a recirculation pump can it make pressure or is it just for moving fluid? I guess I am concerned about it being able to pump fluid "up" or having enough lift?
That leads me to the fill question again, can the pump in the system draw the coolant in from a bucket, should I use a funnel and fill it on the top, and if so what side (behind the pump or in front?)

Whats the popular trick?
 

Novicaine

Well-known member
Joined
Oct 17, 2010
Messages
53
Location
Central Illinois
That is all great info!

What about filling the system? Any tips?

Thanks!

Set it up so as water goes in, air can come out. There are two scenarios, if you are adding plain water or antifreeze mixture.

I google'd and found this:

http://www.radiantcompany.com/details/fill.shtml

And here is the install instructions for one of the radiant panels Menard's sales that describes their system which is applicable to others:

http://www.hydro-smart.com/Images/IntegratorPanel_InstallManual.pdf
 
OP
F

Fastback

Well-known member
Joined
Oct 5, 2010
Messages
518
Location
Indy
Definately put the 90* ball valves on either side of the heater, pump and the expansion tank.

HTH,

Eggman

So you are saying that I need 6 ball valves, one one each side of all three devices? Seems a bit much, this system should hold under 6 gallons, I cant wrap my head around why I would need to shut off in so many places on a closed system?
 

Eggman

Well-known member
Joined
Dec 29, 2010
Messages
82
Location
St. Louis
So you are saying that I need 6 ball valves, one one each side of all three devices? Seems a bit much, this system should hold under 6 gallons, I cant wrap my head around why I would need to shut off in so many places on a closed system?

Then I would look at one each before and after the pump and one right before the fill valve. That way you only have 3 valves total. The system will probably hold more than what you think. 24.5 feet of 1/2" pex will hold a gallon (if my math is right)

HTH,

Eggman
 
OP
F

Fastback

Well-known member
Joined
Oct 5, 2010
Messages
518
Location
Indy
I found a chart that shows .92 gallons per 100' of 1/2" tube. I have two loops of around 275 feet IIRC, so thats about 5 gallons in the floor and whatever is in the expansion tank etc..
 

59 wagon man

Well-known member
Joined
Oct 25, 2010
Messages
1,589
Location
hollywood fla
on the return from each zone you should put a hose bibb followed by a ball valve to shut off the return. shut off the ball valve and hook up a hose to the hose bibb drop the end of the hose into a bucket,open the hose bibb and fill the system until the water coming out of the hose in the bucket shows no more air bubbles at that point shut off the hose bibb and proceed to the next zone when all the zones are bleed then open the return to the boiler and you should have out most of the air
 
OP
F

Fastback

Well-known member
Joined
Oct 5, 2010
Messages
518
Location
Indy
Cant I just put a fill valve just above the pump and let it do the work?
 

yevangelis

Well-known member
Joined
Jan 4, 2011
Messages
409
Location
PHX
Can your heater tolerate cold water coming into it?
If so, your setup will be simple, you won't need a mixing circuit, unless you want to limit the temp going to the floor (but not needed for a concrete garage floor).

Disclaimer: I'm no pro.

actually max temp for a concrete floor should not exceed about 140 f. at that temp its uncomfortably hot and not as evenly distributed as a cooler temp. I believe 90-115 is ideal depending on insulation under the slab.

Fastback- i am putting in a heater and hooking up the plumbing within 2 weeks in my own shop so I am right about where you are.

what do you mean by letting a fill valve do all the work? an automatic fill valve 'tops off' your system if the psi in your system goes below a preset level (adjustable on most) other wise you would have to check it periodically and crack open a ball valve to allow street pressure in to fill it up if its low (cheap route), and this is assuming you have street pressure not a well pump.

you simply need a thermostat that tells your pump to turn on, which then actuates the flow sensor on the heater, and shazam everythings working.

somewhere i think i heard that you dont need a mixing valve on electric heater but im not sure... i would just tee the output input water pipes with a ball valve and experiment.

i am drawing up my own schem and can post it if you wanna see it.
 
OP
F

Fastback

Well-known member
Joined
Oct 5, 2010
Messages
518
Location
Indy
Well, I ordered all of my parts on-line and saved about half of what Menards wanted for in-stock merchandise.

I opted for two sets of valves, one set hard plumbed in front and behind the pump, and a shark bite set around the heater.

22185-0000-4.jpg


I also used a set of shark bite "T" fittings with temp gauges that will do double duty in the event that I need to take the system apart in the future, no cuts needed.

22773-1.jpg


I am going to use a Spirovent on the top tube with the tank hanging from its bottom and I will use a boiler valve on the bottom tube to aid in draining and possibly filling the system, I may also be able to fill at the pressure relief valve location in the top tube.

When I get it done I will post a picture with names of each piece for the next guy to use as reference (If my system works).
 

Throttlejockey

Well-known member
Joined
Jan 31, 2005
Messages
78
Location
CT
For filling I have a T piped in with a one way check valve. On that I have a water hose quick release fitting. I use this for filling and pressurizing the system.
 
OP
F

Fastback

Well-known member
Joined
Oct 5, 2010
Messages
518
Location
Indy
For filling I have a T piped in with a one way check valve. On that I have a water hose quick release fitting. I use this for filling and pressurizing the system.

Do you have a link or pic? I would like to know more about that.
 

Throttlejockey

Well-known member
Joined
Jan 31, 2005
Messages
78
Location
CT
All it is is a 3/4 one way check valve. Then I threaded a barb into one end and slipped a piece of hose on it with a quick release hose fitting.
 
To avoid these ads, REGISTER NOW!
OP
F

Fastback

Well-known member
Joined
Oct 5, 2010
Messages
518
Location
Indy
Thanks.

I am getting there. I am going to have two boiler valves on the bottom row after the return manifold with a ball valve between them, then I am going to force fluid through the system through valve #1 and allow it to return through the other boiler valve and into a bucket to be recirculated. The Spirovent will let the air out and once I am satisfied the system cannot take any more fluid I will just start closing valves.

I have seen this method used on the web in a solar based closed loop system, it looked fairly simple and made sense.
 

truckman5000

Well-known member
Joined
Mar 11, 2008
Messages
1,440
you can t use shark bite fittings on heat pipes. Due to the expansion/contraction of the pipe.

Use could use a circulation pump like a tacco 007 variable speed pump. And to make it easy on you, get the "purge" circ pump fittings. Basically a isolation valve with a hose connection to blead the air out.
You could leave the syatems without a domestic water feed valve and just use a psi guage to monator the system and fill through a hose bib connection off the house. The closed loop system will work at 25psi to 1 and the unit will cut out on a flow fault, if that unit has one..just keep 10 psi in the system.
An air eliminator wont be needed in this system, as ure feeding water in and purging out everytime you need more water like once a year you will probely need to recharge.
So if you tee the 2 loops to gether, first in, last out. or reverse return. This means the 1st loop on the supply ties in last on your return, your 2nd on the supply ties in 1st on the return. This gives the system equall pressure and flow. The two loops will be the same temp.
Add a pump, purge tee/valve,an auto vent on top of the system, temp relief valve. Bettween your unit and you return pipes first tee.
Tie the units supply rite into the supply pipe tees.
It would work as long as your heater is a symple electric type.
Tried to make it symple, acouple google checks will straiten you out.
Mike

Edit, your last post, dont use valves to throttle down the loops.Pipe system reverse return or first in last out. This is the rite way and is common knowlage through plumbers ect.
 
Last edited:
OP
F

Fastback

Well-known member
Joined
Oct 5, 2010
Messages
518
Location
Indy
you can t use shark bite fittings on heat pipes. Due to the expansion/contraction of the pipe.

Use could use a circulation pump like a tacco 007 variable speed pump. And to make it easy on you, get the "purge" circ pump fittings. Basically a isolation valve with a hose connection to blead the air out.
You could leave the syatems without a domestic water feed valve and just use a psi guage to monator the system and fill through a hose bib connection off the house. The closed loop system will work at 25psi to 1 and the unit will cut out on a flow fault, if that unit has one..just keep 10 psi in the system.
An air eliminator wont be needed in this system, as ure feeding water in and purging out everytime you need more water like once a year you will probely need to recharge.
So if you tee the 2 loops to gether, first in, last out. or reverse return. This means the 1st loop on the supply ties in last on your return, your 2nd on the supply ties in 1st on the return. This gives the system equall pressure and flow. The two loops will be the same temp.
Add a pump, purge tee/valve,an auto vent on top of the system, temp relief valve. Bettween your unit and you return pipes first tee.
Tie the units supply rite into the supply pipe tees.
It would work as long as your heater is a symple electric type.
Tried to make it symple, acouple google checks will straiten you out.
Mike

Edit, your last post, dont use valves to throttle down the loops.Pipe system reverse return or first in last out. This is the rite way and is common knowlage through plumbers ect.

Well, not only am I using sharkbite fittings and valves in some places, I will use Sharkbite temp gauges... they are rated for this application specifically.

And from what research I have done an air eliminator is always recommended over a scoop.
 

truckman5000

Well-known member
Joined
Mar 11, 2008
Messages
1,440
ive replaced a handfull of shark bit fittings on heating systems. The expansion and contraction, air, sludge, antifreeze ect kils the little oring gasket and they leak.
But maybee they changed them,
Good luck
 

Weedwaka

Well-known member
Joined
Mar 28, 2008
Messages
737
I will just add that, for the cost , ball valves and freedom flanges are excellent investments in your future servicing. I would put them EVERYWHERE something could break or require service.

Auto fill valves are sweet sweet things. You never have to worry about air or low water ( if using water ).

Are the shark bites just to avoid sweating the copper ? That was one of the most enjoyable things on our whole build and I had never done it before. You should give it a shot. Its easy.
 

GreyOwl

Well-known member
Joined
Oct 23, 2007
Messages
549
Location
North Las Vegas
I was under the impression that expansion tanks were to be installed with the water line fittings on the bottom. Has that changed?
Charles
 
OP
F

Fastback

Well-known member
Joined
Oct 5, 2010
Messages
518
Location
Indy
Well, I got it up and running, and it sounds like I have most of the air out of the lines since it is making no noise while running except the hiss of the electric boiler. I turned it on at about 5:30 this afternoon, I left the pump on high and the output temp is currently running about 107º to 109º, I can get it up to 140º but I dont see the point, we will see what I end up with in the morning.
 

yevangelis

Well-known member
Joined
Jan 4, 2011
Messages
409
Location
PHX
truckman-
I would disagree with 3 of your points.
1. sharkbites are indeed rated for heating/ recirculation but I would not use them personally
2. you definitely would want an air eliminator
3. no need to recharge or flush a closed system for several years at least

fastback- glad to hear about the progress, just ordered all my stuff off pexsupply and should be here towards the end of the week

ps- google didnt do me any good at all
 
OP
F

Fastback

Well-known member
Joined
Oct 5, 2010
Messages
518
Location
Indy
Are the shark bites just to avoid sweating the copper ? That was one of the most enjoyable things on our whole build and I had never done it before. You should give it a shot. Its easy.


I did sweat most of the fittings, but I used a set of sharkbite ball valves and a set of sharkbite gauges in T fittings. The way I have them spaced allows for a simple break down of the system should I need to make any major changes. The temps that a system like this will run should not be an issue for these fittings.
 
OP
F

Fastback

Well-known member
Joined
Oct 5, 2010
Messages
518
Location
Indy
Well, here it is. I still cant decide if I should leave the heater on full tilt or back it down. On max temp, with the pump on high the fluid temp shows nearly 130º, if I slow the pump down it can hit 140º. I need the faster pump temps to get the return temp as high as possible, it does not get over 70º/80º.

It hit my set temp today, it took about 14 hours to get the garage to 60º and I am going to bet that will cost me, lets hope the maintenance cycles are far and few between.

IMG00214-20110118-1236.jpg
 

Weedwaka

Well-known member
Joined
Mar 28, 2008
Messages
737
Nice clean job

I would back it down a bit. Why are you trying top keep the return temps as high as possible ? You dont usually want to be doing that. You want the heat in the floor.
 
Last edited:
OP
F

Fastback

Well-known member
Joined
Oct 5, 2010
Messages
518
Location
Indy
Nice clean job

I would back it down a bit. Why are you trying top keep the return temps as high as possible ? You dont usually want to be doing that. You want the heat in the floor.

Well, if the return temp is really low, the last part of the loops is not getting heated properly. I dont want a huge difference in the two AFAIK.
 
OP
F

Fastback

Well-known member
Joined
Oct 5, 2010
Messages
518
Location
Indy
To expand on that last statement.

If the outlet temp in this system is around 110º the heat loss in the slab was so great that the returning fluid was 60º, now I understand that much of that was due to trying to overcome the cold trapped in my 720SF slab that's 6" thick.

With the outlet temp at 125º to 140º the return temps would climb and that indicated to me that the ends of the loops were still getting fluid that had enough BTU's to make a change in the slab temp.

I think as the slab stabilizes this may all change, but I am really new at this, YMMV.
 

Weedwaka

Well-known member
Joined
Mar 28, 2008
Messages
737
How long are your loops and whats the resistance in feet of head for that heater again ?

Thats normal to come back at 60 - 70 at the beginning. Unless you have the resistance to require the added boost from the higher speed settings, its really just keeping your system running longer. With an electric on demand, Im not sure if that matters much. With a gas on demand it makes a big difference.
 
OP
F

Fastback

Well-known member
Joined
Oct 5, 2010
Messages
518
Location
Indy
How long are your loops and whats the resistance in feet of head for that heater again ?

Thats normal to come back at 60 - 70 at the beginning. Unless you have the resistance to require the added boost from the higher speed settings, its really just keeping your system running longer. With an electric on demand, Im not sure if that matters much. With a gas on demand it makes a big difference.

I have two loops that are around 275' long. I dont know what you are asking about in "Feet of head resistance", but the pump is a Taco 00R-IFC 3 speed unit.

It is shutting off when the room hits 60º or so, tomorrow I am going to try and let it run at 107º and see what the return is with the pump on various speeds, if it comes back at a fair temp I may try that for a while. I still have cool spots in the center of the room and I think I am still quenching the cold out of the slab.
 
OP
F

Fastback

Well-known member
Joined
Oct 5, 2010
Messages
518
Location
Indy
OK, I went ahead and set the pump to medium and backed down the output temp to 110º. I figure the slab has warm spots now and maybe I am over that initial shock of trying to break the curse so to speak and can let it run low and slow and see what happens.

Initially, upon start up, the fluid was coming back cold but after running for a day I may be able to get by with lower temps and a slower flow rate.


Thank you for your help!
 

Weedwaka

Well-known member
Joined
Mar 28, 2008
Messages
737
If you know the feet of head of your on demand unit, you can look on your pump curve and see what setting it should be at. If your loops are equal, (going from memory here ) you should have about 9 feet in those. So just add the resistance of your heater and any other things that are high resistance items ( I don't think you have any others ). Low may be optimal for you.


Here is the flow chart for your 00r . You have to open in pdf and zoom in.

http://www.pexuniverse.com/docs/pdf/101-125.pdf

http://www.pexuniverse.com/content/how-size-circulator-pump

:beer:
 
OP
F

Fastback

Well-known member
Joined
Oct 5, 2010
Messages
518
Location
Indy
I have no clue on the heater, it uses 1/2 fittings and a 1/2 bridge between the heater tank/element tubes. Looking at the info you posted I think that you are correct in using the "low" setting.

I will put it on low at lunch since medium did not really seem to make much difference in return temps over the last 8 hours. I will also back the heater down to just under 110 and see where I am with the return temps. If the fluid is moving slower it may have more time to heat the slab, but since the slab is already at 72 in spots I dont think it will be as drastic a difference as when I first turned the system on. At startup 120º water was returning at 50º, so I think I am getting there.

I will post more temp data tonight.

Thanks again!

Alex
 

tdkkart

Well-known member
Joined
Jun 17, 2006
Messages
6,887
Location
Eastern Iowa
Most of teh "experts" recommend 10-20* drop, no more than 20* drop in temp from input to output, primarily to ensure even temps across the floor. With temp gauges, thermometers etc you should easily be able to see the input and output temps and adjust the pump speeds or valve settings to achieve your desired numbers.

Of course depending on the size of your heat source, and the temp setting of the floor, when the system first fires up the heater probably won't be able to supply enough BTU's to supply full temp water to the floor for a period of time. 50-60 degrees of temp rise takes alot of BTUs.

It ends up being a balancing act, and there's alot of ways to get to the same end result.
 
To avoid these ads, REGISTER NOW!
Top Bottom