To avoid these ads, REGISTER NOW!

600 sf Epoxy-Coat in Phoenix

max thrust

Member
Joined
Apr 24, 2010
Messages
22
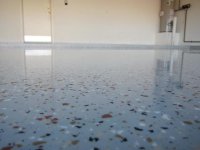
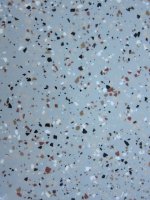
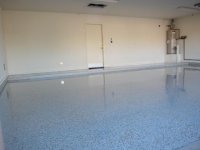
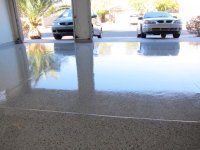
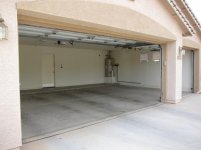
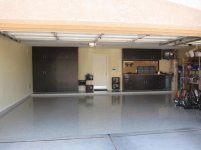
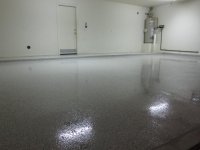
Finally pulled the trigger and painted my 600 sq ft garage floor with 2 full kits of taupe Epoxy-Coat from Lowes plus a kit and a half of clear epoxy form their online store. I wanted some more flakes as well and a slightly different mix so I purchased 1 additional pound of Beige blend (for a total of 4 pounds because each kit comes with 1.5 pounds), 4 pounds of Shoreline blend (same colors as in the beige just higher percentages of the lighter colors), another pound of Scone (to lighten further) and a pound of brick red. I think the blend looks fantastic on the floor!

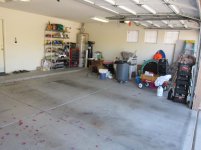
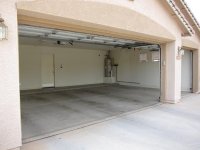
After I cleaned the floor thoroughly I found what I believe to be 8 Armor-All stains courtesy of the previous owner ARGHHH! I cursed his name the whole time i was working on the stains and ended up using 2 gals. Krud-Kutter, 1 gal Bond Lok, the 2 containers of clean and etch solution from the Epoxy-Coat kits and 2 additional gals of muriatic acid diluted 3-1. Then hit them like crazy with the pressure washer...I had no issues when putting down the epoxy but I was worried because you could still see light staining especially when the floor was wet.

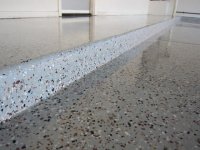
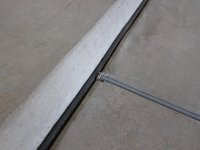
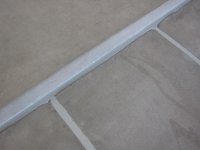
I ended up filling my expansion joints and control joints with SikaFlex but I had a hard time finding suitable backer rod for the expansion joints because they were almost 3/4 in wide. Ended up buying some pipe insulation from Lowes for $1 per 6ft, cut it in half lengthwise, folded it in half again lengthwise and stuffed it into the joint. It worked fantastic and I was half tempted to leave it and not apply any caulk because it looked so good!

Overall I am really happy with the floor, there are some flaws though; I wish I did a better job throwing the flakes (somehow I ended up short on the last section despite anally dividing them up), a few hairs, broom pieces, leaves and a cricket (well, cricket parts now) stuck in the epoxy and one random deflated bubble about 1/2 inch in diameter in the clear. And it was a ton of work especially grinding the latex paint off the 4 inch side walls...who knew! Next time I would definitely consider having a pro do it but then there would be no self-satisfaction...right?

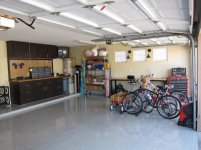
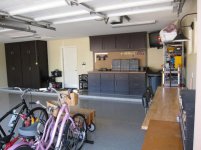
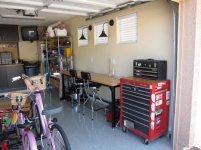
Next up...paint the trim, walls, pole in front of the water heater and install some cabinets! I'll post pics when it's all done.


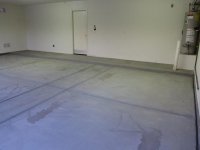
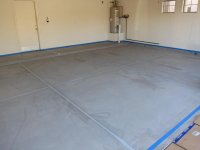
BTW--One of the pictures is after taupe epoxy and flakes but before the clear epoxy. Totally happy with the clear so far, looks fantastic, makes the flakes look great just kind of a pain to put down cause you're never quite sure if you're getting good coverage, or coverage at all for that matter. You can see in my floor when looking at a reflection in the clear, where it is thin (texture from flakes and Shark Bite) and where it is thicker (little to no texture) but you have to look really close and it's a garage floor for pete's sake!

Two posts for all the pics...
 

Attachments

  • IMG_1270.jpg
    IMG_1270.jpg
    64 KB · Views: 902
  • IMG_1304.jpg
    IMG_1304.jpg
    69.6 KB · Views: 898
  • IMG_1307.jpg
    IMG_1307.jpg
    64.7 KB · Views: 880
  • IMG_1308.jpg
    IMG_1308.jpg
    40.8 KB · Views: 891
  • IMG_1327.jpg
    IMG_1327.jpg
    51.4 KB · Views: 930
  • IMG_1328.jpg
    IMG_1328.jpg
    47.4 KB · Views: 945
  • IMG_1334.jpg
    IMG_1334.jpg
    55.9 KB · Views: 1,317
Last edited:
To avoid these ads, REGISTER NOW!
OP
M

max thrust

Member
Joined
Apr 24, 2010
Messages
22
More pics...
 

Attachments

  • IMG_1346.jpg
    IMG_1346.jpg
    87.2 KB · Views: 1,181
  • IMG_1343.jpg
    IMG_1343.jpg
    52.6 KB · Views: 3,405
  • IMG_1340.jpg
    IMG_1340.jpg
    95.8 KB · Views: 1,043
  • IMG_1339.jpg
    IMG_1339.jpg
    56.9 KB · Views: 1,072
  • IMG_1337.jpg
    IMG_1337.jpg
    91.6 KB · Views: 1,253
Last edited:

ZeroSignal

Well-known member
Joined
Jan 13, 2010
Messages
107
Location
Bricktown, NJ
Hard to tell you have shark tooth on the floor looking at this pic. How smooth is the floor?
attachment.php
 
OP
M

max thrust

Member
Joined
Apr 24, 2010
Messages
22
Yep, I put 3 small containers of Shark Bite in 4.5 gallons of clear. Slightly less than the instructed 1 container per gallon because I really didn't want it in the first place since it rains like 3 times a year here and it's never really wet. But the wife said if anyone falls out there, especially her, she would be pissed...so in it went. The texture is pretty smooth, you can see and feel it in the thinner sections, not so much in the thicker areas and you can only see it when the clear is reflecting light. It's much lower profile than the stuff that comes with the kit...almost like a powder and really I can barely tell it's there...we'll see how it is when it gets wet.
 

LegacyIndustrial

ALLIANCE MEMBER
Joined
Jun 7, 2010
Messages
7,994
Location
deerfield, IL
Yep, I put 3 small containers of Shark Bite in 4.5 gallons of clear. Slightly less than the instructed 1 container per gallon because I really didn't want it in the first place since it rains like 3 times a year here and it's never really wet. But the wife said if anyone falls out there, especially her, she would be pissed...so in it went. The texture is pretty smooth, you can see and feel it in the thinner sections, not so much in the thicker areas and you can only see it when the clear is reflecting light. It's much lower profile than the stuff that comes with the kit...almost like a powder and really I can barely tell it's there...we'll see how it is when it gets wet.

That shark material (tabular alumina?) will sink if you mix it in.
Typically you broadcast into the top-coat as you back-roll.

Good looking floor.
 
OP
M

max thrust

Member
Joined
Apr 24, 2010
Messages
22
Thanks for the kind words guys...I just followed the directions on the back of the Shark Bite stuff.. Like I said I didn't really want it anyways so if it doesn't perform as well the way I did it than if I had broadcast on top of the epoxy then no biggie...just as long as it's not too slippery when occasionally wet..
 

bobbycoke

Active member
Joined
Nov 30, 2010
Messages
33
max how did you apply the "flakes" on the vertical surface of the step???? looks super... bobbycoke
 
OP
M

max thrust

Member
Joined
Apr 24, 2010
Messages
22
max how did you apply the "flakes" on the vertical surface of the step???? looks super... bobbycoke

I epoxied the vertical portion of the step and the 4 inch walls all around the garage first. Believe it or not, I figured out the square footage of that area and it's percentage of the total floor which turned out to be 5% and mixed up 5% of the epoxy and literally overhand threw the flakes at the surface. Then swept up the flakes that didn't stick and threw again. Then I took an air hose and blew the flakes at the wall and finally blew the last stragglers out the door. Try to throw at the top of the vertical surface because it's easier to get them to stick close to the floor with deflection from the floor and using the air hose method.

Interestingly enough, like i said, the vertical surfaces were 5% of the floor, the top of the step was 15% so I just divided the main part of the floor into 4 equal sections of 20% each. I bought some smaller mixing buckets and made my own "paint stirrer measuring sticks" by filling one with the calculated amount of water instead of epoxy beforehand, dropping a ruler in and marking the stick...worked perfect!
 
To avoid these ads, REGISTER NOW!
OP
M

max thrust

Member
Joined
Apr 24, 2010
Messages
22
Looks like a pro install to me. First rate!

Do you mind telling us your cost for the project?

Sure thing--

2 kits Epoxy-Coat from Lowe's (with 10% off coupon from PO)-------$340.00
1.5 kits Clear Epoxy-Coat from online plus 10 more pounds flakes----$355.00
10 29oz tubes Sikaflex SL from Home Depot (10% off coupon)-------$115.00
2 gal Krud Cutter, 1 gal Bond-Lok, 2 gal acid------------------------$50.00
80' 3/8" backer rod, 5 6' lengths foam pipe insulation----------------$20.00
3 18' roller covers, 2 18" squeegees--------------------------------$40.00
several mixing buckets and a roll of painters tape-------------------$15.00
3 small containers Shark Bite---------------------------------------$15.00

Total-------------------------------------------------------------$950.00

This was just for the consumables, I didn't include tools and what-not that I bought to do the job because I can use them again, even though some I probably won't like the 29 oz tube caulk gun and the 18" roller frame.

So, $950 or $1.58/sqft plus any tools you may need.
 

sed6

Well-known member
Joined
Feb 8, 2011
Messages
48
Sure thing--

2 kits Epoxy-Coat from Lowe's (with 10% off coupon from PO)-------$340.00
1.5 kits Clear Epoxy-Coat from online plus 10 more pounds flakes----$355.00
10 29oz tubes Sikaflex SL from Home Depot (10% off coupon)-------$115.00
2 gal Krud Cutter, 1 gal Bond-Lok, 2 gal acid------------------------$50.00
80' 3/8" backer rod, 5 6' lengths foam pipe insulation----------------$20.00
3 18' roller covers, 2 18" squeegees--------------------------------$40.00
several mixing buckets and a roll of painters tape-------------------$15.00
3 small containers Shark Bite---------------------------------------$15.00

Total-------------------------------------------------------------$950.00

This was just for the consumables, I didn't include tools and what-not that I bought to do the job because I can use them again, even though some I probably won't like the 29 oz tube caulk gun and the 18" roller frame.

So, $950 or $1.58/sqft plus any tools you may need.

Great info there! You certainly took some extra prep and finishing steps, and they highlight some of the extra or hidden costs associated with finishing the floor. Some quick math shows your project cost 2 1/2 times the base cost of the floor coating! Wow, that's an eye opener. It certainly illustrates the need to plan not just the project but the budget too.

Speaking of extras, what did you think of the tools included with the kit? Did you just need extra or were the included tools no good?

Let me ask, do you think filling the expansion joints was worth the cost or effort? While subdued, they are still visible (though not a detractor from your kick **** floor). Would you fill them if you had to do it over?

Thanks for the great write up!

-Scott
OKC, OK
 

jvitez

Well-known member
Joined
Nov 30, 2009
Messages
2,429
Location
Big Sky Country, Canada
Excellent detailed write up and pics. Thanks!

Ah, southwest style architecture, palm trees, glossy speckled garage floors that will never have snow melt, salt, sand, and general muck slopped all over for 6 months of the year. Sigh. We almost moved to Arizona some years ago.....

Thanks again for posting your results.
 
OP
M

max thrust

Member
Joined
Apr 24, 2010
Messages
22
Great info there! You certainly took some extra prep and finishing steps, and they highlight some of the extra or hidden costs associated with finishing the floor. Some quick math shows your project cost 2 1/2 times the base cost of the floor coating! Wow, that's an eye opener. It certainly illustrates the need to plan not just the project but the budget too.

Speaking of extras, what did you think of the tools included with the kit? Did you just need extra or were the included tools no good?

Let me ask, do you think filling the expansion joints was worth the cost or effort? While subdued, they are still visible (though not a detractor from your kick **** floor). Would you fill them if you had to do it over?

Thanks for the great write up!

-Scott
OKC, OK

The tools in the kit were ok...I used the mixing tool as there was nothing wrong with that and the el cheapo paint brush because it doesn't need to be a good one. I bought 18" roller covers and 2 18" squeegees because the included 8" ones were just too small, especially the squeegee which didn't even have a good way of attaching a handle. I also bought a pack of rubber gloves because they will get ripped and trust me, you want to wear them, I still have some epoxy on my left hand...

Speaking of tools...something that is not mentioned here is that you're probably gonna want a respirator while applying the epoxy. When I put the base coat down the doors were open and my throat was really irritated after, I wore the respirator the next day with the clear because the doors were closed on account of high winds that day and my throat felt much better when I was done.

As far as the joints, I would definitely fill them again but I would do it slightly different. I simply allowed the Sikaflex to self level because that's what the instructions say to do, however, in a couple of places I filled just a bit too much so I scraped some material away there and the joint is invisible there now. I would definitely tool the entire joint simply by overfilling a hair and using a strait edge to scrape the excess off the top. The Sikaflex, if allowed to self level will dry with a slight beaded edge and the epoxy you put down will not hide it, which is what happened to me. It's still way better than having big dirt and wheel catching joints all over the place...and ugly fiberboard edges!
 
Last edited:

sed6

Well-known member
Joined
Feb 8, 2011
Messages
48
Fantastic info, thanks! Good to know about the undersized squeege and the respirator I planned on myself. I'd like to hide my joints too and I'll try your tip of using the trowel.
 
OP
M

max thrust

Member
Joined
Apr 24, 2010
Messages
22
What better use for a brand new epoxy floor than storing 145 cases of girl scout cookies!!
 

Attachments

  • IMG-20110212-00023.jpg
    IMG-20110212-00023.jpg
    141.7 KB · Views: 362

hpw

Well-known member
Joined
Oct 7, 2007
Messages
989
As far as the joints, I would definitely fill them again but I would do it slightly different. I simply allowed the Sikaflex to self level because that's what the instructions say to do, however, in a couple of places I filled just a bit too much so I scraped some material away there and the joint is invisible there now. I would definitely tool the entire joint simply by overfilling a hair and using a strait edge to scrape the excess off the top. The Sikaflex, if allowed to self level will dry with a slight beaded edge and the epoxy you put down will not hide it, which is what happened to me. It's still way better than having big dirt and wheel catching joints all over the place...and ugly fiberboard edges!

Beautiful Floor:thumbup:

? on the Sikaflex......if you were to roll a creeper,floor jack over the expansion joint, would it collapse from the weight?
 
OP
M

max thrust

Member
Joined
Apr 24, 2010
Messages
22
Awesome floor! Which store did you purchase it from?

The base was purchased from the Lowe's at Higley and the 60...the clear from Epoxy-Coat online

Beautiful Floor:thumbup:

? on the Sikaflex......if you were to roll a creeper,floor jack over the expansion joint, would it collapse from the weight?

Nope...definitely not. it is flexible but with the epoxy on top it seems just as hard as the rest of the floor.
 

vtx531

Well-known member
Joined
Jan 6, 2010
Messages
208
Location
Kalamazoo, MI
I'm confused on the part where you said you broomed up the flakes that didn't stick. Do you mean you broomed them after the epoxy dried?
 
OP
M

max thrust

Member
Joined
Apr 24, 2010
Messages
22
Floor looks awesome, I just went out and bought all the supplies to do my pole barn floor.

I am applying a white 2 part epoxy base, sprinkle light flakes and then I am applying norklad clear coat.
Question, are the spiked shoes really needed? I am hoping to be able to do sections small enough where I can squeege and 18" roll ?

I would definitely get the spike shoes, I got a pair of lawn aerator shoes online for $12 I think and although it is possible to do it without them, it makes spreading the flakes much easier and practically indispensable for doing the clear in that it's so hard to tell if you missed any spots or have good coverage without getting up close which the spike shoes allow. Also, if you have them, the job will be generally easier, faster and less frustrating because you'll use them for the cutting in and squeegeeing too. Just be careful, they can be treacherous...I slipped badly once and almost ended up covered in epoxy if it weren't for the fact that I was near a wall when it happened!


I'm confused on the part where you said you broomed up the flakes that didn't stick. Do you mean you broomed them after the epoxy dried?

I did the vertical surfaces of the step and stem walls first and before I laid epoxy on the floor area I flaked them...otherwise I would have ended up with a pile of flakes stuck in epoxy at the bottom of the vertical surfaces. Without any epoxy there yet, I just broomed them up.
 
OP
M

max thrust

Member
Joined
Apr 24, 2010
Messages
22
My garage project is finally (mostly) done!!!!!

Before and after pictures:
 

Attachments

  • IMG_1469.jpg
    IMG_1469.jpg
    51.1 KB · Views: 344
  • IMG_0559.jpg
    IMG_0559.jpg
    42.6 KB · Views: 262
  • IMG_1471.jpg
    IMG_1471.jpg
    49.8 KB · Views: 270
  • IMG_0557.jpg
    IMG_0557.jpg
    55 KB · Views: 267
  • IMG_1467.jpg
    IMG_1467.jpg
    37 KB · Views: 339
  • IMG_0555.jpg
    IMG_0555.jpg
    37.8 KB · Views: 279
Last edited:
OP
M

max thrust

Member
Joined
Apr 24, 2010
Messages
22
And a couple more:
 

Attachments

  • IMG_1270.jpg
    IMG_1270.jpg
    34 KB · Views: 144
  • IMG_1475.jpg
    IMG_1475.jpg
    38 KB · Views: 173
  • IMG_1473.jpg
    IMG_1473.jpg
    54.9 KB · Views: 198
  • IMG_1476.jpg
    IMG_1476.jpg
    34.4 KB · Views: 226
Last edited:

rklindb

Active member
Joined
Jul 7, 2010
Messages
37
Location
UT
First off, thanks for the great write-up, photos, and budget. That is invaluable for us still in the planning stage. I hope mine will look as good. So here is the question, you used 2 full-kits on a 600 sq. ft. garage. Their (Epoxy-Coat's) literature says a full kit will cover 500 sq. ft. I have 927 sq. ft. and have been planning on also using 2 full kits. Am I under planning, or did you have left over or just go thicker?

Also, the clear is a significant part of the budget. While it definitely looks glossy, I am curious as to how glossy it looked prior to the clear application. Would you do the clear again?

Finally, regarding the control joint expansion. You mention overfilling and then scraping for an even surface. How long after filling do you scrape? If you scrape too soon it seems that you'd get the bead again, scrape too late and the Sikaflex would be too dry.

Thanks.
 

Gotxqss

Member
Joined
Apr 19, 2011
Messages
11
Have a item number for the sikaflex. I looked at local hd and couldnt find. They had loctite type concrete caulk that was mentioned in another thread.

Trying to get the right product tonight as ill ve epixying tomorrow late night
 

rklindb

Active member
Joined
Jul 7, 2010
Messages
37
Location
UT
Just bought the Sikaflex SL at HD. Item # 033886000451. It is not by the caulking/painting stuff, rather it is by the concrete stuff over in the commercial/building area of the store. The item number above is for the 29 oz. tube, they also have the 10 oz. tubes in the same location. (Assuming that all HD stores have similar layouts).
 

magnimus1

Member
Joined
Jun 1, 2010
Messages
9
Max thrust,
Did you end up using any more Muriatic acid than what was supplied with the kits? And how did you dispose off the wash?

I'm asking because I'm in Chandler and local laws would be the same if any applied

Thanks
 
OP
M

max thrust

Member
Joined
Apr 24, 2010
Messages
22
First off, thanks for the great write-up, photos, and budget. That is invaluable for us still in the planning stage. I hope mine will look as good. So here is the question, you used 2 full-kits on a 600 sq. ft. garage. Their (Epoxy-Coat's) literature says a full kit will cover 500 sq. ft. I have 927 sq. ft. and have been planning on also using 2 full kits. Am I under planning, or did you have left over or just go thicker?

Also, the clear is a significant part of the budget. While it definitely looks glossy, I am curious as to how glossy it looked prior to the clear application. Would you do the clear again?

Finally, regarding the control joint expansion. You mention overfilling and then scraping for an even surface. How long after filling do you scrape? If you scrape too soon it seems that you'd get the bead again, scrape too late and the Sikaflex would be too dry.

Thanks.

I would have used 1.5 kits if I ordered online, but because I went to Lowe's for the product, I got 2 kits because they only sell full kits there and didn't even think about special ordering. I am glad that I got 2 because there was no question of whether or not I would have enough, however, 1.5 kits of the clear seemed to cover just fine. I would just make sure you divide up the product very well prior to application so you can see right away when you do the first section if the coverage is adequate. Or, you can buy some insurance and get a half kit online as a backup in case you need it (they will let you return it if you don't, you just have to pay return shipping). Or, you can bite the bullet and plan on applying the extra half kit and have some peace of mind!

I would definitely do the clear again, maybe the more expensive clear they sell, because it is UV stable and I am mildly concerned about yellowing. Of course after it's down! But I have seen no evidence of that yet. It is definitely much glossier and looks "deeper", plus the flake protection.

I would experiment with the sikaflex. I "scraped" 2 small areas after it was all down and it didn't get that beaded edge again, but there may have been some movement of the material after that. It probably still won't look perfect but definitely better, and doing no scraping still looks pretty darn good. Just be careful, there is a potential for the stuff to get all over the place so I would probably kind of like trowel the stuff as I was putting it down so that any excess material can be moved into the unfilled portion of the joints rather than removing it altogether. Like I said, experiment first in the corner or something before you commit to a method for the whole floor.

Just bought the Sikaflex SL at HD. Item # 033886000451. It is not by the caulking/painting stuff, rather it is by the concrete stuff over in the commercial/building area of the store. The item number above is for the 29 oz. tube, they also have the 10 oz. tubes in the same location. (Assuming that all HD stores have similar layouts).

Yup, that's the stuff, I bought 10 29oz tubes for about 140 ft of joint if I remember correctly

Max thrust,
Did you end up using any more Muriatic acid than what was supplied with the kits? And how did you dispose off the wash?

I'm asking because I'm in Chandler and local laws would be the same if any applied

Thanks

I'm not aware of any laws regarding disposing of the acid...I used some Bond-Lok which has acid in it plus 2 additional gallons of muriatic acid which neutralizes itself during the reaction with the concrete plus I neutralized with baking soda too and hosed it into the street...should be as harmless as water at that point, but I'm no expert on that..

Good luck guys, glad that my experiences can be learned from. Still very happy with how mine turned out!
 
Last edited:
To avoid these ads, REGISTER NOW!
Top Bottom