To avoid these ads, REGISTER NOW!

Restoring the good doctor's 52 Aston Martin DB-2

NASTYZEN

Well-known member
Joined
Jun 11, 2010
Messages
2,823
Location
St-Colomban,Que. Canada
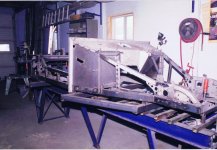
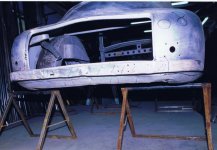
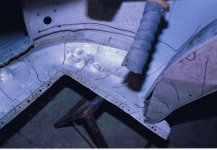
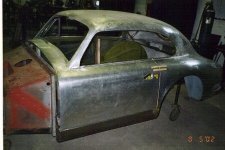
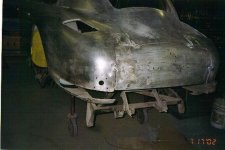
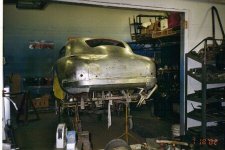
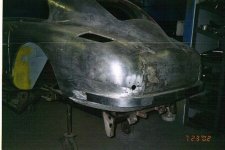
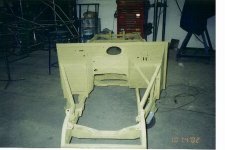
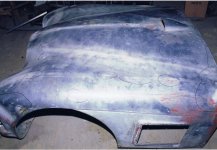
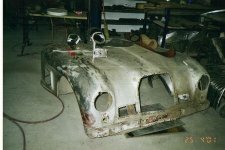
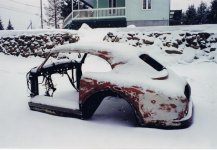
This restoration started in 97 and ended in 2001.This is, if I remember correctly Car chassis no.AM 17-150 had a single owner who was a doctor out in the eastern Ontario country.He had the car shipped from England new and had a 1964 license plate on it when found by Jack.This car was extensively campaigned in touring and rally events and it showed!Judging from the corrosion,it was winter driven.
Somehow the phone conversation about the restoration and what showed up at my door were not quite the same.:wtf:
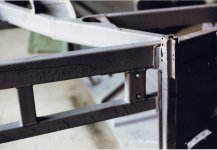
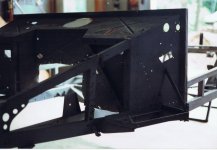
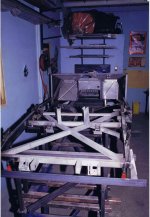
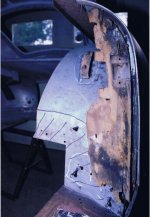
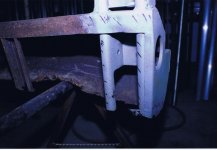
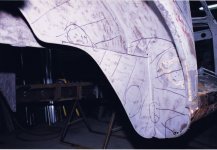
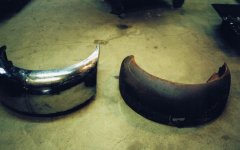
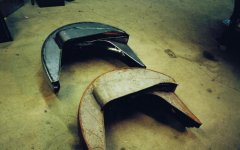
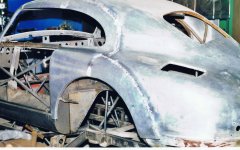
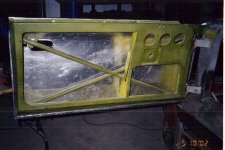
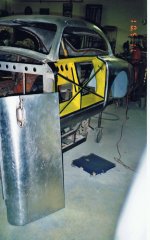
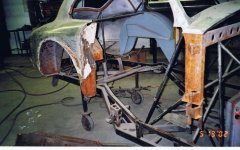
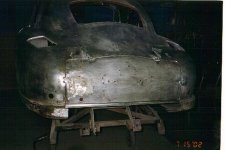
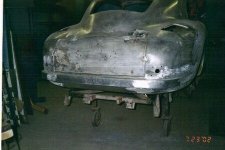
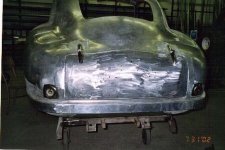
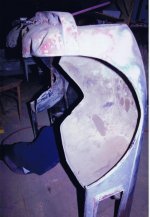
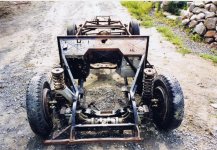
I got suckered into bringing this mess back to life.I tell you this car was really foked up bad!
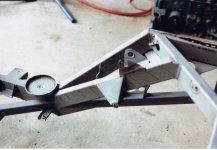
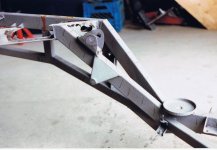
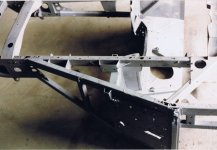
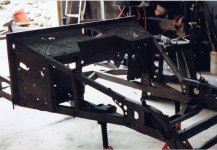
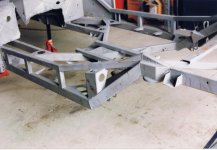
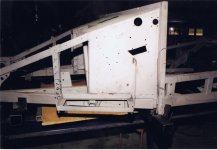
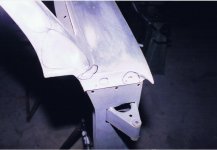
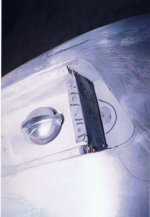
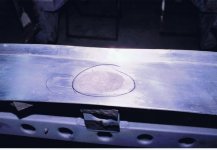
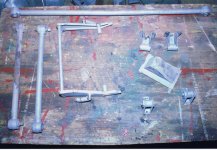
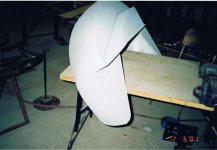
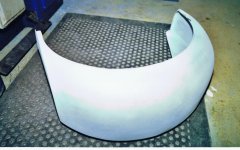
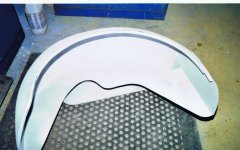
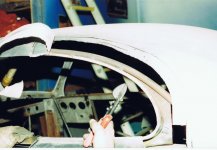
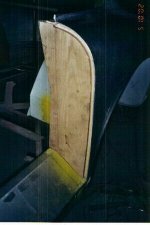
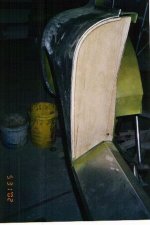
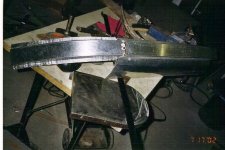
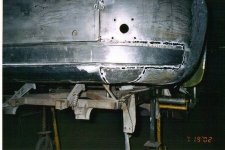
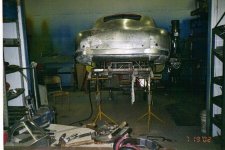
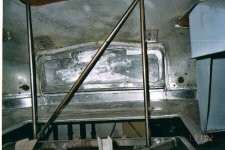
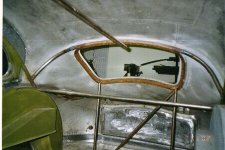
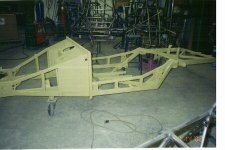
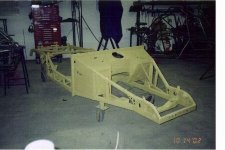
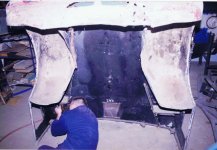
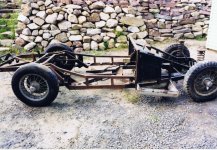
The first step was to make an evaluation of what was left and what had to be replaced.Then decide where to start!
:lol_hitti
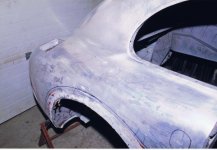
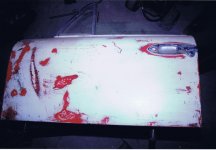
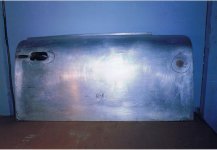
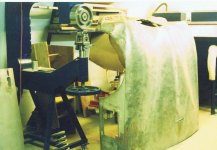
The blue car is what this thing should look like.
 

Attachments

  • Aston Martin54.jpg
    Aston Martin54.jpg
    157.3 KB · Views: 733
  • Aston Martin55.jpg
    Aston Martin55.jpg
    153.8 KB · Views: 706
  • Aston Martin56.jpg
    Aston Martin56.jpg
    150.5 KB · Views: 665
  • Aston Martin57.jpg
    Aston Martin57.jpg
    151.1 KB · Views: 641
  • Aston Martin58.jpg
    Aston Martin58.jpg
    159.8 KB · Views: 664
  • 01.jpg
    01.jpg
    144.5 KB · Views: 739
  • 087f531931.jpg
    087f531931.jpg
    142.3 KB · Views: 850
Last edited:
To avoid these ads, REGISTER NOW!

TAftw

Well-known member
Joined
Feb 2, 2009
Messages
1,727
Location
MA
You probably should have titled this thread "Building an Aston Martin from scratch" :lol_hitti:.

It looks awesome, keep the pics coming.
 

rsanter

Well-known member
Joined
Dec 22, 2007
Messages
18,487
Location
visalia ca
You've got a big job there? Just don't forget the machine guns and ejector seat. Please keep the pics coming.

that is not the 007 model
this one is earlier and rumered to have been used my special agent 001
the guns used were semi-auto

bob
 
OP
N

NASTYZEN

Well-known member
Joined
Jun 11, 2010
Messages
2,823
Location
St-Colomban,Que. Canada
Yes this is pre James Bond,no ejector seat that I could find.They were entirely hand built right down to the door handles and trim.
I tried to turn it away when I saw how badly messed up it was.I called Jack and asked him if he was kidding about the restore.It's really foked up I said!Go ahead and rebuild it he said.Oh man what a colossal amount of work it took to get it back to life.
Your right,I should of entitled this tread''Pandora's Aston Martin from hell''.
Anyway,it came less engine and gearbox so at least no worries about mechanical s.I stripped the chassis clean and brought it out to be sand blasted and set it up upside down on floor jacks to see what was still solid.Not much was still sound.The worst part was that all the tube sizes are not common and custom tubing had to be made out of sheet before I could even begin.:mad:
 

Attachments

  • Aston Martin59.jpg
    Aston Martin59.jpg
    137.2 KB · Views: 488
  • Aston Martin60.jpg
    Aston Martin60.jpg
    137.6 KB · Views: 457
  • Aston Martin61.jpg
    Aston Martin61.jpg
    141.6 KB · Views: 444
  • Aston Martin62.jpg
    Aston Martin62.jpg
    140.6 KB · Views: 418
  • Aston Martin63.jpg
    Aston Martin63.jpg
    139.5 KB · Views: 397
  • Aston Martin64.jpg
    Aston Martin64.jpg
    140.3 KB · Views: 397
  • Aston Martin65.jpg
    Aston Martin65.jpg
    135.4 KB · Views: 424

Lippyp

Well-known member
Joined
Jun 26, 2006
Messages
6,720
Location
Shropshire, UK
The factory still offers a full restoration service over here, if the guy that built bits of your car still works there (and many work from apprentice to retirement) they get to work on it, pretty damn cool, mind you, pretty damn expensive too!
 
OP
N

NASTYZEN

Well-known member
Joined
Jun 11, 2010
Messages
2,823
Location
St-Colomban,Que. Canada
The factory still offers a full restoration service over here, if the guy that built bits of your car still works there (and many work from apprentice to retirement) they get to work on it, pretty damn cool, mind you, pretty damn expensive too!

That's at pretty interesting service they have there.I can see why it doesn't come cheap,it's laboriously intensive to restore one of these.
I found the original workers initials from 4 different guys under the garnishing trim.Maybe 4 different work stations?Each car was a little different from the next and all the trim was custom fit to each one.
They only built 150 of this model.Because of the labor intensive way they were put together many were scrapped.They are a little hard to come bye nowadays.
 

Attachments

  • Aston Martin67.jpg
    Aston Martin67.jpg
    136.3 KB · Views: 273
  • Aston Martin69.jpg
    Aston Martin69.jpg
    136.9 KB · Views: 267
  • Aston Martin70.jpg
    Aston Martin70.jpg
    140.7 KB · Views: 258
  • Aston Martin71.jpg
    Aston Martin71.jpg
    137.8 KB · Views: 240
  • Aston Martin72.jpg
    Aston Martin72.jpg
    139.1 KB · Views: 243
  • Aston Martin73.jpg
    Aston Martin73.jpg
    140 KB · Views: 245
  • Aston Martin66.jpg
    Aston Martin66.jpg
    146 KB · Views: 251
OP
N

NASTYZEN

Well-known member
Joined
Jun 11, 2010
Messages
2,823
Location
St-Colomban,Que. Canada
So slowly I replaced every rusted area bit by bit,taking care to reproduce every bit just like it was at the factory.Once I had a nice solid chassis to work from I was ready to get to work on the suspension so the car could be moved more easily.
 

Attachments

  • Aston Martin74.jpg
    Aston Martin74.jpg
    140.2 KB · Views: 270
  • Aston Martin75.jpg
    Aston Martin75.jpg
    143 KB · Views: 252
  • Aston Martin76.jpg
    Aston Martin76.jpg
    144.7 KB · Views: 247
  • Aston Martin77.jpg
    Aston Martin77.jpg
    141.2 KB · Views: 252
  • Aston Martin78.jpg
    Aston Martin78.jpg
    146.1 KB · Views: 237
  • Aston Martin92.jpg
    Aston Martin92.jpg
    142.7 KB · Views: 235
  • Aston Martin93.jpg
    Aston Martin93.jpg
    141.3 KB · Views: 235
OP
N

NASTYZEN

Well-known member
Joined
Jun 11, 2010
Messages
2,823
Location
St-Colomban,Que. Canada
At this point it was time to strip the paint off of the body to see what lay underneath.7 layers of paint later...what I found was not good.
Back then they would use a steel tubular skeleton frame under the body and crimp the aluminum shell on top of it all.Perfect for electrolysis corrosion to happen.They also used wood in many places,witch was totally rotten at this point.
What a mess!:shocking:
This car was raced and it shows.
 

Attachments

  • Aston Martin03.jpg
    Aston Martin03.jpg
    147.3 KB · Views: 471
  • Aston Martin19.jpg
    Aston Martin19.jpg
    139.2 KB · Views: 405
  • Aston Martin14.jpg
    Aston Martin14.jpg
    143.2 KB · Views: 365
  • Aston Martin24.jpg
    Aston Martin24.jpg
    139.4 KB · Views: 364
  • Aston Martin110.jpg
    Aston Martin110.jpg
    141.6 KB · Views: 395
  • Aston Martin111.jpg
    Aston Martin111.jpg
    143.3 KB · Views: 441
  • Aston Martin25.jpg
    Aston Martin25.jpg
    143.4 KB · Views: 377

Drdaves49

Well-known member
Joined
Oct 26, 2009
Messages
219
Location
Myrtle Creek, Oregon
Do you have your stump,shot bag, mallets, slappers ,etc? Looks like that would be a blast to work on. Bringing something back from the dead, as it were....my kinda projects. It's nice to see the care and research going into it. BTW,if you hadn't noticed I'm a Brit car nut.:beer:

Don't be suprised if one door and fender are a little different in size, rarely were they the same side to side. I'm sure you've all ready found that out tho.

Bondo.....surely you jest:lol_hitti

Dave
 

joeswamp

Well-known member
Joined
Jul 25, 2007
Messages
2,418
Location
Massachusetts
I've seen cars brought back from rougher shape than this (but not much worse than this) -- saw an old Packard limo from a field once that to my eyes was completely unsalvageable, but if you've got the skills of nastyzen just about anything is possible.

Remember that this is a seriously high dollar antique and not an 80's Camaro, the end result is so valuable that it actually makes financial sense to undertake the restoration.
 

Drdaves49

Well-known member
Joined
Oct 26, 2009
Messages
219
Location
Myrtle Creek, Oregon
I've seen cars brought back from rougher shape than this (but not much worse than this) -- saw an old Packard limo from a field once that to my eyes was completely unsalvageable, but if you've got the skills of nastyzen just about anything is possible.

Remember that this is a seriously high dollar antique and not an 80's Camaro, the end result is so valuable that it actually makes financial sense to undertake the restoration.


:beer: Absolutely correct., and I see a couple thousand hours.
 

Skyline

Well-known member
Joined
Nov 11, 2008
Messages
3,586
>Nastyzen

It's great to see your projects. You are a true craftsman.

When you question the guys who vintage race eary Ferraris and Birdcage Maseratis (worth milliions), on one hand, it seems crazy, but on the other, I really don't think accident damage can ever exceed ~$250k, no matter how bad it is. As long as there are guys like nastyzen around that is. These were hand made cars in the first place, and they can be hand made again. There's no such thing as totaled for a $3M irreplacable car. All that really counts is having a valid chassis plate; and to a lesser extent, a correct engine. Given the fact that the cars with serious race provenance often had multiple engines, it's not so much a "number matching" thing like if you were looking at a 60s musclecar. But I just wonder if this Aston is significant enough to be worth the effort? As long as someone loves it enough to want to pay...it really does not matter. All the better for the rest of us who get to see a piece of history roaring by on the vintage circuit, instead of rotting away in some field.
 
OP
N

NASTYZEN

Well-known member
Joined
Jun 11, 2010
Messages
2,823
Location
St-Colomban,Que. Canada
Can't wait to see the next part of the story ... When does the huge bucket of Bondo show up? :)

No bondo ever gets used here.

Do you have your stump,shot bag, mallets, slappers ,etc? Looks like that would be a blast to work on. Bringing something back from the dead, as it were....my kinda projects. It's nice to see the care and research going into it. BTW,if you hadn't noticed I'm a Brit car nut.:beer:


Don't be suprised if one door and fender are a little different in size, rarely were they the same side to side. I'm sure you've all ready found that out tho.

Bondo.....surely you jest:lol_hitti

Dave

Thank's Dave.
I used every tool in the shop on this one!This would of been fun to do at retirement.I also had my second boy born at this point,was building the shop,the yard and tried to keep all the other customers happy.It was not really fun.NOTHING was semetrical,but anyway,I yet have to come across a British car that is.LOL

I've seen cars brought back from rougher shape than this (but not much worse than this) -- saw an old Packard limo from a field once that to my eyes was completely unsalvageable, but if you've got the skills of nastyzen just about anything is possible.

Remember that this is a seriously high dollar antique and not an 80's Camaro, the end result is so valuable that it actually makes financial sense to undertake the restoration.

Thank you Joe.I think I saw this car in Victory Lane magazine go for about $850,000 at auction.So yes it was worth it for Jack!

:beer: Absolutely correct., and I see a couple thousand hours.


Dave,it took 1875 hours to do this project.Your estimating skills are awsome!

>Nastyzen

It's great to see your projects. You are a true craftsman.

When you question the guys who vintage race eary Ferraris and Birdcage Maseratis (worth milliions), on one hand, it seems crazy, but on the other, I really don't think accident damage can ever exceed ~$250k, no matter how bad it is. As long as there are guys like nastyzen around that is. These were hand made cars in the first place, and they can be hand made again. There's no such thing as totaled for a $3M irreplacable car. All that really counts is having a valid chassis plate; and to a lesser extent, a correct engine. Given the fact that the cars with serious race provenance often had multiple engines, it's not so much a "number matching" thing like if you were looking at a 60s musclecar. But I just wonder if this Aston is significant enough to be worth the effort? As long as someone loves it enough to want to pay...it really does not matter. All the better for the rest of us who get to see a piece of history roaring by on the vintage circuit, instead of rotting away in some field.

Thank you so much Skyline.What gives a Vintage race car it's real value is it's racing history.I.E.racing log book as proof.I have built entire cars around the chassis number tag before ,so you are correct in your statement.If you have the V.I.N. plate and a log book your good to go!Race cars consume engines,transmissions,diff's,etc.So matching numbers are almost irrelevant.
I have seen a guy cartwheel his 10 million dollar Ferrari GT250 at the end of the strait at Mosport.Afterward's in conversation with the guy he stated it was all relative to him and that he could never do more than a couple hundred thousand dollars damage at a time to his baby.Some people keep there cars as static art in a museum somewhere.Vintage racers race there art!

Ah, that'll buff right out.


No!

Wow! what a mess!!


Yes!
Wow

I think that car is in a state of shock..:shocking:


I was the one in a state of shock!
 

Attachments

  • Aston Martin17.jpg
    Aston Martin17.jpg
    140.9 KB · Views: 275
  • Aston Martin18.jpg
    Aston Martin18.jpg
    141.2 KB · Views: 262
  • Aston Martin21.jpg
    Aston Martin21.jpg
    139.3 KB · Views: 245
  • Aston Martin23.jpg
    Aston Martin23.jpg
    139.7 KB · Views: 232
  • Aston Martin26.jpg
    Aston Martin26.jpg
    141 KB · Views: 248
  • Aston Martin27.jpg
    Aston Martin27.jpg
    139.7 KB · Views: 250
  • Aston Martin28.jpg
    Aston Martin28.jpg
    136.9 KB · Views: 248

MP&C

Well-known member
Joined
Oct 21, 2009
Messages
4,396
Location
Leonardtown, MD
Nice to see the factory seams inside the roof skin to see how the puzzle went together. Any shots like that of inside the front fenders?
 
OP
N

NASTYZEN

Well-known member
Joined
Jun 11, 2010
Messages
2,823
Location
St-Colomban,Que. Canada
Well at this point I had to figure where to start again.The body is attached to the chassis using brackets.The brackets were still usable but the body was all knackered to hell.This is where I started,I had to first make new rockers and inner fenders.To do this I decided to first brace the inner body with tubing and then set it a couple feet off of the chassis so as to get access to everything.Then before going too far I had to pre fit the doors as this would guide the entire project before fitting anything else.:headscrat
 

Attachments

  • Aston Martin29.jpg
    Aston Martin29.jpg
    136 KB · Views: 180
  • Aston Martin30.jpg
    Aston Martin30.jpg
    135.1 KB · Views: 162
  • Aston Martin37.jpg
    Aston Martin37.jpg
    144 KB · Views: 169
  • Aston Martin38.jpg
    Aston Martin38.jpg
    148.2 KB · Views: 172
  • Aston Martin105.jpg
    Aston Martin105.jpg
    144.3 KB · Views: 169
  • Aston Martin109.jpg
    Aston Martin109.jpg
    140.5 KB · Views: 175
  • Aston Martin116.jpg
    Aston Martin116.jpg
    137.1 KB · Views: 209
To avoid these ads, REGISTER NOW!

joeswamp

Well-known member
Joined
Jul 25, 2007
Messages
2,418
Location
Massachusetts
Man I wish had the skills to do 10% of what you can do. This kind of skill is the automotive equivalent of being a virtuoso musician. Where were you trained? (If you don't mind me asking) -- people that can undertake this level of work are not exactly a dime a dozen.

PS I was of course just kidding about the big tub of Bondo ...
 
OP
N

NASTYZEN

Well-known member
Joined
Jun 11, 2010
Messages
2,823
Location
St-Colomban,Que. Canada
Nice to see the factory seams inside the roof skin to see how the puzzle went together. Any shots like that of inside the front fenders?

Actually the factory seams in this case were irrelevant.I just fixed as I went,you will see why later.The bonnet was the last part restored in this project because I needed to position the other stuff first to determine where it would end up.The bonnet inner fenders were alu.and all messed up also.

So again to start putting it back together I had to start with the doors.I had a little help from a friend to strip them down.Only to find out the metal skeleton inside bottom half was duffed and of course the skins were to be replaced.:rant:
 

Attachments

  • Aston Martin06.jpg
    Aston Martin06.jpg
    146.3 KB · Views: 245
  • Aston Martin07.jpg
    Aston Martin07.jpg
    146.9 KB · Views: 228
  • Aston Martin08.jpg
    Aston Martin08.jpg
    140 KB · Views: 228
  • Aston Martin10.jpg
    Aston Martin10.jpg
    142.2 KB · Views: 360
  • Aston Martin41.jpg
    Aston Martin41.jpg
    139.5 KB · Views: 258
  • Aston Martin42.jpg
    Aston Martin42.jpg
    147.7 KB · Views: 242
  • Aston Martin53.jpg
    Aston Martin53.jpg
    142.6 KB · Views: 260
OP
N

NASTYZEN

Well-known member
Joined
Jun 11, 2010
Messages
2,823
Location
St-Colomban,Que. Canada
Man I wish had the skills to do 10% of what you can do. This kind of skill is the automotive equivalent of being a virtuoso musician. Where were you trained? (If you don't mind me asking) -- people that can undertake this level of work are not exactly a dime a dozen.

PS I was of course just kidding about the big tub of Bondo ...

Thank's Joe,I guess being born with the knack of building stuff is it for the most part and falling on the right mentors is the other.
I learned to weld in high school and never looked back I guess.After that it was the school of hard knocks.When I worked in other peoples shops I had the good fortune to have older skilled guys take me under there wing and teach me what they knew.I always respected and had a good attitude towards these guys and when you gobble it up,the mentors love showing usually.I mean gobble in an intellectual way of course.:lol_hitti
To make these inner fender I built a plywood fixture off of the original that you can see in picture no.114 and went to it.This wooden fixture is reversible so as to make the opposite side symmetrical.I used my English wheel and shot bag to recreate the suckers and tig welded the bits together.
 

Attachments

  • Aston Martin118.jpg
    Aston Martin118.jpg
    143.1 KB · Views: 258
  • Aston Martin15.jpg
    Aston Martin15.jpg
    139.4 KB · Views: 227
  • Aston Martin16.jpg
    Aston Martin16.jpg
    138.2 KB · Views: 226
  • Aston Martin22.jpg
    Aston Martin22.jpg
    143 KB · Views: 222
  • Aston Martin114.jpg
    Aston Martin114.jpg
    142.6 KB · Views: 255
  • Aston Martin115.jpg
    Aston Martin115.jpg
    142.1 KB · Views: 237
  • Aston Martin126.jpg
    Aston Martin126.jpg
    146.5 KB · Views: 257
OP
N

NASTYZEN

Well-known member
Joined
Jun 11, 2010
Messages
2,823
Location
St-Colomban,Que. Canada
More inner fenders and the home made English wheel I use.
:beer:
 

Attachments

  • Aston Martin127.jpg
    Aston Martin127.jpg
    145.6 KB · Views: 164
  • Aston Martin128.jpg
    Aston Martin128.jpg
    146.4 KB · Views: 152
  • Aston Martin112.jpg
    Aston Martin112.jpg
    138.5 KB · Views: 142
  • Aston Martin113.jpg
    Aston Martin113.jpg
    135.7 KB · Views: 139
  • Aston Martin151.jpg
    Aston Martin151.jpg
    141.2 KB · Views: 138
  • Aston Martin152.jpg
    Aston Martin152.jpg
    145.4 KB · Views: 133
  • IMGP4639.jpg
    IMGP4639.jpg
    137.2 KB · Views: 248
OP
N

NASTYZEN

Well-known member
Joined
Jun 11, 2010
Messages
2,823
Location
St-Colomban,Que. Canada
By this time I came across some production contracts and had rented a building down the road for lack of space in the home shop.I also was up to 5 employees.:wtf:
These were stressful and expensive times!
 

Attachments

  • Aston Martin117.jpg
    Aston Martin117.jpg
    140.6 KB · Views: 203
  • Aston Martin119.jpg
    Aston Martin119.jpg
    133.4 KB · Views: 195
  • Aston Martin130.jpg
    Aston Martin130.jpg
    149 KB · Views: 196
  • Aston Martin131.jpg
    Aston Martin131.jpg
    142.1 KB · Views: 191
  • Aston Martin129.jpg
    Aston Martin129.jpg
    146.3 KB · Views: 192
  • Aston Martin134.jpg
    Aston Martin134.jpg
    144.3 KB · Views: 189
  • Aston Martin146.jpg
    Aston Martin146.jpg
    145.3 KB · Views: 215

LARSOFVT

Well-known member
Joined
Jan 18, 2011
Messages
60
Location
Vermont
Is the car still in Ontario or PQ today?

In the Ian Fleming novels James Bond mostly drove a Bentley but I recall in the book "Moonraker" Bond drove a DB-3.
 
OP
N

NASTYZEN

Well-known member
Joined
Jun 11, 2010
Messages
2,823
Location
St-Colomban,Que. Canada
Very nice, I am always envious of someone with body panel skills.


Thank you,it's a noisy messy affair.

Is the car still in Ontario or PQ today?

In the Ian Fleming novels James Bond mostly drove a Bentley but I recall in the book "Moonraker" Bond drove a DB-3.

This project went threw the door 10 years ago.It could be anywhere.
I've yet to see a three grilled DB-2 in a Bond movie.

Spent a little time scanning again.For all of you to enjoy.
 

Attachments

  • Aston Martin135.jpg
    Aston Martin135.jpg
    147.3 KB · Views: 173
  • Aston Martin138.jpg
    Aston Martin138.jpg
    146.4 KB · Views: 177
  • Aston Martin139.jpg
    Aston Martin139.jpg
    146.8 KB · Views: 173
  • Aston Martin140.jpg
    Aston Martin140.jpg
    148 KB · Views: 180
  • Aston Martin156.jpg
    Aston Martin156.jpg
    145.5 KB · Views: 179
  • astonmay1.jpg
    astonmay1.jpg
    139.1 KB · Views: 185
  • astonmay2.jpg
    astonmay2.jpg
    145.6 KB · Views: 181
OP
N

NASTYZEN

Well-known member
Joined
Jun 11, 2010
Messages
2,823
Location
St-Colomban,Que. Canada
So as to keep the electrolysis to a minimum I taped the metal to Alu.contact areas with the highest quality electrical tape I could find before crimping the new skins on the metal frames.
And now it was onto the passenger side.Again first thing is to fit the door before starting to replace all the surrounding areas.
Hours of pleasure!
:lol_hitti
 

Attachments

  • Aston Martin136.jpg
    Aston Martin136.jpg
    145.3 KB · Views: 146
  • Aston Martin137.jpg
    Aston Martin137.jpg
    141.8 KB · Views: 147
  • astonmay.jpg
    astonmay.jpg
    137.5 KB · Views: 145
  • astonaugust1.jpg
    astonaugust1.jpg
    144.4 KB · Views: 153
  • astonapril.jpg
    astonapril.jpg
    144.9 KB · Views: 151
  • Aston Martin142.jpg
    Aston Martin142.jpg
    148.4 KB · Views: 152
  • astonmay6.jpg
    astonmay6.jpg
    142.1 KB · Views: 139

MP&C

Well-known member
Joined
Oct 21, 2009
Messages
4,396
Location
Leonardtown, MD
So as to keep the electrolysis to a minimum I taped the metal to Alu.contact areas with the highest quality electrical tape I could find before crimping the new skins on the metal frames.


How are the AL skins held in place, just the crimp? I remember the Triumph Saloon I worked on had brad nails going into wood to attach the body skins, just curious how it's done here with the two different metals.
 
OP
N

NASTYZEN

Well-known member
Joined
Jun 11, 2010
Messages
2,823
Location
St-Colomban,Que. Canada
The only place that uses copper nails is the strike plate latch area witch also has some garnishing's nailed to it and the top of the doors has some bits under the window,but someone else did that part.There's also some wood on top of the frame under the floorboards.The rest is just simply crimped on.
 
OP
N

NASTYZEN

Well-known member
Joined
Jun 11, 2010
Messages
2,823
Location
St-Colomban,Que. Canada
Some more.
 

Attachments

  • astonmay13.jpg
    astonmay13.jpg
    141.1 KB · Views: 130
  • astonmay12.jpg
    astonmay12.jpg
    142 KB · Views: 133
  • Aston Martin155.jpg
    Aston Martin155.jpg
    149.1 KB · Views: 130
  • astonmay7.jpg
    astonmay7.jpg
    141.2 KB · Views: 132
  • astonmay14.jpg
    astonmay14.jpg
    144.4 KB · Views: 230
  • astonmay11.jpg
    astonmay11.jpg
    139.4 KB · Views: 132
  • astonmay10.jpg
    astonmay10.jpg
    135.4 KB · Views: 129
OP
N

NASTYZEN

Well-known member
Joined
Jun 11, 2010
Messages
2,823
Location
St-Colomban,Que. Canada
And now for the back end of the car.Tack welded the boot to the body so as to keep everything together during repairs.
 

Attachments

  • astonjune4.jpg
    astonjune4.jpg
    136.5 KB · Views: 136
  • astonjune5.jpg
    astonjune5.jpg
    140.9 KB · Views: 132
  • astonjune6.jpg
    astonjune6.jpg
    136 KB · Views: 133
  • astonjune7.jpg
    astonjune7.jpg
    137.1 KB · Views: 130
  • astonjune8.jpg
    astonjune8.jpg
    144.5 KB · Views: 133
  • astonjuly1.jpg
    astonjuly1.jpg
    141 KB · Views: 133
  • astonjuly.jpg
    astonjuly.jpg
    146.2 KB · Views: 132
OP
N

NASTYZEN

Well-known member
Joined
Jun 11, 2010
Messages
2,823
Location
St-Colomban,Que. Canada
More back end.You can see the factory seams from the inside shots.
 

Attachments

  • astonjuly2.jpg
    astonjuly2.jpg
    139.6 KB · Views: 110
  • astonjuly3.jpg
    astonjuly3.jpg
    138.3 KB · Views: 113
  • astonjuly4.jpg
    astonjuly4.jpg
    143.8 KB · Views: 108
  • astonjuly8.jpg
    astonjuly8.jpg
    138.9 KB · Views: 122
  • astonjuly7.jpg
    astonjuly7.jpg
    145.6 KB · Views: 123
  • astonjuly6.jpg
    astonjuly6.jpg
    145.9 KB · Views: 143
  • astonjuly5.jpg
    astonjuly5.jpg
    144.7 KB · Views: 123

LARSOFVT

Well-known member
Joined
Jan 18, 2011
Messages
60
Location
Vermont
This project went threw the door 10 years ago.It could be anywhere.
I've yet to see a three grilled DB-2 in a Bond movie..

As far as Bond movies go, a few Astons appeared over the years but nothing older than a DB-5.
 
OP
N

NASTYZEN

Well-known member
Joined
Jun 11, 2010
Messages
2,823
Location
St-Colomban,Que. Canada
Now that all the main body work was done it was now time to fit it to the chassis or what I call dry fit, before priming.At this point it was also time to fit the suspension bits.
 

Attachments

  • astonaugust.jpg
    astonaugust.jpg
    145.9 KB · Views: 133
  • astonaugust1.jpg
    astonaugust1.jpg
    144.4 KB · Views: 128
  • aston,oct2.jpg
    aston,oct2.jpg
    141.9 KB · Views: 142
  • aston,oct3.jpg
    aston,oct3.jpg
    138.5 KB · Views: 139
  • aston,oct4.jpg
    aston,oct4.jpg
    137.8 KB · Views: 133
  • aston,oct15.jpg
    aston,oct15.jpg
    144.3 KB · Views: 111
  • aston,oct14.jpg
    aston,oct14.jpg
    143.6 KB · Views: 128
OP
N

NASTYZEN

Well-known member
Joined
Jun 11, 2010
Messages
2,823
Location
St-Colomban,Que. Canada
Forgot to include a pic of the boot with the license plate before so here it is.
So now onto the hood or bonnet I think is what the English call it.Again had to strip it of paint to see what lay underneath.Also had some sort of hellish black coating all over the inside. OMFG!:shocking:
Same story as the rest of the car.Needed much TLC!
 

Attachments

  • Aston Martin05.jpg
    Aston Martin05.jpg
    145.7 KB · Views: 111
  • Aston Martin09.jpg
    Aston Martin09.jpg
    141.7 KB · Views: 107
  • Aston Martin12.jpg
    Aston Martin12.jpg
    137.9 KB · Views: 103
  • Aston Martin102.jpg
    Aston Martin102.jpg
    143.2 KB · Views: 108
  • Aston Martin103.jpg
    Aston Martin103.jpg
    143.3 KB · Views: 108
  • Aston Martin101.jpg
    Aston Martin101.jpg
    144.3 KB · Views: 117
  • astonapril2.jpg
    astonapril2.jpg
    141.8 KB · Views: 138
OP
N

NASTYZEN

Well-known member
Joined
Jun 11, 2010
Messages
2,823
Location
St-Colomban,Que. Canada
Zinc cromate primer.I bought a case of rattle cans.It's used on aluminium for priming it.Mainly used in aviation.It only has so long of a shelf life and I had so much, I used as much as possible on this project.It was overkill.
 

johno

Well-known member
Joined
Oct 16, 2009
Messages
2,418
Location
Southern Ont.
Zinc cromate primer.I bought a case of rattle cans.It's used on aluminium for priming it.Mainly used in aviation.It only has so long of a shelf life and I had so much, I used as much as possible on this project.It was overkill.

I thought it looked familiar.
 
To avoid these ads, REGISTER NOW!
Top Bottom