To avoid these ads, REGISTER NOW!

My DIY cabinets/shelves

redman43

Well-known member
Joined
Aug 2, 2010
Messages
181
Location
Lake Stevens, WA
Phase one and phase two of my DIY garage storage is finally done.

I needed something that would help organize our 2-car garage. I've been getting rid of stuff over the last few years and finally have it down to the stuff that we'll actually use.

The "stuff":

52114dd2.jpg


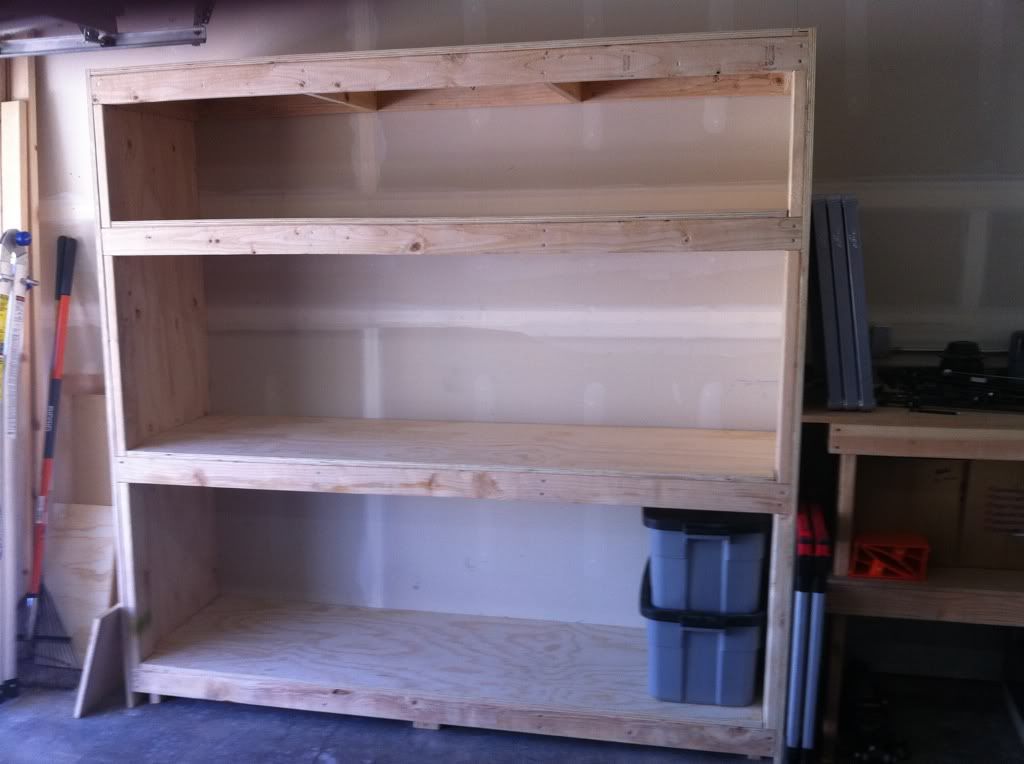
Phase one is a set of large shelves/cabinet approx 7ft long, 2ft deep, and approx 7ft tall. It's a 2x4 frame lagged to the studs, with 3/4" plywood shelves and outer skin. It's been designed around the RubberMaid RoughNeck storage boxes. I should be able to get 25 of the 14gal boxes in there. Little over $100 so far in building materials.

af85a8b9.jpg


ccf84a83.jpg


e64c0ccf.jpg


bafa6984.jpg


f18d2f04.jpg


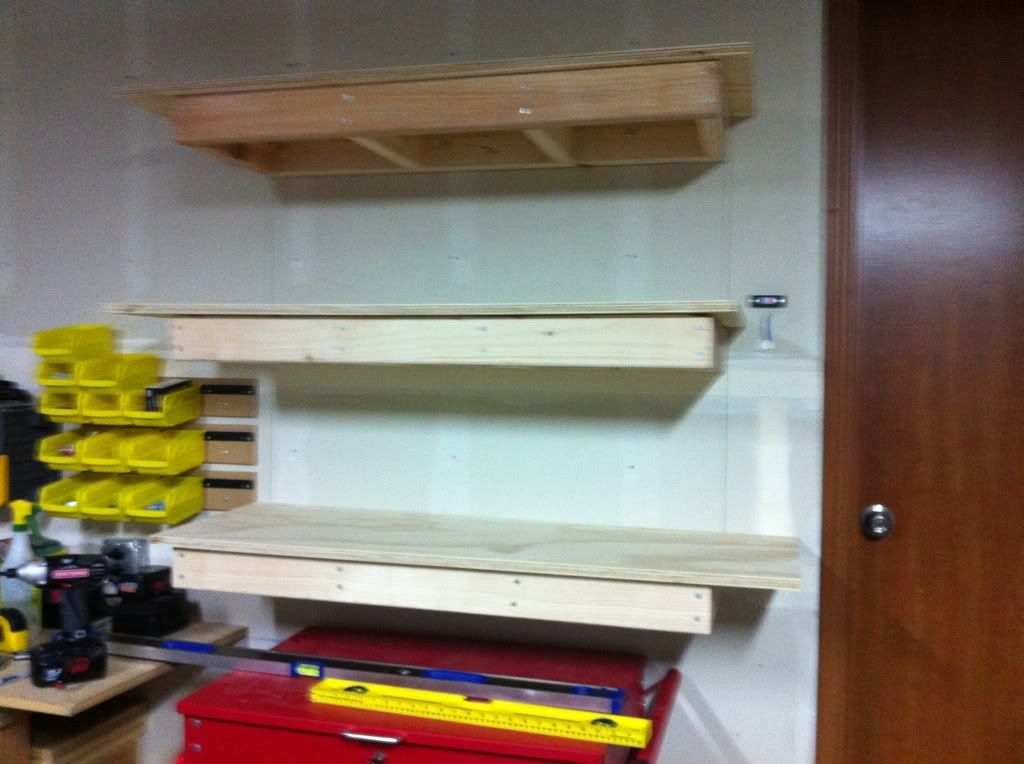
Phase two is a smaller raised shelf/cabinet for smaller lightweight items (carwash stuff, fertilizer/weed killer/etc, paint). Same build type as the larger shelves. About $50 so far in building materials.

c46cce48.jpg


7c4a5ee9.jpg


53e475c4.jpg


Phase three will be another 4ft section to the left of the large shelves. That new section will not have the second shelf leaving an open section that is over 50in tall. The sports gear, golf clubs and other tall items will go in there.

The left over "stuff":

67965b44.jpg
 
To avoid these ads, REGISTER NOW!

35mastr

Well-known member
Joined
Dec 6, 2007
Messages
2,534
Location
Norcal
Looks cleaned up. Is that a one or two story house. If one,Why not use the attic space in the garage?
 
OP
R

redman43

Well-known member
Joined
Aug 2, 2010
Messages
181
Location
Lake Stevens, WA
It is a two story house. The master bedroom is directly above the garage. I would have loved to be able to use open space up there to put the less used stuff, but our builder is one of those tract assembly line machines that crank out a house in no time, so virtually no wiggle room on the design.
 

35mastr

Well-known member
Joined
Dec 6, 2007
Messages
2,534
Location
Norcal
I bought a pretty old home that had 12 feet from the floor to the peak. I framed it all in at 7 foot and put in a pull down door. Only issue is that there is way too much stuff up there now thats been accumulated over 10 years.
 
OP
R

redman43

Well-known member
Joined
Aug 2, 2010
Messages
181
Location
Lake Stevens, WA
Phase 3 was finished some time ago and I finally decided on what to do with the walls above the workbench; I added some pegboard and cabinets. I still plan on some form of covering for the large units, probably just a canvas tarp. The smaller cabinets to the right of the workbench and the cabinets above the workbench will get doors. This should do it though for the construction and should be plenty of storage for our needs.

Phase 3 is back there behind the scrap lumber.
DSCN0606.jpg


DSCN0612.jpg


DSCN0611.jpg


DSCN0607.jpg


This is the last of the stuff to put away/dispose of.
DSCN0610.jpg
 
OP
R

redman43

Well-known member
Joined
Aug 2, 2010
Messages
181
Location
Lake Stevens, WA
Yep, Kreg pocket hole jig. 250+ pocket holes I think. It took probably 5 or 6 times as long to cut everything as it did to drill the pocket holes and assemble everything. Well worth the $100 for the jig.

I had to do this only 2 or 3 hours at a time while my son was down for his naps on the weekend. It took some time to get all of this done. All done with hand power tools (circular saw w/ plywood blade, handheld router w/ flush bit, cordless drill and impact drill).
 

admactanium

Well-known member
Joined
Jul 27, 2008
Messages
77
Great stuff! I'm going to steal these cabinet designs for my garage redo next month. One quick question: Did you lag bolt the 2x4 to the wall studs first and then attach the rest of the shelf frame or did you build the frame first and then use that support jig to hold it up while you lagged it to the wall?
 

DrunkSmurf

Well-known member
Joined
Mar 12, 2011
Messages
181
Location
NorCal
Good work and it's looking great. Are considering doors?

I built a similar shelf unit for the plastic totes, but knowing that was what I was storing, I just did the math to fit 2 stacked by 3 wide for 6 on each shelf and just used 2x4 framing to support them.
It shaved a lot on material cost eliminating the plywood, which can always be added later should I need it.

One thing I can't believe is that I've never thought to store my level/s and carpenter squares the way you have yours on the bench framing...lol...I'm stealing that idea for sure.:thumbup:
 

bad_idea

Well-known member
Joined
Jun 11, 2011
Messages
4,332
Location
Pasquotank, NC
nice looking setup. well crafted and thought out. i would highly recommend doors on those cabinets. i recently did some drywall work in my garage and have drywall dust all over my stuff to prove it. after i get that cleaned up, i will build some cabinets w/ doors to keep the dust off my stuff. i generate a lot of dust out there..... sawdust, grinding dust, drywall dust, dust dust. ugh!
 

fr0mastaj

Well-known member
Joined
Jan 18, 2010
Messages
1,265
Location
MA
VERY nice job! Looks awesome. I am going to steal your idea of using the pegboard papertowel holder as a wire spool rack. I have the same one laying around :beer:

I noticed that it's getting a little cramped in there with all your new bench/shelves, are you still going to have room to pull a car in there to work on?
 
Last edited:

PontiacFan

Well-known member
Joined
Apr 25, 2007
Messages
102
That looks really good for a DYI build-up.
Keep it up.

As previously mentioned by other members above:
You may wanna consider building some doors to 'hide' everything & 'clean-up' the interior of the garage.
You'd be amazed at the difference if it would all be 'smooth' & your eye not focus on every little on the shelves.

Good Luck! Keep it goin'!
 
OP
R

redman43

Well-known member
Joined
Aug 2, 2010
Messages
181
Location
Lake Stevens, WA
It is a two car garage and everything encroaches no more than 24" into the space. Once the last of the "stuff" is dealt with, there should be plenty of space to work on the car or the next woodwoorking project.

When planning out the larger unit, I made a mistake and didn't really take into consideration how to deal with doors, so I'm thinking of just using a canvas tarp to cover everything. It's almost 11ft wide by 7 ft tall, which would be just under 3 full sheets of plywood and I'm not quite sure how to handle it. The smaller cabinets will get face frames and doors though.
 

Lkdelta

Well-known member
Joined
Sep 21, 2010
Messages
1,131
Location
40 mi.east of syracuse
Nice job...very nice.:drool: 
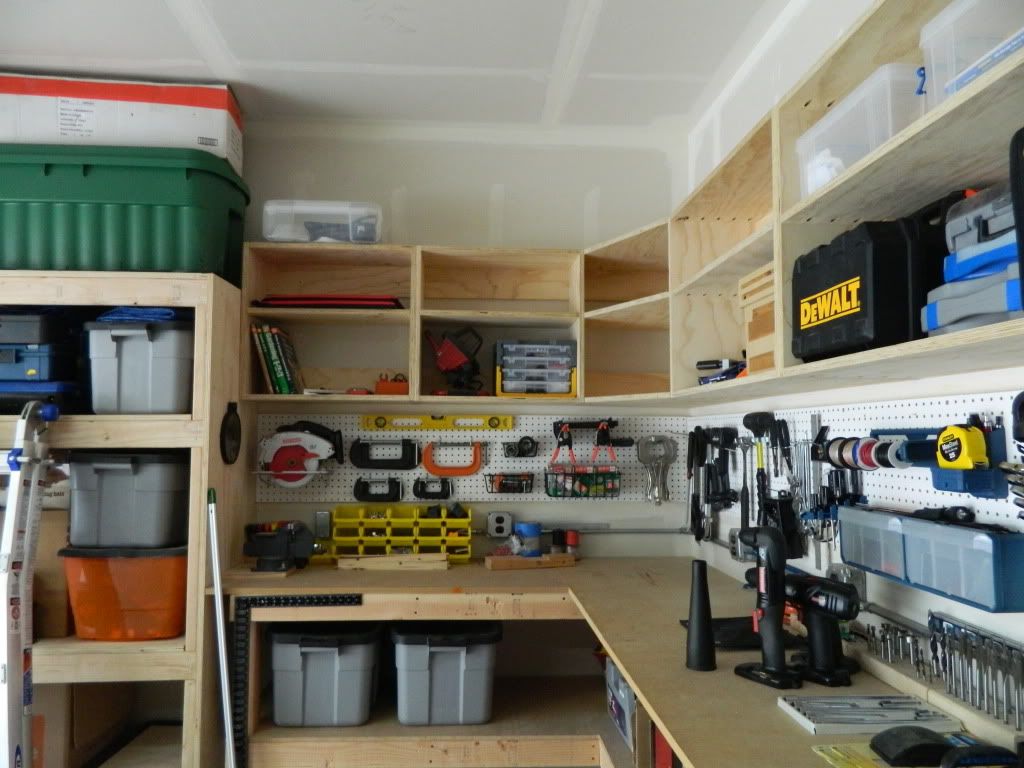
That "4' level" hidey-hole is real handy and protective

Best part about building your own is you can stack stuff in the driveway the way it would be "on the shelf"...and take some measurements.

And figure out how far between each shelf, or how long for each shelf.
No wasted space...the plastic totes or boxes all fit perfect

You have that space under the work bench "by the shop vac and red roll-around seat"
And that cart of white totes over by the hot water tank

Throw another shelf under the bench and slide the white totes in?
That would create another free space by the hot water tank?
 
Last edited:
To avoid these ads, REGISTER NOW!

Bryanatkinson

Member
Joined
Jun 27, 2011
Messages
9
Great Job. The garage changed a lot, much more tidy.

The way you build your own shelves for the garage is very impressive.
 

Josh B

Active member
Joined
Nov 23, 2010
Messages
26
Location
Poca, WV
Looks great bro! I love how your organization is coming together. I am about to tackle my garage, stuff keeps piling up. You are giving me some good ideas. Keep on keepin on!
 

Aspen RT

Well-known member
Joined
Jan 4, 2011
Messages
964
Location
kansas
Nice shelves, real nice job on that corner shelf! I hate to think what mine would look like if I tried that!
 

ChristopherLutz

Well-known member
Joined
Jun 17, 2010
Messages
270
Location
Flower Mound, TX (DFW)
Really nice job - looks top notch.

RE: doors - I've been thinking of doing something similar to your sidewall shelving unit and thought about using 1/8 inch wood for the doors and making them sliding - similar to the 12 gauge garage system.

The coffee hasn't kicked in yet, so I can't remember the name of the wood, but it's dark and has a smooth finish on one side. I was planning to cut this and make slim sliding doors to keep dust out.

Very nice job - looks great.
 
OP
R

redman43

Well-known member
Joined
Aug 2, 2010
Messages
181
Location
Lake Stevens, WA
Thanks all.

Yes, these will be painted at some point, or at least a coat or two of primer.

I planned the workbench cabinets using 24" wide units on the left and 36" wide units on the right. I wanted them shorter, so the shelves would be less likely to sag over time. The corner shelf was then just cut to fit the hole left over (I was surprised that the top and bottom shelves were nearly exactly the same dimensions, only about 1/8" longer in only one direction). I purposefully made it so that it wasn't at a 45* angle so as to try to eliminate as much lost space as possible that usually goes along with corner units. The middle shelf does need some kind of support though in the back, it's only being held up with the 4 pocket holes going into the cabinet units on each side.

I also planned the larger units with a specific Rubbermaid container in mind. In the 7' section of the large unit, I can put 5 containers by 1 tall on the top shelf and 5 by 2 on the bottom and middle shelves. There is a few inches of wiggle room in the horizontal direction and the vertical direction on each shelf to assist with getting the containers in and out.

You can kind of see it in the pics, but the 4' section of the larger unit has no middle shelf. I wanted someplace to put my sports stuff, golf clubs and other taller items and this fit the bill perfectly.

Regarding the 4' level and carpenters square, I hadn't really planned that on purpose. The benchtop overhangs the frame by ~1" on the left leg of the bench, so the carpenters square fit just right. Along the right leg of the bench, the benchtop overhangs the frame by a good 5". I didn't really have a place to hang the 4" level vertically, so I had the (apparently) brilliant idea to put it down there.

Sliding doors would require me to build out another 1" or 2", otherwise I won't be able to use these particular containers. It's not completely off the list of possibilities, but its definitely towards the bottom of that list.

This is the first time I've done anything of this scale. Feel free to use any of these ideas in your own space. Lord knows I've "borrowed" of few ideas from some of you just to get to this point.
 

Bad Idea

Well-known member
Joined
May 31, 2010
Messages
66
Location
South NJ
And to the OP - Looks great and completely custom. Very impressive work with just a circ saw and router.
 

Keep

Well-known member
Joined
Jan 1, 2009
Messages
1,398
Location
Oshawa, Ontario
Looks excellent, those pocket hole jigs are worth their weight in gold!

As for the door suggestion, I would also recommend them, if not for anything other then to hide your stuff from the neighbors, or more likely the guys cruising around looking at all the nice garages with their doors open.
 

Quint

Well-known member
Joined
Jun 14, 2010
Messages
244
Location
Youngstown, OH
I bet your garage smells AMAZING after cutting all of that wood lol. (I do love the smell of fresh-cut wood)
 

freddyaudiophile

Well-known member
Joined
Aug 3, 2011
Messages
49
Location
New Brunswick, Canada
Hi there...

Newbie on here and found this thread while trying to scour the net to find some ideas for good DIY shelving and cabinets... some that did not look DIY... and stumbled upon these. Amazing job by the way; I'm impressed, very impressed.

Questions:
- What thickness and type of plywood did you use?
- What thickness is the MDF top on your bench?
- On your wall cabinets, about how far is that top shelf down from your ceiling?

I noticed that you used a flush-cutting bit in your router. Did you run around the edges of the plywood after the shelves were built and installed on the wall, or did you yank everything down around flush-cut the edges then? I assume that you did everything when it was mounted on the wall....

I'm planning to do a variation on this in a few weeks when my second garage is complete. I plan on having each shelf self-supporting as I plan to make use of the floor space for winter tires, washer fluid, etc., with 2x4s running down at 45s to the wall support. I like the idea of skinning the shelves with plywood to make them look finished as you have done.

Nice work (for the second or third time!)...

freddy
 
OP
R

redman43

Well-known member
Joined
Aug 2, 2010
Messages
181
Location
Lake Stevens, WA
Hi there...

Newbie on here and found this thread while trying to scour the net to find some ideas for good DIY shelving and cabinets... some that did not look DIY... and stumbled upon these. Amazing job by the way; I'm impressed, very impressed.

Questions:
- What thickness and type of plywood did you use? 3/4" "cheap" plywood, $28/sheet at HomeDepot. Not sure of the type off the top of my head.
- What thickness is the MDF top on your bench? 3/4"
- On your wall cabinets, about how far is that top shelf down from your ceiling? somewhere around 30-36" from the ceiling

I noticed that you used a flush-cutting bit in your router. Did you run around the edges of the plywood after the shelves were built and installed on the wall, or did you yank everything down around flush-cut the edges then? I assume that you did everything when it was mounted on the wall.... I ran the router around the edges before I mounted it to the wall. But it didn't work out well due to inconsistencies in the plane of the wall and I had to run the router over the front edge again on a few of the shelves and there is one place where the wall bowed out and the plywood didn't really like it like that. I did it before mounting them because it was easier to get the side edges, especially those that would be closed to the wall. If I could offer advice, do the side edges before you mount the frame to the wall, then scribe the back edge so it matches the wall, then run the router along the front edge.

I'm planning to do a variation on this in a few weeks when my second garage is complete. I plan on having each shelf self-supporting as I plan to make use of the floor space for winter tires, washer fluid, etc., with 2x4s running down at 45s to the wall support. I like the idea of skinning the shelves with plywood to make them look finished as you have done.

Nice work (for the second or third time!)... freddy

Thanks! And welcome to the board.
 

freddyaudiophile

Well-known member
Joined
Aug 3, 2011
Messages
49
Location
New Brunswick, Canada
re: car care stuff shelf, how much usable space is between each shelf?

I like the way you built your wall unit but am concerned about the overall thickness of each shelf: 3/4" for the plywood and another 3.5" high for the 2x4. I might use continuous 2"x3" if I can find it at Home Depot here.

With regards to routing edges, I was *thinking* about building the cabinets on the garage floor and then cleaning up the edges, and the lagging them onto the walls. I will have a 16' foot work bench that will have a 4' wide bank of shelves (like your car care shelf) above the bench on each end, with an open 8' peg board in the middle. I'm trying to determine how high to make the bench off the floor, and how deep to make the car care shelf like yours. I'm 6' tall and like the standard kitchen counter height of 36" off the floor for the bench and was thinking about 28" deep. The car care shelf would be 12 or 14" deep (14" max I would say). I've been reading that you should not have a bench any deeper than 24" if you have a peg board behind it, and no more than 30" if you are putting 12" deep shelves over the workbench (as a general rule of thumb). I've played around with bench heights and depths over the last few nights in my 'in progress' garage in the backyard and agree with what I mentioned earlier -- for me, I don't see the bench any deeper than 28", and I might cut it back to 24" in the middle section where the peg board will be.

How does that compare to yours?

Thoughts?
 
Last edited:

dreamingmuscle

Well-known member
Joined
Dec 4, 2005
Messages
3,472
Location
Tryon Oklahoma
I was about to say you should have put the large shelves on casters so you could roll them out to clean. But then I realized with the slope of the floors. You were right to level and bolt the shelves to the walls before putting on the sides. It ain't easy to build a free standing shelve to match a slope. Great idea I will keep it in mind for the future.

(p.s.) Put some base trim across the bottom to keep stray bolts, parts and sockets from disappearing into oblivion.

I'm also going to steal the level and square idea.

The only thing I would have done differently is to paint it first. Unfinished dry wall doesn't do well over time. And painting around and inside those shelves is not going to be fun.

And thanks for making me want a pocket hole jig.

I gotta go now.

(Honey we need go to town so I can buy a new tool. No really I really need it. No really. A'ww come on you should see what it does. Yes I'll use it I promise.)

Glen
 
To avoid these ads, REGISTER NOW!
Top Bottom