To avoid these ads, REGISTER NOW!

Air compressor run help

1930artdeco

Well-known member
Joined
Dec 28, 2010
Messages
1,107
Location
Lynden, Wa
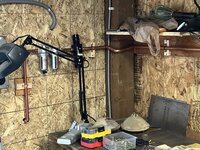
Ok, here is how I plan to plumb my air compressor. Please look it over and let me know what you think.

First off the compressor is a two stage with inter cooler/after cooler made of copper tubing. The air will then go into an after cooler before heading into the tank. It will go from the tank into the garage and follow the diagram.

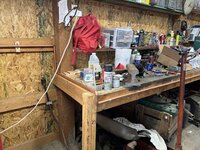
I do have room to install a few drops/aftercooler lines along one wall if need be. Otherwise, it will be roughly as it is drawn here.

Thank you,

Mike
 

Attachments

  • IMG_9990.jpeg
    IMG_9990.jpeg
    480.1 KB · Views: 43
To avoid these ads, REGISTER NOW!

OccupantRJ

Well-known member
Joined
May 15, 2009
Messages
11,148
Location
Eastern North Carolina
I see no need for the two valves on the main run line. Added expense. Also no need for one after the filters. Just relieve the pressure on the main line with a drain port for service.
 

GeoBruin

Well-known member
Joined
May 5, 2018
Messages
3,742
Assuming the filters you show are a water trap, coelescing filter, and dessicant filter, you want them after your aftercooler. The filters/water traps are much more effective at removing moisture from the line when you have cooled it down. Otherwise, you're just filtering it only to then cool it off and condense more moisture out of the air that will wind up in your tools.

If that filter/gauge cluster also contains your regulator, that's all the more reason to move it downstream after the aftercooler. You don't want to start regulating the air until the last point you can. The air flows more efficiently at higher pressure and you will experience less pressure drop after the reg if you move the reg closer to the point of use.

Regarding ORJ's comment, it is added expense and some loss of flow, but there may be some benefits to isolating certain parts of the system depending on how you will use it. It's really at your discretion.
 
OP
1

1930artdeco

Well-known member
Joined
Dec 28, 2010
Messages
1,107
Location
Lynden, Wa
Yes it is a water separator/regulator and then a desiccant filter/coalescent filter. They are all after the after cooler. I can move the reg further down stream if that would be better. Maybe a reg/separator at each drop?

I see what you mean by removing the main line ball valves. I was just thinking of maintenance in the future.
 

OccupantRJ

Well-known member
Joined
May 15, 2009
Messages
11,148
Location
Eastern North Carolina
Also, as far as valves on my personal air system I use either ball valves or gate valves if I have them in my stock due to the flow restriction of a globe valve and the sealing maintenance on some types. If you are not familiar with those three valve types google is helpful for diagrams to see how it affects flow. If this was a large factory piping layout and one has to keep things operational the extra valves are needed. It’s not like individuals can’t bleed down the system to do what they want. I have machines that need constant blowing off so instead of quick disconnects at those locations I attach a custom length hose directly to the piping with attached nozzle. This saves one to two quick disconnects per location, and your hoses stay put with less leak points. Two ear clamps work great for making up hoses and are easily crimped with diagonal cutting pliers. Big box stores have these clamps, and they give a neat snag free connection to a barbed fitting.
 

Attachments

  • 895CDE77-5687-433D-864B-AAD1700A6D0D.jpeg
    895CDE77-5687-433D-864B-AAD1700A6D0D.jpeg
    21.7 KB · Views: 32
Last edited:
OP
1

1930artdeco

Well-known member
Joined
Dec 28, 2010
Messages
1,107
Location
Lynden, Wa
Uhhhh yeah.....I have lots of pretty copper awaiting some silver solder in the garage. Thank you all for the ideas and refinements.
 

GeoBruin

Well-known member
Joined
May 5, 2018
Messages
3,742
Yes it is a water separator/regulator and then a desiccant filter/coalescent filter. They are all after the after cooler. I can move the reg further down stream if that would be better. Maybe a reg/separator at each drop?

I see what you mean by removing the main line ball valves. I was just thinking of maintenance in the future.

Wait now I'm confused. You say your filters are after the aftercooler, then what is the "possible multiple drop/aftercooler area?"
 
To avoid these ads, REGISTER NOW!
OP
1

1930artdeco

Well-known member
Joined
Dec 28, 2010
Messages
1,107
Location
Lynden, Wa
It is an area that I can-if needed-add some drops for a 'homemade' after cooler. So I could in theory have two after coolers. I think that is what it is called. Where the pipe goes up and then down a couple of times with drains at the bottom to let water out. Or am I over thinking/complicating my design?
 
OP
1

1930artdeco

Well-known member
Joined
Dec 28, 2010
Messages
1,107
Location
Lynden, Wa
GEOBRUIN, there will be a separate after cooler attached to the compressor. So it will go: Pump--->After Cooler--->Tank--->garage piping system. Sorry about the confusion with my terminology.
 

GeoBruin

Well-known member
Joined
May 5, 2018
Messages
3,742
GEOBRUIN, there will be a separate after cooler attached to the compressor. So it will go: Pump--->After Cooler--->Tank--->garage piping system. Sorry about the confusion with my terminology.

Understood. Is the aftercooler attached to the compressor a radiator type, refrigerated type, or a serpentine pipe style? In any case, I wouldn't expect the need for an additional aftercooler after the filter/regulator setup and as noted earlier, there are some disadvantages.

Regarding regulators at each drop, that's great if you can do it but in that case, I would eliminate the reg up stream. I would love to have my setup like that since each of my drops has a separate purpose and each requires different pressures. Plus, like I said, you're not choking the system unnecessarily before regulating to final pressure at the point of use.
 
OP
1

1930artdeco

Well-known member
Joined
Dec 28, 2010
Messages
1,107
Location
Lynden, Wa
SUMBOODLE: Don't think so, just the pen I used and the photo from my phone.

GEOBRUIN: Great I will just use the one regulator and not make up a second after cooler. Makes my life that much easier.
 

OccupantRJ

Well-known member
Joined
May 15, 2009
Messages
11,148
Location
Eastern North Carolina
I have a regulator and drier that is assembled as a portable attachment to use where needed. It has a quick disconnect half on each side and a J bolt on top to allow it to hang on an air outlet unless needed, then plug it into my choice of outlets. If I am painting a mechanical part outside I usually hang it on a screw into the sawhorse leg I am using to get it close to the paint gun. One setup, less cost, versatile use.
 
OP
1

1930artdeco

Well-known member
Joined
Dec 28, 2010
Messages
1,107
Location
Lynden, Wa
Occupant, that is a great idea. I do plan to paint small things with the largest being maybe a fender or similar. But I am dedicating one of the quick disconnects to painting things outside. If you don't mind, I would like to copy your idea, you will get full credit of course.

Mike
 

OccupantRJ

Well-known member
Joined
May 15, 2009
Messages
11,148
Location
Eastern North Carolina
Occupant, that is a great idea. I do plan to paint small things with the largest being maybe a fender or similar. But I am dedicating one of the quick disconnects to painting things outside. If you don't mind, I would like to copy your idea, you will get full credit of course.

Mike
Go for it! Copying workshop ideas for personal use can be considered a complement, in my opinion. The portable regulator/drier works very well. I used a pipe ****** between the units, then welded a long 3/8” eye bolt to the ******, opened up into a J shape to act as a hanging hook. Hang it where you want, then run a hose in, hose out. Pressure control is then near at hand.
 
OP
1

1930artdeco

Well-known member
Joined
Dec 28, 2010
Messages
1,107
Location
Lynden, Wa
I have mocked everything up and now need to figure out how to/which order/pieces braze the whole thing together. Ignore the huge mess. Still in the process of cleaning up and organizing the bench. The two drops are there, the valve just fell off the main line.
 

Attachments

  • IMG_0053.jpeg
    IMG_0053.jpeg
    916.8 KB · Views: 8
  • 77222981490__F628FCF6-0F5B-4E84-AA0A-FD6C3C1D4A5A.jpeg
    77222981490__F628FCF6-0F5B-4E84-AA0A-FD6C3C1D4A5A.jpeg
    1,002 KB · Views: 8
  • 77222979936__AB288EE6-D0D2-4B20-81F8-2B7413EE0D27.jpeg
    77222979936__AB288EE6-D0D2-4B20-81F8-2B7413EE0D27.jpeg
    1.1 MB · Views: 10
To avoid these ads, REGISTER NOW!
Top Bottom