To avoid these ads, REGISTER NOW!

blaster/compressor pics

the dude

Well-known member
Joined
Dec 17, 2006
Messages
166
Location
Saskatoon, SK
blaster/compressor/aftercooler pics

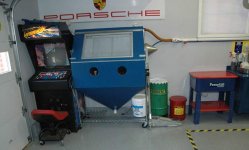
I thought I would post up pics of my air compressor and blaster. The compressor is a rebadged Devair TAPV 5052 2 stage 80 gallon tank that puts out around 20cfm at 100psi and has 100% duty cycle. It weighs in at around 600lbs! I REALLY LOVE MY WIFE for buying me this! I haven't got the walls in yet so I am waiting to run the hard lines and permanently mount it to the floor

blaster003.jpg


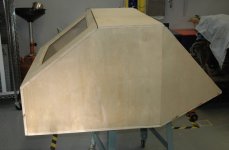
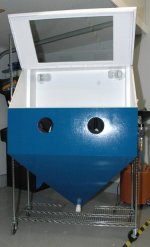
The blaster is a Princess Auto special that works fairly well. It leaks but with a few mods I will have that fixed up. I am using a shop vac to pressurize the cabinet and dump the dust into a 5 gallon pail. I find this easier on the shop vac motor. Most of the decals are on magnets and get moved around..

blaster002.jpg


I rigged up my 11 gallon tank as an extra holding tank right beside the blasting cabinet. It really helps drop the moisture out of the air. I had it before the regulator but was reading the side and it cautioned to not go over 125psi....oops, I had it to 175psi!!

blaster004.jpg


The blasting cabinet is using a 1/8" nozzle and works really well at around 80psi. I can blast for about 10 minutes before the pump kicks in and then it can maintain the 80psi.

This is an alternator bracket. The first to get belted with the new air.

blaster005.jpg
 
Last edited:
To avoid these ads, REGISTER NOW!

Roospike

Well-known member
Joined
Jun 21, 2005
Messages
291
Location
Mid-West
Great looking toys "dude" .................

Now tell us how much time and how much fun you had putting that blast cabnet together , dont lie ........ i put one together too .

The secret is using about half a tube of calk on all the joints .

luv all dem nuts and bolts !
 

bdierks

Well-known member
Joined
Feb 13, 2007
Messages
48
Location
Central Point, Oregon
Do you have an air inlet on your cabinet? i built mine and am using my shop vac to **** out the dust and it does not work well at all. I think i need an air inlet so the air can move though the cabinet faster. you said yours was presurized, thats why i ask, How well does it work?
 

RickP330

Well-known member
Joined
Apr 12, 2007
Messages
831
Location
Middle Island, NY
I have a shop vac on mine and it works well. I have a rubber flapper on a air inlet so if I hit it with the sand it closes and keeps the mess inside. otherwise it opens and pulls air in through the cabinet. The dust killed my shop vac though, might consider getting a dedicated vac just for that.

On mounting the compressor, I don't reccomend bolting it down, just sit it on some vibration pads. I am redoing my garage right now and should get to resetting mine up soon. Check out my thread.
Rick
 
Last edited:

spoulson

Member
Joined
Apr 4, 2007
Messages
13
I'm considering a blast cabinet for my garage. Do you really need a lot of cfm for these? I was looking at this one from Harbor Freight. It says it needs at least 5hp and 5cfm at 40-80psi. I have your average Craftsman 30gal 2hp 6.4cfm compressor, that is plenty for all my tools. Do I really need to upgrade to run this cabinet?
 
OP
T

the dude

Well-known member
Joined
Dec 17, 2006
Messages
166
Location
Saskatoon, SK
I don't think your small compressor will keep up. Blasters eat a lot of air.

The cabinet has two removable plugs. One on the side for a vaccum and the other on the back to let air in/out. The one on the back has a shield covering it on the inside which I would guess is to redirect the sand and get it to drop out of the air before it leaves the cabinet. I plug my shop vav blowing into the one on the side and have a vented pail attached to the one on the back.
 

RickP330

Well-known member
Joined
Apr 12, 2007
Messages
831
Location
Middle Island, NY
You Blow? Why wouldnt' you **** the dust out of the cabinet with the vac? it's gotta create a heck of mess when you are blasting?
If you add a storage cylinder like above I think you could get away with the smaller compressor, but you will have to wait for it to catch up quite a bit.
Rick.
 

OldCarGuy

Well-known member
Joined
Nov 29, 2005
Messages
1,984
Location
Ohio
Your wife is a keeper! She made a fantastic choice and you’re going to be extremely happy with that compressor.

The way to a man’s heart,, is by the tools she purchases for you!
 
OP
T

the dude

Well-known member
Joined
Dec 17, 2006
Messages
166
Location
Saskatoon, SK
My wife is definitely a keeper! She was asking when I am getting the new band saw so I can ditch the chop saw and get rid of all the dust in the air. god do I lover her...

the compressor is great. It is going to last me a life time and I am very happy with it's performance so far. I just need to hook up my frazinator and cooling coils to get rid of the water.
 

Vicegrip

Well-known member
Joined
Mar 9, 2007
Messages
1,187
Location
NoVA.
wrap the filters in bath towels. This helps keeps the dust out of the motors on flow through shop vacs. I make my own dust and fume collectors from 30 gal drums and 3 stage vacuum motors. The 3 stage units are the ones used in truck mount carpet cleaners and are very strong. The dust does not go through the motor and is carried away from the unit via a outlet pipe. Only clean air is use for cooling the motor. The filter is layers of bath towel wrapped around a standard shop filter bolted to the bottom of the drum lid. This setup is great for fine dust if you do a lot of wood work use a pre tank made form a 55 gal drum to catch the big chunks and this setup for the fines and dust.
 

Attachments

  • agarage13.jpg
    agarage13.jpg
    59.5 KB · Views: 69

Uncle Buck

Banned
Joined
Mar 7, 2005
Messages
9,120
Location
Kansas
I'm considering a blast cabinet for my garage. Do you really need a lot of cfm for these? I was looking at this one from Harbor Freight. It says it needs at least 5hp and 5cfm at 40-80psi. I have your average Craftsman 30gal 2hp 6.4cfm compressor, that is plenty for all my tools. Do I really need to upgrade to run this cabinet?

You better go back and read those specs again! It's lookin for 12cfm! not 5cfm, huge difference!
 

Vicegrip

Well-known member
Joined
Mar 9, 2007
Messages
1,187
Location
NoVA.
The HF suction guns tend to be poor at best. It is easy to replace them with a slightly better one from Home Depot for $12. The good part about the Home Depot gun is that Grangers sells the same gun under another name and sells all kinds of tips and air ports of different sizes. You can get a smaller tip and air port to match you compressor. It is better and faster to have more air and media but if you are only cleaning the odd part now and then and do not want to fork out the $$$ for a new compressor a smaller tip and air port would be an option.

I made my own from some gloves off a crappy frustrating junk HF unit, 2 sheets of 3/4 plywood, a Home Depot gun, some tempered glass from an old roll door, some left over costco shelving, some door weather striping and and the odd fitting or two. I put a baffle on each side the left is intake and the right suction. The air inside stays clean during use. Added a screen that fits under the inside Costco rack made inside work shelf to catch the crud before it gets back into the media. The second gun is air only for dusting off the parts and cleaning up the inside of the unit befor upening the hatch. I also have a regulator and filter on the side to ajust the pressure depending on the media used. it ended up being close to 24 deep 48 wide and 36 tall inside the working area. Fun project with lots of compound angles to figure out.
 

Attachments

  • plywoodcuts.jpg
    plywoodcuts.jpg
    43.1 KB · Views: 30
  • plywoodcase.jpg
    plywoodcase.jpg
    41.2 KB · Views: 33
  • finished-up.jpg
    finished-up.jpg
    66.2 KB · Views: 47
  • inside-blast.jpg
    inside-blast.jpg
    70.8 KB · Views: 50
  • hatchopen.jpg
    hatchopen.jpg
    47.6 KB · Views: 45
  • agarage5a.jpg
    agarage5a.jpg
    39.6 KB · Views: 54
Last edited:

Charles (in GA)

Well-known member
Joined
Jan 11, 2006
Messages
12,489
Location
50 mi south of Atlanta
I rigged up my 11 gallon tank as an extra holding tank right beside the blasting cabinet. It really helps drop the moisture out of the air. I had it before the regulator but was reading the side and it cautioned to not go over 125psi....oops, I had it to 175psi!!

You should regulate the air pressure down to 100 to 110 psi. If you regulate it down, you will get even, consistent cleaning from the blaster, and longer between the pump cycles. Unregulated, the ever decreasing pressure makes blasting somewhat inconsistent and probably "too" effective on at least some parts.

Charles
 
To avoid these ads, REGISTER NOW!
OP
T

the dude

Well-known member
Joined
Dec 17, 2006
Messages
166
Location
Saskatoon, SK
i did change it. I have the extra tank regulated at the 80-100 psi needed at the blaster. The compressor is regulated to 175psi...but if the smaller tank could handle the 175 I would be better off with it at the 175 would I not. Or am I not understanding your post?

The air to the blaster is always regulated so the more air stored means the longer before the compressor kicks in. I can maintain the 100psi needed while blasting. With the compressor I bought, it has a 100% duty cycle with a 7 year pump warranty...so I am not too worried about wearing out the pump. I will never wear it out.
 

Roospike

Well-known member
Joined
Jun 21, 2005
Messages
291
Location
Mid-West
OP
T

the dude

Well-known member
Joined
Dec 17, 2006
Messages
166
Location
Saskatoon, SK
Well it took me all day of running around and fighting with every joint but it turned out well. 171*F at the pump 52*F at the inlet to the tank. I think it works well. We will see when the water warms up. I have 50' of copper in the water.

aftercooler003.jpg


aftercooler002.jpg


and the franzinator is designed like this:

seperator.jpg
 

Roospike

Well-known member
Joined
Jun 21, 2005
Messages
291
Location
Mid-West
Looks great Brad .

#1 So how do you get rid of the water that collects in the copper line thats in the bucket when it cools ? I wouldnt think all the water that falls out of the heated air would carry all the way to the franzinator. Does it just sit in the bottom of the coil of copper pipe ?

#2 What was the total cost for this set up from the pump air outlet to air inlet on the tank ?

I was kicking around the idea of doing the same thing for some time now but when you can get a electric compressor air dryer unit for around $500. and the cost of copper today its been hard to make a final choice.

again Dude , Excellent work ~!
 
OP
T

the dude

Well-known member
Joined
Dec 17, 2006
Messages
166
Location
Saskatoon, SK
Thanks. I am not sure what will happen to the water in the coils. I am hoping it gets caught in the franzinator contraption. I found out tonight my compression fittings are leaking that are submerged in the water bath...OOPS. I will have to fix that in the morning.

As for the cost, all in Canadian $$:

50' roll of 3/4 copper $140
Franzinator $50
SS flex line with ends $100
solid copper and fittings $50
trash can $10
misc fittings $50

So that's a grand total of $400 and a days frustrations to put it together. I guess you would need some of the same stuff like the flex lines and the odd fitting if you bought a drier....

In the end I shouldn't have added it up :) but I did make it, and it does work (well almost except for my leaks) and I did enjoy it.
 

Roospike

Well-known member
Joined
Jun 21, 2005
Messages
291
Location
Mid-West
Making you add it all up..........Sorry bout dat brother.
I wanted to know when done right what the cost would be.

Looks like the coils are high enough that you can drain the water and just pull out the trash can from under it , I guess you could always cut the bottom line on the coils and add a copper ball valve to drain the lines if you feel the need to do so .

WHATS NEXT DUDE ! What other kool toy projects u have 4 us ! :bowdown: Your projects are making my "need to do list" longer.
 
OP
T

the dude

Well-known member
Joined
Dec 17, 2006
Messages
166
Location
Saskatoon, SK
The next project...I have to get my darn garage insulated and heated. Then I have to stop playing with my toys and start building another truck!!

I was tinkering with my blast cabinet today. It came with a ****** 12V light. A friend has a cabinet with a halogen light in in and I thought that would be a great idea. I had this little yellow sucker kicking around so I cut the hole and mounted it up:

With the 12V light:

blaster009.jpg


With the new light:

blaster010.jpg
 

Roospike

Well-known member
Joined
Jun 21, 2005
Messages
291
Location
Mid-West
Now thats an F-n awesome idea there bro .

I was looking at a new light kit for mine ( about the same cabnet ) but didnt want anything hanging down to get hit like the average light kit does.

who-wa , halogen light idea.

So you just cut out a square about the size of the halogen light box ?
How did you mount it , just caulk ?
Is it a 250 or 500 watt light ?

my "to do" list is getting even longer. . . . but thats alright , there good upgrades.
 
OP
T

the dude

Well-known member
Joined
Dec 17, 2006
Messages
166
Location
Saskatoon, SK
Yup, all I did was cut a square hole the size of the inside of the black flange and drill four small holes for bolts through the black flange. I then used caulking to seal it up. It's just 250W but my buddy is using a 500W light. It works great.
 

Uncle Buck

Banned
Joined
Mar 7, 2005
Messages
9,120
Location
Kansas
Yup, all I did was cut a square hole the size of the inside of the black flange and drill four small holes for bolts through the black flange. I then used caulking to seal it up. It's just 250W but my buddy is using a 500W light. It works great.

I am suprised that heat is not an issue with that, but it sure would light things up nicely! :thumbup:
 

toms73novass

Well-known member
Joined
Nov 10, 2005
Messages
483
Location
grand island, ny
Brad,

A question about the franzinator, I see you have a t in the middle of the unit. In the sketch you show an elbow pointing down. How did you achieve this? Initally I tought that you just had a t with a 1/2 in inlet... can you give me more info on this connection.
 
OP
T

the dude

Well-known member
Joined
Dec 17, 2006
Messages
166
Location
Saskatoon, SK
Hey tom,

I used a T that I cut the 3/4 inlet off of and welded a 3/4" street elbow in it's place. I will get a pic for you.

Apparently that's the key to the whole system, forcing the air down while it expands in the 2" pipe and changes direction to escape out the top.
 
OP
T

the dude

Well-known member
Joined
Dec 17, 2006
Messages
166
Location
Saskatoon, SK
This isn't the best picture but you can see what I did. Basically the T fitting has a 3/4 flange that I cut of and inserted my own street elbow facing downward. It isn't perfectly centered in the 2" hole but it is close. When I get the unit permanently mounted I won't use the external 90* elbow that you see in the picture.

So far the system is working OK. On friday it was 70% RH and cool and I was getting some moisture in the tank but the franzinator was collecting about an ounce of water in a 60 sec run with the compressor. That's pretty good in my books.

franzinator001.jpg
 
To avoid these ads, REGISTER NOW!
Top Bottom