To avoid these ads, REGISTER NOW!

Dipper's Garage update --Mr. Heater 45KBTU install--

dipper

Well-known member
Joined
Jun 27, 2007
Messages
759
Location
Rochester, NY
Well it was a late night monday, but I was able to get the vent installed and get the electrical connections finished up. I was able to get the heater turned on and it works great, very quiet. It brought the temp from <50 degrees to about 68F in 25 minutes. I still need to insulate the roof of my garage and know that I am losing alot of heat that way, but it's still better than kerosene.

One "issue" I ran into was that I was planning on using 3/8-16 threaded rod to hang the heater, but the slots in the mounting bracket are sized for 1/4". I was able to get some female adapters from 3/8 to 1/4 and they worked great, still allowing me to use the 3/8 rod. I don't think I'd want to hang this heater with 1/4" rod.

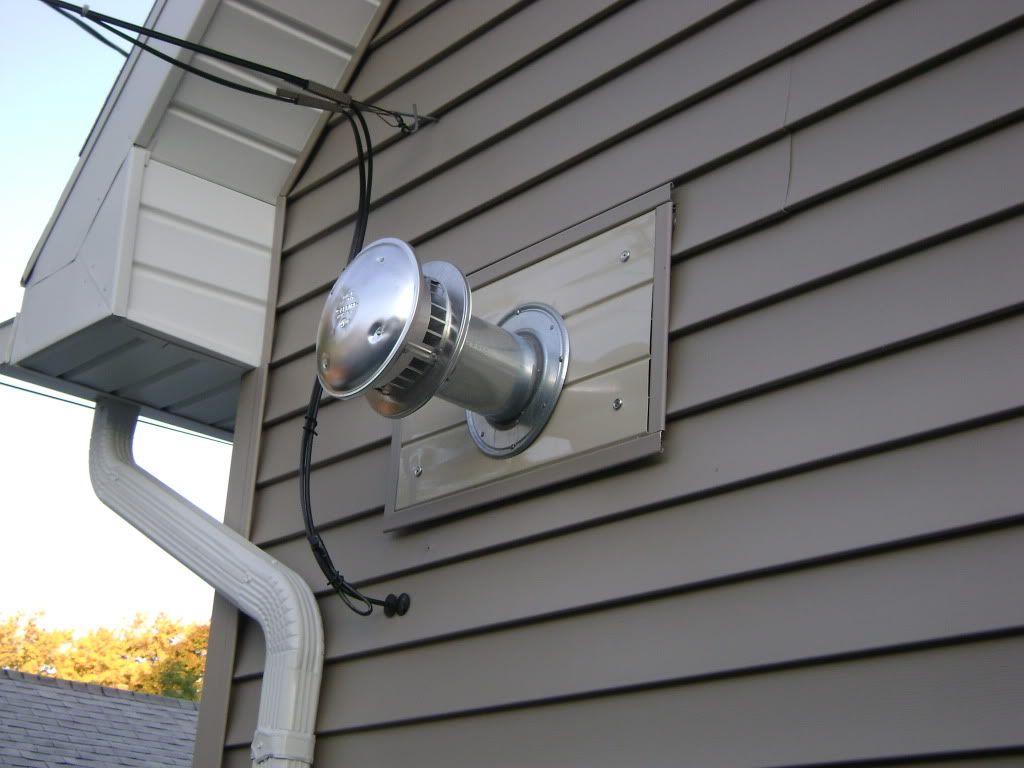
I also used some foil tape I had laying around to seal up the single wall connections not realizing how hot it was going to get, so I'm going to take that off too. I think next summer I'm going to pull the vent off and re-do around the outside where the wall thimble attaches to the vinyl siding, but
it's good for now.

There are a ton of more pictures on my webpage here. http://s630.photobucket.com/albums/uu28/dipper_dipper/Garage/10_Heater/?

dsc03563.jpg
 
Last edited:
To avoid these ads, REGISTER NOW!

ace3

Active member
Joined
Jan 19, 2006
Messages
36
Location
Omaha, NE
Thanks for the pictures!

i've been waiting to buy one for myself, and was curious about the electrical connection.

I just built our house (well, had it built for me), and had them run a gas line & standard 110v outlet where i want the heater.

From your pictures, it looks like I can just get a long 110v cord with a plug on one end, and make the required connections inside the heater. Am I correct?

Any clue how this is going to affect your gas bill, out of curiosity?
 

ace3

Active member
Joined
Jan 19, 2006
Messages
36
Location
Omaha, NE
also, are the mounting brackets & rods included with the heater?

there are connections for a thermostat as well (inside the heater) too, correct?
 

JohnK007

Well-known member
Joined
Sep 13, 2007
Messages
807
Location
Downers Grove, IL
Lookin' good Dipper! Great detailed install documentation on your website. It'll be a great reference for those of us that may be putting one of these up in the future.
 
OP
D

dipper

Well-known member
Joined
Jun 27, 2007
Messages
759
Location
Rochester, NY
Mounting brackets that attach to the heater are included, it's basically a piece of angle iron painted the same color with 1/4" slots for a bunch of different "on centers". After that it's up to the homeowner/installer to attach it to the ceiling. It only requires 1" clearance on the top and i think the brackets included give that. As far as the kindorf and threaded rod, I had to "purchase" that from my brother. He uses it all the time at work. But it's all available at electrical supply houses or hd/lows.

The adjustable 4" fitting is nice cause you can use that to get the proper angle off the heater to go through the wall.


Actual Thermostat is not included, i bought the manual type recommended by Mr. Heater. Any heating t-stat would work. It's got the inputs on the control board to connect to "R" and "W".

Ace-
I supose if you used a "cord" and cut the end off one side, I'd make sure it was at least 16awg wire in it. I could set you up with some metal flex if you want, in fact i think i have a chunk left in the garage still. I can get 14awg THHN off the spools at work.

Not sure how the gas bill is going to be affected, for this winter it will only be on when i'm out there (most likely weekends only). I've only ran it for about an hour so far.
Next summer I definitely plan to finish the insulation in the ceiling of the garage and then keep it at 50-55 all winter long.

-Dipper
 
Last edited:

twostory

Well-known member
Joined
Dec 23, 2005
Messages
554
Location
Duluth, Georgia
Dipper,

Thanks for the article. I am planning on installing the same 45K heater in my garage soon. You article answered most of the remaining quesitons I had on "how to install" the heater.

But I do have one quesiton. Instead of the aluminum tape on the exhaust pipe, what should you seal it with?

I read that you can use high temperature RTV.
 
Last edited:
To avoid these ads, REGISTER NOW!
OP
D

dipper

Well-known member
Joined
Jun 27, 2007
Messages
759
Location
Rochester, NY
I read that you can use high temperature RTV.

The instructions didn't recommend anything other than at least 2 sheet metal screws in each joint. I would try a high temp rtv or silicone.
When I re-install the vent next summer I'll probably just stick with some
clear high temp rtv silicone if needed.

Being a power vented unit, i don't really think you need anything.
 
OP
D

dipper

Well-known member
Joined
Jun 27, 2007
Messages
759
Location
Rochester, NY
Here is a 1 year update to my heater install. I have re-installed the venting from my original install. I originally used foil duct tape around the vent pipe to seal up the joints; not realizing how hot the pipe was going to get and it did not last.

I bought a new 4"x18" piece of b-vent from Lowes and an adjustable 45 to get rid of the pieces with the tape residue all over them.

I also redid the outside of my wall thimble against my vinyl siding using some reclaimed scrap pieces of vinyl fencing material, essentially making a large J-block for the wall thimble to mount to.

The sealant I used on the inside and outside to seal it up against the wall thimble is Ductmate Pro Seal; I highly recommend this as it worked out good.

The heater is still working great, I plan on putting a new thermostat in as I would like to have a digital one so that it cycles more accurately.

here's some pics of the heater, more are on my photobucket page here:
http://s630.photobucket.com/albums/uu28/dipper_dipper/Garage/10_Heater/?

outside:
DSC04291.jpg


DSC04292.jpg


Ductmate Pro Seal
DSC04290.jpg


Inside:
DSC04289.jpg


Inside:
DSC04288.jpg
 
Last edited:

Lomax101

Member
Joined
Oct 8, 2009
Messages
8
Thanks for the update. I ran my wiring this weekend and my heater is scheduled to arrive today. I've read every post and have everything planned out but your pictures are a great resource. Thanks.
 

redsky49

Well-known member
Joined
Jan 21, 2009
Messages
582
Location
near the coast in eastern North Carolina
Just a clarification.

As a rule, duct sealant is not the proper, nor is it the safe, material for sealing of type 'B' flue vents - particularly for pressurized vents such as in a fan-forced device.

This vent may see temperatures well in excess of 400 degrees, something that typical duct sealants are not designed for. Remember that the vent is discharging CO, carbon monoxide, a colorless, odorless gas that can be fatal in concentrations as low as 150 ppm, particularly if exposed over an extended period of time.

Follow manufacturer's recommendations to the letter regarding venting of any fuel burning appliance.

Be safe.

As always, offered only as opinion
 
OP
D

dipper

Well-known member
Joined
Jun 27, 2007
Messages
759
Location
Rochester, NY
As a rule, duct sealant is not the proper, nor is it the safe, material for sealing of type 'B' flue vents - particularly for pressurized vents such as in a fan-forced device.

Then what do you suggest, in your opinion?

All it is doing is sealing up the rather large gap between the b-vent and the wall thimble. All other joints are slip together with a sheet metal screw to retain. The manufacturer's instructions were vague as to what sealant to use, and none was included in the kit. I will take an IR thermometer home and see what the outside of the b-vent gets to during operation.
 

JAckal

Well-known member
Joined
Oct 4, 2009
Messages
66
Location
Nw Arkansas
dipper,

That looks good. I'm gonna rob your idea for the electrical switch idea. That is pretty cool.

Hope mine looks half as good as yours does.


JAckal:beer:
 
To avoid these ads, REGISTER NOW!
Top Bottom