To avoid these ads, REGISTER NOW!

Greenlee 1346 bandsaw gearbox

alfadan

Well-known member
Joined
Mar 9, 2007
Messages
2,154
Location
Augusta, ks
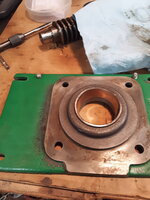
I purchased a Greenlee 1346 bandsaw a while back. I dropped the saw backwards and bent the input shaft. I tore it down and straightened the shaft and replaced the two oil seals.
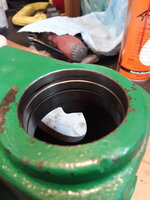
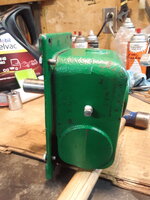
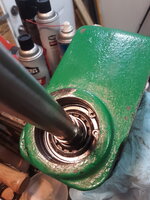
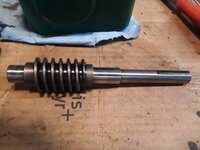
There is virtually no information on the innards of this gearbox so I thought I'd put some pictures and bearing/seal info for anybody in the future.
The input shaft is .625 with a 3/16 key.
Input seal: SKF 7661 (inner seal lip is very tight and needs worked around the seal face, chamfer the front of the sealing surface if you can)
Output shaft: .875 with 3/16 woodruff key.
Output shaft seal: Timkin 471646
The input shaft with worm gear rides in two tapered bearings. It is retained in the housing with an internal circlip under the input shaft seal.
Input bearings: Timkin M12649 (qty.2)
Output bearings: Timkin LM119 49 (qty. 2)
Housing gasket .025 thick.

The manual says to use 10w-40 motor oil. I used 15w40 diesel oil.

The Greenlee 346 may use the same gearbox.
Hope this helps someone.
 

Attachments

  • 20230707_191746.jpg
    20230707_191746.jpg
    551.8 KB · Views: 17
  • 20230720_200214.jpg
    20230720_200214.jpg
    703.6 KB · Views: 15
  • 20230720_200152.jpg
    20230720_200152.jpg
    679.1 KB · Views: 15
  • 20230707_200142.jpg
    20230707_200142.jpg
    795.6 KB · Views: 15
  • 20230707_193016.jpg
    20230707_193016.jpg
    615.4 KB · Views: 15
  • 20230707_193001.jpg
    20230707_193001.jpg
    722.1 KB · Views: 17
  • 20230707_191807.jpg
    20230707_191807.jpg
    609 KB · Views: 16
  • 20230707_191756.jpg
    20230707_191756.jpg
    663.7 KB · Views: 20
To avoid these ads, REGISTER NOW!

pago cruiser

Well-known member
Joined
Dec 6, 2009
Messages
73
Location
Tucson
alfadan - A hearty and belated thanks! My 1346 gearbox started leaking and I just pulled it to try and figure it out. Your info makes that process a lot easier.(y)

Was trying to cut some 1" angle miters to make some frames for a project - and I just could not get the angles to be consistent...
Turns out...
1. The drive wheel was missing about 20% of the tire...
2. (The remains of) both tires were severely cracked and hard as a rock...
3. The non-drive wheel bronze bushings, as well as the associated steel shaft attached to the tensioner were also well worn...
4. Both the fixed and moving clamps were out about 40 thousandths from mating "flat"...
5. 5 of the 6 blade alignment bearing races were way looser than they should have been...

I bought this via Craigslist maybe 5 years ago, and have just been using it for various non-critical stuff. Time for a little love, I guess.
Spent about $100 in parts, and all should be well soon.:cool:

Some questions:
Did you make your housing gasket of paper? Or ???
Have you figured out a means to attach a hydraulic cylinder for downfeed control?

Of the probably(?) thousands of these sold in the (I assume) 70's and 80's, not many folks posting any questions/comments/concerns/upgrades.

Best.
 
OP
A

alfadan

Well-known member
Joined
Mar 9, 2007
Messages
2,154
Location
Augusta, ks
alfadan - A hearty and belated thanks! My 1346 gearbox started leaking and I just pulled it to try and figure it out. Your info makes that process a lot easier.(y)

Was trying to cut some 1" angle miters to make some frames for a project - and I just could not get the angles to be consistent...
Turns out...
1. The drive wheel was missing about 20% of the tire...
2. (The remains of) both tires were severely cracked and hard as a rock...
3. The non-drive wheel bronze bushings, as well as the associated steel shaft attached to the tensioner were also well worn...
4. Both the fixed and moving clamps were out about 40 thousandths from mating "flat"...
5. 5 of the 6 blade alignment bearing races were way looser than they should have been...

I bought this via Craigslist maybe 5 years ago, and have just been using it for various non-critical stuff. Time for a little love, I guess.
Spent about $100 in parts, and all should be well soon.:cool:

Some questions:
Did you make your housing gasket of paper? Or ???
Have you figured out a means to attach a hydraulic cylinder for downfeed control?

Of the probably(?) thousands of these sold in the (I assume) 70's and 80's, not many folks posting any questions/comments/concerns/upgrades.

Best.
Glad I could help. Yes, I cut a new gasket from .025 gasket paper as that is what was on there. No sealant used. Without the gasket, I think the bearings will be too tight.
I haven't looked into a hydraulic setup as the factory spring is fine for me with some adjustment.
Definitely don't use any oil or coolant as the blade will slip and pop off the tires.
 

pago cruiser

Well-known member
Joined
Dec 6, 2009
Messages
73
Location
Tucson
Thanks for the reply.

I would assume... (I hate that word) that the gasket thickness of 0.025" is not real critical? This thing is about 50-year old tech. Having no luck trying to find that exact thickness. Google AI is struggling...
0.025" = 0.6mm; but I can find no .6mm paper gaskets either. The closest on Amazon is 0.8mm, which is also 1/32"...

McMaster Carr does not have, nor my local O'Reillys or NAPA. NAPA does have (in stock) a 1/32" "paper fiber", which is pretty close at 0.031". Close enough?

TIA

Don't know if you have seen this, but this guy:
has done an amazing job of upgrading his Greenlee 346.

Ima gonna copy his downfeed cylinder installation.
 
OP
A

alfadan

Well-known member
Joined
Mar 9, 2007
Messages
2,154
Location
Augusta, ks
Thanks for the reply.

I would assume... (I hate that word) that the gasket thickness of 0.025" is not real critical? This thing is about 50-year old tech. Having no luck trying to find that exact thickness. Google AI is struggling...
0.025" = 0.6mm; but I can find no .6mm paper gaskets either. The closest on Amazon is 0.8mm, which is also 1/32"...

McMaster Carr does not have, nor my local O'Reillys or NAPA. NAPA does have (in stock) a 1/32" "paper fiber", which is pretty close at 0.031". Close enough?

TIA

Don't know if you have seen this, but this guy:
has done an amazing job of upgrading his Greenlee 346.

Ima gonna copy his downfeed cylinder installation.
I hadn't seen that! The gasket material I used was .030 felpro gray paper, probably from oreilly. Good luck!
 
To avoid these ads, REGISTER NOW!

pago cruiser

Well-known member
Joined
Dec 6, 2009
Messages
73
Location
Tucson
Thanks!

Would you know of a thread or forum devoted to the 346/348/1346 Greenlee saws? Theres a few posts on this site, but nothing for Q/A's or upgrades. Some other sites (Hobby Machinist, Home Shop Machinist, Practical Machinist, and another one) have some random comments, but a "all-things-Greenlee Saws" site apparently does not exist.

I've got mine pretty much all broken down into pieces now. Going to the sand blaster tomorrow. Will be rattle-canning a clone of Greenlee Green (Greenlee wants almost $30-$40/can, while Rustoleum Pro "Hunter Green is really close and about $12) with clear top coat prior to re-assembly with some upgrades.

Aluminum sheaves, new axle in the driven wheel, new motor, new belt, new bearings, new tires, downfeed cylinder and mounts, laser, re-made longer fences, swarf pan, gearbox oil seals... I think that's all.

If there no general Greenlee forum, guess I can just post on this site as a stand-alone thread.
 
OP
A

alfadan

Well-known member
Joined
Mar 9, 2007
Messages
2,154
Location
Augusta, ks
Yeah, there is very little talk or info on these "contractor" saws. They're simple enough to work on without needing too much, but if you need parts, be prepared to make them.

I get NOS 81 inch blades on ebay for a good deal.
 

pago cruiser

Well-known member
Joined
Dec 6, 2009
Messages
73
Location
Tucson
alfadan - can I ask how you removed the input shaft/bearing from the gearbox? The input shaft has about 10 thou of wiggle, and at least that much of in-out. The output shaft also has noticeable wear marks in the races. At about 50 years of service I guess it's time for some new bearings.

I removed the oil seal and then the circlip, but it appears the bearing is pressed on the shaft, which is then pressed into the housing.
While I've pulled/replaced more than a few bearings, have not needed to pull one with a blind bearing and blind housing.
See attachment 1/2.

SKF apparently makes a "special tool" for this - at $2300!. The good news is that some other folks have deep discounts,,, See attachment 3/4/5. Even discounted, this is nuts. There's gotta be another way. While my local OReillys and NAPA both rent specialty tools, neither had any idea as to what I was talking about.

I have an old 3 jaw lathe chuck I keep around for stuff like this. Lay the chuck on a machined surface, lock the chuck onto the input shaft, and tap the gearbox with a small ball peen; then try prying (simultaneously on 2 sides) with a pair of 1" X 12"L solid steel bars. Nope. It may have worked with a bigger hammer or longer steel bars... but I was not ready to go there yet... When trying to figure out weird stuff I try to follow the "First, do no harm" rule.

I could also thread the end of my well-used slide hammer to accept a 3-jaw drill chuck; maybe? Would have real concerns about damaging the shaft...

Or, I could just "go nuclear", and drill a 0.25" hole in the back of the gearbox to drive the shaft/bearing out with a punch on the "blind" shaft end, and then weld the hole closed.

But I'm thinking there has to be a more reasonable manner to pull this darn thing?

TIA
 

Attachments

  • Input Shaft 1.jpg
    Input Shaft 1.jpg
    714.9 KB · Views: 3
  • Input Shaft 2.jpg
    Input Shaft 2.jpg
    831.3 KB · Views: 3
  • blind-blind bearing puller.jpg
    blind-blind bearing puller.jpg
    166.2 KB · Views: 3
  • MI blind-blind bearing puller.jpg
    MI blind-blind bearing puller.jpg
    106.7 KB · Views: 3
  • Bolton SKF Puller.jpg
    Bolton SKF Puller.jpg
    158.9 KB · Views: 2
To avoid these ads, REGISTER NOW!
Top Bottom