
Fly Fishing Rick
Well-known member
Hello all! I've used this forum as a recourse more than once and tonight I did a small project that I thought I'd contribute to give something back, so I created an account. I recently had a 3/8" S-K DT rebuild kit given to me by a friend that claimed it made his ratchet feel stiffer than before he installed it, no matter what lube he tried. I put it in my go-to 3/8 ratchet and he wasn't wrong... The back drag was easily double what the original single pawl design is. Which makes sense I suppose, 2 pawls = double the resistance. I've taken apart lots of ratchets and modified them over the years so I tore into this one and it's set up a bit different than the S-K single pawl style. I expected to find 2 springs pushing 2 separate little plunger style pins but instead it's a single pass-through spring with a ball bearing at each end that keeps tension on the pawls. Luckily the bearings can only pass through one side of the hole in the switch, making assembly much simpler. Normally I'd just start cutting the tension spring(s) back .5-1 coil at a time until things felt right to me, but the factory spring has an inactive flat coil at each end to seat the bearings so I wasn't sure how well or even if it would work. I went through my spring collection and couldn't find one the right size to save my life, so I decided to make one. There's tons of tutorials about how to make springs online so I won't get into that. Hopefully you can just find a pen spring or something similar in size that will work in it's place. If you use a premade spring and don't make your own, clip it 3-4 coils longer than you think you want the end product to be, then heat up those extra 3-4 coils red hot with a torch and press them against a flat surface to reset the end of the spring and add some inactive coils to remove one at a time to get proper fitment. Just be careful and take it slow. If you go even 1 coil too far your ratchet will feel sloppy or even slip and you will need to start all over again. I got mine where it felt right then cleaned everything in acetone and rebuilt everything using Super Lube oil for the internals and Super Lube grease for the teeth of the ratchet body and it's just as smooth if not smoother than the original single pawl setup. I'll include a few photos to show the internals of the DT kit 800720-2. If you do decide to take yours apart, I highly recommend doing it inside a gallon ziplock bag incase anything goes flying under spring tension.
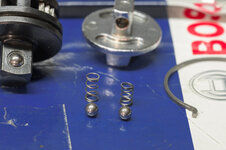
The larger spring on the left is the factory original and the one on the right is the one I made.
And another photo showing the duel pawl pins, just like the original design but 2 of them.

A photo with my spring and the ball bearings installed in the switch.
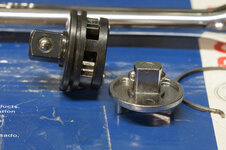
And the finished product, buttery smooth and a joy to use once again.

The larger spring on the left is the factory original and the one on the right is the one I made.
And another photo showing the duel pawl pins, just like the original design but 2 of them.
A photo with my spring and the ball bearings installed in the switch.
And the finished product, buttery smooth and a joy to use once again.