To avoid these ads, REGISTER NOW!

Tiling on a sloped subfloor

branimal

Well-known member
Joined
May 31, 2016
Messages
1,955
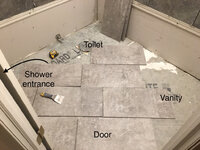
I was about to install 1/4” cement board on my bathroom floor when I realized the floor was pretty sloped. High at the Toilet and sloped down after. I set up a laser and verified it. (Could have figured it out looking at the drywall).

There is also a ridge at the toilet. That will cause seesawing in the 12x24 tile (3/8” thick)

Aside from the ridge it’s pretty flat (not level).

How can I deal with the ridge? I feel that’s gonna be the big issue.

Also how can I get out the stubborn mortar on the ground? Chipped away with a Bosch hammer and chisel bit for a while. I can’t really do that anymore because my neighbor is gonna kill or sue me. (Condo).


Is using custom building products level quick or competing self leveler the best option or is that overkill? I’ve read a flat sloped floor is fine.

I’ve read that’s not easy to get right the first time.

3dd0578780cee56b0d304f8cad5a0ca8.jpg


Sent from my iPhone using Tapatalk
 

Attachments

  • 3dd0578780cee56b0d304f8cad5a0ca8.jpg
    3dd0578780cee56b0d304f8cad5a0ca8.jpg
    722.2 KB · Views: 0
To avoid these ads, REGISTER NOW!

ddurrett896

Well-known member
Joined
Mar 29, 2015
Messages
995
Location
VA
Is using custom building products level quick or competing self leveler the best option or is that overkill?
Aside from the ridge it’s pretty flat (not level).
This is key when tiling. Flat is what you need – nothing else!
How can I deal with the ridge? I feel that’s gonna be the big issue.
In a bathroom, there is no real traffic so a little lippage wouldn’t be an issue, in my opinion. I would start as close as I can to the highest point and work my way out. Reason being is because once this is set, you can always build up the morter on the low tiles.
Also how can I get out the stubborn mortar on the ground?
It looks good to go. Lay down thinset, screw down backerboard and tile.
Is using custom building products level quick or competing self leveler the best option or is that overkill?
I think it’s way overkill!
 
Last edited:

acer66

Well-known member
Joined
Dec 4, 2010
Messages
4,443
Location
Western North Carolina
With all the houses I have seen here 5/8" drop over that distance I would have to consider that basiclly level. :p
As it was said before flat is way more important.
 

rsanter

Well-known member
Joined
Dec 22, 2007
Messages
18,556
Location
visalia ca
That’s a lot of slope
I would be wondering if it is settling, bad construction, or water damage/rot/other damage

Looks like you are a raised foundation, I would look underneath at the structure to verify all is sound. Check level in adjacent rooms and see what that looks like.
If there is something underneath that needs fixed now is the time.
If all is good then I guess you start tiling.
Trying to fix sub structure after tile is in will lead to cracking

A friend that was in an older home noticed that the floor was not level after taking out the carpet (something rolled across the floor)
Turns out it was settling in the central part of the house and jacking things up and adding shims was all that was really needed. He was amazed how doors that stuck were no longer sticking
 

engineer2

Well-known member
Joined
Dec 13, 2009
Messages
11,862
Location
Chicago burbs
A floor like that will screw with your grout lines.
Your choice is to do what ddurrett896 said, but it's tricky to get it right. A straightedge will help.
A better way is to use self-leveling compound. It's really pretty easy to do.
Screw down the floor to the joists (which you should do anyway)
Dam areas where you don't want the SLC to leak into
Put down primer.
Mix and pour the SLC. Use a squeegie to push it around if needed.
 
OP
B

branimal

Well-known member
Joined
May 31, 2016
Messages
1,955
There is only one area in the bathroom that has an issue. It’s that ridge at 25.5” off the back wall.

If it was at 24” I could solve it by running two rows Of 12x24” tile and then lay the next tile sloping downward just after the ridge area. If it was at 30” if could run a row of 6x24 then two 12x24” and then slope the next tile down.

Not sure what to do in this situation. I could run the 12x24” across the whole run of bathroom and cut a patch piece at 24-25.5” to get over the hump. See last pic with green lines


c494753a61be7cfd4d66a1a3e412ee61.jpg

97af63277898b98973fbc4a6fbe6ce12.jpg


d451042352c11611d59195baf53501e8.jpg

d8aa72209a6ba76ece33bc1839dfe263.jpg


Sent from my iPhone using Tapatalk
 

Attachments

  • c494753a61be7cfd4d66a1a3e412ee61.jpg
    c494753a61be7cfd4d66a1a3e412ee61.jpg
    46.8 KB · Views: 0
  • 97af63277898b98973fbc4a6fbe6ce12.jpg
    97af63277898b98973fbc4a6fbe6ce12.jpg
    820.3 KB · Views: 0
  • d451042352c11611d59195baf53501e8.jpg
    d451042352c11611d59195baf53501e8.jpg
    41.9 KB · Views: 0
  • d8aa72209a6ba76ece33bc1839dfe263.jpg
    d8aa72209a6ba76ece33bc1839dfe263.jpg
    345.1 KB · Views: 0

Toomanytools?

Well-known member
Joined
Nov 4, 2010
Messages
855
Location
Washington
Looks to be just that small section that drops almost an inch, I'm guessing your taking photo's from the only entry door. Makes it a bit harder but you could start at the entry and work in, you will only be able to do a row or two so you can still step over. Next day work some more until you get to the corner and build up the slope.
Or using the level lay down some thinset up to 1/2" feathered out, then let it set up a day. Then work out the door, might have to butter that section up another 1/2" to level it with the rest. Being it's behind the toilet and in the corner doesn't seem like it will be too noticeable.
 
To avoid these ads, REGISTER NOW!

Hpozzuoli

Well-known member
Joined
Dec 11, 2013
Messages
3,428
Location
Rhode Island
Either use self level or build up the mortar bed. It’s really not a big deal. Just a matter of what material you want to use to fill your voids.
 

Gerald O

Well-known member
Joined
Mar 5, 2013
Messages
1,884
Location
NC
You could go with a mosaic style tile which is petty forgiving of unflat floor surfaces.
 
OP
B

branimal

Well-known member
Joined
May 31, 2016
Messages
1,955
So I totally messed up and forgot that my floor wasn’t level when I started tiling the WALLS. That compounded with my tiles being 3/16” shorter than advertised is going to leave large gaps between the floor tile and the bottom row of wall tile. In the low spots it works out to 3/4” grout lines. Ugh kicking myself.

The potential solutions are

1. level quick. Can you tile directly on top of level quick?

2. So type of floor profile that can cover these gaps. Schluter Kerdi makes some.

Any other ideas?


Sent from my iPhone using Tapatalk
 

JR 42

Well-known member
Joined
Nov 2, 2013
Messages
966
Location
Sunny Seattle
So I totally messed up and forgot that my floor wasn’t level when I started tiling the WALLS. That compounded with my tiles being 3/16” shorter than advertised is going to leave large gaps between the floor tile and the bottom row of wall tile. In the low spots it works out to 3/4” grout lines. Ugh kicking myself.

The potential solutions are

1. level quick. Can you tile directly on top of level quick?

2. So type of floor profile that can cover these gaps. Schluter Kerdi makes some.

Any other ideas?


Sent from my iPhone using Tapatalk

You should be fine tiling over the level quick. Here's a link to the spec sheet:

http://www.custombuildingproducts.com/TDS/TDS-108.pdf

Custom recommends priming all substrates with their LevelQuik Primer.

Make sure you don't have any holes or gaps along the perimeter your sloopy concrete can pour through- plug or tape over anything suspect.

You should be able to float out the edge of the leveler with a flat steel trowel, so you only need to fill the low area.

Follow the mixing directions precisely - if you overwater the mix it won't perform as advertised, and the mortar might not bond to it.

If you don't have a gauge rake (a specialty tool), you can push the wet leveler around with your steel trowel, keeping it smooth- typically self-leveling compounds need to be worked a bit to break surface tension and actually end up level.

I don't have any great ideas about the gap at the bottom of the wall tile... if you can level the subfloor, at least everything will look parallel.

JR
 
OP
B

branimal

Well-known member
Joined
May 31, 2016
Messages
1,955
Thanks JR. I think I might be able to get away without the level quick.

I laid out the tile in a 33% offset pattern and the ridges might be small enough to be fixed with a healthy layer of thinset. I’m using a 1/2” notched trowel. Would going 5/8” or 3/4” help keeping things level? What are the downsides of going larger trowel size?

In terms of leveling clips I’ve used both QEP Flat clips and Raimondi clean and red clips. I found Raimondi clips left plastic bits behind on the floor. I had to go after them with my Multitool. The QEP seems to level things decently and come out easy.

What do you guys like?

I think I’m going to start from the door first and work my way to the back. Leaving spaces to reach over and lay tile. I’m afraid to start from the back and work forward. I could end up with slithers of tile.


Thanks again to all for the advice.

f5dccd82bb2d96dbec22f3478f3b3564.jpg


Sent from my iPhone using Tapatalk
 

Attachments

  • f5dccd82bb2d96dbec22f3478f3b3564.jpg
    f5dccd82bb2d96dbec22f3478f3b3564.jpg
    788.5 KB · Views: 0

PoorOwner

Well-known member
Joined
Feb 10, 2007
Messages
5,032
Location
CA
Hey, I would just get floor patch and mix it, spread it and screed it in the low area, it's not that screedable as it is a very sticky fast drying product. But I have done it many times, even when I'm not tiling but just to make it flat for plank floors. It doesn't crack and you may need a couple layers to build it up. Pretty easy in your small bath room.

Custom, Henry, Mapei all make one.

Don't use thin set to go that high.
 
To avoid these ads, REGISTER NOW!
Top Bottom