To avoid these ads, REGISTER NOW!

Below 265 SQ/FT Unconventional Post & Beam Shed Build 12'x14'

All workspaces below 265 squarefeet.

BSAschields

Well-known member
Joined
Jan 27, 2011
Messages
450
Location
East Coast
Love the construction .. A smaller version of my barn in a way... Very nice problem solving skills you have there too. Subscribed !
 
To avoid these ads, REGISTER NOW!
OP
M

MegaVan

Well-known member
Joined
Dec 17, 2020
Messages
274
Location
Ohio
Love the construction .. A smaller version of my barn in a way... Very nice problem solving skills you have there too. Subscribed !
Thanks. I'm happy to take any comparison to ~100 yr old buildings. One of my secret goals here is to confuse people when they see when it was build. I also am absolutely not a purist or anything, I'm not going to use completely original materials and everything. I do want to keep the feel of the property in the era it was built.

When the farm was split up we're lucky the builder left this building in place and eventually sold it off.

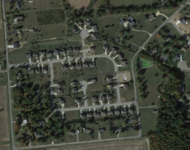
This is the area that used to be the farm - our home is the only one older than 50 years - they are wrapping up construction on 3 more properties this year:
1635428234150.png

The minimum house requirement is about 2,400 sq ft. Just boring suburbia, but all very expensive homes.
1635428089420.png

The hope is very much that the county allows us to get a variance on the property to allow us to rebuild a slightly smaller version of the original barn and keep this property looking a bit like it should (not a pole barn from 1980).

Long term.
 
  • Like
Reactions: 555
OP
M

MegaVan

Well-known member
Joined
Dec 17, 2020
Messages
274
Location
Ohio
I used 5/4x6 around the upper windows - the upright trim pieces around the corners, doors, and windows are 5/4x4 (except on the rear due to inventory issues).
IMG_7083.JPG

At the time I could peek at it like this and pretend it was done:
IMG_7088.JPG

Corner, ridge beam, window trim installed:
IMG_7092.JPG

I ran an extension cord out because the sun started going down before my "call it quits" time (8PM). This makes those crazy windows worth it:
IMG_7171.JPG

Still a real long way to go. This was maybe September... Started in May... as with many projects, it's going to be tight on the schedule. My target was "before the snowflakes fly"... It's going to be close.
 

billconner

Well-known member
Joined
Jul 20, 2021
Messages
6,971
Location
Thousand Islands NYS
Not to detract from your great work but my biggest objection to vinyl and such is the near impossibility to align courses with trim. An old house would rarely notch siding at the corner of a window or door. They would just adjust the exposure slightly to align it.
 
OP
M

MegaVan

Well-known member
Joined
Dec 17, 2020
Messages
274
Location
Ohio
Not to detract from your great work but my biggest objection to vinyl and such is the near impossibility to align courses with trim. An old house would rarely notch siding at the corner of a window or door. They would just adjust the exposure slightly to align it.
No detraction. I recognize it can't be as perfect as I want, goes back to it being a shed and living with it.

Additionally, if I did do the courses myself, I'm sure I'd still end up notching due to my inexperience.
 
OP
M

MegaVan

Well-known member
Joined
Dec 17, 2020
Messages
274
Location
Ohio
Siding Transom Side

Started with the "starter strip" - bends and dings courtesy of Menards:
IMG_7115.JPG

Turns out working from the right side with no windows or doors, this goes pretty quickly!
IMG_7116.JPG

Moving right along, mentally preparing for that second transom window:
IMG_7117.JPG

Second transom window - so much easier when you're prepared for it to be screwed up versus standing there on a ladder scratching your head with a floppy 6' long window:
IMG_7128.JPG

At this time I did a massive cleaning and trash out of my scraps and such. I just always threw stuff in the shed so it wouldn't blow to the neighbors... I took the excess roof sheathing boards (I ordered 10% over and Menards added 6 boards so they didn't have to split a pallet) and made some temporary benches:
IMG_7180.JPG

The basic plan on this was to plan the structure heavily with detailed drawings and sticking to the plan. There were some components like the siding and trim that I decided deserved "design on the fly". The area between the corner trim and transom windows was one of these areas. I wasn't sure if there would be room to add shingles. Once it was in place I made the decision to use extra thin trim next to the window and try to include the vinyl siding. I think this turned out OK (details later).

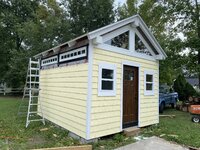
Here's an overall view including the green roof:
IMG_7181.JPG

We got really lucky with a pretty long dry spell (a little over a month) which helped this process move along.

We also got a couple diaper fillers about this time that helped slow the process down.
 
  • Like
Reactions: 555
OP
M

MegaVan

Well-known member
Joined
Dec 17, 2020
Messages
274
Location
Ohio
These windows were so floppy they were very difficult to line up by myself. I tried to shim them well, but in the end I failed:
IMG_7191.JPG

Some caulk will help hide that eventually. Also it's just a shed... just a shed...

Here's the detail of the deign on the fly space mentioned in the last post:
IMG_7192.JPG

Think it turned out reasonably well.
 
OP
M

MegaVan

Well-known member
Joined
Dec 17, 2020
Messages
274
Location
Ohio
So I've very much enjoyed having electricity out in the shed, but that extension cord wasn't a good long term plan.

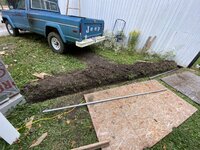
I had a minion helping out for a weekend so I decided to put him to work trenching between the existing pole barn and the shed. The siding work would have been too boring for him.

The pole barn also had some wiring issues and dangers that I wanted to rectify since this power is in use 24/7 for the rabbit accessories.

Call me crazy but I'm not a fan of exposed conductors:
IMG_7321.JPG

I ran new wire from to the rabbits outlet and relocated it to be a little more convenient, than ran another line out to the corner of the barn.

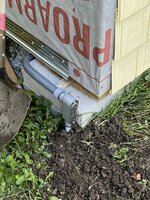
From that corner trenched to the corner of the shed. This is all likely temporary once the real barn gets approved (1-3 years out). Trench is 8" deep with 1" RMC:
IMG_7219.JPG

All assembled and pulling 3 (Black, White, Green) stranded conductors through, 12 ga:
IMG_7224.JPG

In the pole barn there is 12/2 running into a junction box, then into 1" liquid tight flexible conduit, then to the RMC:
IMG_7225.JPG

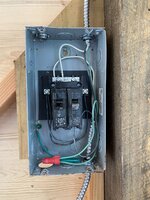
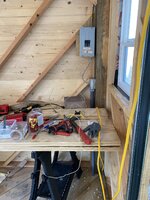
Wired up a Siemens small power distribution box from my old pole barn (old barn got an upgrade), this one doesn't have a ground strip so grounded with a wire nut. This is located in the northeast corner of the shed. The wire sheath needs to be trimmed down but I'm waiting for the final setup to do that and plug all the old knock outs:
IMG_7235.JPG

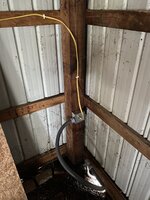
Tried to keep things nice and tight to the post and keep it from becoming a mouse superhighway:
IMG_7236.JPG

Tried to keep things clean and subtle on the shed side:
IMG_7243.JPG

For now just ran one outlet for the compressor and lights. I like using metal shield in exposed wiring situations, keeps everything out where you can see it. It also takes minor bumps a lot better. And I had 100' left over from my old barn.
IMG_7238.JPG

Having power - it's a major convenience. Not having to lug my compressor back to the pole barn when I need to air up. So nice.

All outlets test good with an outlet checker and the compressor DOES run with no issues at all.
 
OP
M

MegaVan

Well-known member
Joined
Dec 17, 2020
Messages
274
Location
Ohio
With the ability to work at my own pace restored after the electrical weekend I returned to siding.

Double window side:
IMG_7202.JPG

More:
IMG_7264.JPG

Working left to right due to the already installed trim. I thought this wouldn't be too bad. I was wrong it was a pain. Work right to left:
IMG_7265.JPG

Some trim installed except the ones I couldn't do solo very well:
IMG_7343.JPG

Baby steps.
 
  • Like
Reactions: 555
OP
M

MegaVan

Well-known member
Joined
Dec 17, 2020
Messages
274
Location
Ohio
I needed to get the rear upper windows in to help the morning doves decide to leave my loft alone.

Started out with some obviously professional planning:
IMG_7255.JPG

Framing, sheathing, wrap:
IMG_7325.JPG

Windows in:
IMG_7339.JPG

Butyl tape applied:
IMG_7341.JPG

Added a small step to the front with some leftover pieces from the foundation PT 8x8:IMG_7324.JPG

Another day over.
IMG_7245.JPG

Rapidly approaching the current condition of the shed. I'm trying to wrap up the eaves and keep the bugs and snow out (rain now can't penetrate anything, but snow blows). Nice days in the winter I'll work on finishing out the various trim pieces.

I have a few other items for which I may end up starting separate threads. Maybe.
 
  • Like
Reactions: 555

mike93lx

ALLIANCE MEMBER
Joined
Dec 9, 2013
Messages
37,869
Location
Richmond, VA
Looking good.

That outlet in your barn is the best electrical work I have ever seen. I never thought about all the money I could save by eliminating boxes
 
OP
M

MegaVan

Well-known member
Joined
Dec 17, 2020
Messages
274
Location
Ohio
Looking good.

That outlet in your barn is the best electrical work I have ever seen. I never thought about all the money I could save by eliminating boxes
Sarcasm? I took the photo after I dismantled the box.

The full electrical story is even more screwed up than just that one outlet. Maybe a future post can address it. To put some perspective on it - the barn and the dryer are on the same circuit. And that's not the most screwed up part...
 

mike93lx

ALLIANCE MEMBER
Joined
Dec 9, 2013
Messages
37,869
Location
Richmond, VA
Sarcasm? I took the photo after I dismantled the box.

The full electrical story is even more screwed up than just that one outlet. Maybe a future post can address it. To put some perspective on it - the barn and the dryer are on the same circuit. And that's not the most screwed up part...
Ah, lol. I thought the outlet was just screwed to the framing
 
OP
M

MegaVan

Well-known member
Joined
Dec 17, 2020
Messages
274
Location
Ohio
Well it's nut season under the hickory trees. The squirrels are happy, roughly 1.2M nuts. Fortunately none have tried to use the shed as a home for their nuts ... yet.
IMG_7306.JPG

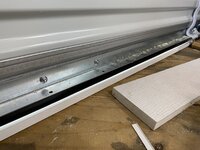
I decided to get working on the roll up door threshold. The long term plan is to have another layer of 3/4" flooring in the shed so I had to factor that in. Here is the starting condition:
IMG_7359.JPG

I removed the 2x4 from the sill and got some wrap on the cedar:
IMG_7360.JPG

Got out my sketch pad and came up with a plan to use the existing architecture to promote shedding of water to outside the shed. This is a rare occurrence, but sometimes rain does fall on this side of the shed (1-3x / year), so I decided on a simple angle to encourage gravity to eliminate the water:
IMG_7361.JPG

Now if I bolted a board down directly to the sill and sub floor it would have a good chance of bowing or breaking if any substantial weight ever passed over it, so I made wedges to provide support ~1' on center. Test fit:
IMG_7363.JPG

Cut up a handful more:
IMG_7362.JPG

Laid out on the sill and pinned in place:
IMG_7364.JPG

Had a friend join me on the shed. My wife was super stoked as she used to breed them. He's been hanging out a couple weeks now:
IMG_7368.JPG


Continued....
 
  • Like
Reactions: 555
OP
M

MegaVan

Well-known member
Joined
Dec 17, 2020
Messages
274
Location
Ohio
Continued....

I chose PVC 1x8 for the threshold because I have lots laying around and it is robust and flexible. Test fit:
IMG_7371.JPG

Hopefully this shows how the water should shed to the outside:
IMG_7372.JPG

From the inside with the door closed to make sure the gasket was situated appropriately:
IMG_7373.JPG

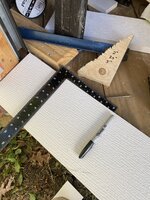
I debated a bit on how to attach it but I settled on stainless steel screws countersunk into the PVC. I used a square and sharpie to mark the locations of every "wedge" to ensure a solid connection:
IMG_7392.JPG

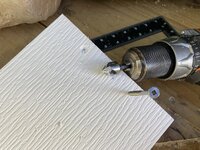
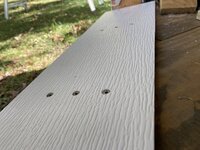
Drilled and countersunk all holes:
IMG_7394.JPG

It's not a perfect job... :
IMG_7397.JPG

Continued...
 
OP
M

MegaVan

Well-known member
Joined
Dec 17, 2020
Messages
274
Location
Ohio
Continued....

I wanted to trim the threshold on one side so that the future flooring can **** up to it nicely. One thing I do pretty often is try to idiot proof the job. In this case if I'm not cutting off words, I'm cutting the wrong side. It helps me confirm directional things.
IMG_7399.JPG

OK so maybe I wrote it upside down:
IMG_7400.JPG

With the 10 degree angle cut, installed all the screws - I don't mind exposed fasteners:
IMG_7401.JPG

One advantage of the exposed screws is that if I ever do roll something heavy on I can make sure it is supported:
IMG_7402.JPG

Up top I added some shims to help compensate for some bad framing I did early on:
IMG_7403.JPG

Added the top casing:
IMG_7404.JPG
 
  • Like
Reactions: 555
OP
M

MegaVan

Well-known member
Joined
Dec 17, 2020
Messages
274
Location
Ohio
Worked on the rear siding - super easy now that I'm almost done:
IMG_7375.JPG

Wrapped up around the window:
IMG_7379.JPG

Literally came down to the last piece of siding... too close for comfort:
IMG_7405.JPG

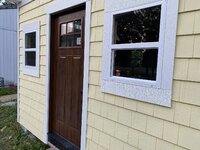
Door closed, corner trim on:
IMG_7406.JPG

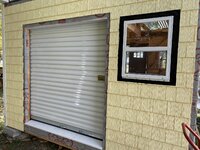
Wrapping up the casing for the roll up:
IMG_7443.JPG

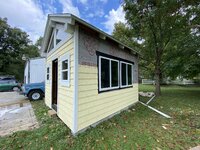
Door and window trimmed up - completion as of 10/31:
IMG_7444.JPG

So this is where I'm at. Finally caught up to the present. There is still a ton to do and only so much reasonable weather left.

In order of rough priority for the remaining items:
  • Close in the eves with some ventilation
  • Caulking
  • Flooring (mice proofing)
  • Loft floor
  • Mesh / gravel for the front / rear to prevent unwanted skunks/ground hogs/squirrels/cats/opossums/chipmunks/etc
  • Gravel and level for the front step
  • Flower bed to make wife happy
  • Gravel along each side to reduce splashback
  • Lighting
  • Remaining power
  • Benches
  • Shelving
  • Wall Storage
  • Assorted minor items I'm forgetting
Plenty to go I guess.
 

captain14

Well-known member
Joined
Dec 19, 2012
Messages
7,065
Location
Near College Park Maryland 20740
Quite an update this morning. Great write up on the ramp for the overhead door. I’m interested in the long term wear. Everything looks good.

Get all the exterior work done first that’s critical for water tightness and rodent proofing.

If you start other threads as you mentioned above, consider posting a link so if we need to reference something it’s easy to find.
 
To avoid these ads, REGISTER NOW!
OP
M

MegaVan

Well-known member
Joined
Dec 17, 2020
Messages
274
Location
Ohio
Quite an update this morning. Great write up on the ramp for the overhead door. I’m interested in the long term wear. Everything looks good.

Get all the exterior work done first that’s critical for water tightness and rodent proofing.

If you start other threads as you mentioned above, consider posting a link so if we need to reference something it’s easy to find.
Yessir. Finally had a few minutes.

The exterior and flooring are the priority. The PT 1x8 sub-floor has some pretty large gaps from the shrinkage. They were up tight when installed but there are some 1/4"+ gaps now that are more than enough for a mouse or vole to pop through if they feel like it.

Absolutely. I don't profess to be an expert on anything but welding (and there's none of that here), but the more references people have, the better. Especially as actual experts hopefully chime in. Links will exist both in this thread and likely my signature.
 

mike93lx

ALLIANCE MEMBER
Joined
Dec 9, 2013
Messages
37,869
Location
Richmond, VA
Yessir. Finally had a few minutes.

The exterior and flooring are the priority. The PT 1x8 sub-floor has some pretty large gaps from the shrinkage. They were up tight when installed but there are some 1/4"+ gaps now that are more than enough for a mouse or vole to pop through if they feel like it.

Absolutely. I don't profess to be an expert on anything but welding (and there's none of that here), but the more references people have, the better. Especially as actual experts hopefully chime in. Links will exist both in this thread and likely my signature.
Route the gaps to a set dimension and fill with a contrasting wood. I suggest walnut.
👍
 
OP
M

MegaVan

Well-known member
Joined
Dec 17, 2020
Messages
274
Location
Ohio
@mike93lx - Thanks for the reminder that I need a router.

Edited the first post to include links to relatively key points in the build so that skimmers & searchers can just read whatever they want more easily.
 

mike93lx

ALLIANCE MEMBER
Joined
Dec 9, 2013
Messages
37,869
Location
Richmond, VA
@mike93lx - Thanks for the reminder that I need a router.

Edited the first post to include links to relatively key points in the build so that skimmers & searchers can just read whatever they want more easily.
You don't have even one router?? Or you just need another?

Routers scare me, but I really like my dewalt 1/4". So much easier to work with than my full size, and it's perfect for small details like round overs, chamfers, and flush trimming thin material
 
OP
M

MegaVan

Well-known member
Joined
Dec 17, 2020
Messages
274
Location
Ohio
You don't have even one router?? Or you just need another?

Routers scare me, but I really like my dewalt 1/4". So much easier to work with than my full size, and it's perfect for small details like round overs, chamfers, and flush trimming thin material
Not even one.

Welder. Low priority.

Haven't done a ton of detail work in the past. Just the way it's worked out I guess :unsure:
 

captain14

Well-known member
Joined
Dec 19, 2012
Messages
7,065
Location
Near College Park Maryland 20740
Just another rabbit hole to go down after a router, table, bits, fence….. But it’s your enjoyment and money we are helping you spend.

Just like welding… helmet, gloves, cart, clamps, grinders….
 
OP
M

MegaVan

Well-known member
Joined
Dec 17, 2020
Messages
274
Location
Ohio
Just another rabbit hole to go down after a router, table, bits, fence….. But it’s your enjoyment and money we are helping you spend.

Just like welding… helmet, gloves, cart, clamps, grinders….
Hmmm.... I seem to be pretty good at spending my money without your folks help....
 

Robey5

Well-known member
Joined
Jan 18, 2010
Messages
406
Location
North of Detroit, Mi
Well shoot, man: that is some inspired work there! I have too many routers to use all at once, and if you were my neighbor, I’d give you one of them. That said: I do know someone who lost a fingertip because he was being careless with a plunge router. These things are awesome though; my favorite router to use is the one that will spin my “panel bit’ and will hog out oak in chunks if you want.
Again: nice work!
 
OP
M

MegaVan

Well-known member
Joined
Dec 17, 2020
Messages
274
Location
Ohio
So I’ve been dealing with temporary loft flooring for months now (since before the rafters were finished). These 4’x4’ ply wood pieces are destined for my attic eventually (another long story).

01F85F7B-3FDB-4239-8FA7-7EDF5269394E.jpeg

Found a semi local place with a decent selection of pine boards, though they had plenty of other too nice for a shed options.

After a lot of inventory issues and calculations I finally got out the door with 1x10 tongue and groove pine (8 3/4” reveal).


7C3B4752-F395-408A-9EEF-4C03E6BAD0B9.jpeg

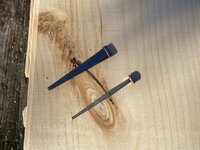
Earlier in the year I picked up some cut nails from Menards to test out face nailing. I wasn’t satisfied for the application - these were clearly meant for masonry work.

After more research and waffling I got some Tremont Nail fire door nails 3”.

The Menards nails just looked like staples (rusty) while the fire door nails looked like… nails.
D382ADB8-F782-4471-BA4D-FAA32454D855.jpeg

Here is a comparison:
B03A74CB-F8F5-4B6D-A9DE-2CFDCDC03EF7.jpeg

Fire door nail on the bottom. Harder steel too (less likely to bend).

~$1/sq ft. A little more for the 14’ boards, a little less for the 12’ boards.

Looks like there may be a nice day for floor coating this weekend so going to get on top of things.
 
Last edited:
OP
M

MegaVan

Well-known member
Joined
Dec 17, 2020
Messages
274
Location
Ohio
Wow. I made that last post in a mobile browser, and what a pain that was. I guess I'll stick to browsing on a phone and make posts from the PC. I guess I'm getting old.

I have 50 lbs of the fire door nails if anyone has need for some special project, let me know.

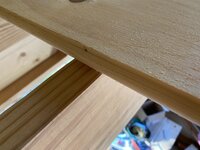
Each board has a smooth side and a rough (wire brushed style) side. I used the smooth side in the loft. Started by blind nailing with 15ga nails in each joist:
IMG_7486.JPG

Used a super accurate template to line up the drill:
IMG_7465.JPG

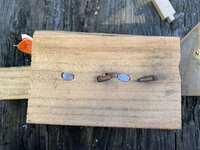
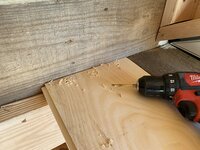
Drilled 3 holes per board with a 3/16" bit:
IMG_7464.JPG

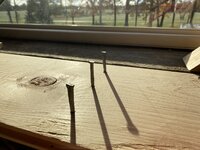
Insert the nails in line with the grain:
IMG_7466.JPG

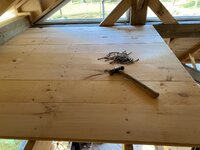
Hammertime:
IMG_7468.JPG

End of the first evening messing around with it:
IMG_7469.JPG

Overall the boards are imperfect, the milled surface is imperfect, I **** with a hammer, and it's all how I want it. Hard to get upset about scratching or denting something that is already scratched and dented.
 
OP
M

MegaVan

Well-known member
Joined
Dec 17, 2020
Messages
274
Location
Ohio
Last night I was able to get a bit more done. I also got another LED light up to illuminate the upper areas. Hopefully I can switch to some strip lighting or something eventually.

Almost half way done:
IMG_7488.JPG

The full progress last night - a bit over half way (12 boards down):
IMG_7491.JPG

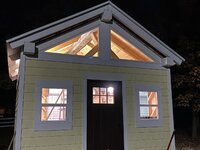
The upper light really makes the appearance nice in the dark:
IMG_7492.JPG

Hopefully wrapping up the loft and migrating to the floor today when it's not nap time.
 

wreckdiver1321

Well-known member
Joined
Aug 12, 2021
Messages
1,039
Location
Billings, MT
Loft looks good. You're storing stuff up there, so who cares how it looks?

I can't wait to see you get fully "moved in" to this space. Your attention to detail and ability to design on the fly while properly thinking things out is impressive.
 
OP
M

MegaVan

Well-known member
Joined
Dec 17, 2020
Messages
274
Location
Ohio
Loft looks good. You're storing stuff up there, so who cares how it looks?

I can't wait to see you get fully "moved in" to this space. Your attention to detail and ability to design on the fly while properly thinking things out is impressive.
Apparently I care how it looks as I'm putting a lot of time and effort into it :D

Not knowing some of the longer term uses just trying to finish things up in an economical yet decent looking way. Certainly not as cheap as ply wood. Still wouldn't change it.

If the schedule in my brain is correct I should keep picking away at things through the spring and get the majority of the "moving in" done by March or April. That's not so far away at all. I better get moving.
 
OP
M

MegaVan

Well-known member
Joined
Dec 17, 2020
Messages
274
Location
Ohio
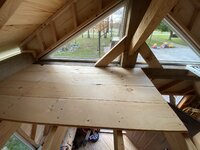
A little slower than I wanted, but got the loft floor in place this past weekend.

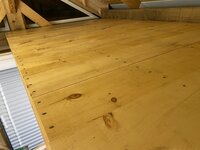
Raw after install:
IMG_7498.JPG

I tacked up some cardboard below a board with some large checks in it (drip hazard) - very glamourous:
IMG_7495.JPG

Swept out the area with the push broom (I should have vacuumed - if you're out there going to poly your floor, get the shop vac out):
IMG_7499.JPG

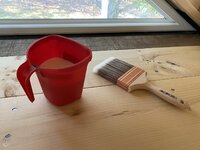
Used a 4" brush and gloss water based poly finish. The purpose of this isn't to have a super shiny surface, a lot of these boards aren't smooth at all and I'm not going to sand them, it's mostly just to keep debris from building up in the pores of the wood. I recognize that the water based stuff doesn't hold the gloss as well, but it's a shed and I'm not looking for that mirror finish, just protection and going on quick:
IMG_7500.JPG

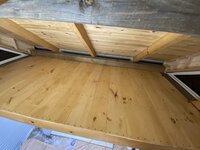
Finished product with 2 coats of poly. It's not perfect, but I would rather have more coats on the first floor where there will be more wear:
IMG_7508.JPG

Overall:
IMG_7509.JPG

Not the most visually exciting update - kind of like watching paint dry.

Having fly issues so going to try to get the eve/soffit area closed up and then clean up / work on the ground floor.
 

Jayman17

Well-known member
Joined
Feb 6, 2017
Messages
3,816
Location
Seattle, Wa
Are you getting a ton flies inside your shed? I have the same problem in my garage.
I don’t know what they are attracted to in there.

Jay
 
To avoid these ads, REGISTER NOW!
Top Bottom