To avoid these ads, REGISTER NOW!

DIY 3D Printed CNC Plasma table based on JD's Garage plans

Meleon

Active member
Joined
May 25, 2013
Messages
32
Following @Keyblazer lead I purchased plans for JD's garage to build my own plasma table. Been slowly picking away at putting together. last night I got the axis's all moving under there own power. still a bit more to do yet, like attaching the z axis, building the slat table and modifying the plasma cutter to accept the CNC control.
here's a little montage of my progress so far (a video editor I am not.)
 
To avoid these ads, REGISTER NOW!

Keyblazer

Well-known member
Joined
Jul 30, 2009
Messages
1,471
Location
Irvine, CA
Awesome!
Pleased you saw what I saw, but you are way ahead of me!
Keep posting, it will help us all!

For my part, I actually made some small progress yesterday.
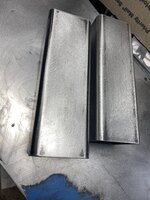
I cut the 2 1/2” tube Axis runners.
As I’m doing a bridge, there are two, 7 1/2” long.
CB323831-861D-461C-B37B-03B60EAF03DC.jpeg

I squared them up on my disc grinder, deburred, prepped them with an DA, and got some primer on them.
41C1D756-18E8-4916-BB0D-109743E34778.jpeg
26F3C3F3-48E4-445B-9948-F6CF83A3A6A5.jpeg
 
OP
M

Meleon

Active member
Joined
May 25, 2013
Messages
32
I wish was warm enough to paint my stuff but it was -10c (15f) in my shop on the weekend.
The cantilever is defiantly a limiting factor of the design.

"Made by dad" youtube channel has a neat fix for his. an outrigger of sorts that rides the outer tube for support.
 

Keyblazer

Well-known member
Joined
Jul 30, 2009
Messages
1,471
Location
Irvine, CA
Yes, I saw that solution, and its a simple one, so good.
My issue might be different.
As my unit will be stored "On End' in the corner of my garage or put into my storage unit when I'm not using it I felt the axis would need to be moved the stops when its stored.
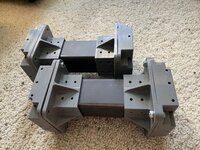
The one thing I notice about PLA parts is they sag over time... I just thought I would negate that by building a more solid bridge system for that axis.
 

fordkid88

Well-known member
Joined
Nov 10, 2013
Messages
680
Since I'm in the same boat with you guys just a different design, how are you going about your feeds and speeds. I've doing test cuts for the last few days and trying to dial stuff in, but it's still a long process. I'm also encountering an issue where on large circles it has slight pause on certain parts of the circle. I don't know if it's in the gcode or Mach 4
 
OP
M

Meleon

Active member
Joined
May 25, 2013
Messages
32
I haven't got that far yet, to tell you the truth I'm actually kinda dreading that part. Metal is so expensive to be just making random cuts. But its a necessary evil if you want to end up with useful parts.
Just being an armchair cowboy and repeating what the boy's at JD garage showed in there video, they ran a test cut determined the speed was too slow, turned up the speed found it too fast and split the difference. judging by the projects you've posted on here I quit certain you figured that much out on you own.

I also understand it common to run the amps wide open (within reason) and only vary your cutting speeds. (removes the amp variable)

I noticed on the Langmere there are some cutting charts for various plasma cutters. so that could be a place to start.
 

fordkid88

Well-known member
Joined
Nov 10, 2013
Messages
680
I haven't got that far yet, to tell you the truth I'm actually kinda dreading that part. Metal is so expensive to be just making random cuts. But its a necessary evil if you want to end up with useful parts.
Just being an armchair cowboy and repeating what the boy's at JD garage showed in there video, they ran a test cut determined the speed was too slow, turned up the speed found it too fast and split the difference. judging by the projects you've posted on here I quit certain you figured that much out on you own.

I also understand it common to run the amps wide open (within reason) and only vary your cutting speeds. (removes the amp variable)

I noticed on the Langmere there are some cutting charts for various plasma cutters. so that could be a place to start.
I've been doing the wide open on the amps and adjusting the travel speed. I think this will mess with fine detail but be ok 90% of the time. When I trained on water jet and commercial plasma tables we would enter the material type and thickness and adjust the torch components and let it rip. Most of us won't be running 5000 dollar hypertherm setup so that's not much help.
 

fordkid88

Well-known member
Joined
Nov 10, 2013
Messages
680
Are you guys doing water tables? If you are have you narrowed down your rust inhibitors?
I'm thinking borox, mold/algae killer and water.
If you are you doing a water table are you doing a semi automated fill level? I had an idea of doing a relay that is controlled by a mini float switch that would fill it along with water proof solenoid tied to a key press to empty the tray.
 

Keyblazer

Well-known member
Joined
Jul 30, 2009
Messages
1,471
Location
Irvine, CA
I’m planning to do a SS water tank with a valve that I can manually open to drain it into a container.

I have no input on speeds and feeds, and am kinda dreading that too.

Did begin assembly of the Y axis runners but don’t have all the hardware yet so that’s all I can do for now.
DAF081B3-4EEC-48EB-81ED-C078979D2A41.jpeg
9DF8605F-8935-4D3B-B40D-F3DAFD966DBF.jpeg
 
OP
M

Meleon

Active member
Joined
May 25, 2013
Messages
32
The gray on black looks sharp.
Did you print in PLA? I was scared PLA wouldn't hold up so I use PETG. what a pain in the *** to print. very stringy. I was getting dialed in on a couple of prints and kept forgetting t save my settings in Cura. so I was constantly starting from scratch. (slow learner)
 

fordkid88

Well-known member
Joined
Nov 10, 2013
Messages
680
Are these tables going to be run on Mach 3 or 4, or is it grbl with a pico controller?
 

fordkid88

Well-known member
Joined
Nov 10, 2013
Messages
680
They run off openbuild & Grbl on arduino uno. if that makes sense?
It does, I had originally attempted to use a raspberry pi and Linux cnc, all kinds of combos that you can use to get to the final goal
 
To avoid these ads, REGISTER NOW!

VonMoldy

Well-known member
Joined
Apr 3, 2006
Messages
46
Location
Utah
I’m planning to do a SS water tank with a valve that I can manually open to drain it into a container.

I have no input on speeds and feeds, and am kinda dreading that too.

Did begin assembly of the Y axis runners but don’t have all the hardware yet so that’s all I can do for now.
DAF081B3-4EEC-48EB-81ED-C078979D2A41.jpeg
9DF8605F-8935-4D3B-B40D-F3DAFD966DBF.jpeg
Can you tell me about your printing? I am starting my build and have got my printer ready to go. Did you use the recommended settings? I am curious if I need to use the exact .8 nozzle the recommend.
 
OP
M

Meleon

Active member
Joined
May 25, 2013
Messages
32
I used .6 nozzle for mine, and actually printed most stuff in PETG. If I remember correctly I used a 0.45 or .04 layer height.
I think the rest of the settings where fairly close to what they recommended.
I don't think there is a huge time saving between .6 and a .8 based on what I've seen on YouTube, but apparently the time saving is massive between a 0.4 and a 0.6.
 

fordkid88

Well-known member
Joined
Nov 10, 2013
Messages
680
What are you running for your controller. I've running an Ethernet smoothstepper and mach 4. I'm not the biggest fan of the setup and am considering going to pokeys57 controller.
 
OP
M

Meleon

Active member
Joined
May 25, 2013
Messages
32
Controller is Openbuilds running on a Arduino board,
So far it does what I need. Pretty shallow learning curve. Can't beat it for the price, but keep in mind my limited experience.
 

fordkid88

Well-known member
Joined
Nov 10, 2013
Messages
680
I was looking at the open builds black box and their cam/cad software. Looks very interesting. I just haven't found anything solid as far as a torch height controller. That's been a part scrapper for sure. Any material warpage pre and post cut will scrap a part real fast
 
OP
M

Meleon

Active member
Joined
May 25, 2013
Messages
32
I'm hoping JD garage will post their version of a torch height controller sometime soon, I surely see the benefits.
 

punziracing

New member
Joined
Sep 14, 2022
Messages
4
I see this thread I’d kinda of old, if anyone is looking I would love to know how long the bearing blocks take to print. I have a stock ender 5 S1. I’m currently printing the bearing blocks and going on 24hrs using the recommended settings.
 
To avoid these ads, REGISTER NOW!
Top Bottom