To avoid these ads, REGISTER NOW!

Vintage & home made auto body tools

Smokeshow69

Well-known member
Joined
Dec 7, 2012
Messages
8,391
Location
Pacific Northwest
Oh yeah, that's not even the first one that comes to mind but holy chit was a that never ending mountain out of a molehill......Bro, it wasn't even the hinge handle, it was the "PIN" ( crossbar) to the hinge handle that launched a thousand posts and had me playing Russian roulette at my kitchen table.
You check your watched threads and see there is an update and you get all excited and check the thread only to be let down. Nothing good posted, just folks one upping eachother :). So you feel cheated and let down for some wasted excitement.
 
To avoid these ads, REGISTER NOW!

cb750plumblife

Active member
Joined
Feb 4, 2023
Messages
36
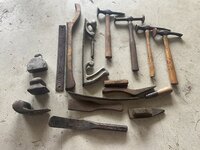
My Grandads body work tools. The only tool that is marked is one body hammer that’s made by Herbrand .

I’ve used them a few times but mostly I just keep them for the nostalgia.

He went to trade school on the GI Bill at some point and he was given this along with a set of mechanics tools that was a mix of Husky USA and Herbrand tools which I was told were army surplus tools .
 

Attachments

  • 846E32B8-701A-4C69-986D-A897CA094F8C.jpeg
    846E32B8-701A-4C69-986D-A897CA094F8C.jpeg
    1.2 MB · Views: 160

NYBODYMAN

Well-known member
Joined
Sep 10, 2013
Messages
4,887
Location
NY
My Grandads body work tools. The only tool that is marked is one body hammer that’s made by Herbrand .

I’ve used them a few times but mostly I just keep them for the nostalgia.

He went to trade school on the GI Bill at some point and he was given this along with a set of mechanics tools that was a mix of Husky USA and Herbrand tools which I was told were army surplus tools .
Beautiful collection!
 

don long

Well-known member
Joined
Mar 31, 2012
Messages
8,856
Location
southern california
Well they tried to teach me but the bondo had just started to become popular so I turned my attention to the mud rather than the lead. I have done some but not to a professional level.
 

Chris_Hamilton

Well-known member
Joined
Dec 2, 2012
Messages
1,023
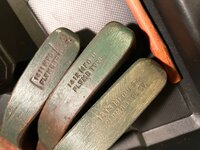
I think those paddles in my last post are late 40's. Most of these hammers go back to the late 20's.
I have 7 or 8 Plvmb's of that era that I still use nearly everyday. The Plvmb's and early Proto's are the best American body hammers ever made IMO. Weight and balance is so good on the various different ones.
 

MR.X

Well-known member
Joined
Dec 13, 2010
Messages
1,795
I have 7 or 8 Plvmb's of that era that I still use nearly everyday. The Plvmb's and early Proto's are the best American body hammers ever made IMO. Weight and balance is so good on the various different ones.
Hi. So 2 of these, the Plomb 1429 and the 1422, with their telltale green painted octagonal handles are from the 40's. There's a P&C in the shot that's from before they were acquired by Plomb so that's a late 30's hammer. The other 5 in this picture are H series Plomb from the late 20's up until the early 30's. A decent percentage of the guy's I've sold 14XX series Plomb and early Proto auto body hammers to said they were for use, not collecting....which is pretty cool.
 

metalmagpie

Well-known member
Joined
Nov 1, 2011
Messages
799
Location
Seattle
Had to chime in. A guy told me about a pre-estate sale. I went over there and found out that the seller's dad had a great home shop, but that the seller didn't know anything about anything. I spent some time over there and gave him a list of items and suggested value. He told me to pick a few things out. I opened up an old rolling toolbox and it was STUFFED with auto body tools. Apparently the owner had owned a service station in the '50s. There were several guys there and things worked out according to the laws of "grab-ity"! Everyone started snatching stuff up as fast as they could. These 3 hammers are what I came aways with. I put them with my blacksmithing tools and there they have sat for about 5 years. But I have recently kindled an interest in forming and shaping and bending and bumping sheet metal with hammer and dolly. So I am looking to acquire more tools. I misspelled Plvmb in the caption on the photo, forgive me. The Fairmount literature I have says about my 165-G hammer (the cross peen looking thing), "For moulding and flanges".

If anyone wants to sell any of these hammers and dollies (US made only) please contact me off list. Thanks!

metalmagpie
 

Attachments

  • firstThreeHammers.jpg
    firstThreeHammers.jpg
    88.3 KB · Views: 67

NYBODYMAN

Well-known member
Joined
Sep 10, 2013
Messages
4,887
Location
NY
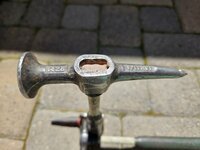
I like that PLOMB hammer. Not a hammer head I've seen often and I don't have one😎

The no name one looks like a tin smiths hammer or the like. Not necessarily a body mans hammer but useful nonetheless
 

Smokeshow69

Well-known member
Joined
Dec 7, 2012
Messages
8,391
Location
Pacific Northwest
Had to chime in. A guy told me about a pre-estate sale. I went over there and found out that the seller's dad had a great home shop, but that the seller didn't know anything about anything. I spent some time over there and gave him a list of items and suggested value. He told me to pick a few things out. I opened up an old rolling toolbox and it was STUFFED with auto body tools. Apparently the owner had owned a service station in the '50s. There were several guys there and things worked out according to the laws of "grab-ity"! Everyone started snatching stuff up as fast as they could. These 3 hammers are what I came aways with. I put them with my blacksmithing tools and there they have sat for about 5 years. But I have recently kindled an interest in forming and shaping and bending and bumping sheet metal with hammer and dolly. So I am looking to acquire more tools. I misspelled Plvmb in the caption on the photo, forgive me. The Fairmount literature I have says about my 165-G hammer (the cross peen looking thing), "For moulding and flanges".

If anyone wants to sell any of these hammers and dollies (US made only) please contact me off list. Thanks!

metalmagpie
That plomb hammer isn’t a common one. They usually go for around $100 on eBay. I have the Proto version
IMG_5594.jpeg
 
To avoid these ads, REGISTER NOW!

MP&C

Well-known member
Joined
Oct 21, 2009
Messages
4,405
Location
Leonardtown, MD
Since they are rather rare and hard to find, I had a commission to make a Snap-On vertical cross peen hammer out of a BF604. The chisel was cut off, rotated 90 degrees, and welded back on using ER312 (super missile welding rod). Then all cleaned up like it never happened.


IMG_8107_qwzBSBkMQDnMeZbSZgZdsA.jpg


IMG_8120_eceV9o3fESba6DozfkZshe.jpg


IMG_8121_qvBrfkp72jir2MX1hvVTEN.jpg


IMG_8122_whu9HYVSqAV9bNfEiRpjX4.jpg


IMG_8144_38Afk1g3PaiFd8tvEEVHQy.jpg


IMG_8147_vbHLf3g25GJHBvAoGg4Sk4.jpg


IMG_8146_wBoYZ8mHJv4ysNAkoVi5rK.jpg


IMG_8145_epQ3bWhFBVTjNwfcBpaMBg.jpg


MP&C

Well-known member
Joined
Oct 21, 2009
Messages
4,405
Location
Leonardtown, MD
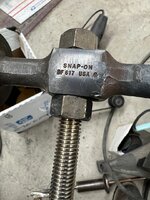
A while back I picked up some used body tools, including this bumper puller/straightener (red handle). The rubber pad was about falling off, with exposed rivets, but since I was just hanging it up as wall art, didn't think much past that..
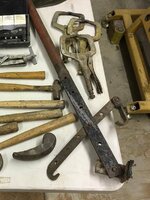


IMG_8349.jpg


Fast forward to last weekend, and a square body 4WD stopped by, which has the typical bumper ears not parallel to the ground. So I pulled the tool out to show the owner that there was indeed a way to repair that. And then decided we need to go ahead and repair the tool so it could be put back in service for when the next time the truck stopped by...


First order of business was to remove the old fender bolt and nut and replace with a machine bolt and lock nut.

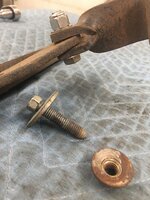

IMG_8350.jpg


IMG_8351.jpg


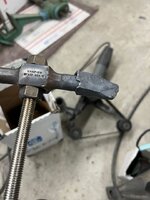
Next, for our "replacement" pad, we had a small piece of horse mat we could cut it out of, and one of our counterbore bits was used to get the screw heads below the surface..


IMG_8352.jpg


IMG_8353.jpg


The pad was held in place using 10-32 pan head screws and lock nuts.


IMG_8356.jpg


This tool works by placing the pad against the bumper face, hooking the top or bottom back edge (depending on direction of pull needed) and prying to twist back into shape.. So now our wall art is all ready for next time...
 

Mike'smeatshop

Well-known member
Joined
Apr 1, 2023
Messages
1,273
A while back I picked up some used body tools, including this bumper puller/straightener (red handle). The rubber pad was about falling off, with exposed rivets, but since I was just hanging it up as wall art, didn't think much past that..


IMG_8349.jpg


Fast forward to last weekend, and a square body 4WD stopped by, which has the typical bumper ears not parallel to the ground. So I pulled the tool out to show the owner that there was indeed a way to repair that. And then decided we need to go ahead and repair the tool so it could be put back in service for when the next time the truck stopped by...


First order of business was to remove the old fender bolt and nut and replace with a machine bolt and lock nut.


IMG_8350.jpg


IMG_8351.jpg


Next, for our "replacement" pad, we had a small piece of horse mat we could cut it out of, and one of our counterbore bits was used to get the screw heads below the surface..


IMG_8352.jpg


IMG_8353.jpg


The pad was held in place using 10-32 pan head screws and lock nuts.


IMG_8356.jpg


This tool works by placing the pad against the bumper face, hooking the top or bottom back edge (depending on direction of pull needed) and prying to twist back into shape.. So now our wall art is all ready for next time...
Very good. You and your skills intrigue me and so many others. Please keep it coming. I know you have more.
 

MP&C

Well-known member
Joined
Oct 21, 2009
Messages
4,405
Location
Leonardtown, MD
Here's a commission I did for a buddy up in PA. He had been searching for quite some time for a Snap-On BF633, but they are rare as hen's teeth. The last (and only) one I've seen was on eBay, it had nicks in the chisel and hammer face, as well as an incorrect MATCO fiberglass handle. With tax and shipping it sold for right at $200, pictured here:


IMG_8063.jpg


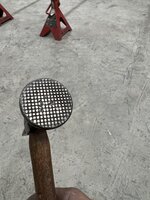
A metalshaper friend of mine has been restoring and selling hammers and dollys for many decades. He told me in all that time, he has never sold a waffle faced hammer. Based on his experience, and since I also have a couple of the BF617 large face hammers with the shrinking face (waffle pattern), I thought I'd use one of them as a donor.


IMG_8215.jpg


IMG_8214.jpg


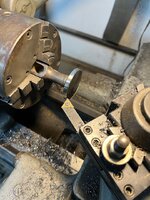
Here is our start to the process, using the blacksmithing skills I didn't know I had. The waffle end was heated cherry red and smacked using BFH to force the hammer face inward. Heat, beat, and repeat. A piece of 1/2-13 all thread serves as our heat resistant handle.


IMG_8204_7tSHWThi9xYfTZWQmgFhbp.jpg


IMG_8206_wadMQypbCCrEHPdZd3senx.jpg


IMG_8205_2VT4gZrkRgefPSHT8hN7tP.jpg


Once our hammer face was "pointy" enough to fit through the jaw of the lathe, the hammer was chucked and the diameter cut down to size for our faux hammer.


IMG_8207.jpg


Now with the face cut down to size and preliminary polishing done on the lathe, the chisel could be heated and curved to match the BF633 Unicorn.


IMG_8238.png


Some grinding using the Dynabrade air file/belt sander...


IMG_8239.png


Face polished


IMG_8226_iwHDQ1c5bKQN1vtsYobkEu.jpg


Handle refitted and neck section thinned out


IMG_8220_4jgM7d6M7TrZG9DtCGrRcP.jpg


IMG_8221_euZvNoohqFT8J6WpgYRyMz.jpg


The tricky part with refinishing the handles is to leave the logo intact.


IMG_8223_txGoABz2KsdQcSavFi6ssi.jpg


IMG_8224_jGMHzMAZpJMPFyyQq1wwGn.jpg


Prior to final assembly the hammer head was taken to Combs Prototype and Fabrication for some heat treatment in his oven.


Assembled, polished, and ready for a trip to PA where it can be put to work...


IMG_8236.jpg


IMG_8233.jpg


MP&C

Well-known member
Joined
Oct 21, 2009
Messages
4,405
Location
Leonardtown, MD
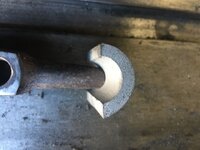
A few years back we had some dings in a '51 F7 hood to remove that were located in the radius along the sides.. Didn't really have a hammer that fit the exact requirement, so I use a "KIT" that my buddy Will Cronkrite had given me, a piece cut out of a Model A leaf spring eyelet.


I had more than one BF603 in stock, and rarely use the pick end, so it became the likely candidate.


IMG_7334.jpg


IMG_7335.jpg


IMG_7336.jpg


TIG welded in place using ER312 rod


IMG_7340.jpg


Some crown added long ways and polished up...


IMG_7345.jpg


IMG_7346.jpg

This worked very well inside the hood, and I've used it on several other occasions since..
 

MP&C

Well-known member
Joined
Oct 21, 2009
Messages
4,405
Location
Leonardtown, MD
I had a commission to make a stubby Snap-On hammer like their BF612 except with a crowned face. Since I had a couple extra BF618's, I accepted the challenge. I had bought a hammer a few years ago from a retired body man, who must have needed a shorter handle at some point. Sad, because it was one of the older scripts. But we'll use this to make a new hammer that should last a lifetime.


IMG_7602.jpg


IMG_7603.jpg


The hammer head is dissected with a cutoff wheel, and a slight angle is sanded into our mating surface to provide more finger room given the shortened head.


IMG_7611.jpg


IMG_7612.jpg


IMG_7613.jpg


The parts got TIG welded together using ER312 rod...


IMG_7615.jpg


and cleaned up with a die grinder


Taped off, media blasted, and painted....


IMG_7618.jpg


IMG_7621.jpg


IMG_7622.jpg


IMG_7624.jpg


I had a replacement hickory handle that didn't have the faceted sides, so flats were sanded, handle fitted to the hammer head, finish sanded, stained and satin finished.


IMG_7619.jpg


Assembled..


IMG_7625.jpg


IMG_7627.jpg


IMG_7642.jpg


So the main reason for making this hammer is that Snap On does not make it with a crowned face. Their tight access hammer, the BF612 has a flat face, which is counter productive in most cases because you'll need it inside of a quarter panel or door, where typically you have a concave crown inside the panel to contend with. A flat face hammer is going to leave coin marks with every strike, the crowned hammer is more suited. The other issue to address is that with the short hammer head there is little finger room when the head face is parallel to the handle. With a slight angle added, we've increased the finger room..


IMG_7630combine.jpg


...made like Snap-On should have done.


MP&C

Well-known member
Joined
Oct 21, 2009
Messages
4,405
Location
Leonardtown, MD
A good friend from Huntsville AL has been selling body hammers and dollys for decades now. He told me he has never sold a "shrinking" hammer with the waffle face. So he had one that had a slightly damaged waffle face, and he sent it to me, said I'd find something to do with it. Didn't have to wait long as one of the guys that had been to the shop for metalshaping classes reached out, looking for a square faced low crown hammer with a chisel. I didn't have the exact hammer, but I did have the parts. Here's the hammer sent from Alabama (I believe it was a Fairmount) with a damaged round shrinking face, smooth face on the square end..

IMG_7553.JPG


IMG_8357_nycSYxww3QAfX6299pyyHi.jpg


The remaining piece of the puzzle, we had just cut this chisel off a Snap On BF618 when we made a stubby hammer out of that one.


IMG_7612_ccSkf2God1rfkwRnWL8Zgh.jpg


That was a good start, but not sleek enough for what I had planned here, so we thinned out the chisel for a better match to this hammer..


IMG_8358_b34vKP7R5ibGuuJkeSfUB9.jpg


Root pass using 312 rod. When welds were done, we also used a die grinder to add the side casting marks through the welds so it looked like it came this way.


IMG_8359_6LryYCvDNQZgZRTqS173XB.jpg


IMG_8373.jpg


MP&C

Well-known member
Joined
Oct 21, 2009
Messages
4,405
Location
Leonardtown, MD
Here's a Heller 422 that we cleaned up (the bottom one in the next picture...)


IMG_8029_eJakWJ4BkEdtj3caPP24pY.jpg


We had years of abuse to remove, nicks, surface rust, and casting flaws. When checked on a loose belt sander we found waves in the face, so the belt sander was used to provide a more consistent arc. Then we followed our sequential sanding techniques, and finished out on the buffer...


Then the polished edges were masked, the remainder media blasted and painted


IMG_8039.jpg


IMG_8036.jpg


IMG_8037.jpg


IMG_8038.jpg


All done....
 

MP&C

Well-known member
Joined
Oct 21, 2009
Messages
4,405
Location
Leonardtown, MD
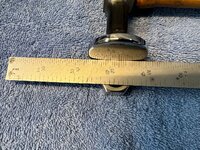
Here's one of those fender bumping hammer that I'm told works well on early vintage (20's-40's?) fenders. The barrel end seems to have not enough crown from end to end for such a fender without leaving coin marks on the ends of the strikes. So I thought I’d doctor it up for more bumping, less coining.


IMG_7984_d2fBsHvXqBWeyqHZ5L1TDR.jpg


A round crowned face was turned out of some tool steel. And a bandsaw didn't want to touch it for the final cut, had to use a 4-1/2" cutoff wheel on this and the hammer.


IMG_7973_t3MfQ2dZng8KunF1nkRhdw.jpg


IMG_7974_hRqtqYv2DXBE71pStiA5FT.jpg


IMG_7975_nmpwZoEUkTust52bgAwjgv.jpg


IMG_7976_q8Jbu9mcEoKZhWB1SGezud.jpg


With the barrel removed and the new face welded in place.....


IMG_7980_swTybc8USdPpUzFS2n98ej.jpg


Belt file makes short work of cleaning up the weld...


IMG_7983_24okgyLW8ZWGgyoEfBPkvG.jpg


Still needs some media blasting and a paint job, but looks like this will do the trick.


IMG_7981_pJcJSQwyqQ9YUPKeC2DZE7.jpg


Finishing touches added…


08674D05-359F-4C68-9919-5E90073F53BC.jpeg

3E8636B2-1643-49F3-ACFC-A01B75ACFB32.jpeg

D5292D24-6C92-4D1E-B05E-C993B525ED63.jpeg


Mike'smeatshop

Well-known member
Joined
Apr 1, 2023
Messages
1,273
Here's one of those fender bumping hammer that I'm told works well on early vintage (20's-40's?) fenders. The barrel end seems to have not enough crown from end to end for such a fender without leaving coin marks on the ends of the strikes. So I thought I’d doctor it up for more bumping, less coining.


IMG_7984_d2fBsHvXqBWeyqHZ5L1TDR.jpg


A round crowned face was turned out of some tool steel. And a bandsaw didn't want to touch it for the final cut, had to use a 4-1/2" cutoff wheel on this and the hammer.


IMG_7973_t3MfQ2dZng8KunF1nkRhdw.jpg


IMG_7974_hRqtqYv2DXBE71pStiA5FT.jpg


IMG_7975_nmpwZoEUkTust52bgAwjgv.jpg


IMG_7976_q8Jbu9mcEoKZhWB1SGezud.jpg


With the barrel removed and the new face welded in place.....


IMG_7980_swTybc8USdPpUzFS2n98ej.jpg


Belt file makes short work of cleaning up the weld...


IMG_7983_24okgyLW8ZWGgyoEfBPkvG.jpg


Still needs some media blasting and a paint job, but looks like this will do the trick.


IMG_7981_pJcJSQwyqQ9YUPKeC2DZE7.jpg


Finishing touches added…


08674D05-359F-4C68-9919-5E90073F53BC.jpeg

3E8636B2-1643-49F3-ACFC-A01B75ACFB32.jpeg

D5292D24-6C92-4D1E-B05E-C993B525ED63.jpeg

I will bet you have quite a few fender bender buddies. Good work.
 

MP&C

Well-known member
Joined
Oct 21, 2009
Messages
4,405
Location
Leonardtown, MD
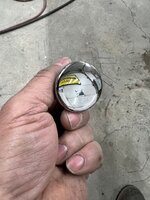
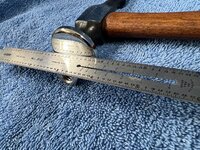
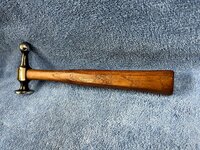
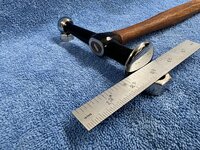
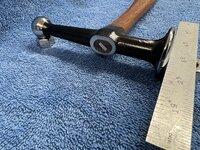
The new help in the shop (Paul) visited a local garage sale last weekend and came across a MAC tools body hammer for $2. Egad, it's pointed!!


IMG_9212.jpg


So it was the perfect candidate for a ball-end. We added a slight crown to the face as well, a good start to his body hammer collection...


IMG_9213_kxuYoWfLamMbJsiPvCUjnB.jpg


IMG_9216.jpg


IMG_9215_pV4XdMmoEzFp4Mc6f59G2N.jpg


IMG_9214_sMj6uYNVjtQo5hh3GsEsuQ.jpg
 

yhprum

Well-known member
Joined
Jul 27, 2006
Messages
1,396
Location
Brisbane Australia
I like your hammer work Robert!
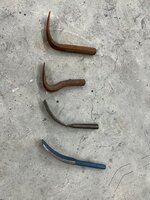
Here is a ******* I made from two pry bars I bought from HF on sale for three dollars each.
I cut the ends off with my angle grinder leaving just a bit of angle leg on each. Overlapped them a little and welded them with the mig welder. I had concerns about the weld strength but it’s held up fine over ten years. Polished up the working faces with varying grit discs on the angle grinder and Bob’s your uncle.
The blue pry bar isn’t the same exact one but similar size and shape.
 

Attachments

  • IMG_0614.jpeg
    IMG_0614.jpeg
    1.1 MB · Views: 38
  • IMG_0613.jpeg
    IMG_0613.jpeg
    1.1 MB · Views: 38
  • IMG_0611.jpeg
    IMG_0611.jpeg
    988.7 KB · Views: 52

MP&C

Well-known member
Joined
Oct 21, 2009
Messages
4,405
Location
Leonardtown, MD
I like your hammer work Robert!
Here is a ******* I made from two pry bars I bought from HF on sale for three dollars each.
I cut the ends off with my angle grinder leaving just a bit of angle leg on each. Overlapped them a little and welded them with the mig welder. I had concerns about the weld strength but it’s held up fine over ten years. Polished up the working faces with varying grit discs on the angle grinder and Bob’s your uncle.
The blue pry bar isn’t the same exact one but similar size and shape.

Now I know what to do with that broken pry bar....
 

Smokeshow69

Well-known member
Joined
Dec 7, 2012
Messages
8,391
Location
Pacific Northwest
Love those old proto boards! Haven’t been able to scoop any up yet so I’m going to have to recreate one for now! You find some real treasures!IMG_7466.jpeg
Thanks! I have an affinity for reasonably priced Proto/ plomb tool boards. I actually paid the most I have ever paid for a board for this body hammer board at $100 but I’ve only seen 1 other online. It’s one of my favorites and keeps the hammers within reach should I need to use one. I recently acquired these in the below post
 
To avoid these ads, REGISTER NOW!
Top Bottom