To avoid these ads, REGISTER NOW!

Reed No. 103R vise: Seeking info

Jacobs976

Well-known member
Joined
Sep 11, 2020
Messages
831
Location
Indiana
PXL_20230410_175844015.jpg
PXL_20230410_175909908.jpg
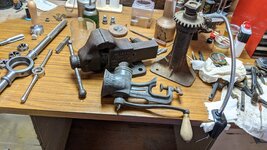
Finally found a few vises on marketplace on my work route, 8 specifically but only one replied after 24 hours, and brought home a Reed No. 103R for $40 with a random meat grinder and screw jack tossed in.

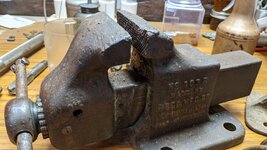
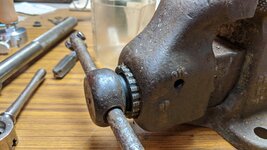
Vise looks to be in decent shape, spindle and spindle nut is clean and no visible cracks or deformations on the body or jaws, however I did notice the bearing(odd bit at the front of the dynamic arm that appears to be attached via set screw to lock the jaw while also functioning as a bearing of sorts, limiting friction between the dynamic arm and spindle) does have some through and through hairline cracks through the thickness of it and one "tooth" has a corner sheared.
PXL_20230410_175912807.jpg
Curious if anybody knows much about the vise in general as well as if anybody has made new parts(the bearing) or if someone still makes them somewhat commercially.

Also wouldn't mind a parts diagram if anybody has found one to confirm everything is still there, nothing appears to be missing but the oil port on the dynamic arm does seem a bit much as is(all examples I could find are the same).
 
To avoid these ads, REGISTER NOW!
OP
J

Jacobs976

Well-known member
Joined
Sep 11, 2020
Messages
831
Location
Indiana
Got the dynamic arm broke down and the bearing appears to be intentional broken like connecting rods in engines. It threads into the body of the dynamic arm after the spindles stop(the ring forged into the handle before the screw) and before the handle.

Basically it physically can't be in position without being broken in half unless it was put on the shaft before forging the ball or stop of the handle.

So while not pristine, no true damages have appeared yet as far as I know. Also clean up is going quicker than I thought it would, dynamic arm and accessories are done with initial rust removal and degreasing except the spindle assembly.
 

Shiftless

Well-known member
Joined
Mar 9, 2014
Messages
14,562
Location
East Bay SFO
That split nut is a patented Reed feature that lets a user compensate for wear to minimize the in and out axial play that vises develop after long use. It appears to be screwed out almost all of the way. Is there a lot of free play (in and out) in the main screw?

To disassemble the vise, loosen the set screw and then use a small punch or old screwdriver to unscrew the split nut. With that out, you can screw the main screw straight out.

I have a couple of Reed R’s with that feature.
That oil port looks like all the other ones I have seen.
 
Last edited:
OP
J

Jacobs976

Well-known member
Joined
Sep 11, 2020
Messages
831
Location
Indiana
That split nut is a patented Reed feature that lets a user compensate for wear to minimize the in and out axial play that vises develop after long use. It appears to be screwed out almost all of the way. Is there a lot of free play (in and out) in the main screw?

To disassemble the vise, loosen the set screw and then use a small punch or old screwdriver to unscrew the split nut. With that out, you can screw the main screw straight out.

That oil port looks like all the other ones I have seen.
It didn't have much play, probably due to all the dried grease covering every surface and excessively packed inside, on inspection but I didn't look too hard after confirming the spindle was in good shape and it opened and closed somewhat freely(basically as you'd expect of a vise with decades of dried grease as lubrication).

It did come off by hand once I got the set screw out so it for sure was loose, think it took maybe 4 full rotations if that. It's probably a good assumption the broken tooth was from installation or maintenance too, most likely the maintenance that resulted in the the piece not being screwed in all the way.

The port just seems quite large since it tapers down to a more reasonable diameter and I didn't initially notice it was designed like that. I seen other examples so I knew it wasn't out of the norm but under the assumption it was a large diameter hole I thought it would have a pressed fitting.
 

Shiftless

Well-known member
Joined
Mar 9, 2014
Messages
14,562
Location
East Bay SFO
The old timers probably had a big squirter oil can with a rather large spout. One squirt and you’re good to go.
If that was my vise, I would soak it in hot Simple green which will dissolve the old grease and remove old paint. Then pressure wash the insides and all of the old gunk will be gone without having to remove the main nut and work with brushes on the inside.
 
OP
J

Jacobs976

Well-known member
Joined
Sep 11, 2020
Messages
831
Location
Indiana
The old timers probably had a big squirter oil can with a rather large spout. One squirt and you’re good to go.
If that was my vise, I would soak it in hot Simple green which will dissolve the old grease and remove old paint. Then pressure wash the insides and all of the old gunk will be gone without having to remove the main nut and work with brushes on the inside.
I already broke it down and started with PB Blaster and a brass brush on the dynamic arm. Only took 10 minutes for everything but the spindle and the split nut needs a bit more work to get the grease in the flutes out. Took a break at that point.

This way I also get any surface rust out of the way and after rinsing I can identify any spots needing more work, usually with grease caked stuff there isn't anything wrong at that point although there is some brazing splatter on the jaws and on the top, and finish by getting it ready for oiling or painting.

In this case I'll clean up the brazing splatter then probably paint it red to match the larger vise(looked like an older Reed, 3-3/4 jaw large body with three point base and 45° cutout necessary for mounting, but was only marked with a 2 and had a basic offset bolt and formed washer as a lock ring instead of the split nut on this one) my coworker left in my shop for 3 months before I finally cleaned it up for him in a day before painting it as he wanted.

Figured it might look nice enough that way since his turned out nicer than I thought it would. Also found out a 7/8 spindle can be quite smooth after proper lubrication if properly machined, never imagined it'd be capable of spinning freely with only one finger given it's size and how rough it was before.
 

Shiftless

Well-known member
Joined
Mar 9, 2014
Messages
14,562
Location
East Bay SFO
You’re doing great on that Reed. 🍻
I once had the privilege of taking a test drive on a nicely restored Prentiss 98 with 8 inch jaws. It too could be operated with just one finger. That is one of the pay offs of our vise restoration hobby. Seeing the vast improvement in appearance and in operating smoothness.
 
OP
J

Jacobs976

Well-known member
Joined
Sep 11, 2020
Messages
831
Location
Indiana
You’re doing great on that Reed. 🍻
I once had the privilege of taking a test drive on a nicely restored Prentiss 98 with 8 inch jaws. It too could be operated with just one finger. That is one of the pay offs of our vise restoration hobby. Seeing the vast improvement in appearance and in operating smoothness.
I'm hoping to find some larger ones eventually but for today I'm happy with the 3" vise. Hopefully next time the other 7 I found are still around and I'll be able to get a few though, poor descriptions and pics but it looked to be 2"-2-1/2" to 6"-8"(can't tell much by them beyond they're listed as vise and look kinda like one if it was underwater or taken while tossing straw through a wood chipper).
Are the jaws replaceable on that Reed?
Looks like they're fixed. Looks like an E on the back of the jaws and the inverse in the body from polishing the one jaw up after removing what turned out to be welding splatter.
 

Shiftless

Well-known member
Joined
Mar 9, 2014
Messages
14,562
Location
East Bay SFO
9
I'm hoping to find some larger ones eventually but for today I'm happy with the 3" vise. Hopefully next time the other 7 I found are still around and I'll be able to get a few though, poor descriptions and pics but it looked to be 2"-2-1/2" to 6"-8"(can't tell much by them beyond they're listed as vise and look kinda like one if it was underwater or taken while tossing straw through a wood chipper).

Looks like they're fixed. Looks like an E on the back of the jaws and the inverse in the body from polishing the one jaw up after removing what turned out to be welding splatter.
On those models, the hardened steel jaws were cast in place when they made the vise.
 
OP
J

Jacobs976

Well-known member
Joined
Sep 11, 2020
Messages
831
Location
Indiana
9

On those models, the hardened steel jaws were cast in place when they made the vise.
Seems they're sturdy enough anyhow. Finished the spindle and all the other accessories along with the dynamic arm(currently in the shop with 2 coats of paint) and found a fair bit of evidence of abuse in regards to the handle being beat on.

Plus the body is in the office for now but already shows signs of being used as an anvil a bit from the cleaning so far.

Meanwhile the octagonal spindle nut, set screw in spindle nut lock pin, and other accessory parts look to be in good shape.

Overall it's been beat but it doesn't look to be giving up anytime soon.
 

Shiftless

Well-known member
Joined
Mar 9, 2014
Messages
14,562
Location
East Bay SFO
Unless I’m mistaken, the octagonal spindle nut means it’s made of steel and not cast iron. Steel is of course more durable.
 
To avoid these ads, REGISTER NOW!
OP
J

Jacobs976

Well-known member
Joined
Sep 11, 2020
Messages
831
Location
Indiana
Unless I’m mistaken, the octagonal spindle nut means it’s made of steel and not cast iron. Steel is of course more durable.
I think it is steel, forged in a longer rail then cut and tapped going by how it looks. You can see where it was cut down before being painted because it wasn't touched up between steps.
 
OP
J

Jacobs976

Well-known member
Joined
Sep 11, 2020
Messages
831
Location
Indiana
Have to wait for the paint to dry on the body enough to clean it up and reassemble but the dynamic arm is finished up(still have to clean up the paint where the two pieces meet once they're together).

One question though, @Shiftless. How's the split nut supposed to work? Found a lot of info on removing it but not much going the other way.

I got it back together but it's not wanting to run down enough to take out most of the slack and allow the set screw to sit in the groove. As is it's set with around 3/16" of play(with the same amount of the split nut still sticking out) but I don't know if that's within reason or if I need to pop it back out and clean the threads up with a thread chaser or something.

Edit: found my mistake. Split nut was in backwards initially and I didn't realize so it went back in the same way. Still curious what'd be the recommended amount of slack though if there is one.
 
Last edited:

Shiftless

Well-known member
Joined
Mar 9, 2014
Messages
14,562
Location
East Bay SFO
That’s the beauty of the split nut adjuster. You can dial in as much free play as you want or need. If all sliding surfaces are clean and greased up, you can tap on the split nut and get it just right. I’d suggest about 1/8 turn on the handle as being a good starting place .

Just tap on the split nut to rotate it to the best position and then tighten the set screw to hold it in place.
 
OP
J

Jacobs976

Well-known member
Joined
Sep 11, 2020
Messages
831
Location
Indiana
PXL_20230411_050231129.jpg
Final coat of paint is dry enough to toss it back together proper. It'll take a few days for the paint to darken but it's supposed to be gloss red pepper. Not sure if I'll mess with the lettering yet.
PXL_20230411_050331329.jpg
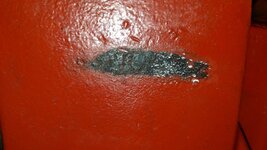
I removed the slag but left the jaws a bit rough so I didn't have any risk of removing too much material so it's not a model but it's nice enough to do it's job. Plus it's got some scars naturally. Also slag spot on dynamic jaw is leveled so it closes right.

Didn't have any tape because my coworker has borrowed the whole bin over the past few months so the transition on the jaws is rough too.

Played with the adjustment a bit but for now it's somewhere in-between smooth and a little play. Kinda hard to zone it in.
PXL_20230411_051106520.jpg
For now it'll do fine enough to hold my vise while it holds my pocket knife though so that's something.

Also looks to be a 1975 build given the 75 stamped on the side.
 
OP
J

Jacobs976

Well-known member
Joined
Sep 11, 2020
Messages
831
Location
Indiana
Got the adjustment about perfect I think. Any tighter it seems like it wants to drag a bit but at about 1/8(45°) of free movement it slides without issue.

Compared it with my modified econ Wilton from the same era and it seems to have less than 1° of free movement(changed out the collar and bearings for better ones and cut down slack from almost 3/16 to practically 0) so the Wilton is more precise but the Reed can actually clamp down with proper force.

Basically have the hobby vise(Wilton, awaiting aluminum jaws and gimbel base) and the small work horse(Reed, awaiting aluminum jaw covers) now.
 
OP
J

Jacobs976

Well-known member
Joined
Sep 11, 2020
Messages
831
Location
Indiana
Found the Reed date thread and some examples of 100R series and found my assumed date was wrong. Tried making out the stamp better, dynamic arm isn't visible at all, but the best I can figure is 10(presumably the month). Did see something about the opposite side being done for a certain period though so I'll have to look at the thread again.
PXL_20230414_175327410.jpg
PXL_20230414_175327410~2.jpg
Here's the unedited and edited pic with the 10 in editing directly under the 10 I initially thought was a 75.

Edit: could be 45 too. Still see the 5 and 1 can look like a 4 but not as tall.
 
OP
J

Jacobs976

Well-known member
Joined
Sep 11, 2020
Messages
831
Location
Indiana
PXL_20230416_225147562.jpg
Went ahead and removed the paint over the stamp to try getting a better look at it.

It's 10/48. 8 looks to have been double struck and 4 was shallow.
 
OP
J

Jacobs976

Well-known member
Joined
Sep 11, 2020
Messages
831
Location
Indiana
PXL_20230420_193633741.jpg
PXL_20230420_193619729.jpg
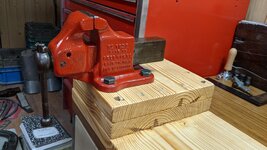
Made a base for it to clamp onto my office desk. Went for a bit taller to make it closer to standing height. Turned out to be more work than I thought though getting materials.

Went to home depot for lumber, a 2x12x8ft, and they had 62 boards in stock. Of those 62 only one was relatively plomb and had no cracks exceeding 1 foot along the length. The one I got still had a defect, where a split in the wood ended leaving a shallow pit around 6 inch's long by 3 inches wide, and turned out not to be plomb, maybe warped during drying, so the sections didn't align properly when stacked.

Next was wood dowels, went to tru value because they said they had 5/8 oak ones. Got there and they had two separate displays, one with the lumber and one with the woodworking tools. Neither had oak, only poplar on the labels. So I went with poplar, looked where it was labeled and it was 3/4, 1/2, 1 inch. Ended up 5/8 was where the square dowels and 3/4 were supposed to be. Only one had a sticker so I had to grab it and double check the unlabeled one, one being the labeled in the square slot and the other being in the 3/4.

Finally hardware, went to tractor supply because the only proper hardware store that carried 5/8 cost around $40 for a set of 4 bolts and nuts before washers. Was originally going to use flange bolts but the flange was a 1/4 too large to fit so next was machinist bolts. They only had all thread in grade 8 so I had to go with grade 5 since they had partial thread. Those worked out alright since they were also 5/8-11 thread,grade 8 was 5/8-16 I think, and they only had that thread on nuts, excluding the flange nuts that were also too big. Those nuts were grade 2 though so silver nuts and black bolts, set of 4 for $12. No washers since they were also too large.

Putting it together was alright though, rushed through everything but only issue was the lumber needed cut a second time to straighten out the ends and it liked to rip out on drilling.

Not the best craftsmanship or particularly appealing but it does well enough to keep the vise where I want it with 2 C-clamps.
 

RTM

Well-known member
Joined
May 13, 2019
Messages
13,229
Location
SF Bay Area
Just gotta ask: is the pair of C-Clamps the only thing holding it to the bench, or do your bolts go all the way thru?
 
OP
J

Jacobs976

Well-known member
Joined
Sep 11, 2020
Messages
831
Location
Indiana
Just gotta ask: is the pair of C-Clamps the only thing holding it to the bench, or do your bolts go all the way thru?
Just the C-clamps. There's no way to actually mount anything to the desk without ripping the top off and making a new one because the mfg thought it needed to be sturdy enough to hold just about anything you could put on it assuming you have a few extra hands or a forklift. Think it was rated for 600lbs or something like that.

Basically it'd be better to just build a new table than drill through the steel supports and make a new top. Plus I didn't want an obstruction if I'm working on something and need the table space so it can be tossed underneath when not needed.

For the size of the vise, 2 C-clamps are enough to hold it in place though. Only one and it can shift with only around 150lbs but two seems to be quite sturdy. It's in my office so it's not going to have that much force applied anyhow.

If I ever find a big vise though it'll get a proper table and designated spot in the shop. It'd be the one that actually takes any jobs beyond what I can do in the office.
 
OP
J

Jacobs976

Well-known member
Joined
Sep 11, 2020
Messages
831
Location
Indiana
PXL_20230426_193737064.jpg
This one, Wilton 5", will get a proper mount on a bench in the shop assuming it cleans up. Friend found it dumped at a work site in a new subdivision along with a truck load of scrap and trash. Basically someone pulled up and dumped their truck bed out in a random lawn of a brand new house.

It's got broken jaw plates and the screws for the locking plate are missing but so far that's the only damage.

Not what I was looking for but it's got some proper weight at least and it's free(minus materials to repair it).
 
To avoid these ads, REGISTER NOW!
Top Bottom