To avoid these ads, REGISTER NOW!

What did you do "IN" your garage today?

kaymccampbell

Well-known member
Joined
Feb 27, 2015
Messages
29,625
Location
Upstate New York
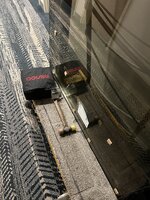
Over the last week, I lightly sanded several inexpensive tool handles and put a Minwax walnut wood finish on them. So far, for three of them I also put satin gloss poly urethane on them to protect the handles.

I had it on hand and didn’t know ahead of time that BLO is the preferred treatment for wood handled tools. Its not like they are heavy use tools: a rubber mallet, a duster and a file, so I think they’ll be fine.

I have a vintage Craftsman USA-made mallet that I have not put the poly on.. and I’m thinking again.. it would be fine. Any reason I should go and spend money on BLO for this more valuable tool?
4AB9140B-098B-4008-8238-B834F59AB5D4.jpeg
I usually coat mine with oil n filth, then wipe them down with a paper towel. Occasionally they'll get a quick wipe with a trash rag that has a bit of random dirty solvent in it.
 
To avoid these ads, REGISTER NOW!

Magnum440d100

Well-known member
Joined
Dec 2, 2018
Messages
3,581
Location
Indiana
Over the last week, I lightly sanded several inexpensive tool handles and put a Minwax walnut wood finish on them. So far, for three of them I also put satin gloss poly urethane on them to protect the handles.

I had it on hand and didn’t know ahead of time that BLO is the preferred treatment for wood handled tools. Its not like they are heavy use tools: a rubber mallet, a duster and a file, so I think they’ll be fine.

I have a vintage Craftsman USA-made mallet that I have not put the poly on.. and I’m thinking again.. it would be fine. Any reason I should go and spend money on BLO for this more valuable tool?
4AB9140B-098B-4008-8238-B834F59AB5D4.jpeg
Nice mallet! I still have mine from about a decade past. Still in use everyday at work lol 63971785-DF81-4BA2-A69D-E494BB4623D7.jpeg8E1CCBA0-4B95-4A42-86C0-3B1DFF4DC19B.jpeg
 

Wiz02

Well-known member
Joined
Jul 13, 2007
Messages
2,399
Location
Southeastern PA
I received the 1/2" NPT-thread Ingersoll Rand ARO filter and regulator that I ordered for my new compressor and connected them, using mostly pieces of pipe that I already had on hand. I added a union and a quarter-turn ball valve to make future servicing or relocating of the air lines easier.

I constructed a simple diagonal brace from a threaded rod, a pipe hanger bracket, and a piece of steel angle to secure the filter/gauge assembly and prevent it from turning and loosening up. The new compressor works great. It's a touch quieter than my old compressor, and it can keep up with my small bench-top blasting cabinet (I'm using a relatively small nozzle) which is one of my most air-hungry pneumatic tools. I've started routing the new air line to my retractable hose reel. So far, so good.

compressor-connection.jpg
Very clean installation, but is there a reason why you placed the shut off valve after the filter / regulator instead of immediately after exiting the tank? The reason that I am asking is because I am planning the air pipe plan for my garage.
 

Blue Chips

Well-known member
Joined
Jan 25, 2012
Messages
199
Location
Maine
Very clean installation, but is there a reason why you placed the shut off valve after the filter / regulator instead of immediately after exiting the tank? The reason that I am asking is because I am planning the air pipe plan for my garage.
It's not the optimum location for the valve, and to be honest, the valve was somewhat of an afterthought. Ideally, it would be ahead of the filter and regulator to allow those units to be serviced without draining the air out of the tank. However, it still lets me make any changes or repairs to the plumbing downstream of the regulator without draining the tank, so it's still useful. On the plus side, its location helped me save precious space in my crowded shop by 'wrapping' the plumbing closely around the tank while keeping the filter accessible and the dial of the regulator gauge facing the working area in the shop for easy reading. It's a bit of a compromise, but I'm happy with it. And if I change my mind later, it's easy to take the plumbing apart and reconfigure it, as opposed to something like soldered copper tubing.
 
Last edited:

kaymccampbell

Well-known member
Joined
Feb 27, 2015
Messages
29,625
Location
Upstate New York
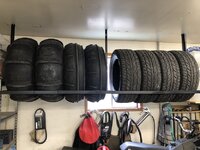
I know a lot of you will cringe, I bought a bed frame at Goodwill for $10 and built this tire rack. I planned it out so I would only have to drill 3 holes. When it came to cutting I used my band saw and pushed it through slowly. I did use some scraps of angled stock I had to make it long enough.
4.jpg
If it works who cares about the cringe. Now if it falls off the ceiling next week, we'll all get a good laugh. Bed frames are a time honored source of cheap angle. I have tons of things made out of it. It's some pretty tough stuff.
 

nadogail

Well-known member
Joined
Jan 23, 2009
Messages
32,054
Location
Coronado, CA
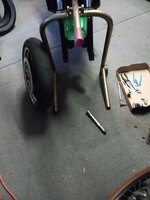
I checked the battery charger for the scooter my neighbor gave me, the light was green indicating the new $50 set of batteries I installed were fully charged.
Drove it enough to be able to say “It’s Alive”.
My next step will be to buy a helmet for a road test.
 

Bob Heine

ALLIANCE MEMBER
Joined
Oct 24, 2009
Messages
10,709
Location
Boca Raton, Florida
I received the 1/2" NPT-thread Ingersoll Rand ARO filter and regulator that I ordered for my new compressor and connected them, using mostly pieces of pipe that I already had on hand. I added a union and a quarter-turn ball valve to make future servicing or relocating of the air lines easier.
@Blue Chips. I like your setup. When I upgraded from an oil-less DeVilbiss Hearing Destroyer to a Harbor Freight 3.5hp 60-gallon model I put the union right on the tank and the regulator before the ball valve. That way I can adjust the pressure before pressurizing the whole system. I connected the plumbing on the compressor to the rigid galvanized on the wall with a relatively cheap 3/4" braided stainless water heater hose. It's a 3/4" FIP (Female Iron Pipe [interchangeable with NPT]) hose that works like a union. I found it at Home Depot but Amazon carries them as well:
Regulatr, Valve and Filter.jpg
After releasing pressure from the tank and loosening two fittings I can take the setup to the bench to work on it. I've replaced the regulator once in the past 12 years.
Regulator Replacement 2.jpg
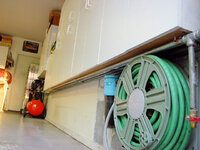
Like you, I have a coarse filter/water separator close to the compressor but in a dozen years I have yet to collect a drop of water in it. By the end of 50 feet of galvanized pipe the air cools and I get heaps of water in the drops. To get the recommended length of pipe I made a zig-zag setup and hung it under some cabinets on the wall. I regret not using copper but it works better than rubber hose.
Air Supply 1.jpg
 

Blue Chips

Well-known member
Joined
Jan 25, 2012
Messages
199
Location
Maine
Like you, I have a coarse filter/water separator close to the compressor but in a dozen years I have yet to collect a drop of water in it. By the end of 50 feet of galvanized pipe the air cools and I get heaps of water in the drops. To get the recommended length of pipe I made a zig-zag setup and hung it under some cabinets on the wall. I regret not using copper but it works better than rubber hose.
Yours looks like a good setup. I'm currently connecting the compressor to my retractable air hose reel via a rubber hose, since I might be reorganizing my shop before long. If I ever decide on a really permanent location within the shop, I'll look at installing metal air pipes sloping down to a couple of water collection points.
 

Swanny1953

ALLIANCE MEMBER
Joined
Jul 28, 2010
Messages
1,082
Location
Lucas, TX
The '19 ZR1 has had a clicking noise when turning at low speed. Several people mentioned it to me at our autocross event on Saturday. I decided to do a Google search and learned there is a TSB from Chevrolet for just that issue. It's supposedly a simple fix involving removing the wheels from the hubs and wiping down the rotor and wheel mating surfaces with brake cleaner. Since these are the carbon ceramic brakes and the rotors are very fragile, I used my lug nut extenders to assist with getting the wheel away from the rotor before removal and to help with re-install. Hopefully, that will remedy the issue - everyone on Corvette Forum who has tried the remedy says it has worked!
 

73fxe

Well-known member
Joined
Jun 11, 2016
Messages
308
Location
SW. Michigan
I fixed My garage door opener , well I just plugged it into a extension cord. It quit working 10 or 12 years ago after a storm with several close lightning strikes. I messed with it but thought the main board was gone. Turns out the hot wire to the plug came loose at the junction. I probably should have checked that first.
 

niget2002

Well-known member
Joined
Oct 2, 2012
Messages
11,260
Location
Josephine, TX
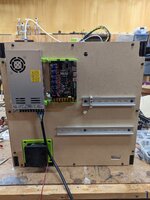
Used the cnc to cut the back panel for the 3d printer. Then disassembled the printer to install said back panel. Now to wire it all back up.

I'm designing some of this as I go, which is what's taking so long. Then when it's all built, I'm going to reprint all the parts out of ASA.

Then I'll get to take it all back apart again, paint all the MDF, and replace all the PLA parts with ASA.

Resizer_16817824516901.jpg
 

Outlawmws

Well-known member
Joined
Aug 9, 2011
Messages
39,332
Location
The Badlands
I know a lot of you will cringe, I bought a bed frame at Goodwill

If it works who cares about the cringe.
I'm with Kate, However I have learned to use my abrasive chop saw for bed frame angle as all too often it has hard spots that will eat a band saw blade instantly. I also try to sue my big hole punches with it.
 

Drill Sergeant Arc

Well-known member
Joined
Jan 7, 2017
Messages
486
Location
Ore-gun
If it works who cares about the cringe. Now if it falls off the ceiling next week, we'll all get a good laugh. Bed frames are a time honored source of cheap angle. I have tons of things made out of it. It's some pretty tough stuff.
Find the “hidden” bed rail in these pics of my Ford 2n tractor.😁

FD08423E-C4AF-4DCD-9809-3330514A562B.jpeg


1431AECF-75A1-4335-AFAB-607D788C24B5.jpeg

2C24FB8D-7B34-4524-8808-DC13F74C06C1.jpeg
 

Bob Heine

ALLIANCE MEMBER
Joined
Oct 24, 2009
Messages
10,709
Location
Boca Raton, Florida
@Bob Heine, I am doing the tradeoff analysis between copper and RapidAir aluminum pipe. At $45 per 10 ft stick of 3/4", copper is looking pretty expensive.
@Wiz02, I did a similar analysis and the RapidAir fitting prices make the copper tubing price less of a concern for me. I was planning to replace these 1/2" galvanized (5 foot pieces) runs with 3/4" copper with tighter U's. I was planning on using the cheaper Type M pipe because it's $10 per stick cheaper. Type M is rated for 700 psi compared to Type L at 1,000 psi. On its best day my compressor puts out 120 psi but adjusting the cutoff could get it to 150 psi.
Air Supply Pre-Cooler 1.jpg
There are no copper airline kits that I'm aware of but here's what a Home Depot/Amazon 90-foot system would look like for me:
  • (9) Pieces 10' copper 3/4" $314.64
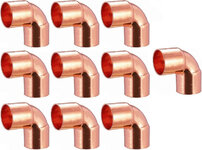
  • (10) 3/4" tight 90° Male-Female copper elbows $18.58
  • (10) 3/4" tight 90 Female-Female copper elbows $19.77
  • (10) 3/4" x 3/4" x 1/2" copper tees $24.44
  • (2) 3/4" copper unions $21.95
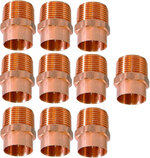
  • (5) 3/4" copper sweat x 1/2" MIP $16.99
  • (10) 3/4" copper sweat x 3/4" MIP $22.88
Total: $439.25
I would still need some straps and miscellaneous stuff but I already have lots of copper accessories, scraps and fittings in my shed.
Copper 3-4 Short 90 Elbow F-M.jpg Copper 3-4 Short 90 F-F Elbows.jpg Copper 3-4 3-4 1-2 Tees.jpg Copper 3-4 Unions.jpg Copper 3-4 sweat 1-2 Thread.jpg Copper 3-4 sweat 3-4 Thread.jpg
The RapidAir system doesn't come with as many fittings but it does have 3 outlets and some tools.
  • F1863 (12) Pieces 7′ 6″ FastPipe
  • F1022-10 (2) 10/PACK Mount Clips (20 total)
  • F1002 (7) Unions
  • F1003 (5) Elbows
  • F1005 (2) Tees
  • F1024 (3) Outlets
  • F1118 (1) 3/4″ Male NPT Adapter
  • F1020 (2) Spanner Wrenches
  • F0142 (1) Deburr Tool
Total: $491.94
RapidAir 90 FT Master Kit.jpg

One RapidAir 90° elbow is $14.73 and an additional tee is $18.49. They supply 3 outlets but each additional outlet is another $40.67. Regardless of price, I can't make my cooler setup work in that narrow space with RapidAir fittings.
 

Cougar67

Well-known member
Joined
Nov 19, 2009
Messages
868
Location
Virginia
"At work…

Today was pretty busy. Lots of general maintenance stuff as the other shops we have got backed up so they sent some our way to help out

...Tomorrow lined up have a 18 Corolla with almost 200,000 on it intermittent no crank no start that I have to diagnose."
What did the no crank no start problem turn out to be?
 
To avoid these ads, REGISTER NOW!

Wiz02

Well-known member
Joined
Jul 13, 2007
Messages
2,399
Location
Southeastern PA
@Wiz02, I did a similar analysis and the RapidAir fitting prices make the copper tubing price less of a concern for me. I was planning to replace these 1/2" galvanized (5 foot pieces) runs with 3/4" copper with tighter U's. I was planning on using the cheaper Type M pipe because it's $10 per stick cheaper. Type M is rated for 700 psi compared to Type L at 1,000 psi. On its best day my compressor puts out 120 psi but adjusting the cutoff could get it to 150 psi.
Air Supply Pre-Cooler 1.jpg
There are no copper airline kits that I'm aware of but here's what a Home Depot/Amazon 90-foot system would look like for me:
  • (9) Pieces 10' copper 3/4" $314.64
  • (10) 3/4" tight 90° Male-Female copper elbows $18.58
  • (10) 3/4" tight 90 Female-Female copper elbows $19.77
  • (10) 3/4" x 3/4" x 1/2" copper tees $24.44
  • (2) 3/4" copper unions $21.95
  • (5) 3/4" copper sweat x 1/2" MIP $16.99
  • (10) 3/4" copper sweat x 3/4" MIP $22.88
Total: $439.25
I would still need some straps and miscellaneous stuff but I already have lots of copper accessories, scraps and fittings in my shed.
Copper 3-4 Short 90 Elbow F-M.jpg Copper 3-4 Short 90 F-F Elbows.jpg Copper 3-4 3-4 1-2 Tees.jpg Copper 3-4 Unions.jpg Copper 3-4 sweat 1-2 Thread.jpg Copper 3-4 sweat 3-4 Thread.jpg
The RapidAir system doesn't come with as many fittings but it does have 3 outlets and some tools.
  • F1863 (12) Pieces 7′ 6″ FastPipe
  • F1022-10 (2) 10/PACK Mount Clips (20 total)
  • F1002 (7) Unions
  • F1003 (5) Elbows
  • F1005 (2) Tees
  • F1024 (3) Outlets
  • F1118 (1) 3/4″ Male NPT Adapter
  • F1020 (2) Spanner Wrenches
  • F0142 (1) Deburr Tool
Total: $491.94
RapidAir 90 FT Master Kit.jpg

One RapidAir 90° elbow is $14.73 and an additional tee is $18.49. They supply 3 outlets but each additional outlet is another $40.67. Regardless of price, I can't make my cooler setup work in that narrow space with RapidAir fittings.
Wow, that is almost the same material list that I have, but I was using type L instead of M copper. I am trying RapidAir's designer now to see if a custom solution will be less expensive.
 

ZRX61

Well-known member
Joined
Aug 15, 2006
Messages
28,716
Location
Solar Blight Valley, SoCal
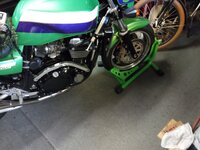
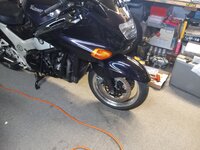
After MONTHS of procrastination I really need to get front tire swapped out on the ZRX11 & both tires on the ZX11, so I will be sorting the ZRX today.
Need to get this done so I can put the ZX11 up on stands & get those tires sorted before my hand/wrist surgery on May 3rd. Also need to pull the lower fairings & clutch cover off the ZX11 to do the starter/alt chain tensioner mod/upgrade
 

zmotorsports

ALLIANCE MEMBER
Joined
Oct 20, 2009
Messages
21,477
Location
Northern Utah
@Wiz02, I did a similar analysis and the RapidAir fitting prices make the copper tubing price less of a concern for me. I was planning to replace these 1/2" galvanized (5 foot pieces) runs with 3/4" copper with tighter U's. I was planning on using the cheaper Type M pipe because it's $10 per stick cheaper. Type M is rated for 700 psi compared to Type L at 1,000 psi. On its best day my compressor puts out 120 psi but adjusting the cutoff could get it to 150 psi.
Air Supply Pre-Cooler 1.jpg
There are no copper airline kits that I'm aware of but here's what a Home Depot/Amazon 90-foot system would look like for me:
  • (9) Pieces 10' copper 3/4" $314.64
  • (10) 3/4" tight 90° Male-Female copper elbows $18.58
  • (10) 3/4" tight 90 Female-Female copper elbows $19.77
  • (10) 3/4" x 3/4" x 1/2" copper tees $24.44
  • (2) 3/4" copper unions $21.95
  • (5) 3/4" copper sweat x 1/2" MIP $16.99
  • (10) 3/4" copper sweat x 3/4" MIP $22.88
Total: $439.25
I would still need some straps and miscellaneous stuff but I already have lots of copper accessories, scraps and fittings in my shed.
Copper 3-4 Short 90 Elbow F-M.jpg Copper 3-4 Short 90 F-F Elbows.jpg Copper 3-4 3-4 1-2 Tees.jpg Copper 3-4 Unions.jpg Copper 3-4 sweat 1-2 Thread.jpg Copper 3-4 sweat 3-4 Thread.jpg
The RapidAir system doesn't come with as many fittings but it does have 3 outlets and some tools.
  • F1863 (12) Pieces 7′ 6″ FastPipe
  • F1022-10 (2) 10/PACK Mount Clips (20 total)
  • F1002 (7) Unions
  • F1003 (5) Elbows
  • F1005 (2) Tees
  • F1024 (3) Outlets
  • F1118 (1) 3/4″ Male NPT Adapter
  • F1020 (2) Spanner Wrenches
  • F0142 (1) Deburr Tool
Total: $491.94
RapidAir 90 FT Master Kit.jpg

One RapidAir 90° elbow is $14.73 and an additional tee is $18.49. They supply 3 outlets but each additional outlet is another $40.67. Regardless of price, I can't make my cooler setup work in that narrow space with RapidAir fittings.

I ran the numbers as well back in 2017 when my new shop was nearly finished and the copper was looking more expensive as well. I chose the Aircom system which is nearly identical to the RapidAir system. I used three complete systems and ran much more air in my shop than I originally planned but now that I have so many air drops with dual outlet manifolds I am so glad I went that route vs. copper or black pipe.
 

DrinkMan

Well-known member
Joined
Sep 13, 2020
Messages
1,253
Location
Georgia, USA
After a couple of months troubleshooting a weird vibration noise in the shifter of our '72 BMW above 3500 rpm, decided to finally cure it. We have been piecemeal making adjustment and fixes based on BMW forum but figured that no more messing about. Pulled driveshaft and exhaust, removed the entire shifter mounting system and replaced all isolators, bushings, etc... Reinstalled, put driveshaft & exhaust back in. Next steps now that we fixed everything accessible from under the car, going to reinstall shift lever and give it a test drive this evening.

Edit - test drive complete. Vibration noise gone.
 
Last edited:

RaisedByWolves

Well-known member
Joined
Feb 4, 2023
Messages
3,629
Location
SE PA.
The “vintage shop stain” look is perfect for tools that get used.
Some peoples shops and tools are so clean I sometimes wonder if they ever do any work or get anything done.

Ive been in cleanup mode lately and still have a long way to go. I have a full machine shop plus a welder, oxy/acet setup, 4 benches, two filing cabinets and shelving in a two car garage so space is limited.

Some of my shelving was filthy due to leaked oil so I cleaned and organized that and in the process consolidated some shelve stuff enough to make room to get my poles and tackle boxes off of the floor.

I must have 30 cans of spray paint on one shelf, and I have no idea why I collected 4 boat motors so I need fix those and turn them back into cash.
 

Magnum440d100

Well-known member
Joined
Dec 2, 2018
Messages
3,581
Location
Indiana
Added a new toy to the shop.

Man. Long story. So hold tight. It’s a doozy.


I had the hands on telehandler and boom lift test/certification. Passed.

Then went to a jobsite. Started working, and the guys painting the hollow metal frames were using bondo to smooth the transitions (double/long frames). In an enclosed room/no airflow. Between the bondo smell and paint, that gave me a hell of a migraine. Fresh air didn’t clear it up. So I texted then talked to the boss. Told him I’m heading home. Not feeling well.

I stop for Taco Bell before heading home, because at this point, I’m planning on going home, dark room, silence.

I’m rushing home, and spaced that that part of the highway goes from 55-30. Like NOW. Yup. Trooper gets me.

I pull onto a side street in a parking lot with enough room for him to pull in as well. No reason to stop on the highway.

As he’s walking up,

“I was goin a bit fast there”

“Yup, that’s why I pulled you over. License, registration, insurance?”

“Uh, it’s in my glove box, but I have to get out and open it from over there, because if I open it from here, the dash is going to fall apart”

“That’s ok. License then? Is the truck registered to you?”

“Yessir”

Hand him my license.

He comes back, and after some small bullshitting, I’m let go with a warning. PHWEW!!!

I get home, use the restroom, and still am not feeling the greatest. I won’t go into detail, but both ends. I’ll leave it at that. But after that, the pounding in my head lessens.

Seein as how it was still early enough to catch the local small engine repair/sales place open, I head that way. It’s only about 10 minutes up the road, if that.

I need to go, as the starter on the Ariens isn’t cranking the engine over one complete rotation. Yes the valves were adjusted.

I get to the place and he is looking up a starter, and reiterates valve adjustment.

I liked how he didn’t push a starter on me, and basically said to re readjust the valves.

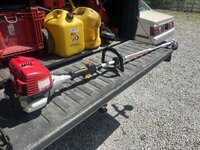
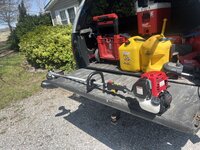
I’ve been eyeballing these Honda 4 stroke whipper snippers for a minute. So I finally just bit the bullet and got one.

And now I’m typing this, going “ow my head ow my head” because I went and did the right thing, and immediately went to town on my yard. With a headache. Yup. I R SMART
 

Attachments

  • 81663FF4-86F8-4C72-8E82-AC265EB440F3.jpeg
    81663FF4-86F8-4C72-8E82-AC265EB440F3.jpeg
    1.3 MB · Views: 31
  • 9529D822-44A1-4834-9CF8-8CFDB0AF3FFC.jpeg
    9529D822-44A1-4834-9CF8-8CFDB0AF3FFC.jpeg
    1.2 MB · Views: 30

ZRX61

Well-known member
Joined
Aug 15, 2006
Messages
28,716
Location
Solar Blight Valley, SoCal
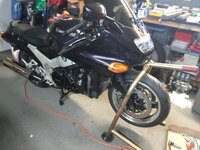
Fender back on & bike off the stand. What a ******** PITA that fender is..

ZRX11: 4 easily accessible M6 Allens, no need to pull the fender to get the wheel off.

ZX11: 4 screws that are accessible & 4 bolts that are damn near impossible to even touch with a finger tip, have to pull the fender to get the wheel out. FFS

IMG_20230418_180514863.jpg
 
Last edited:

Wiz02

Well-known member
Joined
Jul 13, 2007
Messages
2,399
Location
Southeastern PA
Added a new toy to the shop.

Man. Long story. So hold tight. It’s a doozy.


I had the hands on telehandler and boom lift test/certification. Passed.

Then went to a jobsite. Started working, and the guys painting the hollow metal frames were using bondo to smooth the transitions (double/long frames). In an enclosed room/no airflow. Between the bondo smell and paint, that gave me a hell of a migraine. Fresh air didn’t clear it up. So I texted then talked to the boss. Told him I’m heading home. Not feeling well.

I stop for Taco Bell before heading home, because at this point, I’m planning on going home, dark room, silence.

I’m rushing home, and spaced that that part of the highway goes from 55-30. Like NOW. Yup. Trooper gets me.

I pull onto a side street in a parking lot with enough room for him to pull in as well. No reason to stop on the highway.

As he’s walking up,

“I was goin a bit fast there”

“Yup, that’s why I pulled you over. License, registration, insurance?”

“Uh, it’s in my glove box, but I have to get out and open it from over there, because if I open it from here, the dash is going to fall apart”

“That’s ok. License then? Is the truck registered to you?”

“Yessir”

Hand him my license.

He comes back, and after some small bullshitting, I’m let go with a warning. PHWEW!!!

I get home, use the restroom, and still am not feeling the greatest. I won’t go into detail, but both ends. I’ll leave it at that. But after that, the pounding in my head lessens.

Seein as how it was still early enough to catch the local small engine repair/sales place open, I head that way. It’s only about 10 minutes up the road, if that.

I need to go, as the starter on the Ariens isn’t cranking the engine over one complete rotation. Yes the valves were adjusted.

I get to the place and he is looking up a starter, and reiterates valve adjustment.

I liked how he didn’t push a starter on me, and basically said to re readjust the valves.

I’ve been eyeballing these Honda 4 stroke whipper snippers for a minute. So I finally just bit the bullet and got one.

And now I’m typing this, going “ow my head ow my head” because I went and did the right thing, and immediately went to town on my yard. With a headache. Yup. I R SMART

IMHO, Taco Bell is a questionable choice at any time, but you had to know the "outcome", if you go in feeling unwell.
 

PassnThru

Well-known member
Joined
Jan 5, 2010
Messages
6,512
Location
Bowling Green KY
I get home, use the restroom, and still am not feeling the greatest. I won’t go into detail, but both ends. I’ll leave it at that.

Seein as how it was still early enough to catch the local small engine repair/sales place open, I head that way. It’s only about 10 minutes up the road, if that.
I can tell you are much younger than me - after working both ends I'm not leaving the house.
But I vaguely remember that I would have in the very distant past.
 

ezriderga

Well-known member
Joined
Apr 1, 2009
Messages
1,741
Location
NW GA
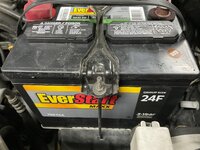
I replaced the battery in my ‘08 Tacoma base truck with the same brand. This battery I took out of my truck had a 5. year warranty which expired 2 months ago the replacement only has a 3 year warranty but for $119.99 I’m ok with that. BTW, these batteries come from Walmart. IMG_1232.pngIMG_1231.jpeg
 

DGersic

Well-known member
Joined
Mar 12, 2017
Messages
6,383
Location
DeKalb, IL
This was actually from yesterday. While the brisket was cooking, I made a zipper bag to store the HF garage door screen when not in use. Today, I stuffed the screen in it, and stored it.

55AACCC4-1471-40FD-A8E9-D75C96F3DC42.jpeg

Today, started putting my car back together.

3C7C65B4-3C48-4520-9569-5110225B3E62.jpeg

Connector parts, arrived from Mouser yesterday.

182B3149-3CA3-48FE-8EC2-67ADB5C28F20.jpeg

Added connectors to the wiring harness on the car.

5314E47D-9170-4604-BDB1-E3EE799669E7.jpeg

Added mating connectors to the headlight wiring harness on the grill shell. When I wired the car, I ran these wires in, and there was no provision for removing them. So to remove the grill shell, I had to cut them. I decided connectors would be good, in case I ever need to take the shell off again.

20B3A690-FCB5-4195-B8B6-EA298245FC19.jpeg

Got the shell back on the frame. The bottom bolts that hold it are in, and finger tight. Now the rest of the pieces can be bolted back in place. I’m hoping to get that all done tomorrow.
 

Drill Sergeant Arc

Well-known member
Joined
Jan 7, 2017
Messages
486
Location
Ore-gun
Added a new toy to the shop.
Seein as how it was still early enough I’ve been eyeballing these Honda 4 stroke whipper snippers for a minute. So I finally just bit the bullet and got one.
I bought the same model 5 years ago and it’s a great little machine. Always starts right up and goes to it. I’ve been using up a package of trim string I bought probably 25 YA and finally needed to purchase some new stuff. I’ve tried that multi sided string this year and I think it’s not letting the auto feed work smoothly. It pulls itself out so hard it cinches up on itself in the drum because of the multiple edges on the string hang up on themselves. I’m going to try a smooth round string and see if that fixes the problem before I continue to fight my way through this whole package of the new stuff. I also realized after a few weeks of getting the trimmer you don’t need to use very much throttle on most of the trimming your doing. Enjoy your new toy!
 

kaymccampbell

Well-known member
Joined
Feb 27, 2015
Messages
29,625
Location
Upstate New York
I bought the same model 5 years ago and it’s a great little machine. Always starts right up and goes to it. I’ve been using up a package of trim string I bought probably 25 YA and finally needed to purchase some new stuff. I’ve tried that multi sided string this year and I think it’s not letting the auto feed work smoothly. It pulls itself out so hard it cinches up on itself in the drum because of the multiple edges on the string hang up on themselves. I’m going to try a smooth round string and see if that fixes the problem before I continue to fight my way through this whole package of the new stuff. I also realized after a few weeks of getting the trimmer you don’t need to use very much throttle on most of the trimming your doing. Enjoy your new toy!
Echo Speed Feed 400 head and Echo string will make your life better. I was so happy when they started making the adaptable speed feed for other brands.
 
To avoid these ads, REGISTER NOW!
Top Bottom