To avoid these ads, REGISTER NOW!

What did you do "IN" your garage today?

landrover bodger

Well-known member
Joined
Sep 25, 2014
Messages
1,810
Location
norfolk england
E4A469F0-A816-4E4E-9076-843CFD5C26C0.jpeg

Something has been trying to dig its way under my shed. I stuck my inspection camera under, didn’t find anything. So I dug a trench around it, added hardware cloth, and filled it in. Whatever it is, it isn’t going to dig under there now.
as you backfill the trench put plenty of broken glass in it. that stops most things digging.
 
To avoid these ads, REGISTER NOW!

Snip's

Well-known member
Joined
Apr 29, 2017
Messages
1,866
Location
Ohio
OK... I'm taking some small liberty with this thread...

"What did you do "IN" your garage today?"

I went out and started up the MINI and backed it out of the garage....

Grabbed my sweetheart and took a back road, two hour trip, out in the country, for an ice cream sundae.....
Tom's Ice Cream Bowl served up their first scoop in 1948... Small town USA...
The weather was great, and the traffic was virtually non-existent...
Time spent with my wife on this small adventure... priceless...
Left with a pound of warm salted cashews for the drive home....
IMG_2562.jpg

Tom's Ice Cream Bowl
 

welder4956

Well-known member
Joined
Apr 8, 2010
Messages
3,084
Location
Birmingham, AL USA
Made a headrest for working underneath the car. I have some more welding and cleaning to do and it strains my neck to do it laying on the concrete. I made it from 2 pieces of 2 x 6 that were 16" long stacked on each other with 2" of foam padding and covered it with the green cloth used for welding jackets. Hopefully I won't fall asleep under there.

20230425_150104.jpg
 

M6erfan

Well-known member
Joined
Dec 6, 2014
Messages
10,170
Location
'Merica!
R&R'd the evap control valve in our E46, and changed the oil/filter. Then helped my friend change the brushes in his Makita table saw that he brought over.
 

larry4406

Well-known member
Joined
Jan 27, 2006
Messages
19,565
Location
Northern Virginia
Replaced the upright freezer that died. Was a hand-me down from the in-laws which we think dates from late 80’s-90’s so it had a good run. Bought a Whirlpool unit from Lowe’s.

Last week was $600 for new Zoeller sewage ejector pump. This week $900 for freezer. What next so I can support the economy?😬😔
 

Old Man Roger

Well-known member
Joined
Apr 6, 2017
Messages
17,836
Location
Palm Coast Florida
Ah man, you gotta make it work. Can you possibly lower the seat, or widen the whole thing to make it more stable?

Do you have any pictures? Or a make and model so we can google an image?

If I remember correctly, you were making a two wheel scooter into a three wheeler. Having a narrow three wheeler would be way less stable than a 2 wheeler, because the natural instinct to lean while turning on a 2 wheeler keeps you from highsiding. A narrow 3 wheeler will highside super easy.

Now if you had an articulating front axle, so you could lean into corners without having to lift the inside wheel, that would be more stable than a 2 wheeler.

.0FD2E792-F640-4FC4-95A8-B1D0345A348D.jpeg

Like this, but your axle is in front.
 
Last edited:

RaisedByWolves

Well-known member
Joined
Feb 4, 2023
Messages
3,629
Location
SE PA.
I learned a new appreciation for one shot lube systems on modern milling machines.

My mill has oil zerks. Picture a grease zerk but shorter and a oil gun that looks like a grease gun with no pump handle.

You put the gun fitting on the zerk and shove the whole thing forward and it’s supposed to shoot oil in the necessary spot.

And it does shoot it there, and over there and on your shoe. Probably 50% of the oil went where intended, the rest was on my hands, clothes and running down different parts of the machine.
 
Last edited:
To avoid these ads, REGISTER NOW!

EarlyBroncoGuy

King Of The World
Joined
Aug 15, 2013
Messages
931
I made one once using a 37 Plymouth hubcap, and that’s the only part I can remember what the source was. It was way back around 1980. Yours looks much more realistic and professionally done. Good job!
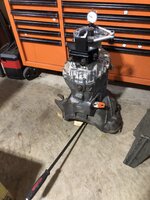
Bottom of saucer section is an air cleaner base, flipped over. Engineering hull is an A/C compressor from a Taurus SHO, gutted. Nacelles are shock absorbers with the ends cut off and fluid drained. Bridge on top is a finish nut from hanging light fixture. Deflector dish is a shock absorber mounting nut, bolted to (of all things) the top to an orange juice bottle - which happened to fit over the compressor clutch hub perfectly.

IMG_3112.jpgIMG_3114.jpg
 
Last edited:

thr3squared

Well-known member
Joined
Oct 4, 2018
Messages
391
Location
CA
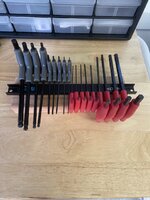
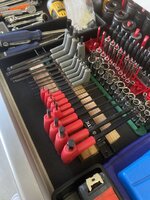
I never had a good place to keep my T-handle hex wrench set (HF), and it always got moved around the top of my tool box, work bench, or wherever.

I had a spare magnetic bar from Capri so I’m tossing around some ideas…

It’s just sitting on a piece of 2x4 for now, but id need to rip the width from 1.5” to 1.25” so I can comfortably close the drawer.

Hopefully I’ll have some time this weekend to cut a real piece, screw down the bar, and paint the block.

IMG_1328.jpeg


IMG_1329.jpeg

IMG_1331.jpeg
 

dwasifar

Well-known member
Joined
May 28, 2017
Messages
2,101
I made this little thumb saver retaining clip for a Ruger Mark II .22 magazine:

1682644482514.png

The hole hooks onto the slider, and I just pull it down and hook it onto the **** of the mag to hold the follower down while I load:

1682644585117.png

It's a lot easier on the arthritis than holding that slider down with my thumb was. Took literally five minutes to make. This one's made from a scrap of treated pine, more or less as a proof of concept; I'll make a tougher one out of jatoba once I'm sure I'm happy with the design.
 

GreenIron

Well-known member
Joined
Sep 26, 2021
Messages
2,092
Location
A bit north of the GOA
I never had a good place to keep my T-handle hex wrench set (HF), and it always got moved around the top of my tool box, work bench, or wherever.

I had a spare magnetic bar from Capri so I’m tossing around some ideas…

It’s just sitting on a piece of 2x4 for now, but id need to rip the width from 1.5” to 1.25” so I can comfortably close the drawer.

Hopefully I’ll have some time this weekend to cut a real piece, screw down the bar, and paint the block.

IMG_1328.jpeg


IMG_1329.jpeg

IMG_1331.jpeg
I'll steal that idea. (y)
 

GreenIron

Well-known member
Joined
Sep 26, 2021
Messages
2,092
Location
A bit north of the GOA
Placed the stall mats in a useful location.
IMG_5264.jpg


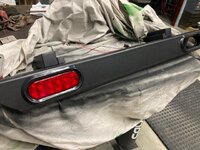
Did more work on the Kawasaki Mule rear bumper.

Sanded and primed.
IMG_5255.jpg

Install plastic caps on the mounting tube openings.
IMG_5256.jpg

A light scuffing, then two coats of Textured Black paint.
After a ~2-hour dry time, I installed the grommets and one light.
IMG_5266.jpg


Had to quit at Beer:30. DrickSip.gif
 

Bob Heine

ALLIANCE MEMBER
Joined
Oct 24, 2009
Messages
10,708
Location
Boca Raton, Florida
Bled with new fluid. Test drive tomorrow.
@DGersic, that's a really nice setup. I notice you are going from a disk/drum master to a disk/disk master. I don't see a proportioning valve in the photos but that might be something to consider. If it's a C3 Corvette power brake master cylinder, it's a 1-1/8" bore and the volume of brake fluid pushed to the rear drums may lock them up before the front disks fully engage. If your drum brake cylinders don't have springs inside to keep a little tension on them, they may also weep fluid if the car isn't driven frequently.

I'm probably telling grandma how to **** eggs but thought it was worth mentioning. It won't matter much if you don't take your baby out in the rain or drive it hard and it could be a cool feature if you like doing bootleg turns.
 

DGersic

Well-known member
Joined
Mar 12, 2017
Messages
6,379
Location
DeKalb, IL
@DGersic, that's a really nice setup. I notice you are going from a disk/drum master to a disk/disk master. I don't see a proportioning valve in the photos but that might be something to consider. If it's a C3 Corvette power brake master cylinder, it's a 1-1/8" bore and the volume of brake fluid pushed to the rear drums may lock them up before the front disks fully engage. If your drum brake cylinders don't have springs inside to keep a little tension on them, they may also weep fluid if the car isn't driven frequently.

I'm probably telling grandma how to **** eggs but thought it was worth mentioning. It won't matter much if you don't take your baby out in the rain or drive it hard and it could be a cool feature if you like doing bootleg turns.

Thanks. It’s complicated. But this is a disc/drum master, as was the one I removed.

The system is a bodge up of parts. Front discs are 70 Chevelle. Rear drums are 78 Malibu. There is a GM brass proportioning valve, mounted on the frame out of sight.

When I got the car, the brakes kinda worked, but with a very low pedal and not very well. No documentation as to what came from where, so I’ve been replacing parts and improving things. Also documenting, so now I know what came from where. Both calipers, both cylinders, all hard and rubber lines, pads, shoes, drums are new. Discs have been turned.

Last year, I took the master and booster off. I can’t identify what came off, but I never could get it to bleed with a hard pedal. I found the pushrod between booster and master was some kind of adjustable thing that had been hacked up to make it fit. In doing so, it flexed all over the place. From pedal (unknown junkyard sourced GM pedal assembly) to booster, there was a tab welded on the pedal arm and some single shear eye bolt looking thing used.

I removed the tab, and tossed the master and booster.

I installed a 66 Impala booster, without the mounting brackets that deal with the angled firewall in the original car. My firewall is vertical. I hooked this with the proper adjustable clevis to the hole in the pedal arm where it belongs. I then put a 70 Chevelle disc/drum master (1 1/8” bore) on and bled it to a hard pedal.

This worked, too well. I have (had) very little pedal travel, like less than 1” from none to all the way hard.

The new master is a 67 Chevelle, disc/drum, 1” bore. I‘m hoping to gain a little bit more pedal travel for better braking feel and reasonable control. I should get slightly longer stroke, and higher line pressure with less pedal effort.
 
To avoid these ads, REGISTER NOW!
Top Bottom