To avoid these ads, REGISTER NOW!

What did you do "IN" your garage today?

To avoid these ads, REGISTER NOW!

VSICCA

Active member
Joined
May 16, 2023
Messages
27
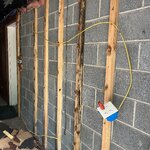
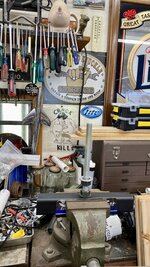
Started demoing the previous owners 60+ years worth of garage reno projects, put together a king platform bed frame and played ball with our GSD.

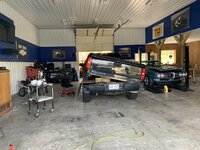
Turning our one car garage into a two car workshop by removing the load bearing center wall (will need structural work to do) while keeping / upgrading the one car garage door on the front of the house.

Plan to eventually add a 2 car attached carport off the end of the house then another one car garage door on the backside of the house opposite the front garage door to make it a pass through for enjoying cross breezes and the view as I’m working on projects - aka watching college football and drinking beer. Lol. Go Vols!
 

Attachments

  • IMG_1468.jpeg
    IMG_1468.jpeg
    704.9 KB · Views: 36
  • IMG_1466.jpeg
    IMG_1466.jpeg
    1.8 MB · Views: 35
  • IMG_1322.jpeg
    IMG_1322.jpeg
    1.3 MB · Views: 37
Last edited:

ecotec

Well-known member
Joined
Oct 5, 2010
Messages
5,471
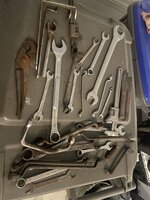
I pulled out the rest of the dirty socket strips out of my metric drawer and got them about 95% clean.

When I first got them, I was so busy that I just put them in the drawer and put sockets on them. That was years ago.

I pulled a bunch of them out and rearranged the drawer a few days ago… and did not clean them… and I had been regretting it.

I got them in and out without breaking any of them.

They still look dirty… they are 30 years old… but they look better.
 

XJSuperman

Well-known member
Joined
Jan 26, 2018
Messages
3,088
Location
Central Iowa
Outside the garage actually since it was so nice out last night:
-I topped off the gas in the truck.
-Then changed the oil in the truck.
-Swapped the CB out for a hopefully nicer unit and a mount that should work better on the center hump.
-Painted half the trailer deck with oil for preservation and weathering.
-Had a couple cold barley pops.
 

dwasifar

Well-known member
Joined
May 28, 2017
Messages
2,101
Cut a replacement piece for a bit of door trim that had started to rot:

photo_2023-05-17_12-05-48.jpg

The finished patch is not as invisible as I'd hoped, but certainly good enough for now:

1684343319025.png

I might level that a little with a sander next time I'm painting.
 

Ben Buck

Well-known member
Joined
Dec 30, 2010
Messages
7,302
Location
S. W. Ohio
In the process of making a small tire change thing ?

I seen some of these on the TUBES .

Have the tire out on the asphalt heatin up- it was shipped this way !!

Grausious!!

But, perseverance and BEER will win 🍻

There’s another tire out in the wild for delivery somewhere?
img_2074-jpeg.1883636


IMG_2073.jpeg
 

Attachments

  • IMG_2074.jpeg
    IMG_2074.jpeg
    771.5 KB · Views: 336
  • IMG_2075.jpeg
    IMG_2075.jpeg
    798.5 KB · Views: 10

catongw

Well-known member
Joined
Feb 19, 2023
Messages
58
3D printed the holder for my 12 point 1/2" SAE sockets with red PLA and let the glue dry overnight. It is a pretty tight fit, but I think that finishes off that drawer. Many more drawers to go, but it feels good to have that one done.


Lee
Excellent !
 

73project

Well-known member
Joined
Jan 16, 2014
Messages
82
IMG_7132.jpeg
Fuel pump today on my 17 Chevy with 45,000. No big surprise here.
45k isn't a lot of miles for a fuel pump! Im guessing its an in-tank pump? Are you regularly running your tank down to the bottom? One of my buddies was always running his Chevy truck down with the fuel light on and was burning up pumps. His mechanic said to keep the tank filled up at least 1/2 way because that cools off the pump while it's running. He didn't replace another one for the life of that truck, which was another 125k before he sold it.
 

RivennHewn

Well-known member
Joined
Jun 4, 2011
Messages
10,385
Location
PNW
Sat in a chair and watched the boys install a new Bosch heat pump/air handler w/AC.

Sparky added a couple new circuits to feed them.

Tomorrow the tech comes to land the control wires and fire it off.
 

Attachments

  • IMG_6405.jpeg
    IMG_6405.jpeg
    798.9 KB · Views: 39
  • IMG_6406.jpeg
    IMG_6406.jpeg
    1 MB · Views: 38

nadogail

Well-known member
Joined
Jan 23, 2009
Messages
32,049
Location
Coronado, CA
I moved seven 12 volt batteries from my workshop into my van to take to an Auto Parts store to exchange for gift cards. They were various sizes.

Three were left behind by a former tenant and four were from from an Alarm panel and from kids toys.
 
To avoid these ads, REGISTER NOW!

rohartman

Well-known member
Joined
Dec 28, 2012
Messages
968
Location
Ohio
Oil change.

I wouldn’t normally post what some will consider a simple task but this is a little different and I thought someone might find it interesting, or offer a suggestion to me on how to do it better/easier.

First off, this is a dry sump system with a remote filter. Not the “dret” system on a stock LS7.

First step remove the filter, then remove the drain plug in the (2-1/2 gal) tank. This drains a lot of the oil but not what’s in the bottom of the “pan”. The belt driven pump mounts to the pan and pumps the oil from the pan to the tank AND from the bottom of the tank, through the filter then into the engine. So after the oil that was in the tank has drained, I remove the belt & spin the pump by hand to pump oil from the pan into the tank and out the drain in the bottom of the tank. Replace plug & belt, install new filter then refill with 9 qts of oil. I took some pics to help explain it

This is the pan & pump when I installed it several years ago
3DEF792C-D903-49D8-901F-C87EBDCE4CB2.jpeg
From today
DB03AAA4-F012-4A47-8EC4-75A76E6627C1.jpeg
I had Dailey Engineering make a system like that for my Ford 2L, they do awesome work. I picked up 2hp with it, I know that doesn't sound like much but it's huge in our S2 class. I found Dailey at the PRI show one year. I change my oil pretty much the same way you do but my pump is easier to get to so I use a separate belt and my drill to drive the pump. It pumps it out in no time. What kind of car do you have and do you race it?
 

housewolf

Well-known member
Joined
Feb 3, 2021
Messages
1,144
Location
East Texas
I had Dailey Engineering make a system like that for my Ford 2L, they do awesome work. I picked up 2hp with it, I know that doesn't sound like much but it's huge in our S2 class. I found Dailey at the PRI show one year. I change my oil pretty much the same way you do but my pump is easier to get to so I use a separate belt and my drill to drive the pump. It pumps it out in no time. What kind of car do you have and do you race it?
It’s a late model GTO with a 454” LS2(bottom)/7(top), I drag race it but it is registered and (somewhat) street legal. It launches pretty hard and with the OEM oil pan has the sump in front my oil pressure was dropping to below 20 psi. I figured the engine wasn’t long for the living like that. I looked into dams & baffles in the oil pan, different dry sumps including the LS7 semi dry. Once I talked to Bill Daily I was sold. It wasn’t the least expensive route but everything went together exactly like he said and it’s performed exactly as he said it would. It may have been overkill but it is the 100% ultimate solution to the problems I was having.

I’ve thought about using a drill and an extra belt but my hands are pretty full holding up a “gutter” under the tank. It really only takes a few minutes spinning it by hand to get all the oil.
1656BA22-A2A7-4F8F-8D93-8B0464F4F151.jpeg
 

Magnum440d100

Well-known member
Joined
Dec 2, 2018
Messages
3,581
Location
Indiana
Did a quick and dirty weld job on the mulching deck to reattach the back mount. Robbed a baffle off the red craftsman deck. Installed the new mulching blades IMG_1477.jpegThen mowed the yard IMG_1500.jpeg
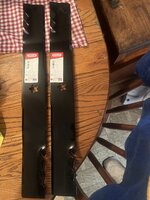
I was going to paint the mulching deck, but after looking under the deck I JUST rebuilt…IMG_1495.jpeg

Paint is gone Lmao. So until I can get something tougher, I’m just gonna run it bare. That, AND I’d want to paint it right, and to do so would mean removal of the mandrels. Those are still “ok” and to remove the bolts, means they will absolutely snap. So. It works. I ain’t touching it.


I usually balance my blades on a nail. It’s how I was taught. But I decided to get this balancer for S&G’s. This is an old blade I sharpened last season. It this season yet. I’d say it’s fairly balanced still. IMG_1501.jpeg
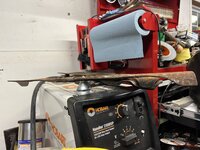

That’s it for today. Tomorrow I’m going to head back to work I think I hope. Leg still hurts but I HAVE to go to work. Otherwise I can’t afford a $1000 emergency 😜
 

kaymccampbell

Well-known member
Joined
Feb 27, 2015
Messages
29,622
Location
Upstate New York
Did a quick and dirty weld job on the mulching deck to reattach the back mount. Robbed a baffle off the red craftsman deck. Installed the new mulching blades IMG_1477.jpegThen mowed the yard IMG_1500.jpeg

I was going to paint the mulching deck, but after looking under the deck I JUST rebuilt…IMG_1495.jpeg

Paint is gone Lmao. So until I can get something tougher, I’m just gonna run it bare. That, AND I’d want to paint it right, and to do so would mean removal of the mandrels. Those are still “ok” and to remove the bolts, means they will absolutely snap. So. It works. I ain’t touching it.


I usually balance my blades on a nail. It’s how I was taught. But I decided to get this balancer for S&G’s. This is an old blade I sharpened last season. It this season yet. I’d say it’s fairly balanced still. IMG_1501.jpeg


That’s it for today. Tomorrow I’m going to head back to work I think I hope. Leg still hurts but I HAVE to go to work. Otherwise I can’t afford a $1000 emergency 😜
I've got the same balancer. It's gotta be 50 years old. It makes an amazing difference having balanced blades.
 

Magnum440d100

Well-known member
Joined
Dec 2, 2018
Messages
3,581
Location
Indiana
I've got the same balancer. It's gotta be 50 years old. It makes an amazing difference having balanced blades.
I’m hopin!


I mean, I’m doin fine using the nail method. But if I can get closer to better balanced, I’ll use this balancer. So simple yet so effective lol
 

rharman

Well-known member
Joined
Apr 22, 2012
Messages
8,905
Location
SoCal
I moved seven 12 volt batteries from my workshop into my van to take to an Auto Parts store to exchange for gift cards. They were various sizes.

Three were left behind by a former tenant and four were from from an Alarm panel and from kids toys.
Who is buying battery cores as opposed to just refunding the core charge you already paid them?
I have one that I'd gladly take a couple of bucks for.
 

glider

Well-known member
Joined
Mar 31, 2007
Messages
2,427
Location
Flint Michigan
45k isn't a lot of miles for a fuel pump! Im guessing its an in-tank pump? Are you regularly running your tank down to the bottom? One of my buddies was always running his Chevy truck down with the fuel light on and was burning up pumps. His mechanic said to keep the tank filled up at least 1/2 way because that cools off the pump while it's running. He didn't replace another one for the life of that truck, which was another 125k before he sold it.
I am that guy, always putting $20 in the tank. The truck does sit a lot also. I will try keeping more gas in it.
 

Snip

Well-known member
Joined
Jan 9, 2011
Messages
446
Location
Crossville, Tennessee
Not today but yesterday, I watched the Electrical inspector place a nice "final" sticker on my panel in the shop. 225a panel feeding 3 subs ( 1 out in the barn), 7-220 circuits, 60+ outlets , ceiling fans and ceiling lights. Main panel and 1st outlet and switched light were done by a contractor, rest was on me. Passed on the first try. Not too shabby for a retired wastewater plant mechanic, lol. Pretty happy.
 

rd65

Well-known member
Joined
Sep 29, 2017
Messages
2,837
Location
Granite Falls, WA
Sat in a chair and watched the boys install a new Bosch heat pump/air handler w/AC.

Sparky added a couple new circuits to feed them.

Tomorrow the tech comes to land the control wires and fire it off.
If you dont mind me asking, what does something like that set you back. Wife is really wanting to add a/c to the house and since the gas furnace is original (2010) we will be updating that as well. I am thinking a new panel will be required since the current one is completely full, including lots of peanut breakers.
 

rd65

Well-known member
Joined
Sep 29, 2017
Messages
2,837
Location
Granite Falls, WA
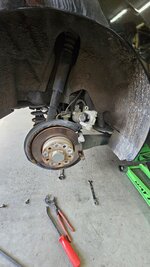
Last minute rear brake pad replacement on my daughter's 2016 Jetta. How fun. I have only done disc brakes, on cars, a few times so my experience is lacking but what a PITA. Special tools needed, didnt have, made do. She is up and running.
 

Attachments

  • 20230517_185325.jpg
    20230517_185325.jpg
    594.2 KB · Views: 18

RivennHewn

Well-known member
Joined
Jun 4, 2011
Messages
10,385
Location
PNW
If you dont mind me asking, what does something like that set you back. Wife is really wanting to add a/c to the house and since the gas furnace is original (2010) we will be updating that as well. I am thinking a new panel will be required since the current one is completely full, including lots of peanut breakers.


My gas furnace was circa 1996. Thinking it was just about to “end of life” status.

With both mechanical and electrical, we’re right at 16K.

I got bids from 16 to 26K, definitely pays to shop.

I went with a contractor that we use regularly at work, so I know the crew and their work.
 

threewood

Well-known member
Joined
Sep 9, 2014
Messages
419
Location
Yuma, AZ
N
Last minute rear brake pad replacement on my daughter's 2016 Jetta. How fun. I have only done disc brakes, on cars, a few times so my experience is lacking but what a PITA. Special tools needed, didnt have, made do. She is up and running.
Never done brakes on a VW. How complicated can the Germans make brake pad replacement?
 

rd65

Well-known member
Joined
Sep 29, 2017
Messages
2,837
Location
Granite Falls, WA
N

Never done brakes on a VW. How complicated can the Germans make brake pad replacement?
Had to find a youtube video. If I had to replace rotor I would have needed to make a trip to the parts store for a 14mm 12pt torx type socket to remove the caliper holder. There is also a tool for pushing the piston back into the caliper but I made do with knipex pliers and a short pry bar. Never mind the silly plastic caps over the lug bolts, yes bolts, not nuts. She had all the stock jack equipment including the key for locking lug nut. I've had to replace the pcv assembly too. https://www.myvwpart.com/p/Volkswagen__Jetta/Engine-Crankcase-Vent-Valve/67801091/06K103495AP.html?partner=BingShopping&kwd=&matchtype=e&device=c&network=o&userLocation=&msqs=2016 vw jetta pcv valve&bingCampaignID=367648708&bingAdGroupID=1218259323644410&bingAdID=76141316174487&bingExtensionID=
 

Attachments

  • 20230517_185239.jpg
    20230517_185239.jpg
    671.4 KB · Views: 52

supratreo

Well-known member
Joined
Sep 4, 2020
Messages
354
Location
elk grove, CA
thats pretty standard. a lot of new cars might require you to disable the electronic e-brake or use a scanner to clear the brake light after replacement. the actual part replacement process hasn't changed much.
as far as oil changes go, it all depends on the the car. just did my wifes Cayenne and the hardest part was getting the damn gravel shield off with its 20 bolts. after that, the actual oil change was cake. this is on the base 3.0 tho. did the spark plugs in about 30 min which really surprised me. one of the easiest i've done. i'm sure if you have a v8 model its much worse.
most of the time they charge for service isn't the actual service. its all the BS you have to do inorder to be able to get to the part that you need to service.
not entirely their fault. cars are just getting way more complicated.
 
To avoid these ads, REGISTER NOW!
Top Bottom