Roberts210
Well-known member
ebay will be your friend. But the swivel bases by themselves are getting pricey. And don't go by what the seller claims it will fit. Go by measurements.

Looking at the solid base of the 9300 images above, can it have a swivel base attached?ebay will be your friend. But the swivel bases by themselves are getting pricey. And don't go by what the seller claims it will fit. Go by measurements.
Hello and thank you, I have sent autopts a note (to his ebay contact) Will also try to find him here. Thanks also for stand idea... interesting... also, I posted over in EXP on slide thread, asking for some hinst about the model (clearly 3") but why no "Chicago" etc on the casting, would like to know what model number and rough year as well... Thank you also for the welcome!Jesse: Wilton did sell some of their vises without the swivel base so you can mount yours to a bench and use it as is. That said if you’d like a swivel base you might have to search eBay or message member autopts and see if he might have something that fits.
Another option is to build or find or buy a stand and mount the vise to it and then just turn the stand as needed for 360 degree access.
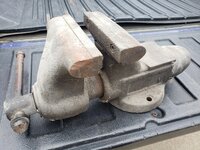
Welcome to GJ snd congrats on finding an older Wilton Bullet in decent shape.


Looks good! Surprized that a 1" section would yield enough material for that job. Assume you annealed it first? Going to do the same for my vises, thanks.I finally got around to making some copper jaw covers for my Reed 2C vise.
I purchased a 2' length of 1" diameter copper pipe. I cut the pipe into two 1' sections. I then cut one of the sections lengthwise with my angle grinder. I spread the pipe open and hammered it flat on a piece of railroad track. I clamped the flattened piece in the vise and marked it for the length of the jaws and the 'tabs' that fit under the jaws. I made the cuts with a hacksaw and bent the tabs. I clamped it in the vise with tabs as tight to the jaws as possible, then gently hammered the cover over the top of the jaw. Then i repeated the process for the other jaw. I labeled the covers for the jaws they were marked and worked for.
I have some ideas for leather jaw covers; I'll post them when I'm done.
This picture shows the covers on the vise.
This picture shows the underside of the covers.
This picture shows the unused half of the pipe and the flattened section that was not needed.
I would carefully press it cold.I have a lead screw on a 4" Wilton that has a little bend in it..1/8". What is the best way to try to straighten..heat up with a torch or just press it cold? Thanks for any help with this..Bill
Yes. In your case you'd be looking for a swivel base with a 5-1/2" diameter, and the bolts 4" apart CL to CL.Looking at the solid base of the 9300 images above, can it have a swivel base attached?

@Roberts210 this guy makes really nice ones, they are not "cheap" but they are much more affordable than the ones you found:E-Replacement parts has them too--$255. Plus shipping, no doubt.


 with them opened up wide and then hammered down on it. The vise nut moves around quite a bit in the keyway. Is the vise nut likely cast as well? I don't see repairing the vise body/keyway easily unless it were an attempt with epoxy. A longer vise nut (lengthened towards the rear) would keep the end from wanting to rock. I could try to tighten up the fit of the vise nut by welding/brazing depending on what material I'm working with.
Yessir, plan on either driving it out or using a couple bolts to press it out. But curious how people felt about heating that jaw up. In my mind, even if it's cast I should be able to get it pretty darn hot without any harm to help ease the process. And I've got one of those vises where that pin seems to have walked off (prior to my ownership). Yet another project on the long list...Nice find on the swivel jaw Parker. At least you still OWN the pin cause more than a few are missing theirs. Lots of good info in this big thread about removing swivel jaw pins and most have best luck pushing them out from below up and out. I don’t have access to all my pics at the moment but maybe someone has a pic of a few ways to remove the pin so you can eventually get the swivel jaw to work like it should.
Got a wild hair, started tearing it apart, got sad news. Someone had apparently tried to beat the pin out of the swivel jaw without clamping it down, broke the pivot for the swivel jaw. Pretty cool system Parker used to pin it in place. Welcoming suggestions on how this can be fixed...Some questions on a Parker 385. I won't get around to making repairs on this until winter most likely but I want to get the pin out of the swivel jaw and clean it up. I knew there was a problem of sorts with how the dynamic jaw snugged up when I bought the vise, but it was too dirty to really inspect. Advice on how to repair is much appreciated.
1). Is the tapered pin typically cast or were they steel? Some gorilla has put some vise grip teeth marks on the pin at some point which can be filed, but if steel I will add weld to keep the original diameter and fix flaws
2) Is the swivel jaw cast? Any risk of giving it some light heat with say a mapp torch to help fight the tapered pin out
3) thoughts on fixing the vise nut/keyway? Looks like someone probably had something in the jaws
This vise will never have a hard life from here on out, but I would like to keep it functional for light duty work, and don't want the problem getting any worse. I appreciate any input.


This was broken before I got my hands on it, so I can't say where the rest of the puzzle went. I'm guessing this is more of a fill and recreate the groove situation. I do have the skills to tig braze with silicon bronze or aluminum. Also seen some people recommending inconel filler, and while I've never messed with it I can't imagine it's toooo far of a stretch from stainlessIf the broken parts still mate up accurately they can be brazed back into one piece. If you don't have the equipment to do it, a local welder should be able to do it easily.
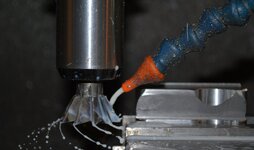
This is a hard repair, I've done one a while ago. Here are pic's on how I fixed mine but the hardest part for me was figuring how to hold the cast swivel jaw. I removed the cast material to the center of the cut radius. Happened to be a nominal radius where I could machine a radius on the plug I made to fit in the swivel jaw. Mine came out nice.Got a wild hair, started tearing it apart, got sad news. Someone had apparently tried to beat the pin out of the swivel jaw without clamping it down, broke the pivot for the swivel jaw. Pretty cool system Parker used to pin it in place. Welcoming suggestions on how this can be fixed...
Also of note, the vise nut is certainly cast.


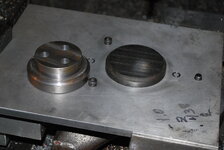
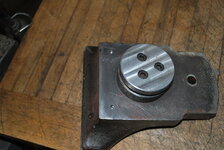


"Mine came out nice...." Understatement of the week. I'm no machinest but last night in my dreams I was thinking cutting flat and bolting on a puck with countersunk bolts might be the best way to tackle this. Then you show me how it's done. Now I just need to pony up for a mill.This is a hard repair, I've done one a while ago. Here are pic's on how I fixed mine but the hardest part for me was figuring how to hold the cast swivel jaw. I removed the cast material to the center of the cut radius. Happened to be a nominal radius where I could machine a radius on the plug I made to fit in the swivel jaw. Mine came out nice.
A bit of well directed heat with the oxy acetylene and a ball joint press made quick work of the pin. I really like the press you made but I was hoping to keep mine in the best shape possible. Thanks again for taking the time to post all the picsRemoving the swivel pin from the same swivel jaw Parker. Don't be afraid to heat your swivel jaw. The pin on some Parkers are cast.
Brilliant work holding! It's amazing how the set up can longer than the repair.This is a hard repair, I've done one a while ago. Here are pic's on how I fixed mine but the hardest part for me was figuring how to hold the cast swivel jaw. I removed the cast material to the center of the cut radius. Happened to be a nominal radius where I could machine a radius on the plug I made to fit in the swivel jaw. Mine came out nice.
The braze was done earlier from the previous owner. Just a note about the groove in the swivel jaw. If the groove does not match the pin diameter and location the swivel jaw will lift up when tightening up on a work piece. Parker used a terrible design and I have seen a few fail like yours and mine."Mine came out nice...." Understatement of the week. I'm no machinest but last night in my dreams I was thinking cutting flat and bolting on a puck with countersunk bolts might be the best way to tackle this. Then you show me how it's done. Now I just need to pony up for a mill.
Out of curiosity, had you tried a brazing repair before that or was it someone else's work?
Also, if you have time, could you please comment on the vise nut keyway damage I pictured above? Or anyone else who has ideas, I'm all ears. Trying to extend the vise nut further back in the keyway so the back end of the nut isn't at the chipped area is my best thought at the moment.


Very interesting info regarding breakage due to misalignment of the pin and swivel jaw. I assumed my breakage was from someone else trying to drive out the tapered pin without clamping the jaw to body of the vise, and while that still may be, it sounds like that's not the only option. I kind of appreciated Parkers design because it allows you to remove the swivel jaw even if the tapered pin is stuck in place, but it doesn't give a lot of room for error (and also I'm not a toolmaker so my opinion doesn't mean much).The braze was done earlier from the previous owner. Just a note about the groove in the swivel jaw. If the groove does not match the pin diameter and location the swivel jaw will lift up when tightening up on a work piece. Parker used a terrible design and I have seen a few fail like yours and mine.
Just a note about my work. I am a Toolmaker and have been repairing tools, molds and now vises for years. I don't post much here because these repairs take a machine shop and most guys here are not equiped for major breakage. This repair was a fun challenge and I'm posting these pic's for maybe a newer machinist that might needs an idea for this type of repair.
As a matter of fact this same Parker 275 had the same break in the dove tail area except worse. Again this repair is difficult. I machined a pocket and fit inserts from the bottom up with the new dovetails. Most of the work was figuring how to pick up the dovetail's from underneath. I did this by using the dovetail nut backup pin that keeps the nut from backing out. Using trig and a 1/2" pin in the casting dove tail told me where the dovetail was located, flipped the vise over and designed two pockets. The rest was machining the pockets and fitting the steel inserts.
On your repair, one possible fix is to remove 3/16 of material on the nut dovetail on the chipped side and brazing in a 3/16 steel plate longer then the break to support the nut beyond the chipped dovetail. This would keep the nut from lifting, make sure it has a little movement sideways and a little up and down. Another fix is to drill and counterbore a screw hole underneath and tap your nut to tie it down, this would hold the nut tight and not alow a little slop in the dovetail area for miss alignment. Most nuts are a little sloppy to allow for misalignment unless it is a Reed. Good luck.
Original factory is of course the best, but that part might not be unique. You might find other leadscrews would fit. What is the length, diameter, and thread pitch that you are looking for?Hello everyone. Does anyone know of a Rock Island 571 lead screw for sale anywhere?
Thank you in advance!
Best Regards,
Shawn
I bought a No.6 some years back, and it has the exact same text, casting details, and the same t-handle style as mine did.I just purchased a Paramo HI Duty No 5. It seems to be in fair condition, I have done some reading here but dont find alot of information. Is there any way to tell what era it was made? 1950S, 70s? I am looking forward to cleaning it up and will get better photos.