To avoid these ads, REGISTER NOW!

ZMotorsports Shop Projects 2.0

OP
Z

zmotorsports

ALLIANCE MEMBER
Joined
Oct 20, 2009
Messages
21,441
Location
Northern Utah
Last night I completed the engine bay of the Jeep.

Wiring would be the first order of business so I grabbed my selection of woven nylon split loom from the cabinet and selected the appropriate size for the first wire cluster.
jeep1.jpg

The wiring for the MAF sensor had the convoluted plastic casing deteriorating as well as the casing near the brake booster and master cylinder so I thought I'd start there as I also wanted to modify the intake duct to gain better access to the air filter. When I installed the new battery box a couple of weeks ago to turn it parallel with the engine as well as the TIPM it interfered with the air filter. Now the air filter is angled slightly upward which will allow me to install an Outerwear rather easily when needed plus give better access for removal and cleaning. This configuration also netted me a bit more clearance between the power steering pump pulley and the air filter which now has about an inch of clearance.
jeep2.jpg

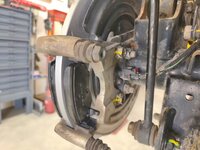
The deteriorated convoluted casing was removed and the woven nylon split loom installed on the wiring leading to the C100 bale connector.
jeep3.jpg

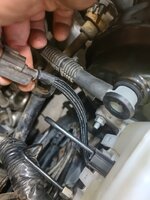
Same with the wiring for the brake reservoir fluid level sensor connector.
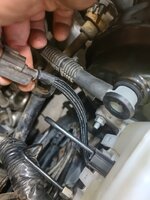
jeep4.jpg

GM ECM and power distribution board reinstalled in place.
jeep5.jpg

Turning the battery and TIPM sure netted me a lot more clearance around the right side of the engine. I can actually reach the coil packs and spark plugs now, even better than with the old 3.8 liter V6.
jeep6.jpg

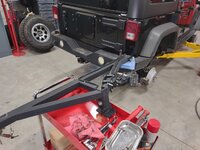
After finishing up the engine bay I racked the Jeep, removed tires/wheels and began working on the brakes.
jeep7.jpg


Thanks for looking.
 
To avoid these ads, REGISTER NOW!

losdudes

Well-known member
Joined
Mar 10, 2011
Messages
210
Location
Colorado
Don’t know if your filter is a K&N our not, I had one on my 05 Duramax that started to collapse like yours, took a picture and sent it to customer service and they sent me a new one, no charge.
 

WoodsTruck

Well-known member
Joined
Jan 12, 2013
Messages
1,025
Nice work on the wiring.
Working on the neighbors Yota project I have a couple miles of wire to clean up when I get close to done.
How did you cap off the ends of the braided split loom?
 

Attachments

  • jeep4.jpg
    jeep4.jpg
    105.3 KB · Views: 35
OP
Z

zmotorsports

ALLIANCE MEMBER
Joined
Oct 20, 2009
Messages
21,441
Location
Northern Utah
Don’t know if your filter is a K&N our not, I had one on my 05 Duramax that started to collapse like yours, took a picture and sent it to customer service and they sent me a new one, no charge.

This particular filter is a Volant. It's not a manufacturing defect as it is from the constant removal and installation for cleaning. I don't blame the filter manufacturer for that as quarters are quite tight. I did order a K&N that is a bit more tapered to give a try and see if it will work better in the space available. Should be here today.
 
OP
Z

zmotorsports

ALLIANCE MEMBER
Joined
Oct 20, 2009
Messages
21,441
Location
Northern Utah
Nice work on the wiring.
Working on the neighbors Yota project I have a couple miles of wire to clean up when I get close to done.
How did you cap off the ends of the braided split loom?

There are generally two ways I terminate the split looms. If the connectors are going on after the fact such as around the battery connectors I will slip heat shrink on prior to the connector then shrink up to the connector.

In situations where the split loom is being added without removal I will start with a wrap of abrasion or electrical tape around the wires themselves, then slip the split loom over the first wrap or two allowing the tape to come through the split. Then a couple more wraps around the outside of the split loom. I think that is how many manufactures used to do it which would keep the casing or loom from sliding around independently of the wires themselves and keeps the loom or casing tightly up against the connector where that first wrap is around the wires. Hope that all makes sense. :unsure:
 
OP
Z

zmotorsports

ALLIANCE MEMBER
Joined
Oct 20, 2009
Messages
21,441
Location
Northern Utah
i Like it ! i use that same loom, the heat shrink on the ends looks real clean, but takes some planning , what abrasion tape are you using on the ends, looks nice compared to electrical tape

Thanks. I do use standard electrical tape at times and when I do I have pretty much stuck with either the 3M Super 33+ or the 3M Super 88.

However, when it comes to abrasion tape, I have not been impressed with many over the years due to lack of adhesion properties most possess. A couple of years ago however, I was turned onto Tesa and have been very impressed. I think it is part # 51036 if I'm not mistaken. It has excellent abrasion resistance but also I have been very impressed with the adhesion properties of this tape. I have only used it for a relatively short time but I have found it works great for underhood work as it withstands heat well, does a great job of sticking/adhering and is easy to work with.
 

SilverJimmy

Well-known member
Joined
Apr 14, 2012
Messages
1,667
Location
Prescott/Flagstaff, AZ
Mike, thank you for all your very in-depth explanations on your wiring work and the reasons behind why you do things “Mike’s Way”! Very timely as I have a repair that is now needed on my 2006 GMC DuraMax. Seems the tree rats decided to have a snack the other night and thought the coolant sensor wire was on the menu!
792B4998-56A2-4B03-8AE2-89F7E7D1A714.jpeg79C0A8BB-6D42-4FB0-A3EB-01E00A44A139.jpeg
How would you approach this repair, simple cut and crimp with a **** connector (which I doubt!), new pigtail with heat shrink self soldering connectors, solder the wire and heat shrink? Or??? Thanks in advance! Also, you grew up on a farm, any advice on how to keep varmit from destroying our stuff short of inside storage or 40 cats?
 
OP
Z

zmotorsports

ALLIANCE MEMBER
Joined
Oct 20, 2009
Messages
21,441
Location
Northern Utah
Mike, thank you for all your very in-depth explanations on your wiring work and the reasons behind why you do things “Mike’s Way”! Very timely as I have a repair that is now needed on my 2006 GMC DuraMax. Seems the tree rats decided to have a snack the other night and thought the coolant sensor wire was on the menu!
792B4998-56A2-4B03-8AE2-89F7E7D1A714.jpeg79C0A8BB-6D42-4FB0-A3EB-01E00A44A139.jpeg
How would you approach this repair, simple cut and crimp with a **** connector (which I doubt!), new pigtail with heat shrink self soldering connectors, solder the wire and heat shrink? Or??? Thanks in advance! Also, you grew up on a farm, any advice on how to keep varmit from destroying our stuff short of inside storage or 40 cats?


Sterling, thanks for your confidence, I think. ;)

I don't have any advice on keeping critters from feasting on wiring as we had a little experience with that but not as much as some.

As for the repair on that particular wire, where it appears to be near the middle of a run and not right at the connector, I would probably slip some heat shrink over it and solder the connection then tuck back into some new split loom.

Years ago I was soldering most everything and not using **** connectors at all. However, upon a couple of relatively recent conversations with two gentlemen in particular I have changed my mindset. Tough to admit but I don't know everything and I am still learning. :)

We had such a bad situation with **** connectors when I first started in the industrial maintenance field from previous mechanics and management that it turned me sour for **** connectors, period. No if's and's or but's and no exceptions, I despised **** connectors and figured they had absolutely no use anywhere. I operated under that philosophy for 25+ years until a severeal years back I bumped into a gentleman in an RV park that drove a nice older Prevost Royale conversion. He had purchased it well used as he neared retirement and he spent a few years zero'ing it out before he and his wife took to the open road to enjoy. It was really a beautiful and well maintained coach for being more than two decades old at the time. Upon talking to him I discovered he was a retired Prevost mechanic who worked on the chassis side of the business for 35+ years. As we were talking the subject of wiring, connections, bundling and other related topics came up and I specifically asked about soldering vs. crimping. The gentleman actually changed my mind towards crimping. :unsure:

He said during all of the Prevost schooling and/or training that he went through their philosophy was that soldering would stiffen the wire to the point of fatigue cracking and breaking at the terminations whereas a proper crimp would stay flexible and move with the wiring. He heavily emphasized the point of "proper" crimping and to be honest, I think looking back to my early days as an industrial maintenance mechanic that improper crimping and connector placement were the two reasons why I was so adamant about my feelings towards crimped connections. I would see half-assed crimps that would allow the wires to work their way out and worst, the connectors placed right where a wire was supposed to be flexible to allow for movement. Had the crimped **** connectors been better placed away from movement and better crimping tools and techniques used I may have had a different mindset towards crimping vs. soldering for the first vast majority of my career.

This gentleman told me that in areas where there is a long run and the wire needs to be either spliced, sectioned or intersected, they did in fact approve of soldering and then would use tie raps (zip ties) and Adel clamps to support the wiring within the bundle. This would allow the wire to move with the bundle and be suspended so as to not fatigue crack and break over time. For terminations at say a terminal strip, junction block or any other hard wired termination a crimp was the only process approved to allow some movement of the wiring but also suggested using stress relief measures where possible and to ensure the termination had the correct crimp without "over-crimping" as he put it.

I also was introduced to a gentleman who worked on high end off-shore race boats about a year or so ago and upon during one of our discussions sitting around camp he said nearly the exact same thing as the retired Prevost mechanic. He mentioned specifically the possibilities of fatigue cracking and breaking of soldered joints due to the harsh pounding and vibrations that race boats experienced. If the soldered joint was near the end of a run or at a termination these were unacceptable and would certainly fail, usually at the most inopportune time. In the middle of a run where the wires could be restrained was a different story but even then, he said the preferred method was to replace the entire wire, which unfortunately isn't always an option.

Sorry for the long explanation Sterling, just how my thoughts on the matter of wiring have changed over the past 5 or so years now and why they've changed.
 

Blackbyrd

Well-known member
Joined
Nov 28, 2020
Messages
1,170
Location
TN
Been a while since I've dropped in, glad to see you have been out and a bout for some r&r. Love the photo's my wife and I have talked about going out west more. I went once in my youth to Colorado for snowboarding and skiing. Tennessee gets all four seasons but we dont get true snow. Took our annual trip to the beach a few weeks ago, though id be lying if I say I havent lost some motivation the last month. bit of a funk if you will.

Anywho, glad to see the vyper chair still gets high praise, its on my short list of things to acquire this year been focusing on tools again. I think I need to learn to follow your lead on the door jams and trunk jam wipe down. Everytime I wash my 6th gen, I towel dry it down, but I always end up with streaks under the doors where it runs back out.....
 
OP
Z

zmotorsports

ALLIANCE MEMBER
Joined
Oct 20, 2009
Messages
21,441
Location
Northern Utah
Been a while since I've dropped in, glad to see you have been out and a bout for some r&r. Love the photo's my wife and I have talked about going out west more. I went once in my youth to Colorado for snowboarding and skiing. Tennessee gets all four seasons but we dont get true snow. Took our annual trip to the beach a few weeks ago, though id be lying if I say I havent lost some motivation the last month. bit of a funk if you will.

Anywho, glad to see the vyper chair still gets high praise, its on my short list of things to acquire this year been focusing on tools again. I think I need to learn to follow your lead on the door jams and trunk jam wipe down. Everytime I wash my 6th gen, I towel dry it down, but I always end up with streaks under the doors where it runs back out.....

Thanks for checking back in and commenting.

Door jambs, underhood and trunk areas are pet peeves of mine and keeping them clean can be a PITA but I've found it is easier to give them a swipe with the towel at the end of each wash job vs. letting them go and then hitting them once a year or so. I have also found that using the warm air from my Airshammy in conjunction with a towel or chamois really speeds up the process and eliminates those pesky drips and streaks after a wash job. I hate water trickling our of mirrors or door handles and the air blower really is a worth while tool for that. I've used just normal compressed air in the past and while it works fair, the small Airshammy really shines.

I just have the base model but with the longer power cord and the 10' hose but it was well worth the small price for the big results.
 

Blackbyrd

Well-known member
Joined
Nov 28, 2020
Messages
1,170
Location
TN
Thanks for the recommendation, im gonna look into that. Since both of mine toys have similar issues though the firebirds problem is confined to the rear bumper. The gap between the taillight section and bumper always drips!!!! my solution the last several years has been DI filters and speed shine the following day, but I'm all for removing steps.
 
OP
Z

zmotorsports

ALLIANCE MEMBER
Joined
Oct 20, 2009
Messages
21,441
Location
Northern Utah
Thanks for the recommendation, im gonna look into that. Since both of mine toys have similar issues though the firebirds problem is confined to the rear bumper. The gap between the taillight section and bumper always drips!!!! my solution the last several years has been DI filters and speed shine the following day, but I'm all for removing steps.

Agreed. Anything to save time and just as importantly, frustration.

Our Fifth Gen Camaro's taillights are water traps as well as the fuel fill opening and front grille area. I can chamois the car and back it out of the driveway and have steaks down the rear bumper from the taillights in particular or from under the fuel filler lid. Wipe them again and at the next stop the same thing. After a few wash jobs last fall, I opted to get the Airshammy back out and start using it and I have been very pleased with the results. No more streaks down the rear bumper and the chrome trim bezels around the taillights don't even have chamois streaks, just perfectly reflective chrome.

The wheels are another place the Airshammy really shines, no more streaking or water spots around the lugnuts after washing. I give them a quick swipe with the chamois, then hit the lugnuts specifically while holding the chamois over them and it captures the mist of water coming from the lug holes then a light wipe across the wheel and another quick shot with the blower and the wheel is streak and droplet free.

I need to get back to using it on the Jeep as well as the mirrors, door handles and fuel fill compartment on the Jeep are huge water traps.

And to think, I almost let my Airshammy go with my Harley last summer when I sold it. Glad I opted to keep it as it has come in just as much on the car as it ever did the bike. :cool:
 

SilverJimmy

Well-known member
Joined
Apr 14, 2012
Messages
1,667
Location
Prescott/Flagstaff, AZ
Sorry for the long explanation Sterling, just how my thoughts on the matter of wiring have changed over the past 5 or so years now and why they've changed.
Thanks for the explanation, and it wasn’t long, just thorough. The only thing better would have been “I’ll have time to take care of it next week, drop it off Monday.”!!!!! Lol!
 

SilverJimmy

Well-known member
Joined
Apr 14, 2012
Messages
1,667
Location
Prescott/Flagstaff, AZ
All joking aside, do you have any preference towards crimp/**** connectors? I have the 3M Master set and I also have some of the Snap-On self soldering heat shrink that was sold awhile ago…. maybe 20 years ago! Geez, I’m getting old!
 

Scuderia-F1

Well-known member
Joined
Feb 9, 2011
Messages
1,198
Location
Stockholm, Sweden
Thanks. I do use standard electrical tape at times and when I do I have pretty much stuck with either the 3M Super 33+ or the 3M Super 88.

However, when it comes to abrasion tape, I have not been impressed with many over the years due to lack of adhesion properties most possess. A couple of years ago however, I was turned onto Tesa and have been very impressed. I think it is part # 51036 if I'm not mistaken. It has excellent abrasion resistance but also I have been very impressed with the adhesion properties of this tape. I have only used it for a relatively short time but I have found it works great for underhood work as it withstands heat well, does a great job of sticking/adhering and is easy to work with.
Tesa is my go to for loom work.
 

PugetDude

ALLIANCE MEMBER
Joined
Mar 13, 2013
Messages
22,461
Location
Superstition Mountains, AZ
Mike, thank you for all your very in-depth explanations on your wiring work and the reasons behind why you do things “Mike’s Way”! Very timely as I have a repair that is now needed on my 2006 GMC DuraMax. Seems the tree rats decided to have a snack the other night and thought the coolant sensor wire was on the menu!
792B4998-56A2-4B03-8AE2-89F7E7D1A714.jpeg79C0A8BB-6D42-4FB0-A3EB-01E00A44A139.jpeg
How would you approach this repair, simple cut and crimp with a **** connector (which I doubt!), new pigtail with heat shrink self soldering connectors, solder the wire and heat shrink? Or??? Thanks in advance! Also, you grew up on a farm, any advice on how to keep varmit from destroying our stuff short of inside storage or 40 cats?
Damn tree rats chewed through the variable displacement wiring on my Dodge Ram when I left it parked outside when we went to Arizona for the winter. Soy-based insulation on wiring, what could possibly go wrong?
Next year I stuffed Bounce dryer sheets around the engine compartment and didn't have a problem. Also used them in the storage bays on the motorhome when it was in outside storage. Again, no problem but the rigs parked on either side of me did have rodent damage.

Some people say it's a myth but it's worked for me. Cheap deterrent either way.
 

jbmatth

Well-known member
Joined
Jun 3, 2013
Messages
5,689
Location
Northern Ok.
Damn tree rats chewed through the variable displacement wiring on my Dodge Ram when I left it parked outside when we went to Arizona for the winter. Soy-based insulation on wiring, what could possibly go wrong?
Next year I stuffed Bounce dryer sheets around the engine compartment and didn't have a problem. Also used them in the storage bays on the motorhome when it was in outside storage. Again, no problem but the rigs parked on either side of me did have rodent damage.

Some people say it's a myth but it's worked for me. Cheap deterrent either way.
I'll also give credit to bounce dryer sheets, they have really seemed to help with my vehicles, since using them I've only ever had one problem with mice or rats and that was just minor inconvenience compared to previous troubles.

Mike, thank you for the info on the tape, I've not been please with what I've used and now have three rolls on order. Also I'm on the crimp and heat shrink band wagon, so far, knock on wood I've had no failures using that method since perfecting it. A car I recently picked up had some harnesses extended with those self soldering heat shrink connectors and I have one causing me some fits, but haven't determined which one yet as the problem is intermittent and never is happening when I'm trying to find it, frustrating.

JB
 
OP
Z

zmotorsports

ALLIANCE MEMBER
Joined
Oct 20, 2009
Messages
21,441
Location
Northern Utah
All joking aside, do you have any preference towards crimp/**** connectors? I have the 3M Master set and I also have some of the Snap-On self soldering heat shrink that was sold awhile ago…. maybe 20 years ago! Geez, I’m getting old!

Sterling, yes, for most insulated connectors I too use 3M as they seem to use a nice pliable insulation and are readily available. However, for the past several years now I have leaned heavily towards the use of non-insulated terminals and then apply heat shrink over the connection. I feel they provide a better connection in many applications and I think they look much more aesthetically pleasing, plus I feel appear to give the job a more professional vibe if I'm being honest. ;)

For many years I purchased most of my connectors from either Waytek or Del City however, a few years ago I stumbled across Sherco Auto & Marine supply and have found their products and prices to be excellent. I had to replenish my non-insulated assortment a couple months ago and placed an order for 100 each of the 18-20 gauge and 14-16 gauge **** connectors and if memory serves they were around $6 bucks.

Here is a link to Sherco Auto & Marine if you want to check them out.
 
To avoid these ads, REGISTER NOW!
OP
Z

zmotorsports

ALLIANCE MEMBER
Joined
Oct 20, 2009
Messages
21,441
Location
Northern Utah
Tesa is my go to for loom work.

That is good to hear Anders. Thank you. Glad to hear you are pleased with their product as well.

Mike, thank you for the info on the tape, I've not been please with what I've used and now have three rolls on order. Also I'm on the crimp and heat shrink band wagon, so far, knock on wood I've had no failures using that method since perfecting it. A car I recently picked up had some harnesses extended with those self soldering heat shrink connectors and I have one causing me some fits, but haven't determined which one yet as the problem is intermittent and never is happening when I'm trying to find it, frustrating.

JB

JB, please let me know what you think on the tape after using it. I did some research a few years back when I was looking for something with better adhesion yet still provide the abrasion protection factor and to be honest, information pertaining to wiring harnesses was a bit slim so I had to do the ole' trial and error until I used the Tesa tape. I'd be interested to hear your thoughts afterwards.
 
OP
Z

zmotorsports

ALLIANCE MEMBER
Joined
Oct 20, 2009
Messages
21,441
Location
Northern Utah
Last night I replaced the Emergency brakes on our Jeep Wrangler. For anyone who has been lucky enough to replace these you will know what a PITA they can be. Some people suggest the only way the E-brake shoes can be replaced is by pulling the axle shafts due to the axle flange's intrusion, and although it does make the job much easier, it is not necessary. I've done quite a few of these over the years and have done them both ways but don't pull the axle specifically to replace the E-brake shoes. I only pull the axle shaft if the client is having me do other work that requires it and then I will suggest doing the E-brakes if they are nearing needing to be done, otherwise I've struggled through the process with the axle in place. Most Jeep/Chrysler products utilize the same configuration but on larger vehicles there is a larger gap between the E-brake shoes and the axle flange so they are less problematic.

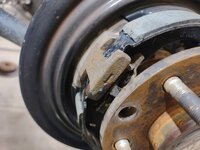
For those who know this configuration on the Jeeps with the smaller E-brake shoes and axle flange, you will know there are two springs on the pivot end of the shoes, one back behind the shoes and one on the outside but both of which share the exact same holes in the shoes just opposite sides. The outside one is accessible from the outside of course, but the inside one is not.

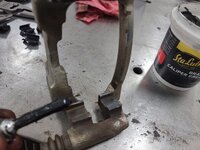
Removal and installation of the emergency brake shoes requires that back spring to be installed due to the inability to remove or install with the shoes up against the backing plate. I generally install the back spring on the shoes and slip it in between the pivot anchor block shown here and behind the axle flange while using the two shoes as a guide or level to pull the spring through the void. It's a tight fit but it is doable. Also while I'm here I take a little Tri-Flow and lube the two pivot pins on the apply lever. Good thing I inspected this one closely as the small E-clip must have flipped off while removing the shoes and I could not find it on the floor. Luckily I have an assortment and was able to walk to the drawer and grab a replacement as that would surely be a failure point with the pin falling out in the near future. :oops:
jeep11.jpg

Once the rear spring is installed on the shoes, "fenagle" the spring between the anchor block and the axle flange then use a small pry bar to lift the shoe up and over the apply lever and into the anchor block.
jeep12.jpg

With the shoes in their relatively close proximity to their final location I will use a couple pairs of C type locking pliers to lock the shoes to the backing plate. Not tight enough to bend or dent the backing plate mind you, just tight enough the hold the shoes in place so the anchor pins and spring clip retainers can be installed without having to fight the shoes moving around while installing the anchor pins.
jeep13.jpg

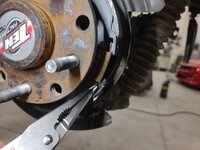
This is one area I've struggled in the past using a combination of a cotter pin hook type tool and locking needle nose vise grips to connect the outer spring into the same locating holes as the inner spring. I messed with it for a few minutes and then thought I'd grab my new Snap-on LN47ACF talon grip long nose pliers wondering if they'd have enough grip to extend a spring and guide it into place. Lo and behold the new Snap-on pliers worked amazingly well and much quicker with more control over the placement of the spring's hook end into the slot. The spring slid into the hole so easily I almost thought the other end must have come disconnected. :D
jeep14.jpg

The next task was to re-engage the spring clip retainer onto the anchor pin which feeds in from the backside. This also gave me frustration in the past because the clip has to be compressed and slid under the head of the anchor pin then slid into position. I tried using the same Snap-on LN47ACF pliers as I used on the spring but they were too large to be able to maneuver between the axle flange and the brake shoe outer diameter. That's when I remembered I also purchased the smaller Snap-on LN46ACF so walked to the toolbox, grabbed the smaller talon grip pliers and to my surprise they worked perfectly. Again, I was shocked at the ease and speed in which this job was now being completed.

Here you can see the end of the talon grip pliers compressing the spring clip and sliding under the head of the anchor pin. Easy peasy.
jeep15.jpg

Backed out view of the tight space in which to work in while installing the spring clip onto the anchor pin. Also worth noting is the small amount of brake grease that can be seen on the small pads where the shoes ride. Anti-seize can also be used but just use a small amount, no need to put so much on that the shoes get covered or that will attract dirt which will then act as an abrasive. You just want enough to aid in movement and reduce the chance of wear and squeaks or creaks when applying the E-brake.
jeep16.jpg

Now moving over to the adjuster side with the anchor pins installed, the locking pliers can be removed and a small prybar can be used to pry the upper shoe upward and lower shoe downward slightly in which to slip the screw adjuster into position and lastly the Snap-on LN47ACF pliers can be used to install the smaller spring on the adjuster side. I also used a cotter pin hook tool to aid in guiding the spring into the proper hole but the pliers did the majority of the work and with ease I must say. Another thing worth mentioning is I like to disassemble the threaded adjuster and ensure it threads easily through its range and apply a small amount of anti-seize to make certain the movement remains easy to adjust over time and miles.
jeep17.jpg

The emergency brakes completely installed plus a little more anti-seize applied to the axle flange surface and hub to ensure the new rotor doesn't get stuck on over time.
jeep18.jpg

New rotor installed after being wiped down with brake wash and the final adjustments of the emergency brake are made. I like a very very slight drag to be heard consistent around the rotor hat so as to get full locking capabilities of the emergency brake's range. Prior to reinstalling the rotor I also spray some Tri-Flow down the cable housing behind the backing plate and move it a little bit through its range to draw the lube into the cable housing and prevent seizing. Before I lower the Jeep I will spray some at the other end of the cable above the driveshaft as well.
jeep19.jpg

Here are the specific tools I used that aided in making this job go quickly although the spring tool to the far right was only used on one spring, but the job could be done without it once I reached for the talon grip pliers.
jeep20.jpg


That was hands down the easiest and quickest emergency brake replacement I've done on a Jeep to date. Those of you who have done this job will know what I'm talking about. ;)

Thanks for looking.
 
OP
Z

zmotorsports

ALLIANCE MEMBER
Joined
Oct 20, 2009
Messages
21,441
Location
Northern Utah
Before doing the emergency brake job on the Jeep last night and as soon as I arrived home from work I ran around the lawns and got them mowed before the storm was supposed to roll in.

I was able to get the lawns mowed rather quickly so while I was still in yard work mode I figured I would replace two sprinkler heads that I have been fighting with to keep an area green in the front yard. I thought maybe my secondary water filter was getting plugged so I cleaned that first and it was quite dirty but I have not been impressed with the Orbit rotary heads that the original owner had installed in the front yard. I had replaced most all of the Orbit heads with Rainbird heads as I have added and moved sprinkler heads in the front yard but the last two remaining were next to the fence that I installed after taking ownership and upon seeing the grass turn in the heat over the past week or so I thought I'd investigate.

One head had quit rotating and the adjacent head was also an Orbit so I went to work quickly to replace both heads with the Rainbird 5000 series rotary heads.

Once the sprinkler heads were replaced and adjusted for pattern and sweep I went into the shop and worked on the Jeep's emergency brakes before dinner.

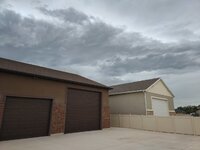
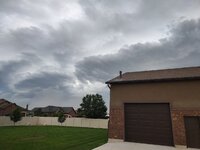
When the wife got home and told me dinner was ready I was locking up and noticed the storm clouds were gathering rather quickly so I had to snap a couple of pictures.

storm1.jpg

storm2.jpg

I no sooner got into the house, changed and washed up for dinner when the wind came up and then the much needed rain.
 

Scuderia-F1

Well-known member
Joined
Feb 9, 2011
Messages
1,198
Location
Stockholm, Sweden
Sterling, yes, for most insulated connectors I too use 3M as they seem to use a nice pliable insulation and are readily available. However, for the past several years now I have leaned heavily towards the use of non-insulated terminals and then apply heat shrink over the connection. I feel they provide a better connection in many applications and I think they look much more aesthetically pleasing, plus I feel appear to give the job a more professional vibe if I'm being honest. ;)

For many years I purchased most of my connectors from either Waytek or Del City however, a few years ago I stumbled across Sherco Auto & Marine supply and have found their products and prices to be excellent. I had to replenish my non-insulated assortment a couple months ago and placed an order for 100 each of the 18-20 gauge and 14-16 gauge **** connectors and if memory serves they were around $6 bucks.

Here is a link to Sherco Auto & Marine if you want to check them out.
Fully agree with you about the look of using uninsulated connectors with heatshrink. Takes the job to an entirely different level.
 

Bob Heine

ALLIANCE MEMBER
Joined
Oct 24, 2009
Messages
10,708
Location
Boca Raton, Florida
Last night I replaced the Emergency brakes on our Jeep Wrangler. For anyone who has been lucky enough to replace these you will know what a PITA they can be.
Mike, I had almost forgotten about Emergency brake shoes. Probably going to have nightmares tonight. When I was working on the '72 Corvette's rear axles I did the e-brake shoes. In my case it was probably easier because the whole trailing arm/hub assembly was out of the car. I chose to install the stainless steel setup from Corvette Stainless Steel Brakes (https://www.cssbinc.com/1965-55_emergency_parking_brake.aspx) so it would last longer. Back in 2014 my tools worked but I see some upgrades would have made the job easier.
e-brake install.JPG
 

Bob Heine

ALLIANCE MEMBER
Joined
Oct 24, 2009
Messages
10,708
Location
Boca Raton, Florida
Mike, while I'm interrupting your train of thought, where do you buy replacement factory connectors? As our vehicles age, the plastic parts of the wiring tend to break from a gentle touch. I found the replacement connectors I needed for the Corvettes from specialty Corvette sites but boy do they put a premium on those bits. I found a site that has a decent selection but wonder if you have a go-to supplier. This is the one I found:
 
OP
Z

zmotorsports

ALLIANCE MEMBER
Joined
Oct 20, 2009
Messages
21,441
Location
Northern Utah
Mike, while I'm interrupting your train of thought, where do you buy replacement factory connectors? As our vehicles age, the plastic parts of the wiring tend to break from a gentle touch. I found the replacement connectors I needed for the Corvettes from specialty Corvette sites but boy do they put a premium on those bits. I found a site that has a decent selection but wonder if you have a go-to supplier. This is the one I found:

Bob, I have used the exact site that you posted in several situations, The Repair Connector Store, but they are a bit on the pricey side.

Most of the time however, I am able to locate what I need from my local NAPA store as they have a good selection of replacement pigtail assemblies. If I only need the connector itself and don't need the wires then it is still less expensive to buy the pigtail assembly from NAPA and then I will de-pin the connector and swap out the connector only but a good share of the times I replace the entire pigtail assembly. The ones from NAPA seem to be good quality, are usually less expensive than other options and for the most part I would say readily available.
 

ctandc72

Well-known member
Joined
Sep 19, 2020
Messages
1,087
Location
VA
Bob, I have used the exact site that you posted in several situations, The Repair Connector Store, but they are a bit on the pricey side.

Most of the time however, I am able to locate what I need from my local NAPA store as they have a good selection of replacement pigtail assemblies. If I only need the connector itself and don't need the wires then it is still less expensive to buy the pigtail assembly from NAPA and then I will de-pin the connector and swap out the connector only but a good share of the times I replace the entire pigtail assembly. The ones from NAPA seem to be good quality, are usually less expensive than other options and for the most part I would say readily available.

What he said. Dig around the internet - there is a huge PDF catalog for AC Delco, Motorcraft etc that lists all the harness connectors w/ dimensions, specs, pictures and pt#. RockAuto actually lists alot of them too. Then cross reference and go from there Echlin, Standard etc - they make a lot of the pigtails for most everything.
 

Just Fishing

Well-known member
Joined
Dec 21, 2020
Messages
57
Location
Utah
Last night I completed the engine bay of the Jeep.

Wiring would be the first order of business so I grabbed my selection of woven nylon split loom from the cabinet and selected the appropriate size for the first wire cluster.
jeep1.jpg

The wiring for the MAF sensor had the convoluted plastic casing deteriorating as well as the casing near the brake booster and master cylinder so I thought I'd start there as I also wanted to modify the intake duct to gain better access to the air filter. When I installed the new battery box a couple of weeks ago to turn it parallel with the engine as well as the TIPM it interfered with the air filter. Now the air filter is angled slightly upward which will allow me to install an Outerwear rather easily when needed plus give better access for removal and cleaning. This configuration also netted me a bit more clearance between the power steering pump pulley and the air filter which now has about an inch of clearance.
jeep2.jpg

The deteriorated convoluted casing was removed and the woven nylon split loom installed on the wiring leading to the C100 bale connector.
jeep3.jpg

Same with the wiring for the brake reservoir fluid level sensor connector.
jeep4.jpg

GM ECM and power distribution board reinstalled in place.
jeep5.jpg

Turning the battery and TIPM sure netted me a lot more clearance around the right side of the engine. I can actually reach the coil packs and spark plugs now, even better than with the old 3.8 liter V6.
jeep6.jpg

After finishing up the engine bay I racked the Jeep, removed tires/wheels and began working on the brakes.
jeep7.jpg


Thanks for looking.

I would love to hear about your experience with the new brake setup.
I'm finding the brakes on my 07 are ok but lacking.
Recently I replaced the brake hoses with some (future lift friendly) SS braded lines and rebuilt the front calipers due to an occasional sticking of the driver side.

And of course, I painted them pretty red while I was in there and had it all apart. ;)
I lost all motivation once I made it to the rear brakes, so the backs really stand out now as being rusty and nasty with the front's all pretty.
:sneaky:


And of course, the moment it gets hot outside both the wife's Buick and the Tahoe sprung major leaks within a few days of each other.
I was lucky that I caught the Buicks Dex cool puddle in the driveway camera and called the wife back home before it overheated.

It looks like the water pump started leaking out of the weep hole, so as long as I have to get in there, I'm replacing everything related.
3.6 on those enclaves is a pita, but I think it's much easier than that last one you worked on.

and of course, I need to do spark plugs anyways,
I get to take the intake off in order to do the rear plugs... *sarcastic* yay! 🥒 (pickle emoji seems appropriate here)


I'll admit my first thought was "I wonder what Mike's up to" for the job. :unsure: :whistle:
But I'll let you enjoy the summer and not deal with another Buick for now. :thumbup:

But if the timing chain ever needs changing, the Buick will wait for you. 😉
(Engine out the bottom, or a pita through the wheel well = over my head)


The Tahoe wasn't nearly as lucky,
headed up parleys canyon to go to a beach boys' concert in park city, the only heater core hose that I didn't replace popped at the crappy plastic connector.
And it was the only line that looked like it didn't need replacing!!

I was busy and paying attention to people in the back and keeping a casual eye on my oil pressure and transmission temp but totally ignoring the right side of the gauge cluster, I ended up pinning the temp gauge after gauges started telling me reduced performance...

:sad::willy_nil

I'm still kicking myself for that one, brand new engine and I nearly cook a set of AFR cylinder heads. :monkey_po

While the 1 1/2 hrs it took us to get parts and fix the Tahoe made it so we couldn't get lotto tickets in Wyoming, we did still make it to the concert.

I still need to tear that LS2 down in order to lower the compression a little and swap out the lifters for a different type (morel).
I can also do some damage assessment while it's apart.

I'll probably bug you for some of your expertise when I have the motivation this winter.
I'm pretty sure I want to swap the cam bearings for some durabond seamless bearings while it's apart, you seem like the obvious choice for the task. :beer:


Anyways,
Nice work, I love the Camaro, reading the projects and solutions you come up with, and of course the lawn. 😎
You're awesome, get outside and enjoy the summer!
 
OP
Z

zmotorsports

ALLIANCE MEMBER
Joined
Oct 20, 2009
Messages
21,441
Location
Northern Utah
I would love to hear about your experience with the new brake setup.
I'm finding the brakes on my 07 are ok but lacking.
Recently I replaced the brake hoses with some (future lift friendly) SS braded lines and rebuilt the front calipers due to an occasional sticking of the driver side.

And of course, I painted them pretty red while I was in there and had it all apart. ;)
I lost all motivation once I made it to the rear brakes, so the backs really stand out now as being rusty and nasty with the front's all pretty.
:sneaky:


And of course, the moment it gets hot outside both the wife's Buick and the Tahoe sprung major leaks within a few days of each other.
I was lucky that I caught the Buicks Dex cool puddle in the driveway camera and called the wife back home before it overheated.

It looks like the water pump started leaking out of the weep hole, so as long as I have to get in there, I'm replacing everything related.
3.6 on those enclaves is a pita, but I think it's much easier than that last one you worked on.

and of course, I need to do spark plugs anyways,
I get to take the intake off in order to do the rear plugs... *sarcastic* yay! 🥒 (pickle emoji seems appropriate here)


I'll admit my first thought was "I wonder what Mike's up to" for the job. :unsure: :whistle:
But I'll let you enjoy the summer and not deal with another Buick for now. :thumbup:

But if the timing chain ever needs changing, the Buick will wait for you. 😉
(Engine out the bottom, or a pita through the wheel well = over my head)


The Tahoe wasn't nearly as lucky,
headed up parleys canyon to go to a beach boys' concert in park city, the only heater core hose that I didn't replace popped at the crappy plastic connector.
And it was the only line that looked like it didn't need replacing!!

I was busy and paying attention to people in the back and keeping a casual eye on my oil pressure and transmission temp but totally ignoring the right side of the gauge cluster, I ended up pinning the temp gauge after gauges started telling me reduced performance...

:sad::willy_nil

I'm still kicking myself for that one, brand new engine and I nearly cook a set of AFR cylinder heads. :monkey_po

While the 1 1/2 hrs it took us to get parts and fix the Tahoe made it so we couldn't get lotto tickets in Wyoming, we did still make it to the concert.

I still need to tear that LS2 down in order to lower the compression a little and swap out the lifters for a different type (morel).
I can also do some damage assessment while it's apart.

I'll probably bug you for some of your expertise when I have the motivation this winter.
I'm pretty sure I want to swap the cam bearings for some durabond seamless bearings while it's apart, you seem like the obvious choice for the task. :beer:


Anyways,
Nice work, I love the Camaro, reading the projects and solutions you come up with, and of course the lawn. 😎
You're awesome, get outside and enjoy the summer!

Thanks Chris. Your comments are much appreciated and I've been happy to help you on your various projects over the years.

As for the Jeep brakes, like you I felt the OEM's were ok and did the task required but nothing more. I had the OEM brake setup for the first 80k miles all while I was on 35" tires. However, after the move, new shop and yard being completed I again started contemplating my LS swap and thought I'd start upgrading components a little at a time as needed to support the coming GM powertrain. After upgrading to the Dynatrac Prorock 44 front axle I thought I'd tackle the brakes because with the new power coming I also knew I wanted to upgrade to 37" tires and although I wasn't having any issues, I just didn't think the OEM brakes were up to the challenge of stopping a 6k pound Jeep on 37" tires with the OEM brakes.

I've had the Teraflex Big Brake kit on the Jeep for the past 70k plus miles and 6 years or so now and have been very pleased with the way the Jeep brakes, both on and off-road. It does go through front brake pads as this is the second set I've installed in those 70k or so miles and with the rotors starting to show a slight amount of wear I thought I'd replace the rotors then have the ones that have been on the Jeep turned and put on the shelf as backup or next time they're needed.

The dual piston calipers on the front really added to the gripping force but immediately after installing them I knew I needed a master cylinder with a larger piston to push the additional fluid required. That's when I discovered that the 2007-2011 had a smaller piston than the 2012-2018 so I swapped out the master cylinder for one from the later model JK and problem solved. Many were upgrading to the J8 master cylinder as well as the booster and that was an option but the J8 package is just a little larger than the JK booster/master cylinder configuration and I wasn't sure how it would fit with the upcoming LS engine as well as I wanted to keep my Jeep as OE as possible to aid in parts availability and it seemed the J8 parts were harder to come by so this prompted me to stay with JK components and I have been pleased with them so far. I have braking confidence when needed and have not had any time when I felt like the brakes were lacking.

Hope that is helpful Chris. I know there are other vendors out now that offer larger rotors and dual piston calipers as well for the JK and I know at the time there were cheaper options. However, I had used other Teraflex parts previous and was never disappointed so rather than start to mix and match components I just went with their Big Brake kit and I have not had any complaints.
 

Just Fishing

Well-known member
Joined
Dec 21, 2020
Messages
57
Location
Utah
Thanks Chris. Your comments are much appreciated and I've been happy to help you on your various projects over the years.

As for the Jeep brakes, like you I felt the OEM's were ok and did the task required but nothing more. I had the OEM brake setup for the first 80k miles all while I was on 35" tires. However, after the move, new shop and yard being completed I again started contemplating my LS swap and thought I'd start upgrading components a little at a time as needed to support the coming GM powertrain. After upgrading to the Dynatrac Prorock 44 front axle I thought I'd tackle the brakes because with the new power coming I also knew I wanted to upgrade to 37" tires and although I wasn't having any issues, I just didn't think the OEM brakes were up to the challenge of stopping a 6k pound Jeep on 37" tires with the OEM brakes.

I've had the Teraflex Big Brake kit on the Jeep for the past 70k plus miles and 6 years or so now and have been very pleased with the way the Jeep brakes, both on and off-road. It does go through front brake pads as this is the second set I've installed in those 70k or so miles and with the rotors starting to show a slight amount of wear I thought I'd replace the rotors then have the ones that have been on the Jeep turned and put on the shelf as backup or next time they're needed.

The dual piston calipers on the front really added to the gripping force but immediately after installing them I knew I needed a master cylinder with a larger piston to push the additional fluid required. That's when I discovered that the 2007-2011 had a smaller piston than the 2012-2018 so I swapped out the master cylinder for one from the later model JK and problem solved. Many were upgrading to the J8 master cylinder as well as the booster and that was an option but the J8 package is just a little larger than the JK booster/master cylinder configuration and I wasn't sure how it would fit with the upcoming LS engine as well as I wanted to keep my Jeep as OE as possible to aid in parts availability and it seemed the J8 parts were harder to come by so this prompted me to stay with JK components and I have been pleased with them so far. I have braking confidence when needed and have not had any time when I felt like the brakes were lacking.

Hope that is helpful Chris. I know there are other vendors out now that offer larger rotors and dual piston calipers as well for the JK and I know at the time there were cheaper options. However, I had used other Teraflex parts previous and was never disappointed so rather than start to mix and match components I just went with their Big Brake kit and I have not had any complaints.

It is.
On the note about part availability, how are the pads and rotors?
Standard parts, or would I need to buy from the supplier?

Right now, I usually just buy the best set of pads that AutoZone offers for their lifetime warranty.
I have had it where I accidently got oil on them, or just felt like replacing them and never had any issues.
I'm hoping that's an option with the conversion.

the big brakes I have on my C4 vette are a mix of C5 Z06 and C6 Z51 brakes.
Hardest part about that is I'm all C5 Z06, but I have the rear rotors from a C6 Z51.
I just wrote that in the back of the owner's manual so I can remember it later. :lol:
 
OP
Z

zmotorsports

ALLIANCE MEMBER
Joined
Oct 20, 2009
Messages
21,441
Location
Northern Utah
It is.
On the note about part availability, how are the pads and rotors?
Standard parts, or would I need to buy from the supplier?

Right now, I usually just buy the best set of pads that AutoZone offers for their lifetime warranty.
I have had it where I accidently got oil on them, or just felt like replacing them and never had any issues.
I'm hoping that's an option with the conversion.

the big brakes I have on my C4 vette are a mix of C5 Z06 and C6 Z51 brakes.
Hardest part about that is I'm all C5 Z06, but I have the rear rotors from a C6 Z51.
I just wrote that in the back of the owner's manual so I can remember it later. :lol:

That was one of the things I really liked about Teraflex's Big Brake kit was wear item replacement parts such as brake pads. There are a lot of really good options out there in the performance aftermarket for Jeeps, as well as about everything else, but some of the parts are a bit more difficult and/or time consuming to get replacement parts when needed in a hurry. For that purpose alone when I build daily drivers I prefer to use as many OEM or at least OE available parts as possible to reduce downtime as well as expense.

The Teraflex system uses OEM brake pads on the rear as the OEM calipers are merely moved outward about a half an inch allowing a 1" larger rotor to be used. The front uses a much larger rotor and a dual piston caliper, but the brake pads are 1/2-ton Dodge truck pads from around 2010-2012 model years so very easy to obtain even in a rush.

Rotors were also easily obtained but did make me a bit anxious at first because they were made for Teraflex but I have not had any issues obtaining them on any of the vehicles in which I have used these on. As a matter of fact, I ordered them through Northridge 4x4 as I have a wholesale account with them and the rotors were drop shipped right from Teraflex locally here in Salt Lake City. I actually had the rotors the next day.

After removing my original rotors and actually measuring them, I can see they are not worn as much as I originally thought a couple of weeks ago when I rotated my tires. I think I will get them turned slightly and put on the shelf to reuse in the future if/when needed.
 

bigdave_185

Well-known member
Joined
Feb 14, 2021
Messages
443
Location
Utah
As always all good things to read and catch up on, seen a few wagons at cache Vally cruise this last month. Non pulled by you or near as nice as the one your building
 
OP
Z

zmotorsports

ALLIANCE MEMBER
Joined
Oct 20, 2009
Messages
21,441
Location
Northern Utah
I was able to get a few more hours on the Jeep over the weekend, although with the triple digit heat here in Northern Utah I've been a little less energenic as I should be.

After trimming, edging and mowing the lawns I got back to the brakes on the Jeep.

With the new brake booster and master cylinder in place it was time to turn the attention to the four corners.

I removed the rear brake calipers and brackets removed the glide pins for cleaning and applying with brake grease. Don't put too much on and not down deep in the bore or as the grease heats up it can create a jacking effect which pushes the against the brake pad creating a drag condition.
jeep1.jpg

Next I cleaned the area where the shoes ride with a wire wheel, then applied a little caliper grease to the bracket under where the shims ride. This prevents the shims from rusting to the caliper bracket. Again, a little grease is all that's necessary, not too much or it will ooze out onto the rotors and brake pads.
jeep2.jpg

Anti-rattle clips installed and the track lubed. I then install the pads orientating the wear indicator in the proper location. I install the pads with the wear indicator on the inside (piston side) of the caliper bracket and at the first point of contact in direction of rotation of the rotor. This is the driver's rear caliper.
jeep3.jpg

Pads loaded and ensured that they move freely and ready for installation.
jeep4.jpg

Caliper bracket installed and bolts torqued to spec.
jeep5.jpg

As I compress the piston in brake calipers, I like to crack open the bleeder which allows the dirty brake fluid that has been in the caliper to escape the system and not be pushed back towards the master cylinder, or worse, the ABS module. Once the piston is compressed, close the bleeder screw and install the caliper then normal brake bleeding can begin. Here you can see the darker brake fluid being pushed back towards the bleeded by the brake piston compression tool.
jeep9.jpg

Once the caliper is installed and torqued to spec I apply a little TorqueSeal to the fasteners for marking and quick identification purposes. Then vacuum bleeding begins by operating the air bleeder and opening the bleed screw.
jeep7.jpg

jeep8.jpg

After all brake calipers are bled and the pedal is compressed several times to take up an volume in the system it is ready for tire installation and brakes are complete.
jeep10.jpg

That concludes the brake system maintenance on our 2011 Jeep Wrangler.
 
OP
Z

zmotorsports

ALLIANCE MEMBER
Joined
Oct 20, 2009
Messages
21,441
Location
Northern Utah
After completing the brakes I played with the orientation of the intake duct so I could install my new K&N filter. The new K&N filter that arrived had an inner ring that mounted to the duct then the filter slid over the ring and clamped in place.
jeep21.jpg

I slid the duct into the silicone elbow just a little further and clocked the duct which would allow the filter to reside between the TIPM and the core support and leaving me just enough room for the Outerwear to be slid on quickly when needed.
jeep22.jpg

Test fitment of the Outerwear.
jeep23.jpg

Engine bay is done.
jeep24.jpg

Moving back to the last item on the preventive maintenance list, the tire carrier bearings needed to be repacked. Although, when I disassembled it to clean the bearings and wipe the old grease out I didn't like what I found. During our last trip when I was swinging the tire carrier open I detected some ever so slight cracking and popping so I knew I had a bearing issue. Sure enough, when I removed the carrier from the spindle the upper bearing fell apart and the race came out in several pieces. The lower bearing and race seemed to remain intact but they need to be replaced. Glad I caught this in time before it got any worse.
jeep25.jpg

I also stopped by the local brewing company and had my Powertank filled so it's ready to go back into the Jeep.
jeep26.jpg

I'll stop and grab bearings on the way home then I can wrap up the carrier installation and the Jeep should be done and ready for the road and trails.

Thanks for looking.
 
OP
Z

zmotorsports

ALLIANCE MEMBER
Joined
Oct 20, 2009
Messages
21,441
Location
Northern Utah
Finished up the Jeep last night and she's back on the road.

Stopped by and picked up bearings, seal and new dust cap for the tire carrier yesterday. The dust cap could have easily been just bead blasted and repainted but it had a dent in the top. As I was able to easily find a replacement I figured I'd just bead blast the new one and paint it rather than reinstall the dented one. The old bearings were in very poor condition. I couldn't remember when the last time I repacked the bearings in the tire carrier and after going through my notes I discovered it was one of the first jobs I did in the new shop back in 2017 so six years ago. I didn't think it had been that long and with it working so effortlessly I guess I paid it no nevermind. That it until last trip when I detected some crackling coming from the bearings during a lunch stop one day. :oops:
jeep31.jpg

New races installed.
jeep32.jpg

Bearings greased and ready to install.
jeep33.jpg

Seal at the ready as soon as the bearing is placed in the housing.
jeep34.jpg

Carrier in place, upper bearing in place and ready to accept the washer and castle nut.
jeep35.jpg

Washer, castle nut and cotter pins all installed and ready to install the freshly painted dust cap.
jeep36.jpg

Back from bedding the brakes in and roadtesting.
jeep37.jpg

jeep38.jpg

Put tools away and gave the shop floor a good sweeping before locking up and calling it a day.
jeep39.jpg


Thanks for looking.
 
OP
Z

zmotorsports

ALLIANCE MEMBER
Joined
Oct 20, 2009
Messages
21,441
Location
Northern Utah
Just noticed the note about the C02 tank, local brewers can fill those? :unsure:

Bring a growler and your air tank to get filled at the same time?! :love:

Chris, Norco Welding Supply used to fill my CO2 tanks but about two plus years ago they quit filling them at the Ogden branch and shipped that operation off to SLC so I had to drop off the tank, they would ship it down to SLC to fill and then send it back to Ogden. Turn around time took about a week, which wasn't bad and I generally wasn't in a hurry for it however I got a couple of chips in the powder coating so I opted to not leave them for others to throw around. A guy over on RME4x4.com owned the Ogden and SLC brewery supply houses and offered to fill them for RME members so I started using the Ogden store and they've been great to fill while I wait.
 
To avoid these ads, REGISTER NOW!
Top Bottom