
You are using an out of date browser. It may not display this or other websites correctly.
You should upgrade or use an alternative browser.
You should upgrade or use an alternative browser.
ZMotorsports Shop Projects 2.0
- Thread starter zmotorsports
- Start date
OP
zmotorsports
ALLIANCE MEMBER
How long does it take to change the spark plugs in the Jeep? I just did the first plug change on my 2000 Corvette at 70,000 miles and it was not an easy job, won't tell you how long it took.
I'm not sure how long now with the LS engine. They look much easier to reach with the battery tray and TIPM turned now though so that should help. I know when I changed the spark plugs on the OEM 3.8 liter V6 it was easier to reach the passenger's side by removing the inner fender whereas the driver's side wasn't bad to do.
Just Fishing
Well-known member
Chris, Norco Welding Supply used to fill my CO2 tanks but about two plus years ago they quit filling them at the Ogden branch and shipped that operation off to SLC so I had to drop off the tank, they would ship it down to SLC to fill and then send it back to Ogden. Turn around time took about a week, which wasn't bad and I generally wasn't in a hurry for it however I got a couple of chips in the powder coating so I opted to not leave them for others to throw around. A guy over on RME4x4.com owned the Ogden and SLC brewery supply houses and offered to fill them for RME members so I started using the Ogden store and they've been great to fill while I wait.
Sounded like a fantastic deal.
Get them filled while you enjoy some delicious tacos or a brat.
Got me thinking air tank vs trying to mount an air compressor somewhere.

I also noticed this little bracket.
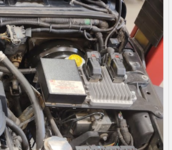
You know I have been trying to figure out the best place to mount some electronics.
For instance, my external voltage regulator install that was a pure "I give up and want to drive this damn thing" install.

I'm not proud of it, but it drives and charges the battery w/o trying to fry everything!
I kept wondering how much space I really had above the fender line.
So, I guess that answers that question.
Who makes that plate?
OP
zmotorsports
ALLIANCE MEMBER
Sounded like a fantastic deal.
Get them filled while you enjoy some delicious tacos or a brat.
Got me thinking air tank vs trying to mount an air compressor somewhere.
I also noticed this little bracket.
You know I have been trying to figure out the best place to mount some electronics.
For instance, my external voltage regulator install that was a pure "I give up and want to drive this damn thing" install.
I'm not proud of it, but it drives and charges the battery w/o trying to fry everything!
I kept wondering how much space I really had above the fender line.
So, I guess that answers that question.
Who makes that plate?
That mounting plate I obtained through Motech when I bought their CANbus module to create the handshake between the Chrysler BCM and GM ECM. I mounted the GM ECM on it and the Power Distribution board. I don't believe they sell that particular one any longer as I think they now run a smaller potted power distribution board and mount the ECM standing on end in place of the Chrysler PCM as they are now running their "single module system", whereas I am still running the Chrysler PCM that is responsible for a few functions.
OP
zmotorsports
ALLIANCE MEMBER
Is that a common off roading thing to replace the booster and master? I have never had to nor replaced one in any car I've owned, so curiosity has me asking.
That is a valid question and not necessarily an off-roading thing. I replaced them solely as preventive measures. With brake boosters and master cylinders failing at a much less frequency than a couple of decades ago it was just as a safety measure. Most of the ones I've replaced have been in the 150k-200k mile range, so I figured my odds were getting better that it was coming up and with the demands I place on the brakes stopping this heavy thing I decided to err on the side of caution.
With our Jeep now just passing the 150k mile mark I replaced both solely as preventative measures. Many of the off-road trails we go on are high mountain shelf roads with a mountain on one side and a couple hundred to 1k plus foot drop-off on the other so that is not the most ideal place to lose one's brakes. To set my mind at ease it was a no brainer to just replace them and not have to worry on every application of the brake pedal. Overkill? Yeah, I'm certain it was but falling off a thousand-foot cliff would really ruin my day.
OP
zmotorsports
ALLIANCE MEMBER
Over the past two days since having the Jeep back on the road, I've been tweaking the tune ever so slightly. When I changed the orientation of the battery and TIPM I had to alter the length of the intake duct slightly as well as went to a slightly shorter air filter. This caused my LTFT (Long Term Fuel Trims) to be off just a little compared to where I had them nailed down previously. Not terrible but slightly more than I prefer with the LTFT's being around -10 to -12. I had also been monitoring my spark and was not experiencing any knock retard events so Monday night I added a couple of degrees of timing plus altered the MAF vs. Frequency table by about 5%.
It netted me very positive result so last night I tweaked it again another 2% and added another few degrees of timing. After a test drive I was liking what I was seeing as far as fuel trims but upon some low RPM to rather hard accelerations I was just getting a degree or so of spark retard so I went back to the shop, pulled the tune and removed a degree of timing then uploaded the tune back to the ECM.
After the last test drive I was feeling good with no spark knock events and fuel trims were in the -3.7 to -4.5 range (LTFT). I opted to leave everything there for a day or two and put some miles on it for validation as well as letting the adaptives relearn after a fueling event or two.
This morning in the "somewhat" cooler ambient temps, I say somewhat because our overnight low was still 80-degrees, it ran perfectly. Upon several acceleration pulls I saw no spark retard nor knock events and my fuel trims at 70-72 MPH @ 2k RPM were sitting in the -1.5 to -2.3 range. That is perfectly where I like to see the LTFT's and close to where I had them with the old intake setup. The last setup I was -.7 to -1.5 and I am almost perfect with where I was but with 4-degrees more timing. I prefer to see the LTFT's just ever so slightly pulling fuel rather than adding it so just slightly to the negative side of zero is where I like them and I think it is there. I'll drive it for a few days under various conditions and with the temps in the 80-104 range that should give me about the best range of conditions I can ask for during summer months.
After giving the Jeep a wipe down with Final Inspection and running a vacuum through it I moved back over to my grandson's little red wagon project and knocked out some threaded bungs for mounting the body to the chassis and the rear axle mounting.


Thanks for following along.
It netted me very positive result so last night I tweaked it again another 2% and added another few degrees of timing. After a test drive I was liking what I was seeing as far as fuel trims but upon some low RPM to rather hard accelerations I was just getting a degree or so of spark retard so I went back to the shop, pulled the tune and removed a degree of timing then uploaded the tune back to the ECM.
After the last test drive I was feeling good with no spark knock events and fuel trims were in the -3.7 to -4.5 range (LTFT). I opted to leave everything there for a day or two and put some miles on it for validation as well as letting the adaptives relearn after a fueling event or two.
This morning in the "somewhat" cooler ambient temps, I say somewhat because our overnight low was still 80-degrees, it ran perfectly. Upon several acceleration pulls I saw no spark retard nor knock events and my fuel trims at 70-72 MPH @ 2k RPM were sitting in the -1.5 to -2.3 range. That is perfectly where I like to see the LTFT's and close to where I had them with the old intake setup. The last setup I was -.7 to -1.5 and I am almost perfect with where I was but with 4-degrees more timing. I prefer to see the LTFT's just ever so slightly pulling fuel rather than adding it so just slightly to the negative side of zero is where I like them and I think it is there. I'll drive it for a few days under various conditions and with the temps in the 80-104 range that should give me about the best range of conditions I can ask for during summer months.
After giving the Jeep a wipe down with Final Inspection and running a vacuum through it I moved back over to my grandson's little red wagon project and knocked out some threaded bungs for mounting the body to the chassis and the rear axle mounting.
Thanks for following along.
red94chev
Well-known member
Mike, what would be signs of a failing brake booster if you don't mind me asking?
I have a '09 Silverado with 316k on it and the calipers were replaced about 3 years ago. Lately, I have been experiencing uneven braking pressures from side to side, a "sinking" brake pedal, and overall very weak braking. I did pull and lube the slide pins, bled the calipers again recently, but I haven't checked the pistons yet. Does this sound like it could be booster related?
I have a '09 Silverado with 316k on it and the calipers were replaced about 3 years ago. Lately, I have been experiencing uneven braking pressures from side to side, a "sinking" brake pedal, and overall very weak braking. I did pull and lube the slide pins, bled the calipers again recently, but I haven't checked the pistons yet. Does this sound like it could be booster related?
OP
zmotorsports
ALLIANCE MEMBER
Mike, what would be signs of a failing brake booster if you don't mind me asking?
I have a '09 Silverado with 316k on it and the calipers were replaced about 3 years ago. Lately, I have been experiencing uneven braking pressures from side to side, a "sinking" brake pedal, and overall very weak braking. I did pull and lube the slide pins, bled the calipers again recently, but I haven't checked the pistons yet. Does this sound like it could be booster related?
Generally a failing brake booster will cause fuel trims will be off and sometimes bad enough that it will throw lean codes. I've seen them bad enough that at idle and depressing the brake pedal you can actually hear the air hissing as it's leaking and watch the trims fluctuate and start going high positive as the ECM is trying to add fuel to keep up with the unmetered air. Other than that, maybe a pedal that gets increasingly harder to push as there becomes less vacuum assist during braking events.
Boosters won't cause uneven braking and the sinking pedal and overall weak braking sound more like a master cylinder that may be leaking internally. I have also pulled master cylinders to find the inside of the brake booster wet with brake fluid which indicate that the master cylinder O-ring/packing on the piston has failed and is allowing brake fluid to leak past it into the booster.
red94chev
Well-known member
Understood, thanks Mike. I will look into the master cylinder when i get a chance.Generally a failing brake booster will cause fuel trims will be off and sometimes bad enough that it will throw lean codes. I've seen them bad enough that at idle and depressing the brake pedal you can actually hear the air hissing as it's leaking and watch the trims fluctuate and start going high positive as the ECM is trying to add fuel to keep up with the unmetered air. Other than that, maybe a pedal that gets increasingly harder to push as there becomes less vacuum assist during braking events.
Boosters won't cause uneven braking and the sinking pedal and overall weak braking sound more like a master cylinder that may be leaking internally. I have also pulled master cylinders to find the inside of the brake booster wet with brake fluid which indicate that the master cylinder O-ring/packing on the piston has failed and is allowing brake fluid to leak past it into the booster.
gearhead1960
ALLIANCE MEMBER
I would agree with Mike, in that it sounds more like a brake Master Cylinder issue. However, one other thing you might consider though is the ABS module. On a car (Mazda 5) about the same vintage, I had similar symptoms. From my reading on this particular model, MC replacement did not fix the sinking issue. It turned out to be the ABS module that was causing the same symptoms.....Mike, what would be signs of a failing brake booster if you don't mind me asking?
I have a '09 Silverado with 316k on it and the calipers were replaced about 3 years ago. Lately, I have been experiencing uneven braking pressures from side to side, a "sinking" brake pedal, and overall very weak braking. I did pull and lube the slide pins, bled the calipers again recently, but I haven't checked the pistons yet. Does this sound like it could be booster related?
Bob Heine
ALLIANCE MEMBER
Mike, probably leave a mark as well.Overkill? Yeah, I'm certain it was but falling off a thousand-foot cliff would really ruin my day.
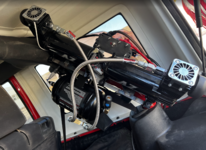
I gave up on my Co2 tank. Got tired of filling it up and I ran short one outing. Since then I was paranoid about it and started carrying a portable system as well... so I built out an onboard air system.Chris, Norco Welding Supply used to fill my CO2 tanks but about two plus years ago they quit filling them at the Ogden branch and shipped that operation off to SLC so I had to drop off the tank, they would ship it down to SLC to fill and then send it back to Ogden. Turn around time took about a week, which wasn't bad and I generally wasn't in a hurry for it however I got a couple of chips in the powder coating so I opted to not leave them for others to throw around. A guy over on RME4x4.com owned the Ogden and SLC brewery supply houses and offered to fill them for RME members so I started using the Ogden store and they've been great to fill while I wait.
This is version 1, I am still running it but I have plans to change it up. I want to mount one compressor on each roll bar with a slim 5 gallon tank across the back, or underneath somewhere.
OP
zmotorsports
ALLIANCE MEMBER
I gave up on my Co2 tank. Got tired of filling it up and I ran short one outing. Since then I was paranoid about it and started carrying a portable system as well... so I built out an onboard air system.
This is version 1, I am still running it but I have plans to change it up. I want to mount one compressor on each roll bar with a slim 5 gallon tank across the back, or underneath somewhere.
Looks like a nice system Jason. So far in the nearly 5 years I've had the Powertank setup I really like it but that could be due to the ease of having the bottles refilled locally and I definitely like how fast it is as I hated being the last one aired up. It actually takes me longer to get the hose connected and ready to fill my 37's as it does to actually fill them.
It usually takes me about 35 seconds per tire to go from 12 PSI back to street pressure and ready for road travel. When we go for week rallies or gatherings where we wheel 6 days straight, I haven't run out of CO2 yet with my two 10-pound bottles and some of those days I am deflating tires and airing up twice as we cover more than one trail and have some pavement in between.The last air compressor iteration I ran with my 35's was the dual ARB setup which I still have mounted under the passenger seat as you know the old saying "two is one and one is none". Rather than remove it when I went with CO2, I kept it as a backup so IF I ever have an issue with the Powertank setup I have my air compressor. However, I still use my air compressor to blow the dust out of the interior and engine bay once aired up which also thaws my coiled air hose so it goes back into the storage bag easier.
As for tanks, they really add no value unless you go to one with enough volume to do something. I've had multiple air systems in my Jeep as well as installed a wide variety of systems in other Jeeps over the years and the one thing in common is that as soon as the air depletes from the small tank you are running solely on whatever the output of the compressor is so the tank is adding no substantial value to the system other than taking up space. The air is usually depleted from the tank midway through the first tire and then is unable to fill both tank and the tire so your reliant on the low CFM output of the compressor alone at that point. Those small compressors don't have much of an output so it still is a timely process. I think ARB has one of the highest CFM output compressors right now which is rated at around 6 CFM @ zero PSI. As the tire nears 25 or so PSI I think the output of that compressor drops to around 4 CFM or so. Many of the Viair compressors are a fraction of the ARB around 2.6 CFM @ zero and closer to 2 CFM at around 25 PSI.
The only air compressor I have truly been impressed with is the York that I installed in a client's YJ. The York model 210 was capable of about 10 CFM and still put out over 5 CFM at 90 PSI if memory serves so it could even run air tools. They take up a bit of space and really aren't feasible in the newer Jeep JK's and JL's if you want to keep any of the nice amenities such as A/C functional and not have a trail only rig as there just isn't the real estate available for such a system in these modern Jeeps.
That being said, air compressors are still the most widely used system for airing tires back up as it is one and done. When I was with our local club there were only about 4 of us running CO2 tanks and with our friends from our national RV club I am the only one running CO2 as all of the rest are using portable compressors of one flavor or another. Then again, the vast majority of those are full-time RV'ers and don't have a place to call home nor want to mess with trying to find places to fill CO2 tanks as they travel the country which I fully understand. If I didn't have a local place I may still be using just a compressor.
OP
zmotorsports
ALLIANCE MEMBER
So I guess with not being able to leave **** alone I pulled the Jeep back into the shop last night after work and after driving about 20 or so miles after a fueling event. I wanted to just make another small "tweak" to the tune before I called it good enough.
I wanted to just get a little closer to that -.7 or -1.5 range on my trims and I still wasn't seeing any spark retard from the knock sensors. I added another degree of timing as the Jeep has responded very favorable to a little more spark advance and then adjusted the MAF frequency another 1%. I think that did the trick. After running around last night and this morning I am in the -.7 to -1.5 at freeway speeds @ 2k RPM and on a hard acceleration I saw it try to pull back a fraction of a degree of timing on one occasion during a hard pull so I think it is spot on but will continue to monitor my knock events (if any) and if any timing gets pulled out but I think it likes the timing I've thrown at it.

I then shifted gears and jumped back on the Radio Flyer project of my grandson's. He also stopped by to check on it last night while I was in the shop working.
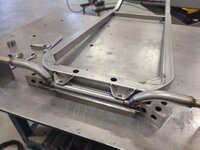
Moving to the rear axle assembly and after determining the spacing on the axle for the frame brackets, I mocked up a quick fixture to hold the frame tabs at the correct spacing and tacked them in place.

One last test fit of the rear axle. I played with angles and determined I would tilt the rear axle outward 10-degrees from vertical to allow some spacing between the axle and frame. This was solely for aesthetics as I just thought it would look nicer to have some space visible around the axle to frame areas and make the setup appear as though the axle is not actually part of the frame but bolted to it as a sub-component.
Now over to the mill to bore the holes in the axle for the threaded bungs which were machined the night before. Setting the axle to 10-degrees from vertical using the parting line of the vise as my reference point.

Spot drilled and then drilled with .5" bit before moving to a .750" end mill to match the bung diameter. This will be a very tight fitment so the angle will hold the bung in the correct orientation and maintain that 10-degree tiltback.

Bungs pressed into the bores and ready for final welding.

More pictures of the welding to follow....
I wanted to just get a little closer to that -.7 or -1.5 range on my trims and I still wasn't seeing any spark retard from the knock sensors. I added another degree of timing as the Jeep has responded very favorable to a little more spark advance and then adjusted the MAF frequency another 1%. I think that did the trick. After running around last night and this morning I am in the -.7 to -1.5 at freeway speeds @ 2k RPM and on a hard acceleration I saw it try to pull back a fraction of a degree of timing on one occasion during a hard pull so I think it is spot on but will continue to monitor my knock events (if any) and if any timing gets pulled out but I think it likes the timing I've thrown at it.
I then shifted gears and jumped back on the Radio Flyer project of my grandson's. He also stopped by to check on it last night while I was in the shop working.
Moving to the rear axle assembly and after determining the spacing on the axle for the frame brackets, I mocked up a quick fixture to hold the frame tabs at the correct spacing and tacked them in place.
One last test fit of the rear axle. I played with angles and determined I would tilt the rear axle outward 10-degrees from vertical to allow some spacing between the axle and frame. This was solely for aesthetics as I just thought it would look nicer to have some space visible around the axle to frame areas and make the setup appear as though the axle is not actually part of the frame but bolted to it as a sub-component.
Now over to the mill to bore the holes in the axle for the threaded bungs which were machined the night before. Setting the axle to 10-degrees from vertical using the parting line of the vise as my reference point.
Spot drilled and then drilled with .5" bit before moving to a .750" end mill to match the bung diameter. This will be a very tight fitment so the angle will hold the bung in the correct orientation and maintain that 10-degree tiltback.
Bungs pressed into the bores and ready for final welding.
More pictures of the welding to follow....
OP
zmotorsports
ALLIANCE MEMBER
Continuing on with the TIG welding process.
Go easy on me as I haven't had a TIG torch in my hand in nearly two months so I'm a bit rusty.
Bungs being welded into the axle tube.
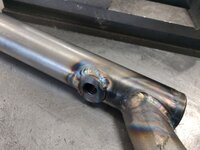
Frame tabs fully welded to the frame.

Making more progress as I bounce from weld joint to weld joint to control heat input.

Rear axle welding completed.
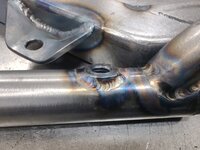
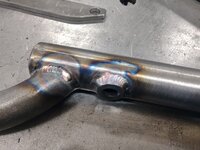
Rear axle bolted in place as a test fit. Perfect fitment and I like the angle to keep the tubes back away from the frame just enough to give the perspective that they are indeed separate components.
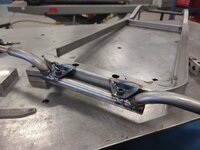
And I had to throw the tires/wheels on just to see the overall effect.

I hope my grandson approves.
Thanks for looking.
Go easy on me as I haven't had a TIG torch in my hand in nearly two months so I'm a bit rusty.
Bungs being welded into the axle tube.
Frame tabs fully welded to the frame.
Making more progress as I bounce from weld joint to weld joint to control heat input.
Rear axle welding completed.
Rear axle bolted in place as a test fit. Perfect fitment and I like the angle to keep the tubes back away from the frame just enough to give the perspective that they are indeed separate components.
And I had to throw the tires/wheels on just to see the overall effect.
I hope my grandson approves.
Thanks for looking.
OutlawDrifter
Well-known member
Mike, it's looking good!
I do believe it's state law, you have to throw the wheels/tires on when you've reached that point
I do believe it's state law, you have to throw the wheels/tires on when you've reached that point
OP
zmotorsports
ALLIANCE MEMBER
Mike, it's looking good!
I do believe it's state law, you have to throw the wheels/tires on when you've reached that point
Thanks Marc. Well, I'm glad I threw the tires/wheels on then as I don't want the build police coming after me.
OP
zmotorsports
ALLIANCE MEMBER
Last night after arriving home I trimmed, edged and mowed the lawns.
I'm quite pleased with how it looks considering we have had no substantial rain for about six weeks and it's been hovering around 100-degrees most day. I only have a couple of dry spots that I have to put up with. The front is looking better since I replced the two Orbit rotating heads with Rainbird heads two weeks ago as those two spots are coming out of it nicely.

The side yard is looking better than in years past with it just a little dry around the tree which I can't seem to alleviate.
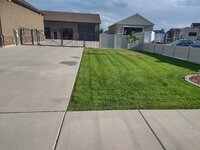
Back yard is looking amazing other than two small dry spots. One just past where I replaced the dead grass which got infected with grubs last year and another where the bedroom window reflects down onto the grass in the late afternoon. Other than that it is thick and lush this year. So thick I had to mow at a much slower pace last night to minimize clippings left behind.

As I was blowing off our 32 year old Snapper 21" walk-behind mower, I noted something with the right front wheel assembly.

Damnit. Another front set of wheels needs to be replaced. This is the third set in the 32 years I've owned this mower.

Oh well, I guess wheels are much cheaper than a new mower and I am pleased with how well this mower has held up and performed in those 32 years. Tires are just a normal wear item.
Thanks for looking.
I'm quite pleased with how it looks considering we have had no substantial rain for about six weeks and it's been hovering around 100-degrees most day. I only have a couple of dry spots that I have to put up with. The front is looking better since I replced the two Orbit rotating heads with Rainbird heads two weeks ago as those two spots are coming out of it nicely.
The side yard is looking better than in years past with it just a little dry around the tree which I can't seem to alleviate.
Back yard is looking amazing other than two small dry spots. One just past where I replaced the dead grass which got infected with grubs last year and another where the bedroom window reflects down onto the grass in the late afternoon. Other than that it is thick and lush this year. So thick I had to mow at a much slower pace last night to minimize clippings left behind.
As I was blowing off our 32 year old Snapper 21" walk-behind mower, I noted something with the right front wheel assembly.
Damnit. Another front set of wheels needs to be replaced. This is the third set in the 32 years I've owned this mower.
Oh well, I guess wheels are much cheaper than a new mower and I am pleased with how well this mower has held up and performed in those 32 years. Tires are just a normal wear item.
Thanks for looking.
OP
zmotorsports
ALLIANCE MEMBER
Also, I arrived home yesterday and found my new fan on the doorstep from Vyper Industries. If you remember a couple of weeks ago when I received my new Vyper fan I had noted that one of the blades was damaged during shipping. When I contacted Vyper and sent pictures they were quick to respond but not very quick to ship the new one out. I got a notification that if finally shipped on Monday and it arrived yesterday.
I brought it in the house and immediately opened it to verify it was in good condition. The box didn't appear to have any dents or damage and the fan actually looked like it was packaged well wrapped in plastic in between some styrofoam sheets and surrounded by packing peanuts.
Unfortunately, upon removing the plastic from the blade I noticed it was damaged worse than the original one.
This **** is rediculous. The original fan box was damaged slightly so I assumed that the damage was from the shipping process. However, I don't know what to think about this one as the box was in perfect condition and not a single bit of damage to any of the styrofoam sheets in which the fan was sandwiched between. I actually don't know if this one was damaged during shipping OR actually during packaging.
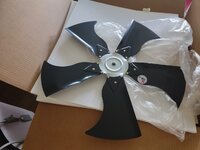
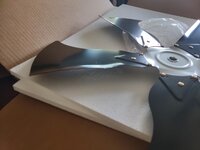
I sent off another email instantly with pictures, but I still haven't gotten a response as of this morning. I'm sure they are tired of hearing from me at this point. I'm not trying to be a PITA, I just want a fan in proper condition and what I paid for. The Vyper fan's construction and motor assembly all seem like nice quality components and I had nothing but an amazing experience during the purchase of the stool about six months ago, but I am quickly regretting this purchase at this point.
I brought it in the house and immediately opened it to verify it was in good condition. The box didn't appear to have any dents or damage and the fan actually looked like it was packaged well wrapped in plastic in between some styrofoam sheets and surrounded by packing peanuts.
Unfortunately, upon removing the plastic from the blade I noticed it was damaged worse than the original one.
This **** is rediculous. The original fan box was damaged slightly so I assumed that the damage was from the shipping process. However, I don't know what to think about this one as the box was in perfect condition and not a single bit of damage to any of the styrofoam sheets in which the fan was sandwiched between. I actually don't know if this one was damaged during shipping OR actually during packaging.
I sent off another email instantly with pictures, but I still haven't gotten a response as of this morning. I'm sure they are tired of hearing from me at this point. I'm not trying to be a PITA, I just want a fan in proper condition and what I paid for. The Vyper fan's construction and motor assembly all seem like nice quality components and I had nothing but an amazing experience during the purchase of the stool about six months ago, but I am quickly regretting this purchase at this point.
signcrafter
Well-known member
- Joined
- May 9, 2012
- Messages
- 12,638
Mike, ***** you got two damaged blades. For some reason I remember you saying you got the owners phone number when you got your stool? Or am I remembering wrong? He may want to know so he can get to the bottom of why it's happening.
OutlawDrifter
Well-known member
Your yard is looking great Mike! I'm a bit jealous, as mine gets no water other than what the big man sends down. We are on rural water and irrigating our 2.5 acres of grass weekly would cost a small fortune.
In regards to the brown around the tree. I was taught a tree takes 5gal of water per day, so I would imagine as it's putting down more roots, its leaching your valuable H2O out a high rate. A soaker hose in that spot for a couple of days might do the area wonders.
**** deal on the Vyper fan, might be time to take 3 steps back and punt.
In regards to the brown around the tree. I was taught a tree takes 5gal of water per day, so I would imagine as it's putting down more roots, its leaching your valuable H2O out a high rate. A soaker hose in that spot for a couple of days might do the area wonders.
**** deal on the Vyper fan, might be time to take 3 steps back and punt.
OP
zmotorsports
ALLIANCE MEMBER
Mike, ***** you got two damaged blades. For some reason I remember you saying you got the owners phone number when you got your stool? Or am I remembering wrong? He may want to know so he can get to the bottom of why it's happening.
Scott, I "had" one of the owner's number. He had text me after I submitted a few questions on their website while trying to decide on which option(s) to go with but unfortunately, after getting the stool and being pleased with it I deleted the text and no longer have the number. Yeah, pretty stupid on my part I know.
OP
zmotorsports
ALLIANCE MEMBER
Your yard is looking great Mike! I'm a bit jealous, as mine gets no water other than what the big man sends down. We are on rural water and irrigating our 2.5 acres of grass weekly would cost a small fortune.
In regards to the brown around the tree. I was taught a tree takes 5gal of water per day, so I would imagine as it's putting down more roots, its leaching your valuable H2O out a high rate. A soaker hose in that spot for a couple of days might do the area wonders.
**** deal on the Vyper fan, might be time to take 3 steps back and punt.
Thanks Marc.
When I planted the trees I put quite a bit of topsoil around them but the original owners of the property had hauled in a bunch of road base on that side of the house. I had as much as I could hauled off during the shop build process but I think some remained and is causing some of my permeability issues. I aerated last year and really concentrated on the side yard knowing the soil was more compact and I think it helped as this is the best the grass has looked on the side yard thus far. I bumped the timers a bit around the tree and it seems to be doing better this year compared to last but I think you may be right that the tree is ingesting water at such a high rate it is taking it from the grass, plus being a sandy soil doesn't help matters either.
On the note of spot watering, my hard headedness is not allowing me to drag a hose across the yard to water. At our last place I had to spot water multiple spots to keep the lawn green and I swore I was NOT going to do that at our new place. I told myself that I would do a much better job with the sprinkler system so I wouldn't have the need to spot water. For the most part I am pleased with the back yard and side yard sprinkler system that I installed and have had to only make a few alterations and additions over the past six years, but they've been impactful. The front sprinkler system was installed by the original owner and I was not impressed. I have nearly doubled the number of heads in first four years of ownership and in all honesty, I should have ripped the front yard out and started over while doing the back yard but it's finally looking quite nice, so I'll take that as a win.
Mike it looks good. The axle is at an angle with only two socket screws, can I ask if you plan to weld a tab on the bottom of the axle and tie it to the bottom of the frame to support the angle?Continuing on with the TIG welding process.
Go easy on me as I haven't had a TIG torch in my hand in nearly two months so I'm a bit rusty.
Bungs being welded into the axle tube.
Frame tabs fully welded to the frame.
Making more progress as I bounce from weld joint to weld joint to control heat input.
Rear axle welding completed.
Rear axle bolted in place as a test fit. Perfect fitment and I like the angle to keep the tubes back away from the frame just enough to give the perspective that they are indeed separate components.
And I had to throw the tires/wheels on just to see the overall effect.
I hope my grandson approves.
Thanks for looking.
OP
zmotorsports
ALLIANCE MEMBER
Mike it looks good. The axle is at an angle with only two socket screws, can I ask if you plan to weld a tab on the bottom of the axle and tie it to the bottom of the frame to support the angle?
Thanks. No, the axle will remain in place with the two fasteners and no other supports will be needed. Those two 3/8" fasteners are more than adequate to hold the axle in location. The axle is at only a 10-degree angle off vertical but the bung's surfaces are mated squarely with the frame tabs and are large enough to provide adequate contact that the fasteners will hold it solidly in place.
Finallygotit
ALLIANCE MEMBER
Mike, regarding your tree in the side yard, take a look at this to see if it might help.
Rain Bird Root Watering System

Rain Bird Root Watering System
OP
zmotorsports
ALLIANCE MEMBER
Mike, regarding your tree in the side yard, take a look at this to see if it might help.
Rain Bird Root Watering System
Thanks Dan.
That's an interesting looking system but they suggest putting it on its own separate zone which I do not have available. I only have two zones feeding the side yard and both have a combination of pop-ups and rotary head.
Although I may look into it deeper to see if I could rig up a flow control nozzle somehow to limit water while the remainder of the zone is running.
I appreciate the info. Dan.
Jarhead0408
Well-known member
Look…I know this will be unpopular Mike, but the obvious answer is to keep ordering damaged fans until you can wire them all in series to your Grandsons wagon and then you and he embark ala “Radio Flyer” style and exact sweet vengeance! Your call sign would obviously be Viper!
OutlawDrifter
Well-known member
Look…I know this will be unpopular Mike, but the obvious answer is to keep ordering damaged fans until you can wire them all in series to your Grandsons wagon and then you and he embark ala “Radio Flyer” style and exact sweet vengeance! Your call sign would obviously be Viper!
I think you mean "Vyper"
LeonardY
Well-known member
Check your phone bill. The number could be there in the log.Scott, I "had" one of the owner's number. He had text me after I submitted a few questions on their website while trying to decide on which option(s) to go with but unfortunately, after getting the stool and being pleased with it I deleted the text and no longer have the number. Yeah, pretty stupid on my part I know.
Jarhead0408
Well-known member
Whoops. I bought the wrong vowel Alex.I think you mean "Vyper"
ntsqd
Well-known member
I'm still working my way thru this thread, only on page 144, but a question has come up that perhaps you can help with. I will assume that the upper end motorhomes like yours have the std. 14"x14" roof vents in them. Those that don't have A/C units in them anyway. What brand of vent or vent/fan do they use? Most of what I've been able to find thus far is typical RV junk made to the lowest possible price. The vent-only in our Hallmark pop-top has failed, again.
OP
zmotorsports
ALLIANCE MEMBER
Check your phone bill. The number could be there in the log.
I was able to find the number for the guy I communicated with @ Vyper during my welding stool research. I actually had written it down on my paperwork when I received the stool to keep on hand and I had forgotten.
Unfortunately, it did no good. I sent the email last Thursday and a text Friday after locating the phone number and I haven't heard back from anyone.
I hope they're not just washing their hands of me. I was able to straighten the original bent fan fairly well, which has allowed me to use the fan as the past couple of weeks have been hovering around the century mark. However, I'd like to have one that isn't damaged, especially for the premium I paid for this fan compared to anything else on the market.
OP
zmotorsports
ALLIANCE MEMBER
I'm still working my way thru this thread, only on page 144, but a question has come up that perhaps you can help with. I will assume that the upper end motorhomes like yours have the std. 14"x14" roof vents in them. Those that don't have A/C units in them anyway. What brand of vent or vent/fan do they use? Most of what I've been able to find thus far is typical RV junk made to the lowest possible price. The vent-only in our Hallmark pop-top has failed, again.
Pretty much all of the coaches I've seen and worked on use a standard size 14x14 vent. However, most of the mid to upper tier ones seem to use the fantastic vents which have rain sensors, wind sensors, etc. for protecting them. I have installed the Maxxair covers on all of mine as it allows the vents to be open slightly during travel and create a nice venturi affect drawing from the coach, pulling warm air out and cooler air in. The Maxxair vent covers come in white or smoke but I painted mine to match the coach which also provides some better UV protection.
ntsqd
Well-known member
Thank you!
With the sale of the FantasticFan Co. and not seeing great reports afterwards I wasn't sure but there might be a better option that I had missed. I'll have a closer look at Maxxair.
With the sale of the FantasticFan Co. and not seeing great reports afterwards I wasn't sure but there might be a better option that I had missed. I'll have a closer look at Maxxair.
OP
zmotorsports
ALLIANCE MEMBER
So I've been doing some contemplating lately pertaining to trailers.
For those that have followed my previous Shop Projects thread or my YouTube channel you may have seen my utility trailer project from back in about 2015. WOW, it's hard to believe I built this trailer more than 8 years ago.
The background is we had our 26' enclosed race trailer at the time and had just sold our 18' car hauler that I used to **** non-running vehicles as well as transport build projects from our home shop where I performed the fabrication and mechanical work to my parent's farm where I had my paint shop setup to perform the paint & body work, then transport back home for final assembly. After my parent's passed and the farm sold I no longer had a place to paint so I opted to sell the open flatbed car hauler. We kept the enclosed race trailer after getting out of racing to transport our Harley and Jeep when we traveled with our coach. However, it was too large and cumbersome to use for small projects such as bikes or parts so I thought I'd build a nice utility trailer to fill the void between the large enclosed race trailer and the pickup, which I hated hauling things in. My goal was to build something that would last the rest of my life and be something nicer than what was available on the market commercially.
My son and I were heavily involved in bikes by this time and were not only building our own but also flipping bikes as time allowed so a small 6x10 utility trailer was the ticket.
I was not impressed with anything that I looked at on the market so I took some ideas that were bouncing around in my head and ordered a 3500 pound torsion axle, a couple of steel fenders, coupler, tongue box and some tubing and commenced to build something nice. I also thought I'd incorporate some E-trak into the deck flooring as well for that custom touch and flush mounted Pingel transport wheel chocks.
I went all out on the trailer build, fabricating and machining things like the taillight boxes, recessed LED lighting, hidden aluminum ramps and small siderails with tall front guard covered in ATP. I even splurged and purchased some nice looking aluminum wheels rather than standard steel wheels. The trailer is fabricated fully from rectangular tubing to provide a smooth and nicer look that angle iron or C-channel yet fully sealed for corrosion protection. It was then sprayed with two full coats of epoxy primer and single stage urethane paint before riveting the ATP to the sides. I installed the E-trak tie down strips along the sides and down the middle of the trailer for flush and easy securing of loads and also flush mounted some Pingel mounts for the removeable Pingel wheel chocks which would allow the ability to haul two full size bikes on the trailer.
It has been an awesome little trailer and more than capable to handle anything I've thrown at it yet. I have used the hell out of it for the intent it was constructed and it even took on yard care duties when we moved into our new home and were putting in the yard.
With us no longer having motorcycles to haul around and the thoughts of my son eventually getting a project car to build and our fleet of vehicles it has me contemplating selling the small utility trailer and upsizing to a 18-20 foot open car hauler again. I really hate to sell this little utility trailer but if I had say a 20' open car hauler I really don't think I would need a 10' utility trailer as the car hauler would easily perform any duties I would ask of the utility trailer, plus more.
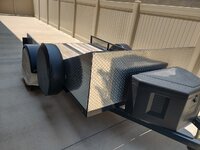
So that's my dilemma, contemplating selling the utility trailer and getting a ~20' open car hauler to use in its place plus be able to use for future builds OR in the event we have a vehicle break down and I need to retrieve it to bring it home.
Those of you that have open car haulers, do you also keep a small utility trailer around or have you found that one open trailer can easily serve all needs?
I just hate to keep something around that I don't need nor will use as that is something that requires maintenance and upkeep vs. being able to have one trailer to do it all.
For those that have followed my previous Shop Projects thread or my YouTube channel you may have seen my utility trailer project from back in about 2015. WOW, it's hard to believe I built this trailer more than 8 years ago.
The background is we had our 26' enclosed race trailer at the time and had just sold our 18' car hauler that I used to **** non-running vehicles as well as transport build projects from our home shop where I performed the fabrication and mechanical work to my parent's farm where I had my paint shop setup to perform the paint & body work, then transport back home for final assembly. After my parent's passed and the farm sold I no longer had a place to paint so I opted to sell the open flatbed car hauler. We kept the enclosed race trailer after getting out of racing to transport our Harley and Jeep when we traveled with our coach. However, it was too large and cumbersome to use for small projects such as bikes or parts so I thought I'd build a nice utility trailer to fill the void between the large enclosed race trailer and the pickup, which I hated hauling things in. My goal was to build something that would last the rest of my life and be something nicer than what was available on the market commercially.
My son and I were heavily involved in bikes by this time and were not only building our own but also flipping bikes as time allowed so a small 6x10 utility trailer was the ticket.
I was not impressed with anything that I looked at on the market so I took some ideas that were bouncing around in my head and ordered a 3500 pound torsion axle, a couple of steel fenders, coupler, tongue box and some tubing and commenced to build something nice. I also thought I'd incorporate some E-trak into the deck flooring as well for that custom touch and flush mounted Pingel transport wheel chocks.
I went all out on the trailer build, fabricating and machining things like the taillight boxes, recessed LED lighting, hidden aluminum ramps and small siderails with tall front guard covered in ATP. I even splurged and purchased some nice looking aluminum wheels rather than standard steel wheels. The trailer is fabricated fully from rectangular tubing to provide a smooth and nicer look that angle iron or C-channel yet fully sealed for corrosion protection. It was then sprayed with two full coats of epoxy primer and single stage urethane paint before riveting the ATP to the sides. I installed the E-trak tie down strips along the sides and down the middle of the trailer for flush and easy securing of loads and also flush mounted some Pingel mounts for the removeable Pingel wheel chocks which would allow the ability to haul two full size bikes on the trailer.
It has been an awesome little trailer and more than capable to handle anything I've thrown at it yet. I have used the hell out of it for the intent it was constructed and it even took on yard care duties when we moved into our new home and were putting in the yard.
With us no longer having motorcycles to haul around and the thoughts of my son eventually getting a project car to build and our fleet of vehicles it has me contemplating selling the small utility trailer and upsizing to a 18-20 foot open car hauler again. I really hate to sell this little utility trailer but if I had say a 20' open car hauler I really don't think I would need a 10' utility trailer as the car hauler would easily perform any duties I would ask of the utility trailer, plus more.
So that's my dilemma, contemplating selling the utility trailer and getting a ~20' open car hauler to use in its place plus be able to use for future builds OR in the event we have a vehicle break down and I need to retrieve it to bring it home.
Those of you that have open car haulers, do you also keep a small utility trailer around or have you found that one open trailer can easily serve all needs?
I just hate to keep something around that I don't need nor will use as that is something that requires maintenance and upkeep vs. being able to have one trailer to do it all.
Well I’ve got both mike and as much as I feel you’d like me to confirm the direction you want to go - can’t. My little boy is 6’6” x 10ft clear on the inside with 1’ high wells. It’s great for moving just about anything not exceptionally heavy. My open car trailer is a 20ft and great for that single purpose only. My vote is making space for both. But I suppose on the rare occasions you need a small utility you could always rent one.
OutlawDrifter
Well-known member
Mike, granted, you and I use pickup bed's differently.
But, if I DIDN'T have a pickup bed, I would have a smaller single axle 10-12' utility trailer in addition to my 18' car hauler.
My youngest will be driving in a few years, and I'm thinking at that time he'll end up driving the Tundra if its still around. It will be replaced with another SUV(already have the next rig built in my brain). At that point I will be adding a smaller utility trailer to the fleet.
But, if I DIDN'T have a pickup bed, I would have a smaller single axle 10-12' utility trailer in addition to my 18' car hauler.
My youngest will be driving in a few years, and I'm thinking at that time he'll end up driving the Tundra if its still around. It will be replaced with another SUV(already have the next rig built in my brain). At that point I will be adding a smaller utility trailer to the fleet.
ronjon1190
Well-known member
I have both- I use the 6.5x12 ALL the time, and the bigger 20' trailer a few times a year, moving a vehicle or tractor around. I have a crew cab GMC Sierra 1500 with what I call the baby bed- 5.5'. It's not really useful for much, but with the little trailer, I can haul anything I need for my house renovations or yardwork or toys.